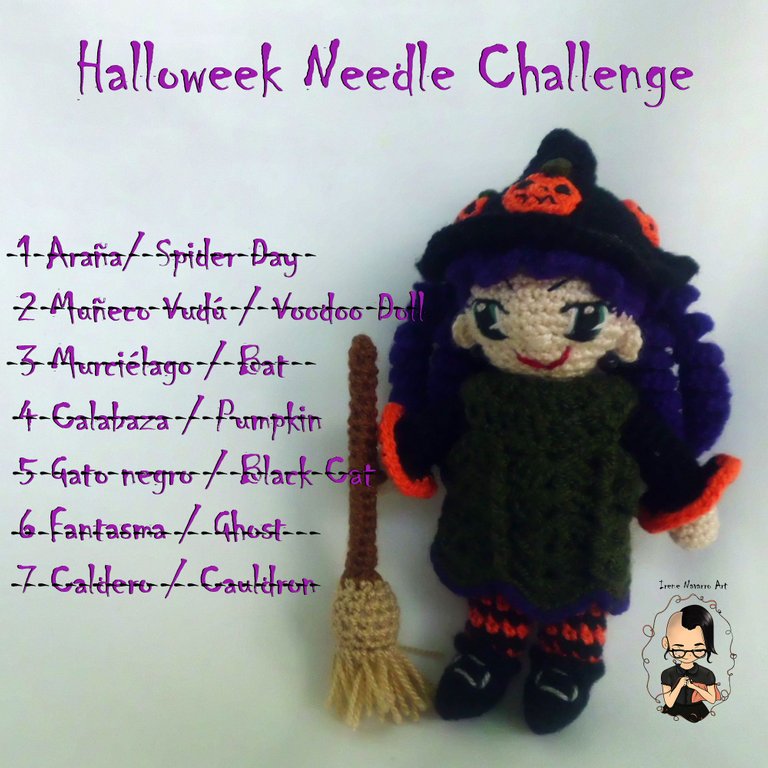
Saludos este es mi séptimo y último día del Halloweek Neddle Challeenge, estoy completamente feliz de haber llegado a Halloween publicando la semana completa un proyecto de tejido, aunque anuncié el desafío una semana antes y empecé a tejer de inmediato , escribir los tutoriales, traducirlos, colocar códigos, editar imágenes es un trabajo que quita mucho tiempo, además me he preocupado por comentar, compartir y votar todas las publicaciones de las participantes, son tantas que a veces debo esperar algunas horas para que mi poder de voto se recargue y darles mi modesto apoyo, espero que cada una de las participantes se haya sentido a gusto realizando y compartiendo sus proyectos, todos son recibidos con mucho amor de mi parte, sé del gran esfuerzo que hacen cada una, todavía tienen hasta las 11:59 de la noche para presentar su post final, el día de mañana estaré haciendo la publicación resumen de desafío, anunciando a los ganadores de 17 Hive, de nuevo muchas gracias a @neumannsalva por unirse al reto como sponsor, me queda aún por hacer el trabajo difícil que es repartir los premios porque todos lo merecen. Las bases del reto están en el post. El día de hoy corresponde Caldero de mi lista.
Greetings this is my 7th and last day of Halloweek Neddle Challeenge, I am completely happy to have made it to Halloween by posting a knitting project the whole week, even though I announced the challenge a week before and started knitting right away, writing the tutorials, translating them, placing codes, editing images is a job that takes a lot of time, in addition I have been concerned about commenting, sharing and voting on all the publications of the participants, there are so many that sometimes I have to wait a few hours for my voting power to recharge and give them my modest support, I hope that each of the participants has felt comfortable carrying out and sharing their projects, all are received with a lot of love from me, I know of the great effort that each one makes, they still have until 11:59 at night To present your final post, tomorrow I will be posting the challenge summary, announcing the 17 Hive winners, again thanks a lot to @neumannsalva who joined the challenge as a sponsor, I still have to do the difficult work that is to distribute the prizes because everyone deserves it. The bases of the challenge are in the post. Today corresponds cauldron of my list.
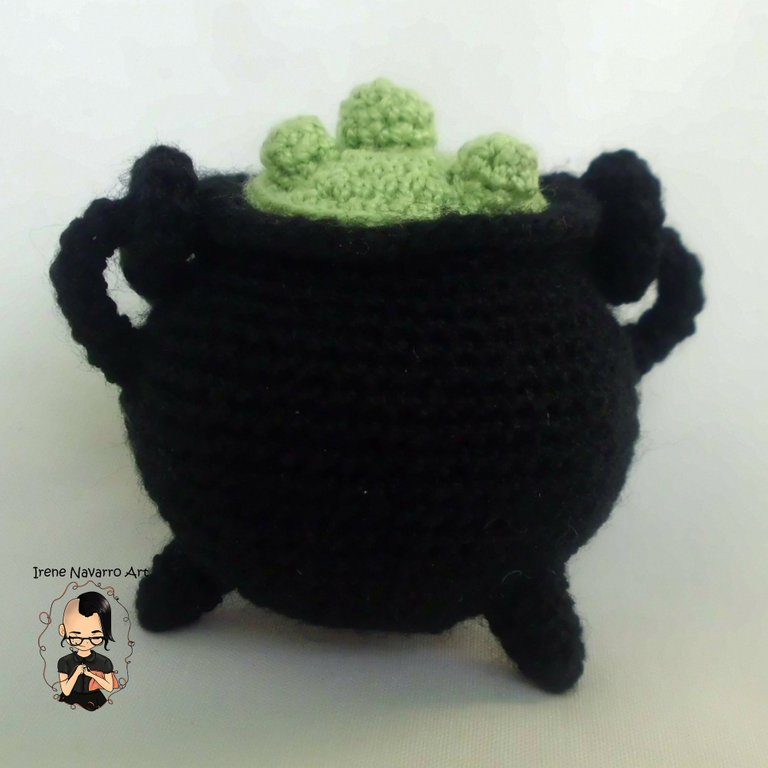
A year ago I made my knitted witch, so for this Halloween I promised that I would make a cauldron for her to prepare potions and also concoctions, that was not enough for me but I also wanted to make some additional friends for her which led me to the idea of create this seven-day challenge, because just as the image of the witch has a hat and a broom, it could not lack the cauldron.

Materiales / Materials
- Hilo acrílico negro y verde
- Crochet # 4 (1.25mm)
- Relleno de fibra antialérgica
- Alambre
- Aguja de ojal grande
- Tijera
- Black and green acrylic yarn
- Crochet # 4 (1.25mm)
- Anti-allergic fiber filling
- Wire
- Large buttonhole needle
- Scissors
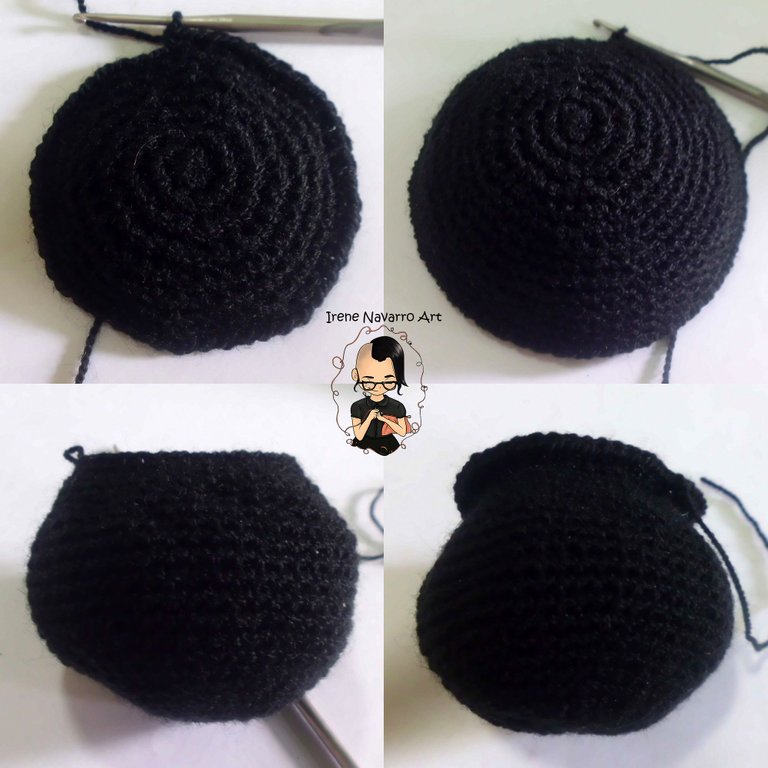
Caldero
Con hilo negro hacer 8 puntos bajos en un anillo.
1 Ronda: 8 aumentos. Total de puntos (16)
2 Ronda: (1 punto bajo, 1 aumento) x 8. Total de puntos (24)
3 Ronda: (2 puntos bajos, 1 aumento) x 8. Total de puntos (32)
4 Ronda: 32 puntos bajos
5 Ronda: (3 puntos bajos, 1 aumento) x 8. Total de puntos (40)
6 Ronda: 40 puntos bajos
7 Ronda: (4 puntos bajos, 1 aumento) x 8. Total de puntos (48)
8 Ronda: 48 puntos bajos
9 Ronda: (5 puntos bajos, 1 aumento) x 8. Total de puntos (56)
10-15 Ronda: 56 puntos bajos
16 Ronda: (5 puntos bajos, 1 disminución) x 8. Total de puntos (48)
17 Ronda: 48 puntos bajos
18 Ronda: (4 puntos bajos, 1 disminución) x 8. Total de puntos (40)
19 Ronda: 40 puntos bajos
20 Ronda: (3 puntos bajos, 1 disminución) x 8. Total de puntos (32)
21 Ronda: 32 puntos bajos
22 Ronda: tomando solo el lado del frente hacer (3 puntos bajos, 1 aumento) x 8. Total de puntos (40)
23 Ronda: (4 puntos bajos, 1 aumento) x 8. Total de puntos (48)
Cerrar con un punto deslizado
With black thread, make 8 single crochets in a ring.
1 Round: 8 increases. Total Stitches (16)
2 Round: (1 single crochet, 1 increase) x 8. Total stitches (24)
3 Round: (2 single crochets, 1 increase) x 8. Total stitches (32)
4 Round: 32 single crochets
5 Round: (3 single crochets, 1 increase) x 8. Total stitches (40)
6 Round: 40 single crochets
7th Round: (4 single crochets, 1 increase) x 8. Total stitches (48)
8 Round: 48 single crochets
9 Round: (5 single crochets, 1 increase) x 8. Total stitches (56)
10-15 Round: 56 single crochets
16 Round: (5 single crochets, 1 decrease) x 8. Total stitches (48)
17 Round: 48 single crochets
18 Round: (4 single crochets, 1 decrease) x 8. Total stitches (40)
19 Round: 40 single crochets
20 Round: (3 single crochets, 1 decrease) x 8. Total stitches (32)
21 Round: 32 single crochets
22 Round: taking only the front side make (3 single crochets, 1 increase) x 8. Total stitches (40)
23 Round: (4 single crochets, 1 increase) x 8. Total stitches (48)
Close with a slip stitch
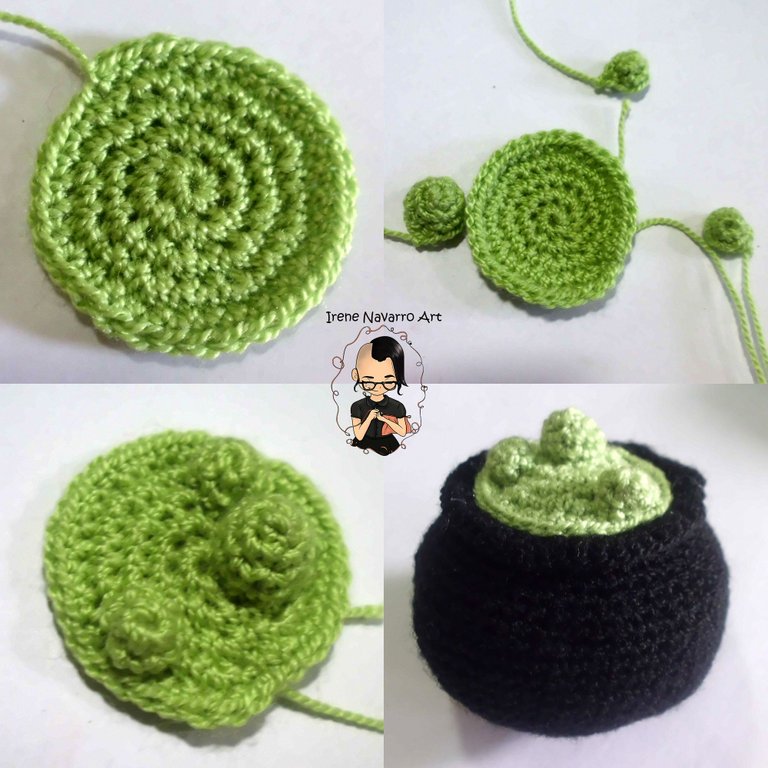
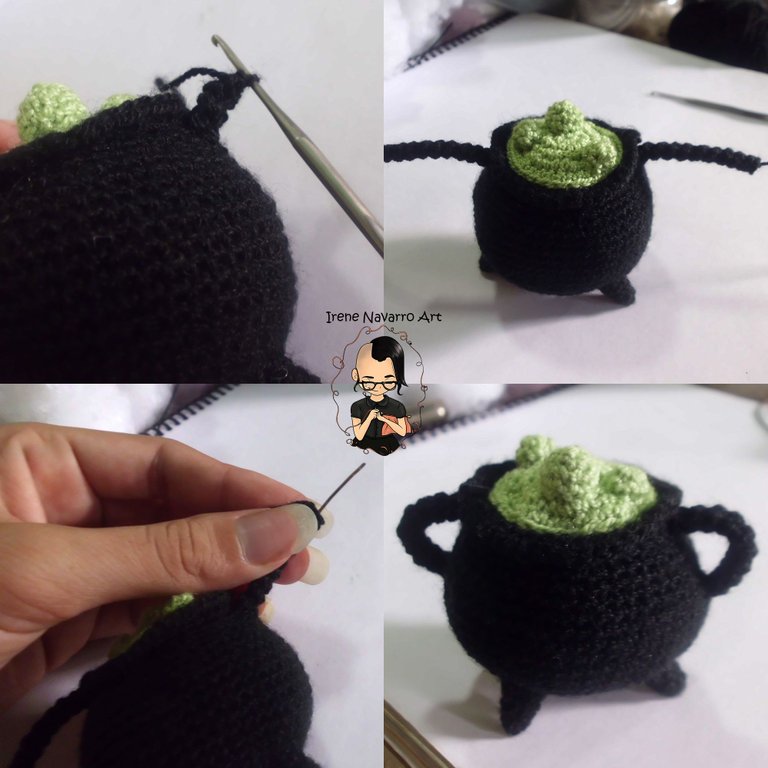
Contenido del caldero / Cauldron content
Con hilo verde hacer 8 puntos bajos en un anillo
1 Ronda:8 aumentos. Total de puntos (16)
2 Ronda: (1 punto bajo, 1 aumento) x 8. Total de puntos (24)
3 Ronda: (3 punto bajo, 1 aumento) x 8. Total de puntos (32)
4 Ronda:32 puntos.
Cerrar con un punto deslizado, dejar una hebra larga para coser.
1 Burbuja
Con hilo verde hacer 4 puntos bajos en un anillo.
1 Ronda: 4 aumentos. Total de puntos (8)
2-3 Ronda: 8 puntos bajos.
Cerrar con un punto deslizado, dejar una hebra larga para coser.
2 Burbujas
Con hilo verde hacer 6 puntos bajos en un anillo.
1 Ronda:6 puntos bajos.
Cerrar con un punto deslizado, dejar una hebra larga para coser.
Rellenar y coser las burbujas a la base del caldo.
Rellenar el caldero con fibra y coser el contenido.
With green thread make 8 single crochets in a ring
1 Round: 8 increases. Total Stitches (16)
2 Round: (1 single crochet, 1 increase) x 8. Total stitches (24)
3 Round: (3 single crochet, 1 increase) x 8. Total stitches (32)
4 Round: 32 points.
Close with a slip stitch, leave a long thread to sew.
1 Bubble
With green yarn, make 4 single crochets in a ring.
1 Round: 4 increases. Total Stitches (8)
2-3 Round: 8 single crochets
Close with a slip stitch, leave a long thread to sew.
2 Bubbles
With green yarn, make 6 single crochets in a ring.
1 Round: 6 single crochets.
Close with a slip stitch, leave a long thread to sew.
Fill and sew the bubbles to the base of the broth.
Fill the cauldron with fiber and sew the contents.
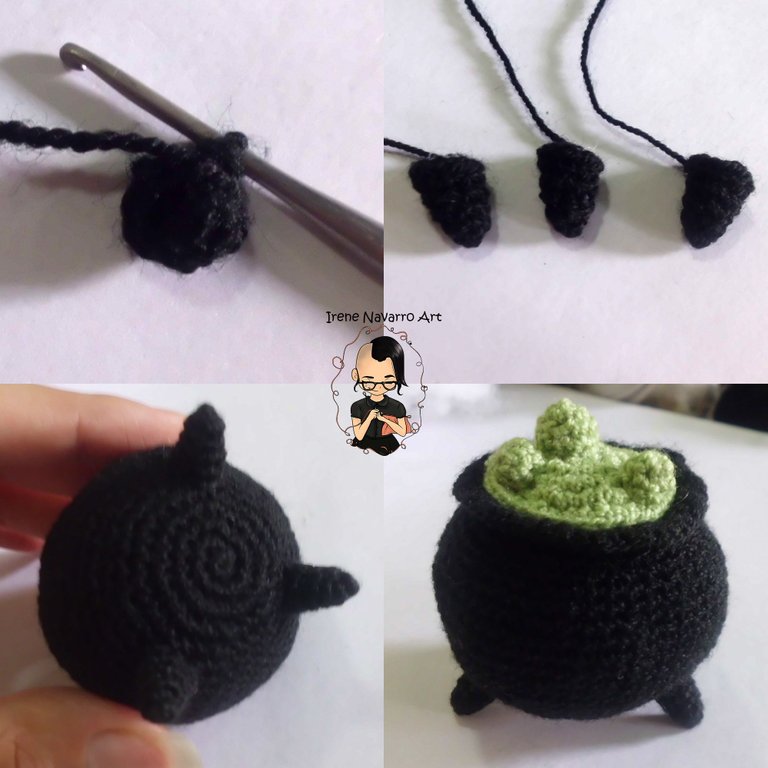
Patas de caldero / Cauldron legs
Con hilo negro hacer 4 puntos bajos en un anillo
1 Ronda: 3 puntos bajos, 1 aumento. Total de puntos (5)
2 Ronda: 2 puntos bajos, 1 aumento, 2 puntos bajos. Total de puntos (6)
3 Ronda: 5 puntos bajos, 1 aumento. Total de puntos (7)
Cerrar con un punto deslizado, dejar una hebra larga para coser.
Hacer tres iguales, rellenar con fibra y coserlas por debajo del caldero.
With black thread make 4 single crochets in a ring
1 Round: 3 single crochets, 1 increase. Total Stitches (5)
2 Round: 2 single crochets, 1 increase, 2 single crochets. Total Stitches (6)
3 Round: 5 single crochets, 1 increase. Total Stitches (7)
Close with a slip stitch, leave a long thread to sew.
Make three of the same, fill with fiber and sew them under the cauldron.
Asas del caldero / Cauldron handles
Levantar 4 puntos bajos a un lado del caldero y tejer 10 rondas.
Cerrar con un punto deslizado y dejar una hebra larga para coser.
Hacer lo mismo del otro lado del caldero
Insertar alambre en ambas asas, crear una curva y coser.
Pick up 4 single crochets on one side of the cauldron and work 10 rounds.
Close with a slip stitch and leave a long strand to sew.
Do the same on the other side of the cauldron
Insert wire into both handles, create a curve, and sew.
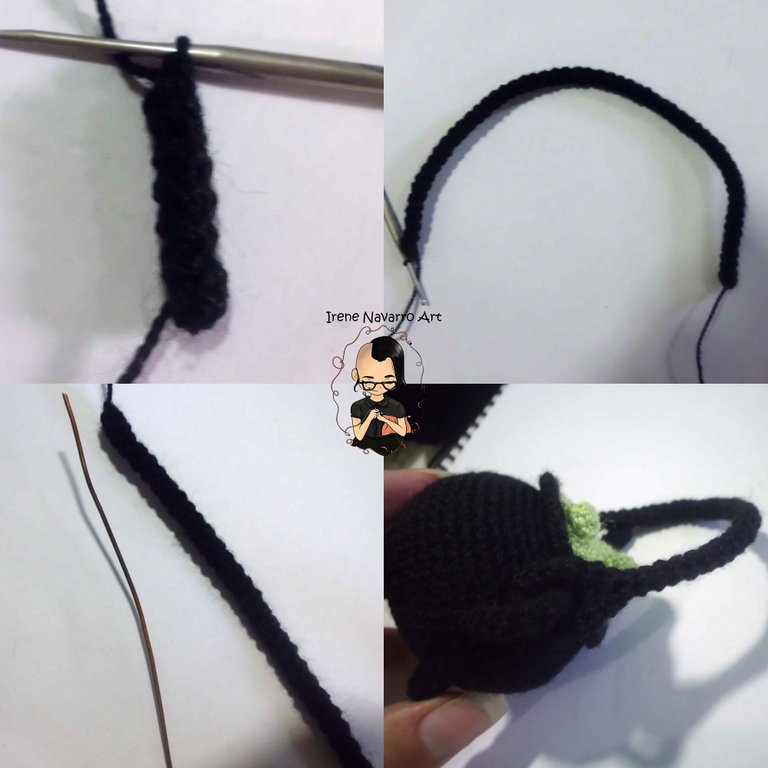
Agarradero / Handgrip
Con hilo negro hacer 4 puntos en un anillo y trabajar 50 rondas.
Insertar alambre por dentro.
Insertar el agarradero en las asas, crear una curva de cada lado y coser.
With black yarn make 4 stitches in a ring and work 50 rounds.
Insert wire inside.
Insert the Handgrip into the handles, create a curve on each side and sew.
Resultado/ Result
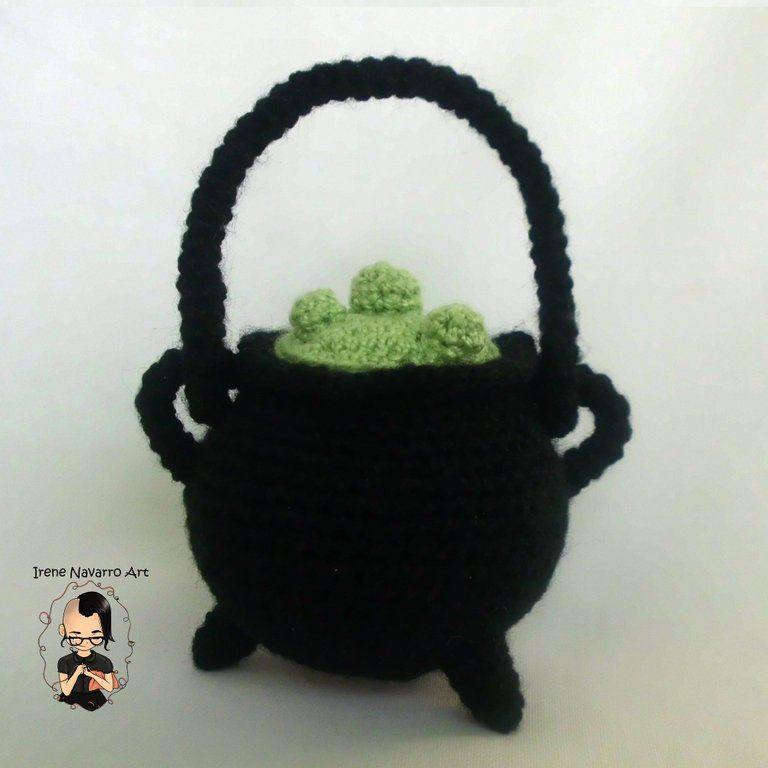
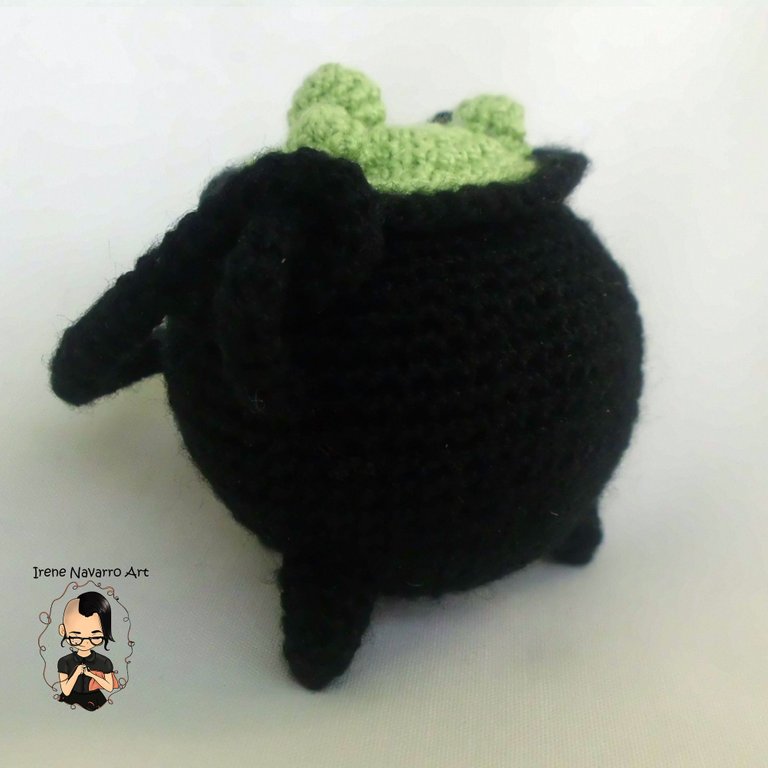
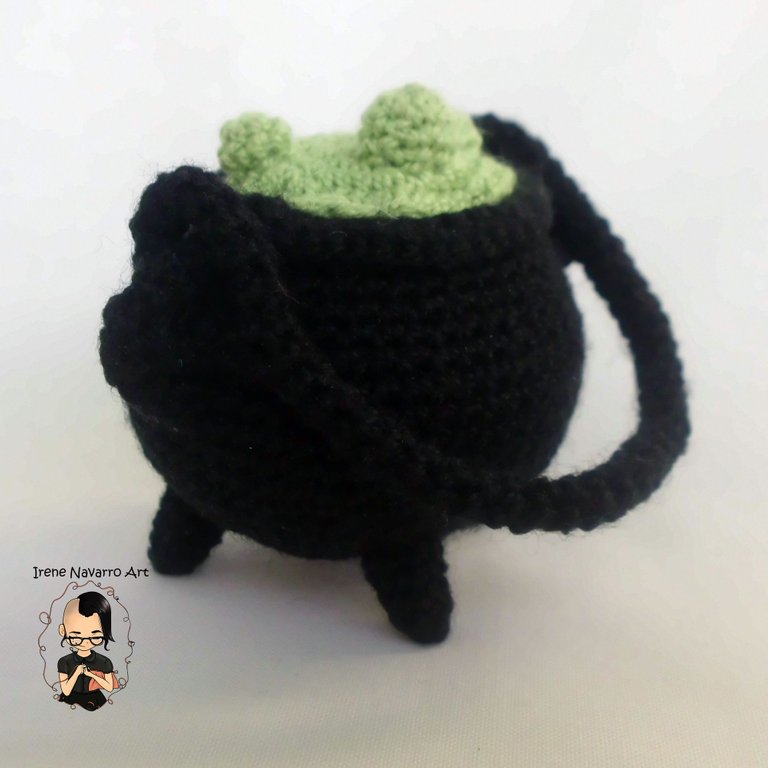
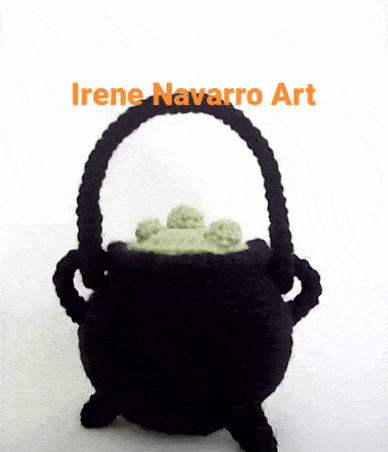

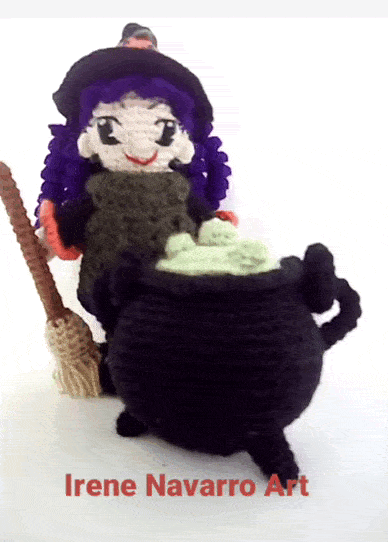
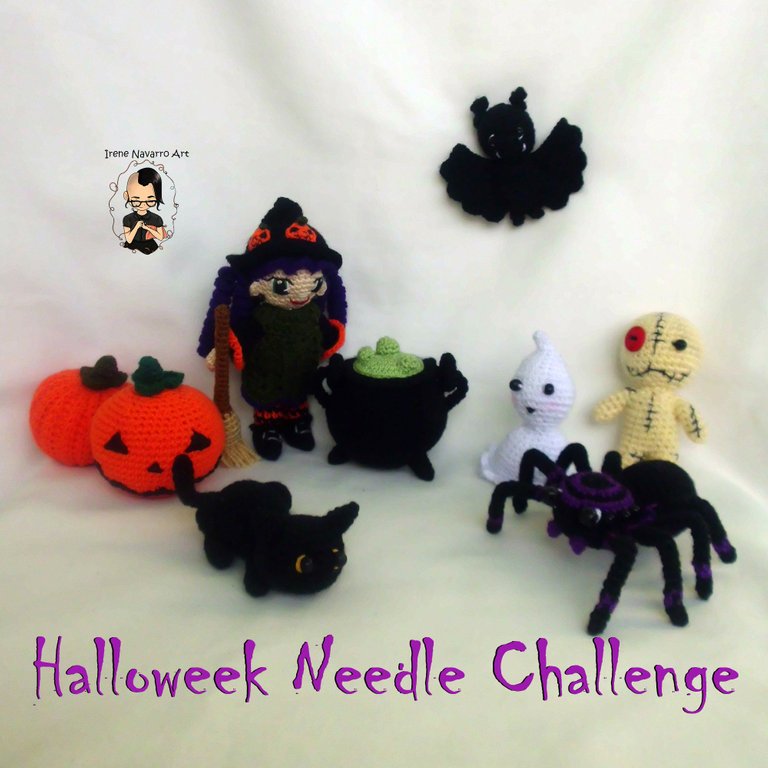
All projects completed
Imágenes tomadas con cámara Casio QV-R100 y editadas en Adobe Photoshop Cs6
Images taken with Casio QV-R100 camera and edited in Adobe Photoshop Cs6
Invítenme un Café/Support Me on Ko-Fi
Si te gusta mi contenido y quieres apoyarme a seguir dibujando, pintando, escribiendo y tejiendo puedes invitarme un Ko-fi en el enlace que les dejo aquí abajo, les recuerdo que es fácil, se usa Paypal y Tarjeta. ¡Muchas gracias a todos!
If you want to support my art you can also make donations for the value of a coffee (Ko-Fi) this uses Paypal, it is simple and with it I will be able to continue knitting and buying materials to create and share my publications

https://ko-fi.com/irenenavarroart

Espero les haya gustado. Les invito a leer mis próximas publicaciones y siempre estaré dispuesta a responder sus preguntas y comentarios, también pueden seguirme y contactarme en cualquiera de mis redes sociales. ¡Muchas gracias!
I hope you liked it. I invite you to read my next publications and I will always be willing to answer your questions and comments, you can also follow me and contact me on any of my social networks. Thank you!
You make this look easy as well as fun!
Have a Happy Halloween @irenenavarroart 🎃
Thank you so much for visiting my post, I had so much fun doing this during the week, Happy Halloween dear @kerrislravenhill ❤️
Excelente todo tu trabajo, se nota que te gusta mucho lo que haces. Tienes una inmensa creatividad, te felicito por este reto. Todos quedaron geniales, mi preferido fue el murciélago.
Mucha gracias
Que lindo te quedo amiga @irenenavarroart
Saludos ❣️
Muchas gracias 😊
Looks nice thanks for sharing @irenenavarroart
Thank you 😊
You’re welcome
Thank you for sharing this amazing post on HIVE!
Your content got selected by our fellow curator @rezoanulvibes & you just received a little thank you via an upvote from our non-profit curation initiative!
You will be featured in one of our recurring curation compilations and on our pinterest boards! Both are aiming to offer you a stage to widen your audience within and outside of the DIY scene of hive.
Join the official DIYHub community on HIVE and show us more of your amazing work and feel free to connect with us and other DIYers via our discord server: https://discord.gg/mY5uCfQ !
If you want to support our goal to motivate other DIY/art/music/homesteading/... creators just delegate to us and earn 100% of your curation rewards!
Stay creative & hive on!
Thanks for the support 😊
The rewards earned on this comment will go directly to the person sharing the post on Twitter as long as they are registered with @poshtoken. Sign up at https://hiveposh.com.