What Will I Learn?
In this tutorial you will learn how to create a Single Page Application using React framework and a very useful tool called create-react-app. Also, we'll be covering some basics about the structure of a React application using components.
- How to create a Single Page Application with React.
- How to use
create-react-app. - How to create a React component.
- Basic usage of component's props
Requirements
- NPM (>= 5.6)*
- Node.js (>= 8.9)*
- Text/code editor
* : the versions listed above are the ones that we'll be using in this tutorial. Using newer or older version might work too.
Difficulty
- Intermediate
Tutorial Contents
Installing create-react-app
In order to install create-react-app, we type the following command in a terminal:
sudo npm install -g create-react-app

Creating the project
After installing create-react-app, now we are going to create a new project with this package, by typing the following command with the name that we want for the project, mine will be spa-project:
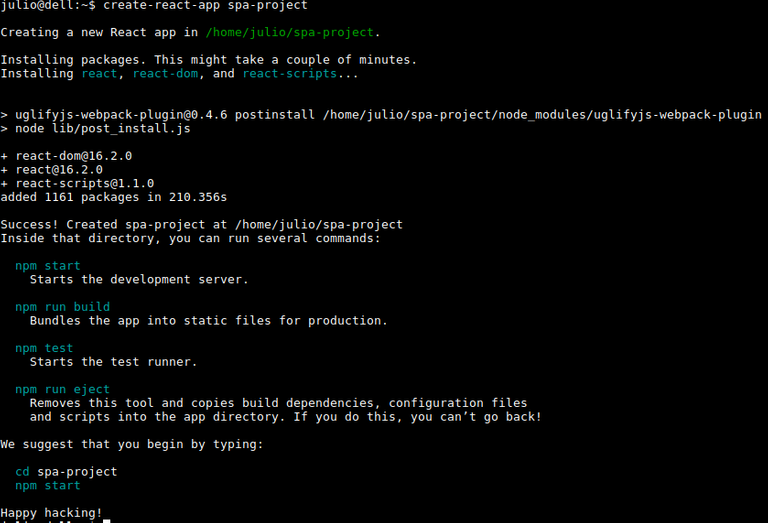
create-react-app spa-project
After hitting Enter a folder with the name of our project will be created. If everything went as expected, we'll see an output like this:
create-react-app create a new project ready to be executed. To start our newly created project, we go into the project folder, and run the following command in order to start it:
cd spa-project && npm start
If everything is alright, a new tab in our default browser will open and you will see something like this:

Now, every time we modify and save the changes in the files contained in our project, the project will be compiled automatically and the changes will be shown in the browser.
Editing our project
First, we are going to create a new folder inside the src folder in the project's directory called components. There, we will place the new components we want to create. We are going to create two components: a navbar for our SPA, and a personal information section. So, the organization of our project will look like this:

Now, let's edit our files.
Basic structure of React components
There are a a few different ways to create a React component. In this tutorial we'll be using the following boilerplate for the React components:
import React, { Component } from 'react';
class ComponentName extends Component {
  render() {
    return(
      <div>
        Component content goes here
      </div>
    )
  }
}
export default ComponentName;
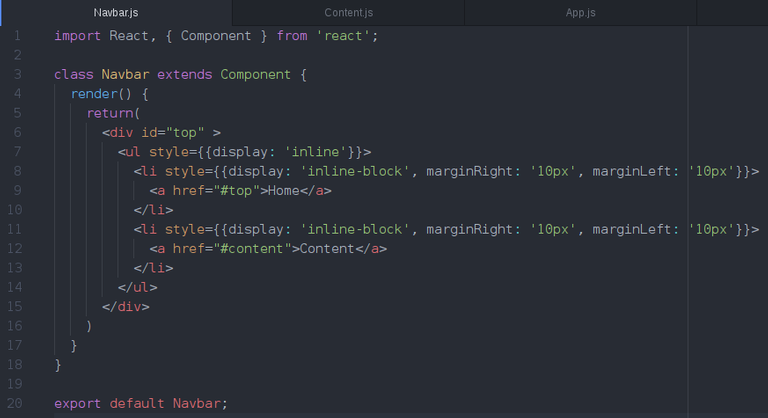
Creating a simple Navbar
In the navbar components will be placed all the links that allow the user to navigate through the different sections of our web site. It's basically a horizontal HTML list of links. Here is what it should look like:
class Navbar extends Component {
  render() {
    return(
      <div id="top" >
        <ul style={{display: 'inline'}}>
          <li style={{display: 'inline-block', marginRight: '10px', marginLeft: '10px'}}>
            <a href="#top">Home</a>
          </li>
          <li style={{display: 'inline-block', marginRight: '10px', marginLeft: '10px'}}>
            <a href="#content">Content</a>
          </li>
        </ul>
      </div>
    )
  }
}
export default Navbar;
Notice the inline style in the previous snippet:
style={{display: 'inline'}}
That's how inline style is used in React applications: between double curly braces, each property followed by a semicolon and the value between quotation marks. Properties that has more than one word, just like padding-bottom, flex-flow, etc. must be written in camelCase mode:
style={{display: 'inline', paddingBottom: '10px', marginLeft: '30px', textSize: '24px'}}
Creating the content section
In this component, we'll be using a React feature called props. The props are a way of passing information through parent components to child components. These props can be of any type: strings, numbers, booleans, objects, arrays, etc.
We are going to create a component that will show some of our information, such as our name, our Steemit profile, our utopian profile and our hobbies. Our props will be called: name, steemit_profile, utopian_profile and hobbies.
So far, we don't know what our props will have. We just know the name of the props, so we'll place them in a proper place. Our content component will look like this:
import React, { Component } from 'react';
class Content extends Component {
  render() {
    return(
      <div>
        <center><h1>User information</h1></center>
        <h2>Name</h2>
        <span>{this.props.name}</span>
        <h2>Steemit profile</h2>
        <span>{this.props.steemit_profile}</span>
        <h2>Utopian profile</h2>
        <span>{this.props.utopian_profile}</span>
        <h2>Hobbies</h2>
        <span>{this.props.hobbies}</span>
      </div>
    )
  }
}
export default Content;
As you might have noticed, here we used elements like this one: {this.props.hobbies}. This elements between single curly braces inside our HTML content are called JSX elements. They are the way of using Javascript elements inside our HTML content in React. Between these curly braces, we can call any variable we need inside the view.
The props we talked about later are stored in a special variable called this.props. Every React component have one.

Wrapping up the components
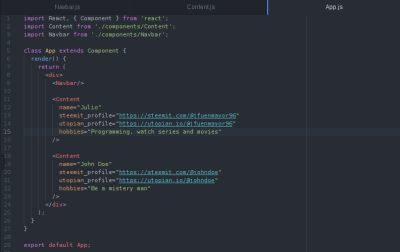
We already finished editing the components. Now, we have to place them somewhere in order to see them in the browser. Now, we are going to edit the App.js file inside the src folder of our project. In this file, we are going to erase most of the content that is already there, and replace it with the following:
import React, { Component } from 'react';
import Content from './components/Content';
import Navbar from './components/Navbar';
class App extends Component {
  render() {
    return (
      <div>
        <Navbar/>
        <Content
          name="Julio"
          steemit_profile="https://steemit.com/@jfuenmayor96"
          utopian_profile="https://utopian.io/@jfuenmayor96"
          hobbies="Programming, watch series and movies"
        />
        <Content
          name="John Doe"
          steemit_profile="https://steemit.com/@johndoe"
          utopian_profile="https://utopian.io/@johndoe"
          hobbies="Be a mistery man"
        />
      </div>
    );
  }
}
Here, there some important things worth talking about:
- Everytime we want to use a Component we created, we need to import them like we just did, for example:
import Content from './components/Content';
Everytime we import a Component, we can use as many times as we need it, in any place inside our HTML content.
Imported Components work just like we have created a new HTML tag. For example, we can use our navbar component in the following ways:
<Navbar />,<Navbar></Navbar>, and both ways work the same.We pass props to our components like paremeters inside the tag that represents our component. For example:
<Content
          name="Julio"
          steemit_profile="https://steemit.com/@jfuenmayor96"
          utopian_profile="https://utopian.io/@jfuenmayor96"
          hobbies="Programming, watch series and movies"
        />
- We can try to every prop we want. For example, we could have used
this.props.whateverinside our Content file, but will see that in our website the value of this prop will be undefined. It won't throw an error nor crash.
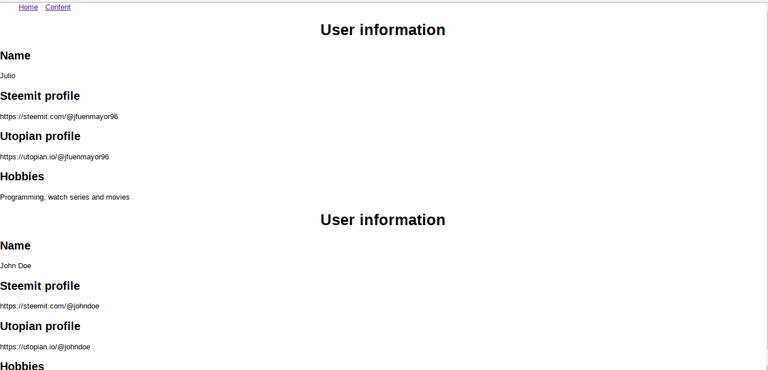
After we finish editing our App.js file, we save the file, and we should see the changes in the browser:
Posted on Utopian.io - Rewarding Open Source Contributors
Hey @jfuenmayor96 I am @utopian-io. I have just upvoted you!
Achievements
Suggestions
Get Noticed!
Community-Driven Witness!
I am the first and only Steem Community-Driven Witness. Participate on Discord. Lets GROW TOGETHER!
Up-vote this comment to grow my power and help Open Source contributions like this one. Want to chat? Join me on Discord https://discord.gg/Pc8HG9x
Seguiré tus tutoriales. Like.
Gracias Gustavo, me alegra que te gusten :) espero seguir haciendo una serie de tutoriales sobre React por los momentos.
Thank you for the contribution. It has been approved.
You can contact us on Discord.
[utopian-moderator]