Me gustan las manualiades, en especial si llevan como material principal hilo, son infinitas las posibilidades lo que se puede realizar utilizando hilo. En esta ocasión les presento el proceso creativo para realizar el bordado de una flor utilizando alfileres y por supuesto la aguja. Es sencillo de realizar esta flor, y se hace en muy poco tiempo, no me tomo una hora bordarla. Espero te animes a hacerla y utilizarla como decoración donde mas te guste.
I like crafts, especially if they have thread as the main material, there are infinite possibilities that can be done using thread. This time I present the creative process to make the embroidery of a flower using pins and of course the needle. It is simple to make this flower, and it is done in a very short time, it did not take me an hour to embroider it. I hope you are encouraged to make it and use it as decoration where you like.

Materiales
Para realizar esta hermosa flor bordada usando alfileres, se requieren alfileres, una madeja de hilos de bordar, tela, tijeras, aguja para bordar, mostacillas o botón para el centro de la flor.
Materials
To make this beautiful embroidered flower using pins, you will need pins, a skein of embroidery threads, fabric, scissors, embroidery needle, beads or button for the center of the flower.

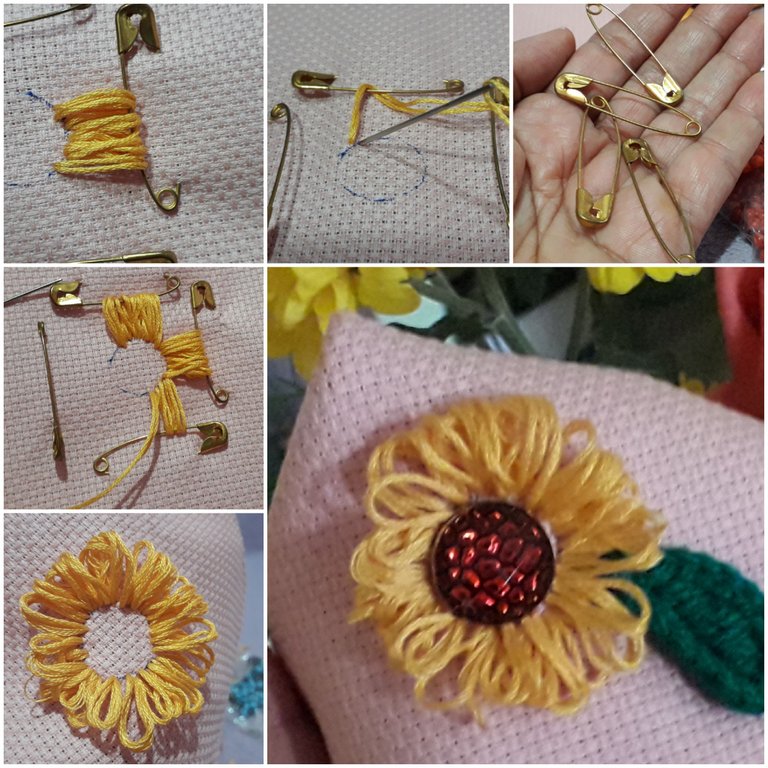
Cuando vi varios videos de cómo bordan usando alfileres me sorprendió, en este caso se usan cuatro alfileres, el tamaño de los alfileres da el tamaño de la flor.
When I saw several videos of how they embroider using pins I was surprised, in this case four pins are used, the size of the pins gives the size of the flower.

Pasos
Comenzar montando la tela en un aro para bordar, luego con algo circular de aproximadamente 1 cm de diámetro realizar un círculo, este será el centro de la flor.
Seguidamente ubicar los alfileres en especie de un cuadrado, luego de esta ubicación que representará una guía para saber en donde serán enganchados los alfileres para luego comenzar a bordar la flor.
Steps
Start by mounting the fabric in an embroidery hoop, then with something circular about 1 cm in diameter make a circle, this will be the center of the flower.
Then place the pins in a kind of square, after this location that will represent a guide to know where the pins will be hooked and then begin to embroider the flower.

Como ya conocemos la ubicación de los alfileres, ahora es el turno de enganchar los alfileres, formando una especie de cuadrado.
As we already know the location of the pins, now it is the turn to hook the pins, forming a kind of square.

Es el turno de comenzar a bordar los cuatro pétalos de la flor. Para comenzar bordando el primer pétalo, meter la aguja ya enhebrada con el hilo de bordar en la orilla del círculo marcado en la tela. Luego pasar ese hilo por el alfiler, y regresar al centro, repetir la secuencia hasta bordar todo el pétalo. Es importante, que cada vez que se meta la aguja en la orilla del círculo, quede pegada a la puntada anterior.
Now it's time to start embroidering the four petals of the flower. To start embroidering the first petal, put the needle already threaded with the embroidery thread on the edge of the circle marked on the fabric. Then pass the thread through the pin and return to the center, repeating the sequence until the entire petal is embroidered. It is important that each time the needle is threaded into the edge of the circle, it remains attached to the previous stitch.

Luego de bordar el primer pétalo, repetir la misma secuencia para bordar los otros tres pétalos.
After embroidering the first petal, repeat the same sequence to embroider the other three petals.

Una vez completado el bordado de los cuatro pétalos, se retira de cada uno de los pétalos los alfileres. Es maravillosa la impresión que se experimenta en este paso, ya se puede observar la flor, estaría faltando el centro de la flor.
Once the embroidery of the four petals is completed, the pins are removed from each of the petals. It is wonderful the impression that is experienced in this step, you can already see the flower, it would be missing the center of the flower.

Ahora es el turno de hacer el centro, me gusta ir probando diversos materiales sobre el centro de la flor para luego decidir cuál va mejor. Ensayé con dos colores de mostacilla, con una especie de botón tejido y con un botón acrílico.
Luego de hacer ensayos con varios materiales para el centro de la flor, me he decidido por el botón de acrílico rojo, me parece que le saca brillo a la flor y la hace lucir más natural.
Now it's time to make the center, I like to try different materials on the center of the flower and then decide which one goes best. I tried with two colors of mustard, with a kind of woven button and with an acrylic button.
After testing several materials for the center of the flower, I decided to use the red acrylic button, I think it brings out the brightness of the flower and makes it look more natural.

Luego de pegar el botón acrílico con silicone sobre la flor, así luce. Esta flor es una excelente opción para decorar una tarjeta, también se puede incorporar sobre un cojín. También se pueden realizar muchas flores de esta sobre una misma tela y hacer un mantel.
Es una flor sencilla de realizar, no se necesita tener un mayor conocimiento de bordado puede hacer una labor como esta.
Usaré esta flor para decorar una tarjeta que realizaré próximamente.
After gluing the acrylic button with silicone on the flower, this is how it looks like. This flower is an excellent option to decorate a card, it can also be incorporated on a cushion. You can also make many of these flowers on the same fabric and make a tablecloth.
It is a simple flower to make, you don't need to have a great knowledge of embroidery to make a work like this.
I will use this flower to decorate a card that I will make soon.

Gracias por dedicar un espacio de su tiempo para leer la publicación. Si hay alguna pregunta, por favor pregúntame en la sección de comentarios a continuación.
Thank you for taking the time to read this publication. If there are any questions, please ask me in the comments section below.
Texto e imágenes: Por @jicrochet
Text and images: By @jicrochet
Hola querida amiga espero te encuentres bien, una forma muy practica de usar alfileres para crear una bella flor me encanto tu trabajo.
Saludos!
Hola @mariaser,
Me alegra te haya gustado, lo mejo de este proceso, es que es sencillo de hacer y rápido.
Que tengas un buen fin de semana.
Saludos
Thanks for de support
esos imperdibles siempre son de lo mas útil que existe, siempre se le encuentra la aplicación. Saludos, muy buen post :)
Hola @irenenavarroart
Si, son super útiles, una vez compré unos cuantos, se vienen otros proyecto en los cuales le daré uso.
Feliz y bendecido fin de semana. Un gran saludo
Quede fascinanda con el detallado paso a paso de las flores, es algo maravilloso lo que haces con tu creatividad, te felicito, te invito a visitar la comunidad @hivemexico 👉 https://peakd.com/c/hive-147104/created , tambien estamos en Discord https://discord.gg/DWVwyZ8 👈 enlace para ir directo alli. Hoy tenemos curacion en vivo y me encantaria que pudieras asisitir, Saludos!!
Gracias por tu apreciación y por el apoyo a los trabajos creativos como este. Gracias por las iniciativas de la @fuerza-hispana.
Saludos
Awesome.. It looks easy and fast. I think it will be nice on bags or tops as embellishments.😍 Job well done. Godbless..
Hola @jicrochet he quedado sorprendida con esta técnica para bordar, no la conocía y se ve bastante práctica y el resultado muy bonito.
Yo admiro muchísimo el bordado, lo sé hacer y he practicado varias técnicas pero por cuestiones de deficiencia visual no lo práctico. Sin embargo, con esta técnica, se ve que no necesitaré forzar la vista para bordar una hermosa flor como la tuya. Te agradezco muchísimo por compartirla. Siempre es un placer aprender contigo amiga.
que buen truco, me encantó! Hay una muchacha de la comunidad que hace unos bordados hermosisimos, hace unos días me imagine haciendo una flor de mostacilla para una camisa tambien jeje
Si, es muy buen truco. Sería genial un flor en mostacilla para decorar una franela.
Saludos
¡Buena idea!, gracias por compartir. Se me ocurre hacer flores miniatura y aplicaré esa técnica.
¡Buenas vibras!.
Que bueno te parece útil esta técnica.
Gracias por comentar.
Saludos
Amiga felicidades, nunca había visto esa técnica, es muy creativa.
Gracias... si es una técnica que sale de lo común.
Gracias por comentar.
Saludos
So creative! The pins make a sort of temporary loom. !BBH
Because this is such an awesome post, here is a BBH Tip for you. . Keep up the fantastic work