Español
Hola Amig@s
Espero esta semana esté llena de bendiciones y sorpresas para todos nosotros.
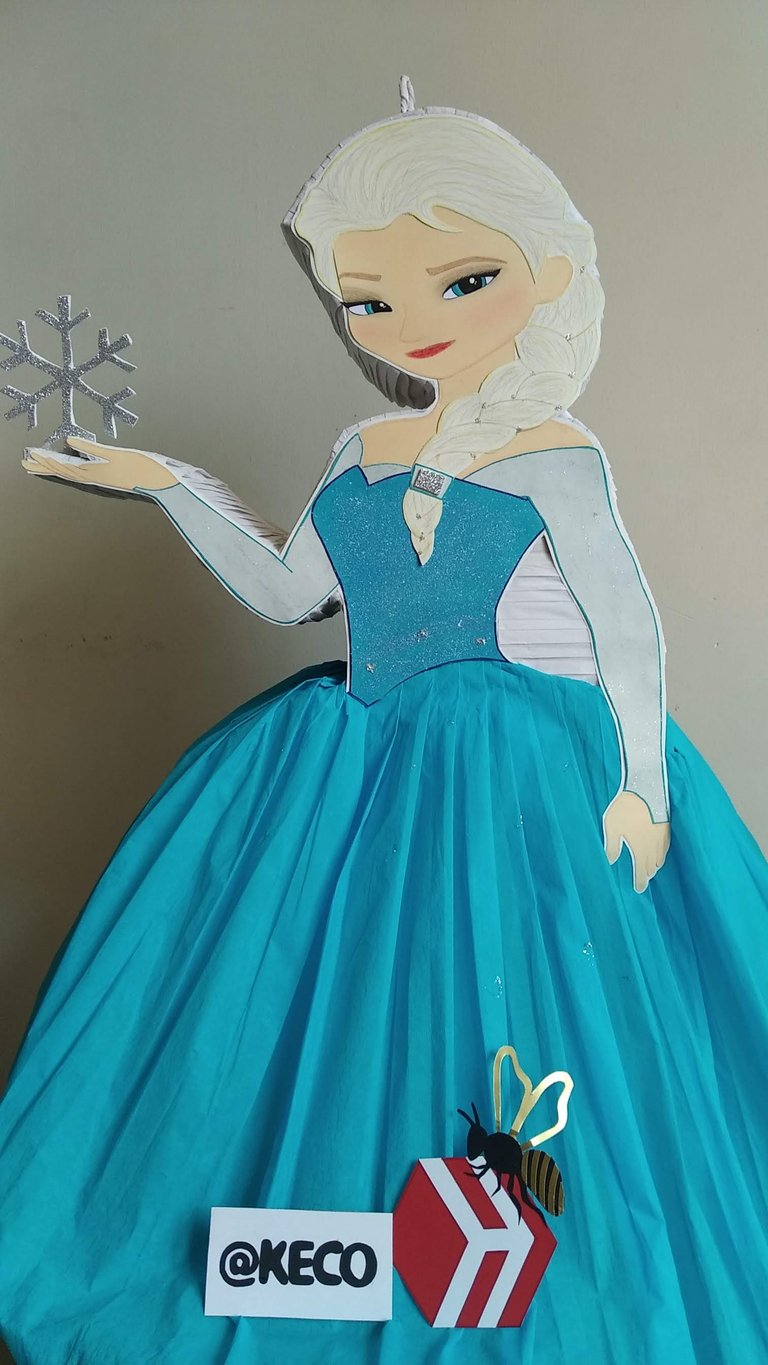
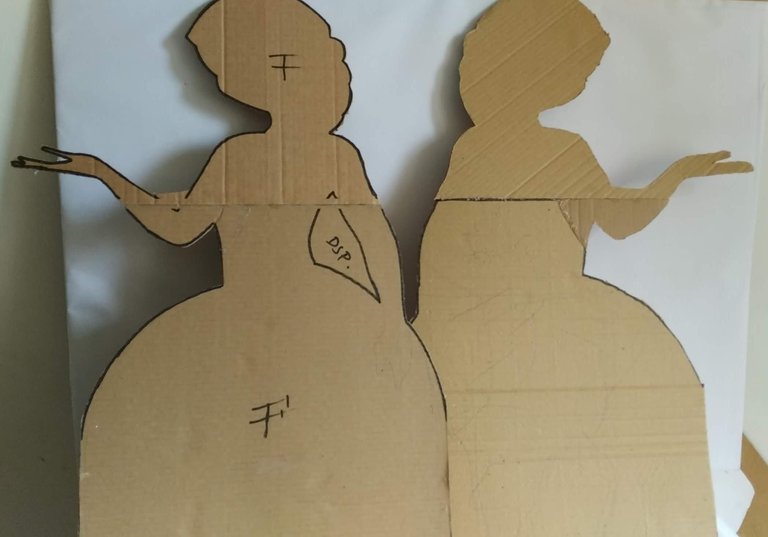
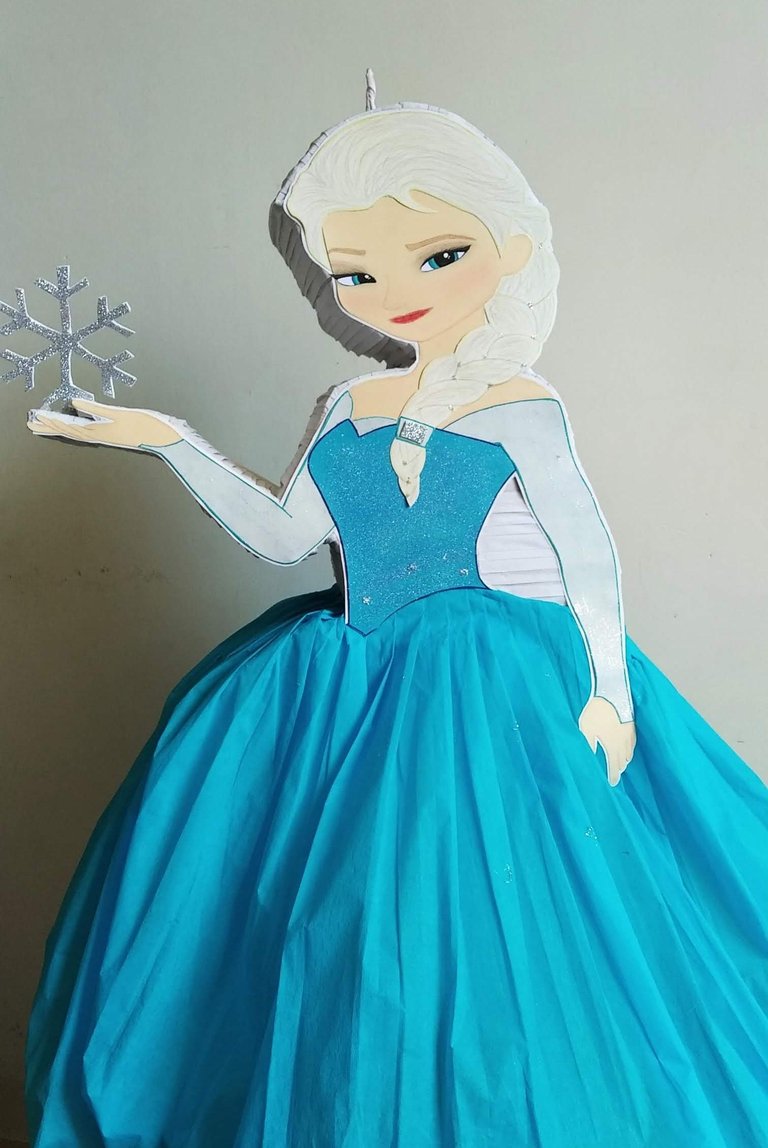
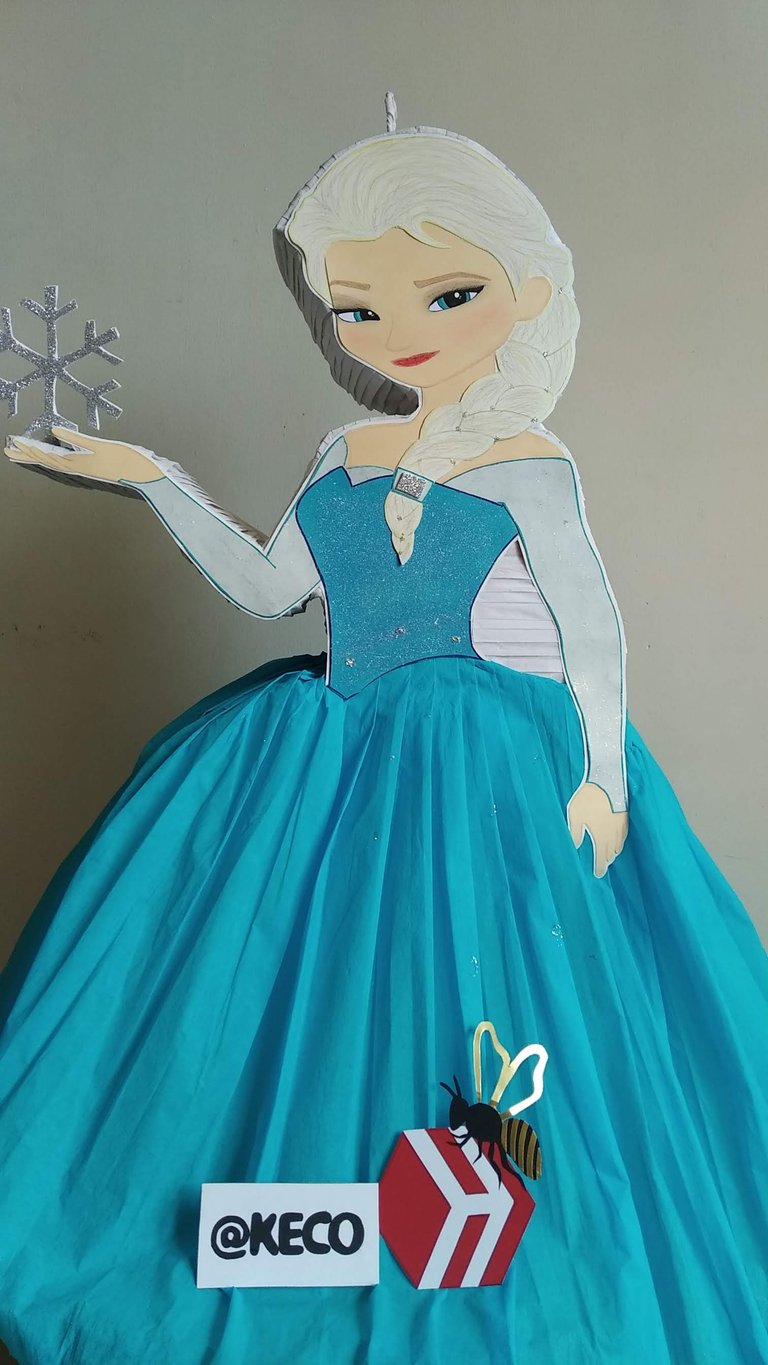
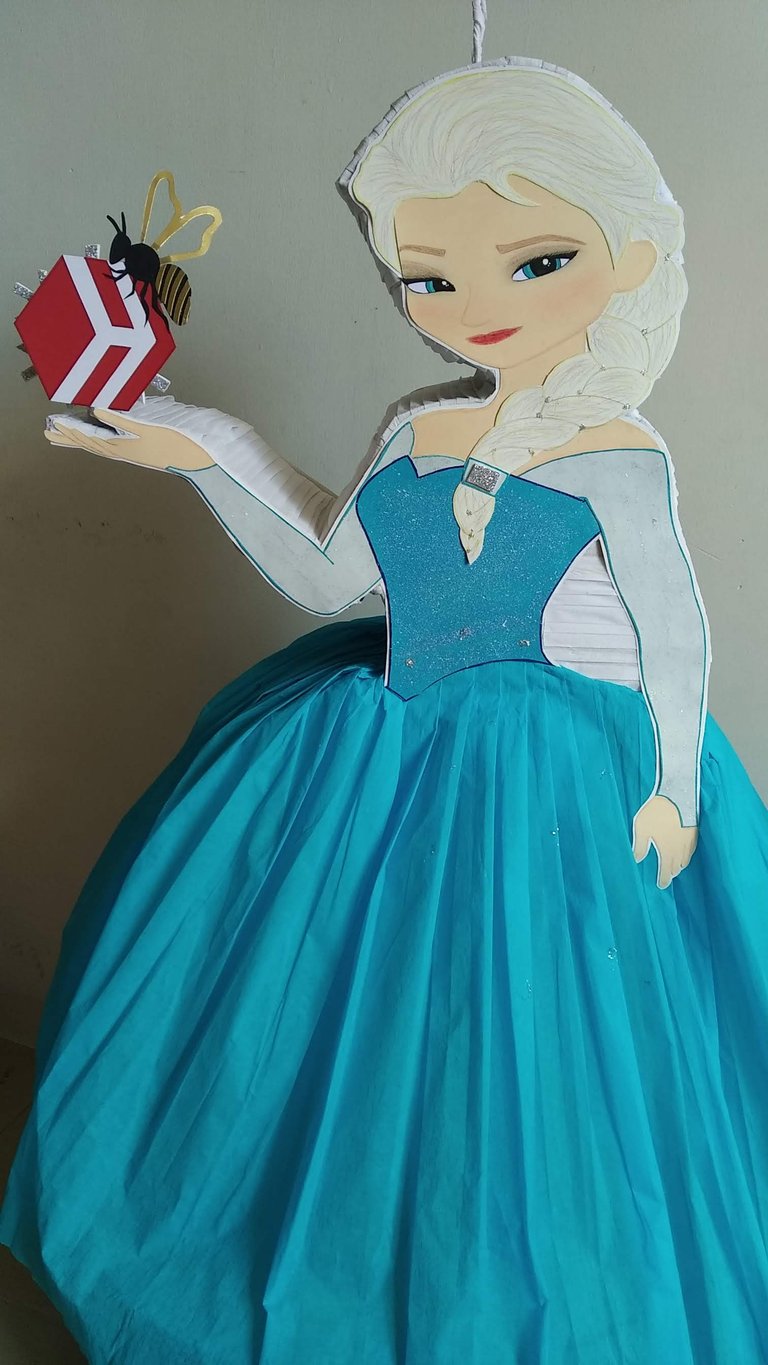
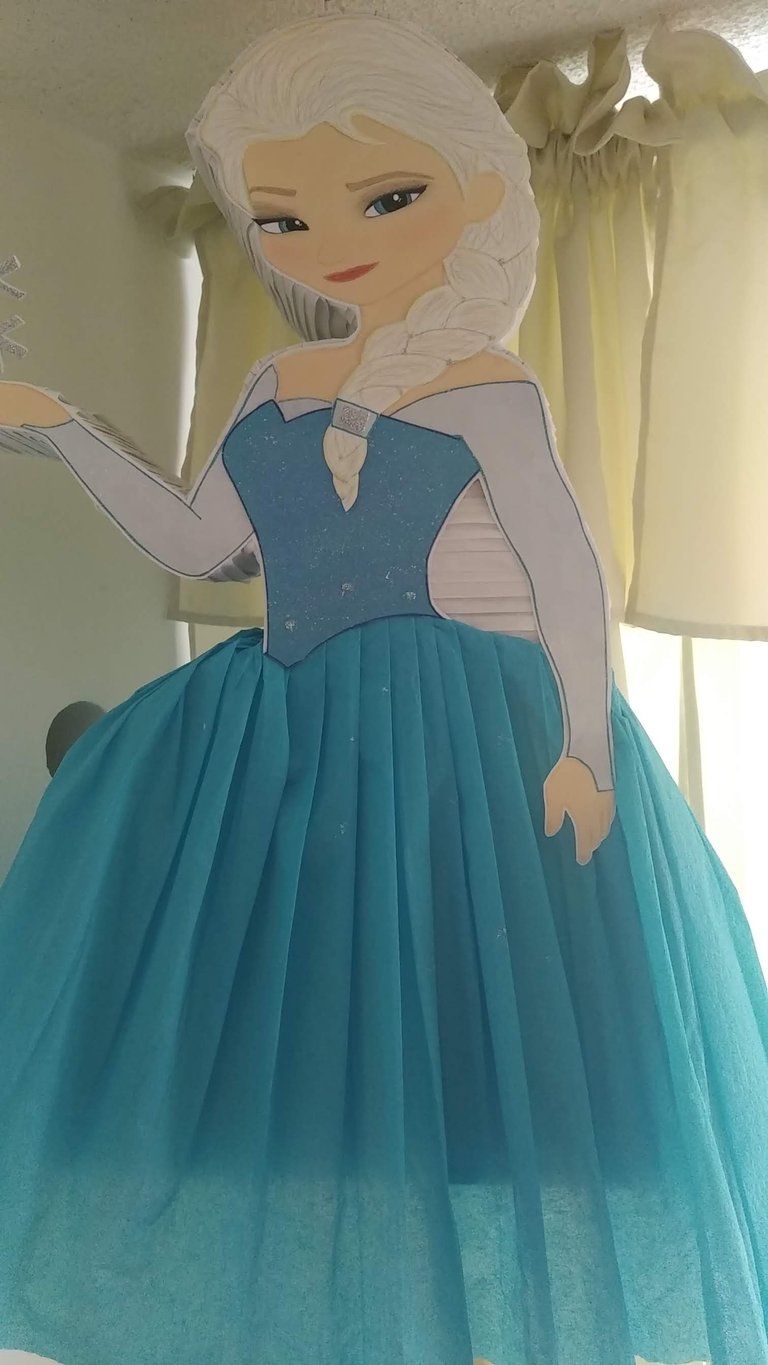
Hoy quiero mostrarles como hacer una piñata de Elsa de Frozen 1. Es una piñata realizada con mucho amor para un linda niña fanática de este personaje. Es muy original, porque mezcla figura plana en cartulina, sobre figura en cartón y crepé. El efecto resultó maravilloso y la homenajeada no quería ni que la tocaran, (risas)..
A primera vista puede resultar compleja de realizar, pero les aseguro que no lo es, por eso les invito a que se animen a crear sus propios trabajos y sorprendan a los más hermosos de la casa, los niño@s...
Sin más y esperando disfruten del trabajo realizado con amor , les dejo los materiales utilizados, el proceso y las imágenes del trabajo.
- Cartón fino (para ambas caras y laterales).
- Cartulina de colores de acuerdo al diseño: azul intenso, azul claro, blanco, piel.
- Marcadores de colores.
- Colores variados (madera o cera)
- Sombra para ojos.
- Pintura al frio, colores: azul, negro y blanco (para los ojos).
- Escarcha de color azul (textura fina).
- Alambre grueso (un pedazo para colgar).
- Papel crepé de colores: azul y blanco.
- Foami escarchado de color plateado.
- Silicón frio
- Silicón caliente
- Tijera
- Cutter
- Lápiz
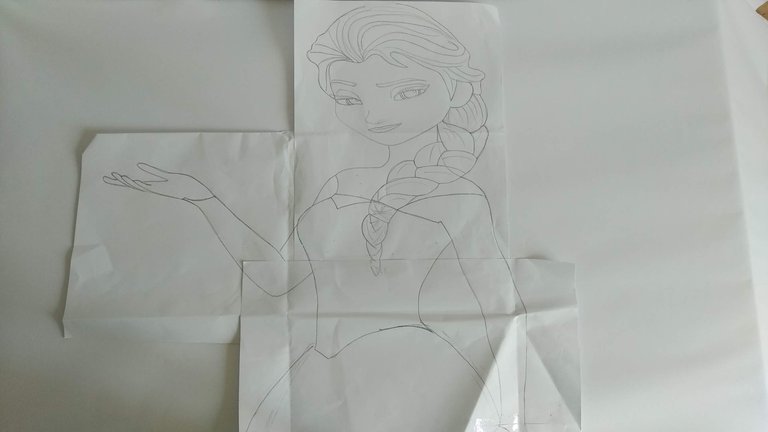
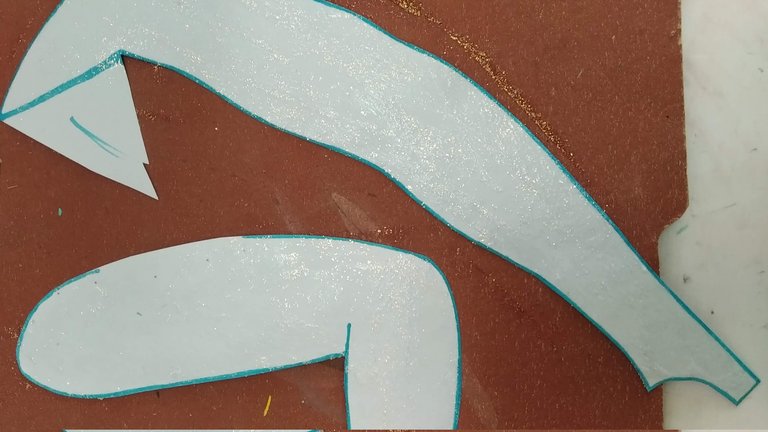
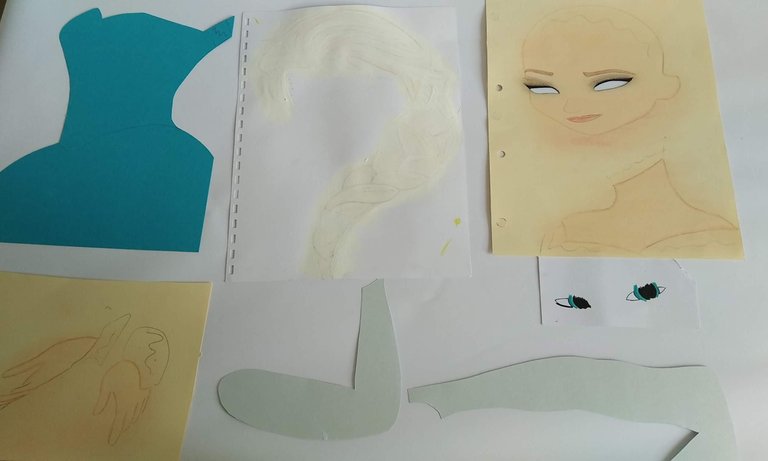
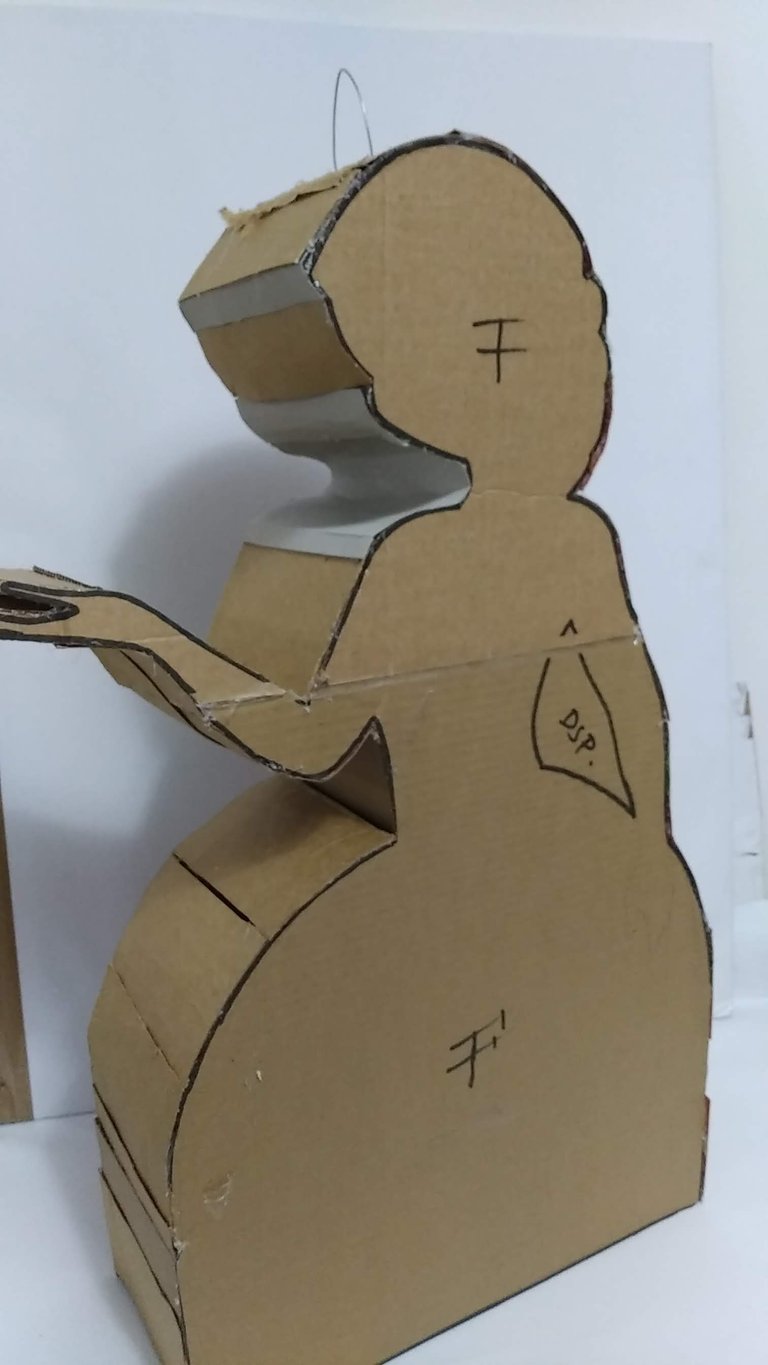
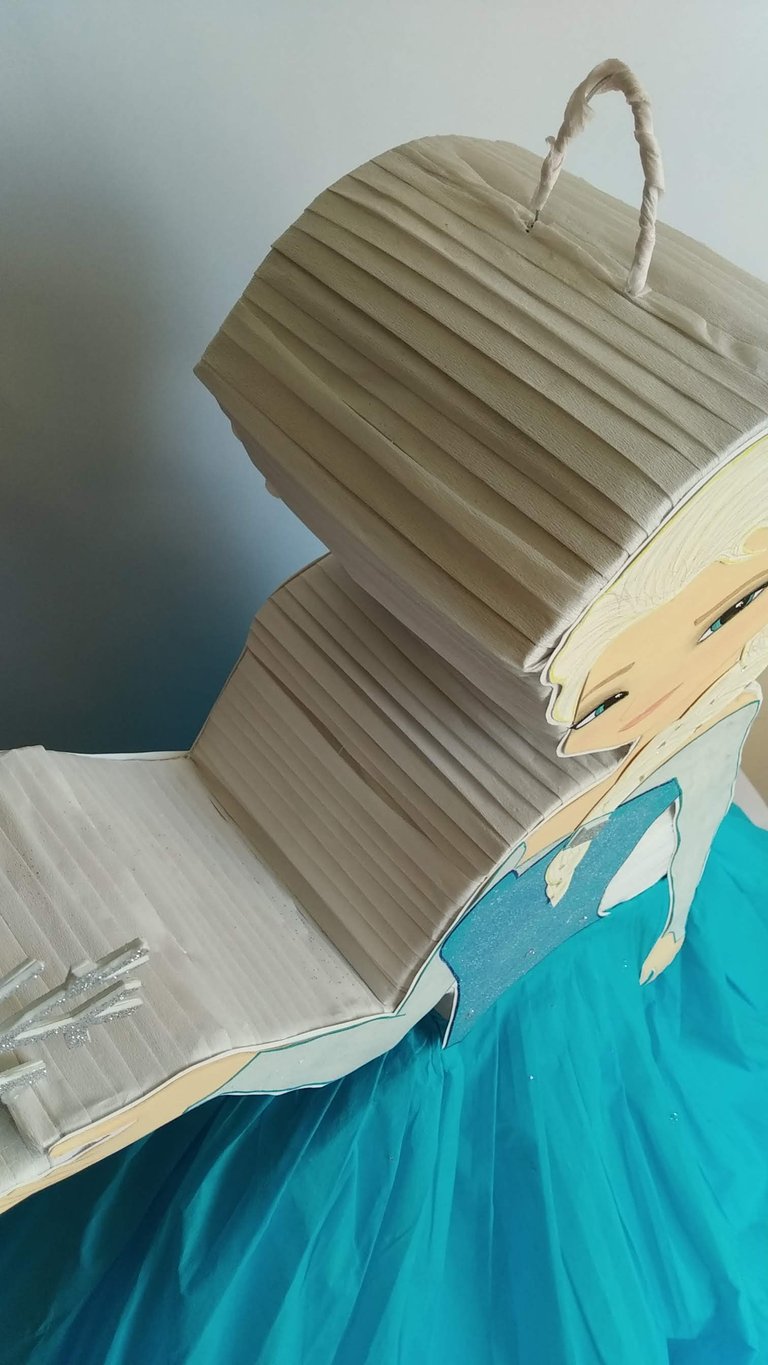
- Sacar el diseño de Elsa en las medidas que se desee. Ésta piñata en total, tiene una medida de 65 cm de alto por 50 de ancho y una profundidad de 15 cm.
- Las distintas partes que componen el diseño (rostro, brazos, pecho, etc.) marcarlas en las cartulinas de colores que correspondan a cada pieza y recortar. Teniendo en cuenta que se deberá cortar doble (de frente y el inverso) de cada pieza.
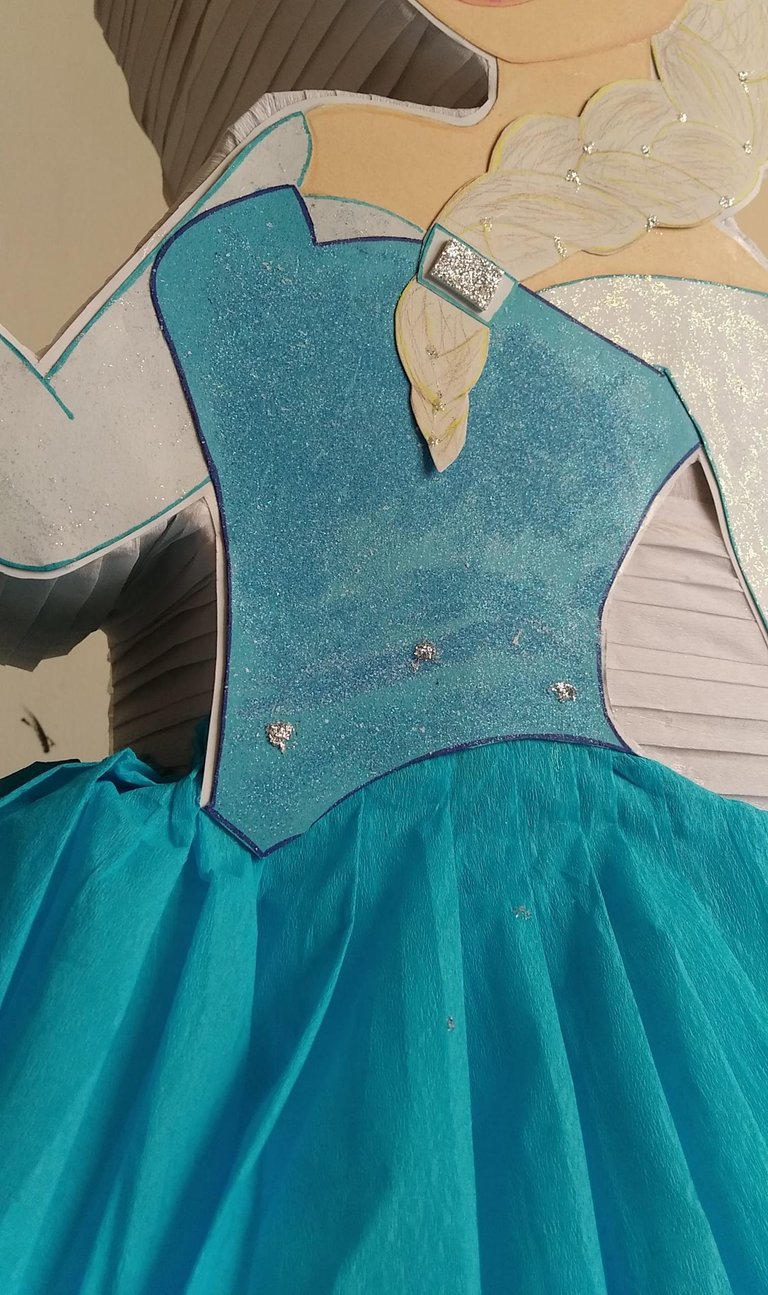
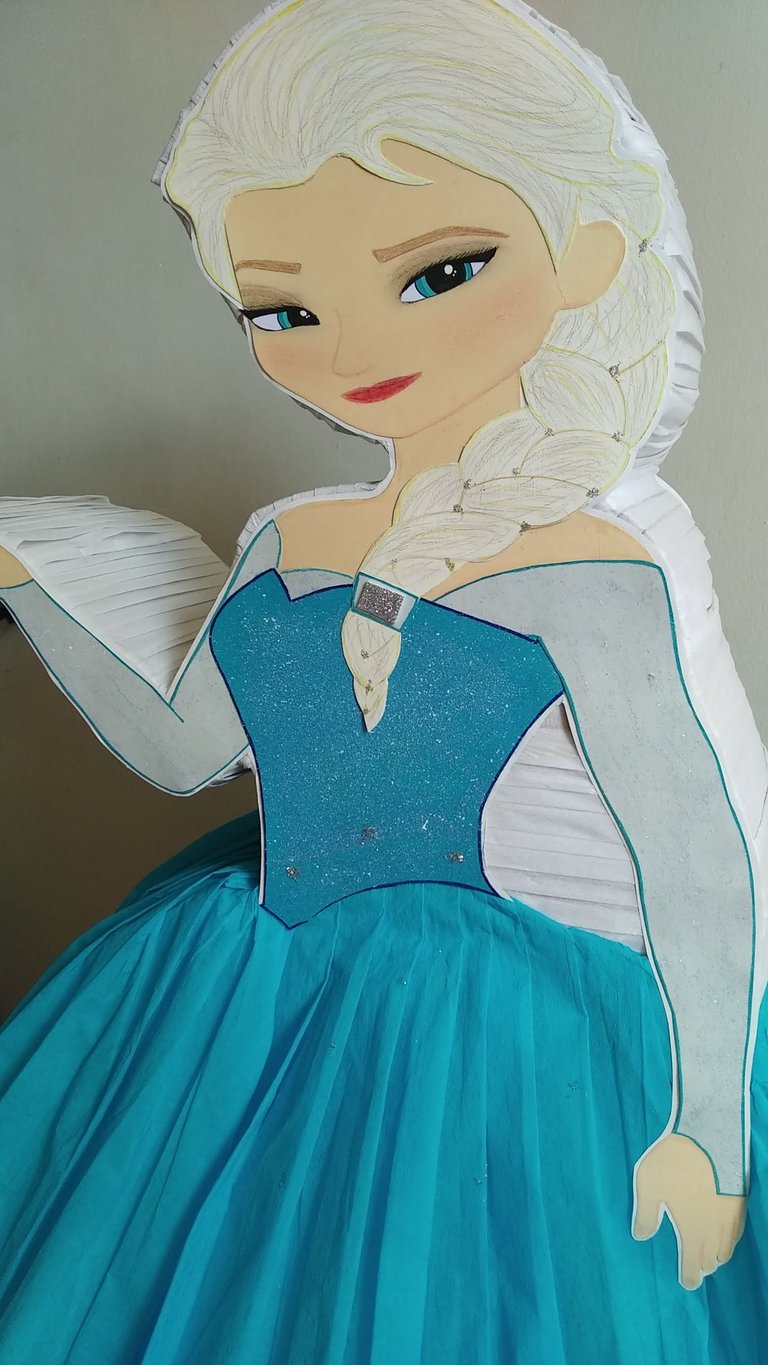
- Una vez recortadas todas las piezas, trabajar por separado. La parte del cuerpo correspondiente al vestido en la parte superior, aplicarle escarcha azul fina y dejar secar muy bien.
- Las piezas correspondiente a las brazos, aplicarle escarcha nacarada fina o pintura al frio nacarada, esto para darle ese efecto de brillo característico del personaje. Dejar secar muy bien.
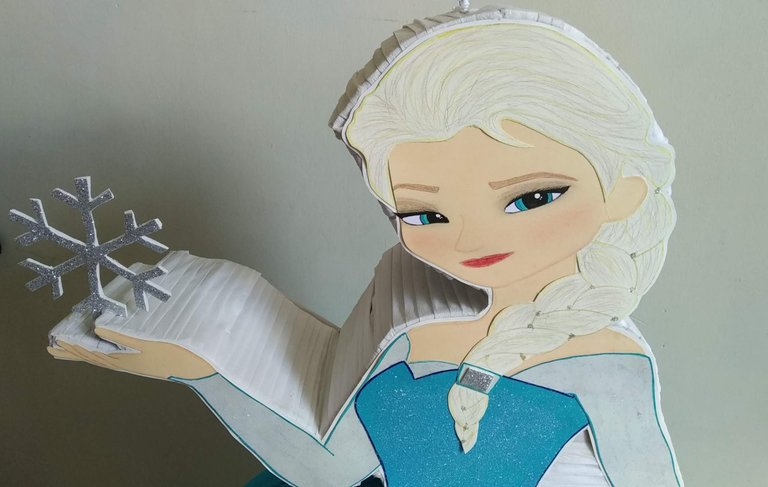
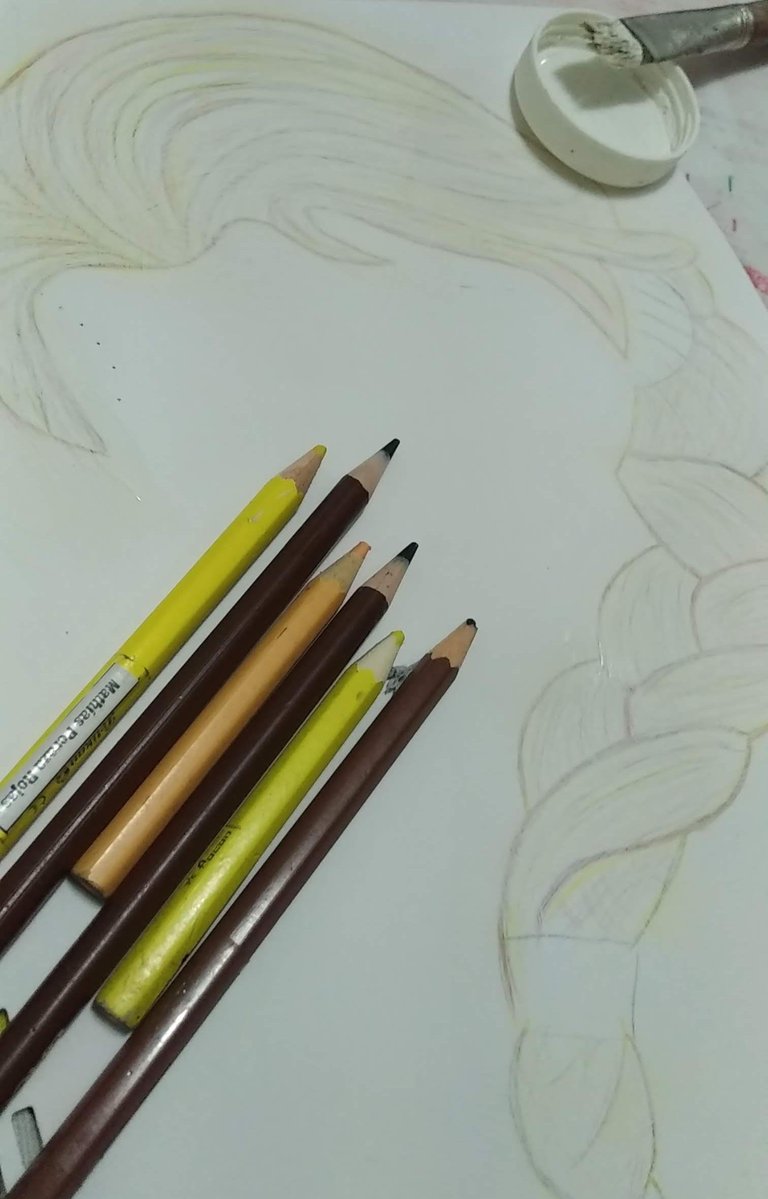
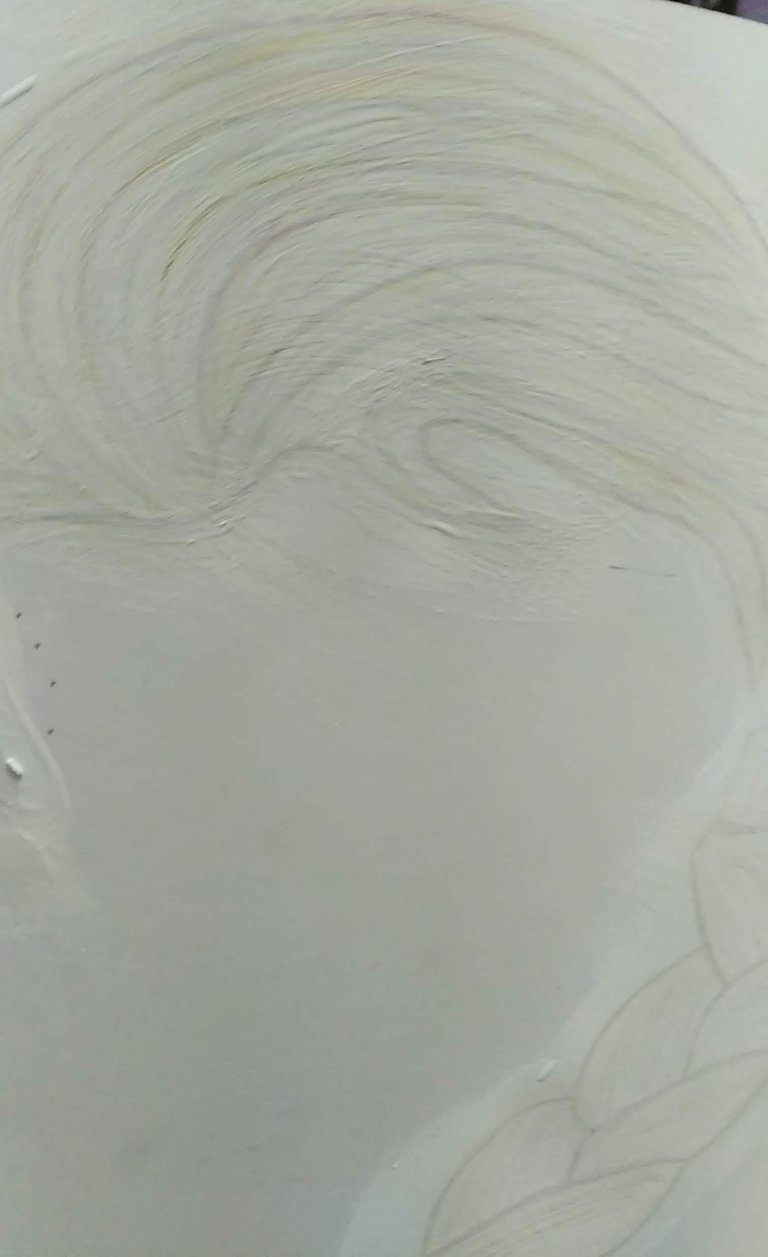
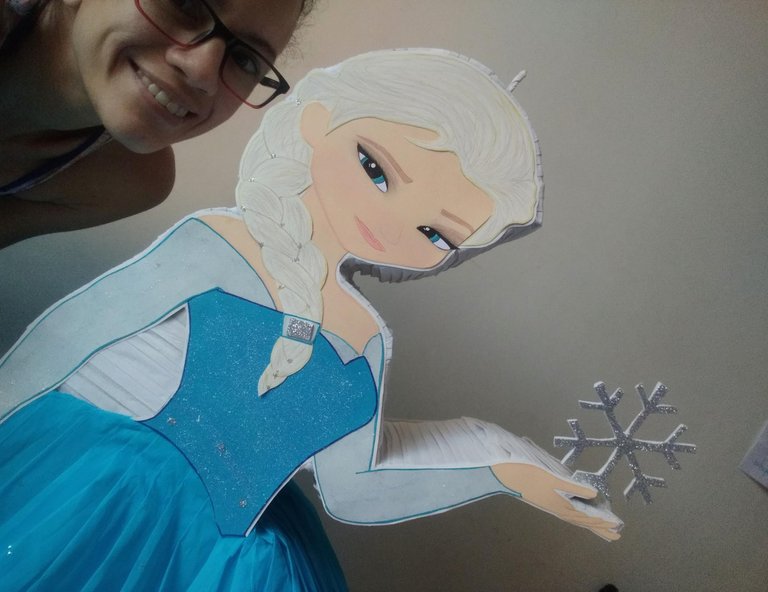
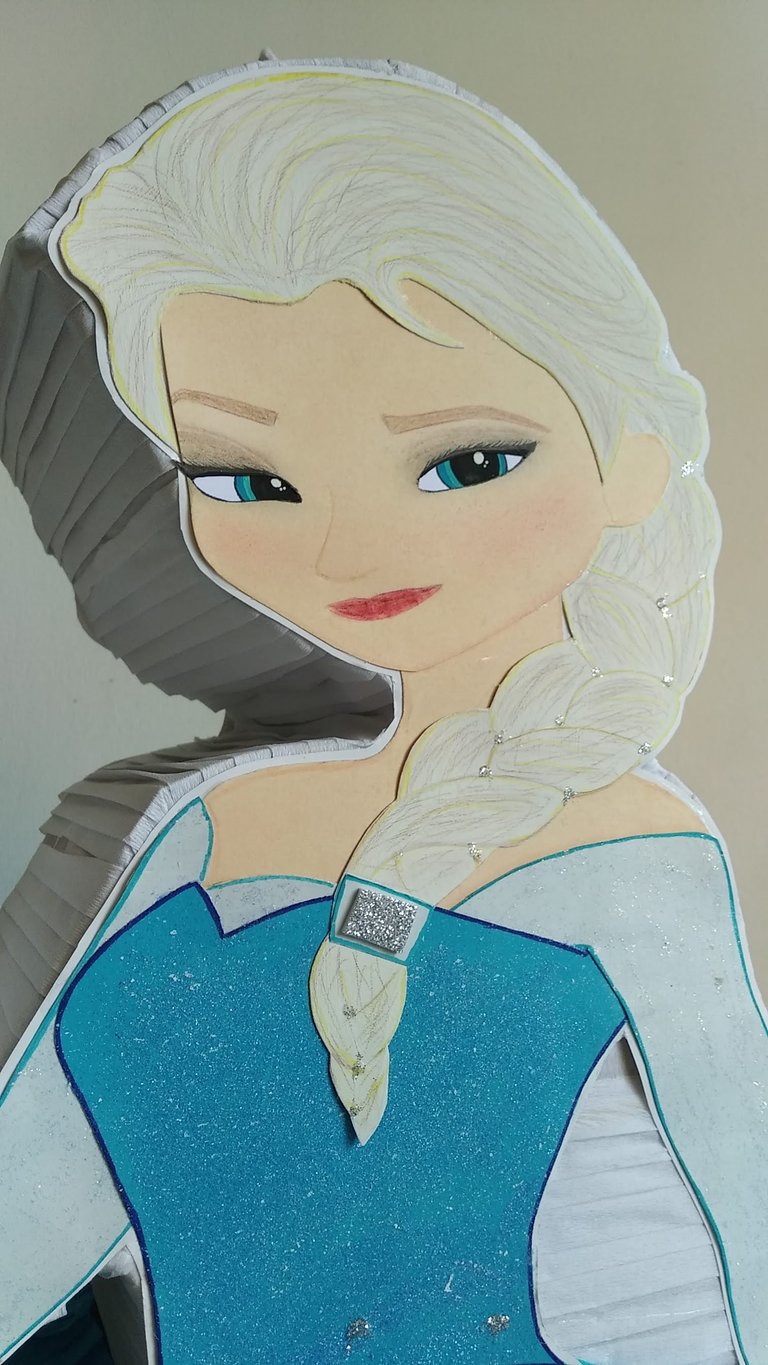
- La pieza correspondiente al cabello, hacerlo sobre cartulina blanca y al diseño, con la ayuda de los colores marrón, gris, negro y amarillo hacer lineas que simulen el cabello. Una vez listas todas las lineas de colores, aplicar una capa de pintura blanca al frio. Dejar secar muy bien y luego recortar con cuidado para que quede bien definida la clineja de Elsa.
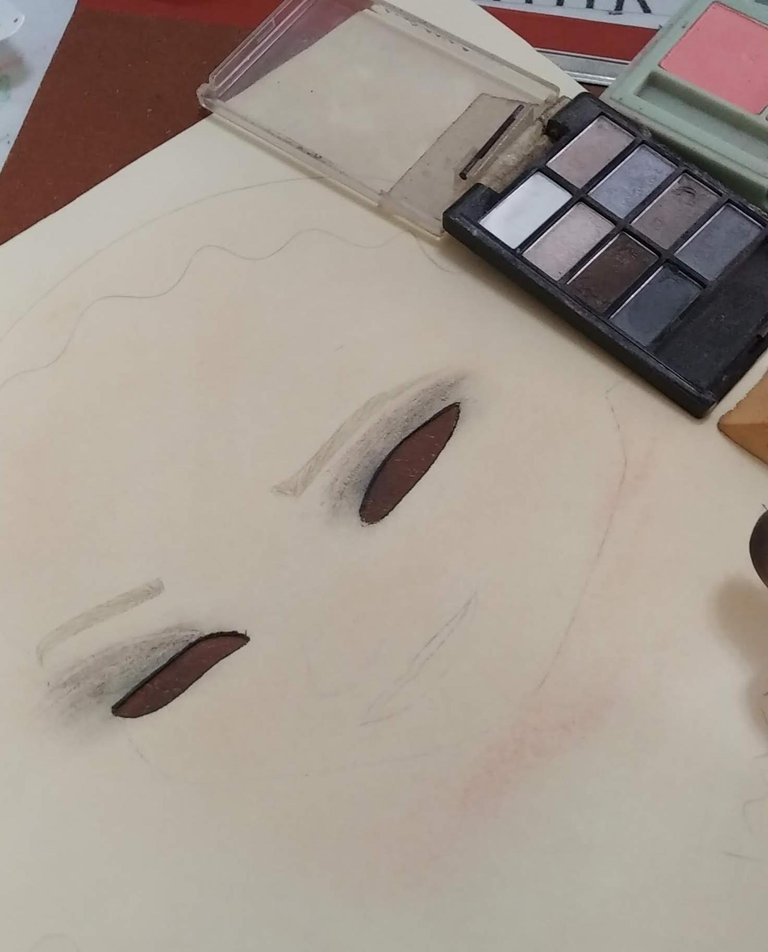
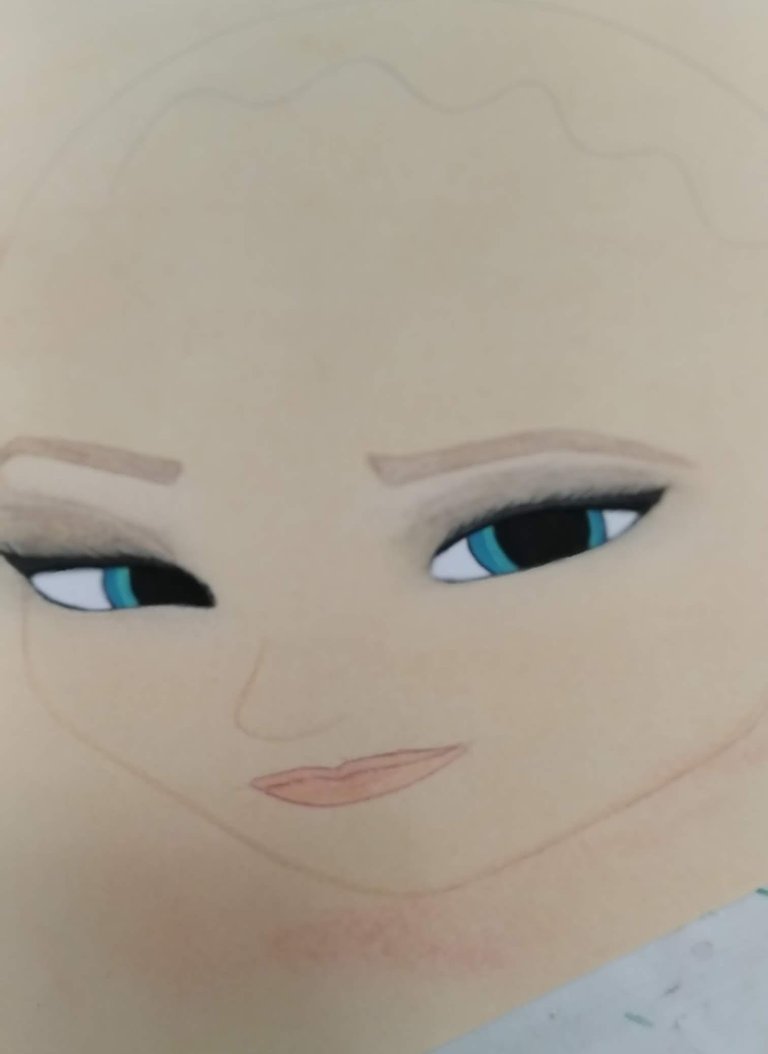
- La pieza correspondiente al rostro, deberá trabajarse distinto. El área de los ojos debe cortarse con un cutter y pintarse aparte en cartulina blanca. Para evitar excesos de color, aplicar sombra real de ojos en el área de los parpados y difuminar muy bien. Los labios pintarlos con color rosado intenso.
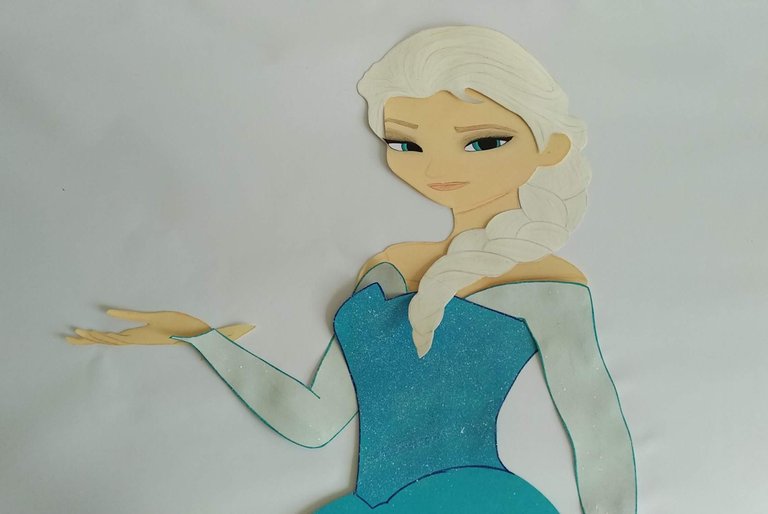
- Con todas las piezas secas y recortadas, ensamblar las partes según el diseño original para crear el personaje. Las piezas deberán pegarse con silicón frio en las áreas donde se conectan unas con otras.
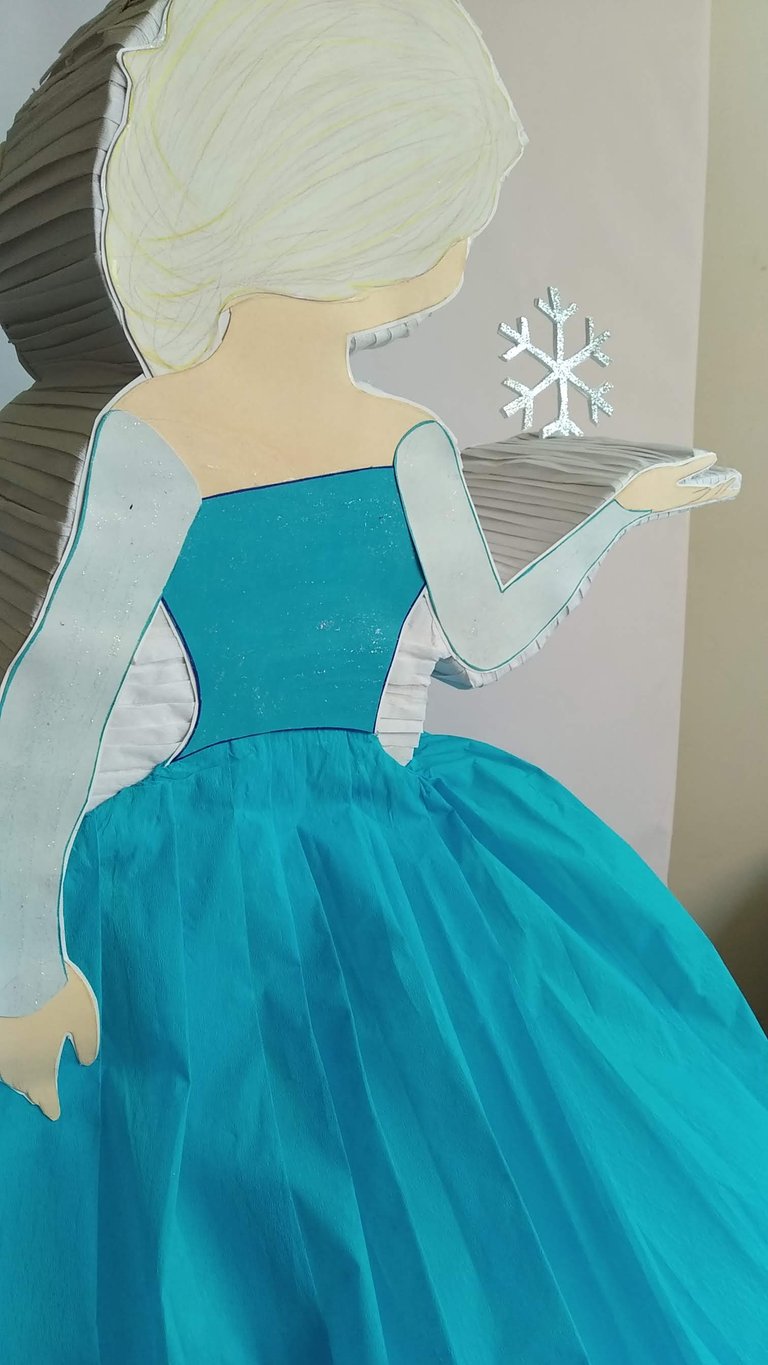
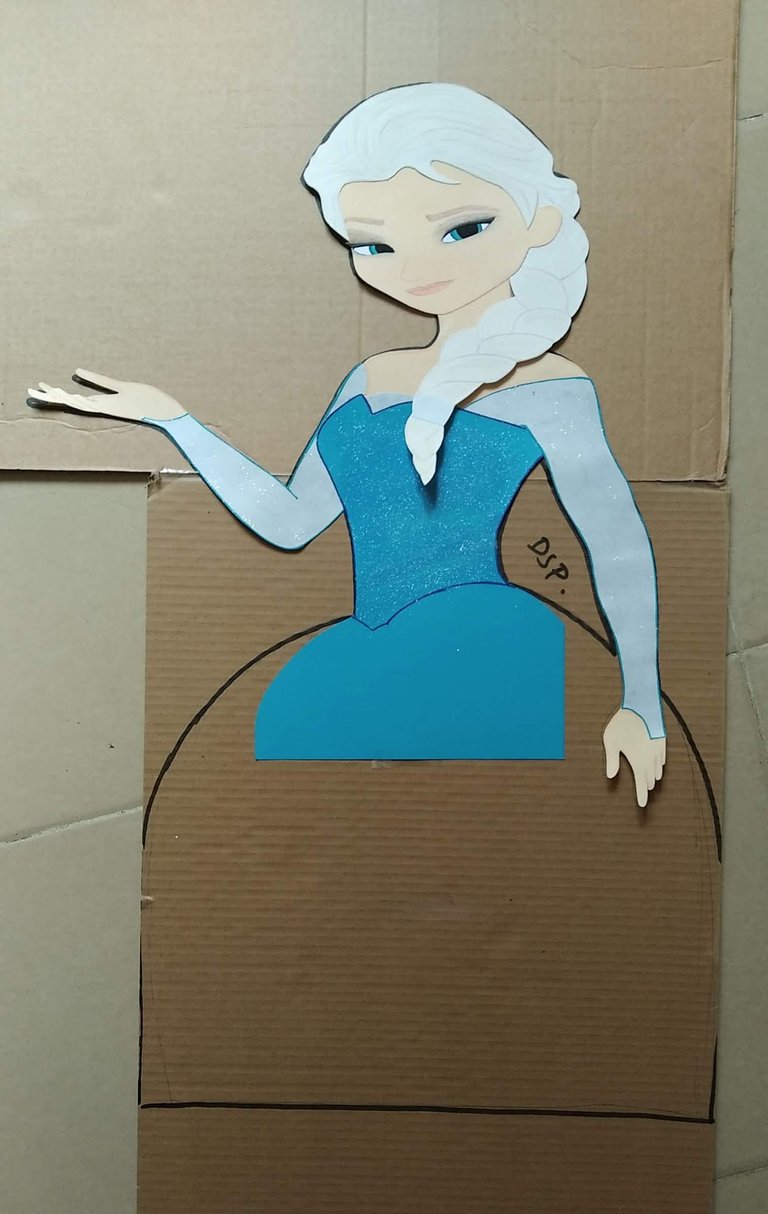
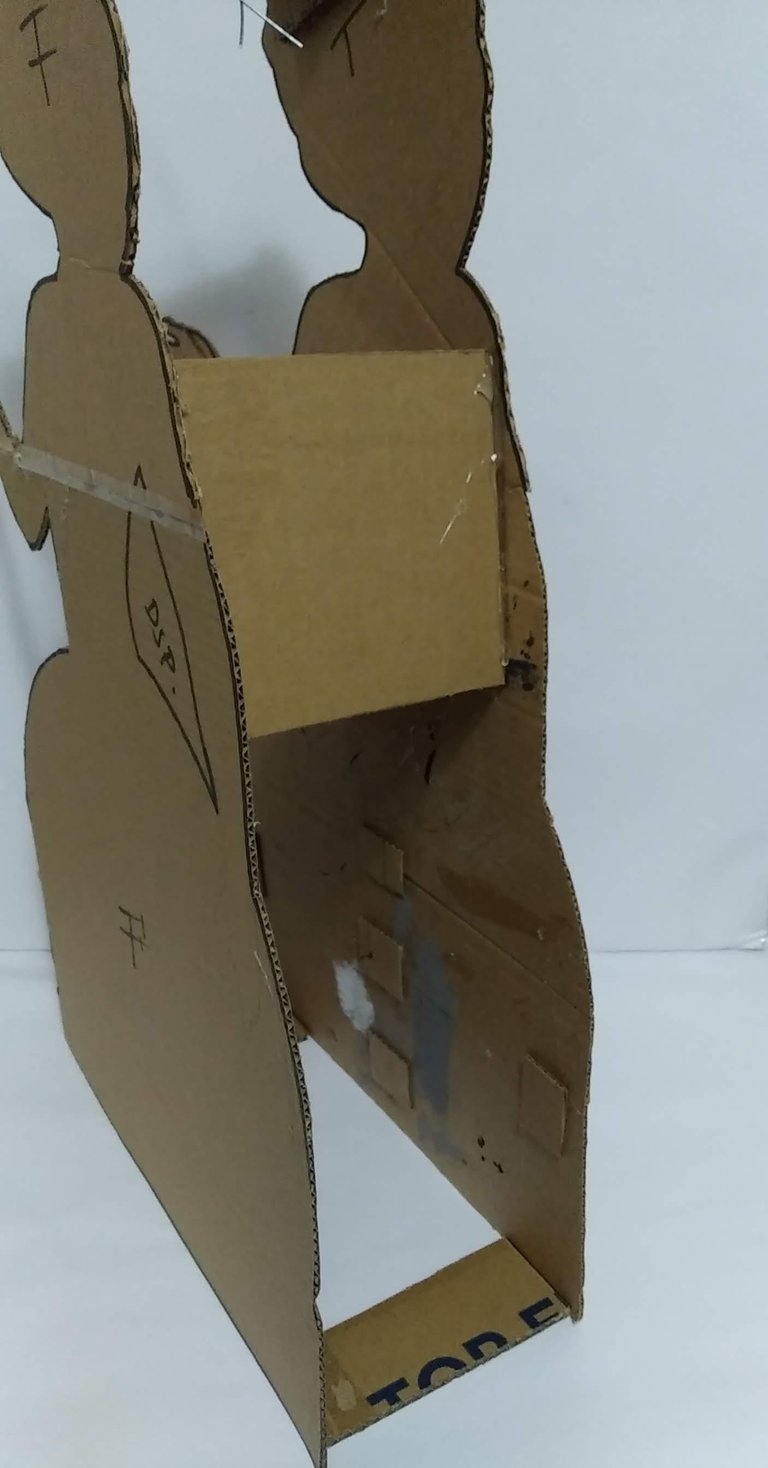
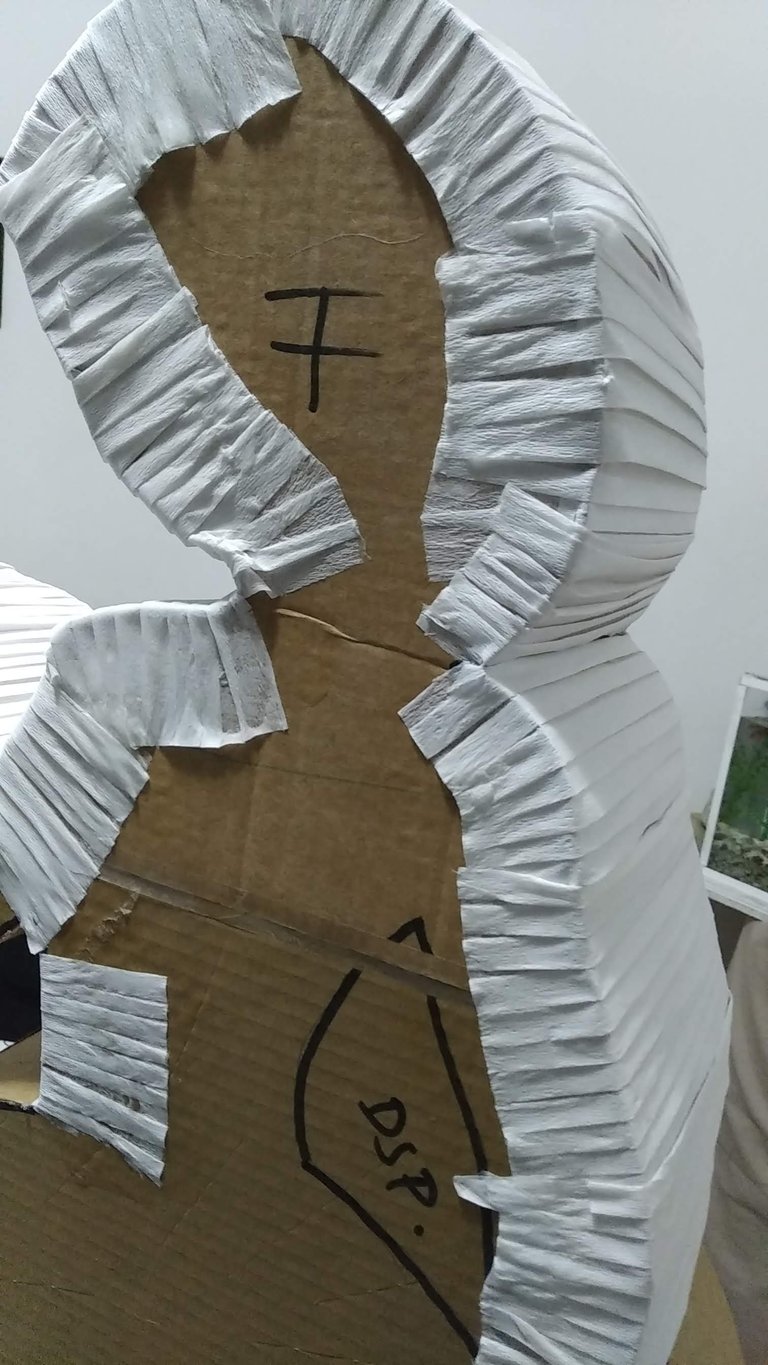
- Con la pieza de Elsa lista, colocar sobre el cartón fino y marcar todo el borde con un lápiz, y cortar con un cutter. Luego de cortada la primera pieza, marcar y cortar la segunda pieza, la posterior.
- Con pequeños pedazos de cartón duro, de 15 cm de ancho, unir ambas caras de la piñata. Para fijarlos utilizar silicón caliente.
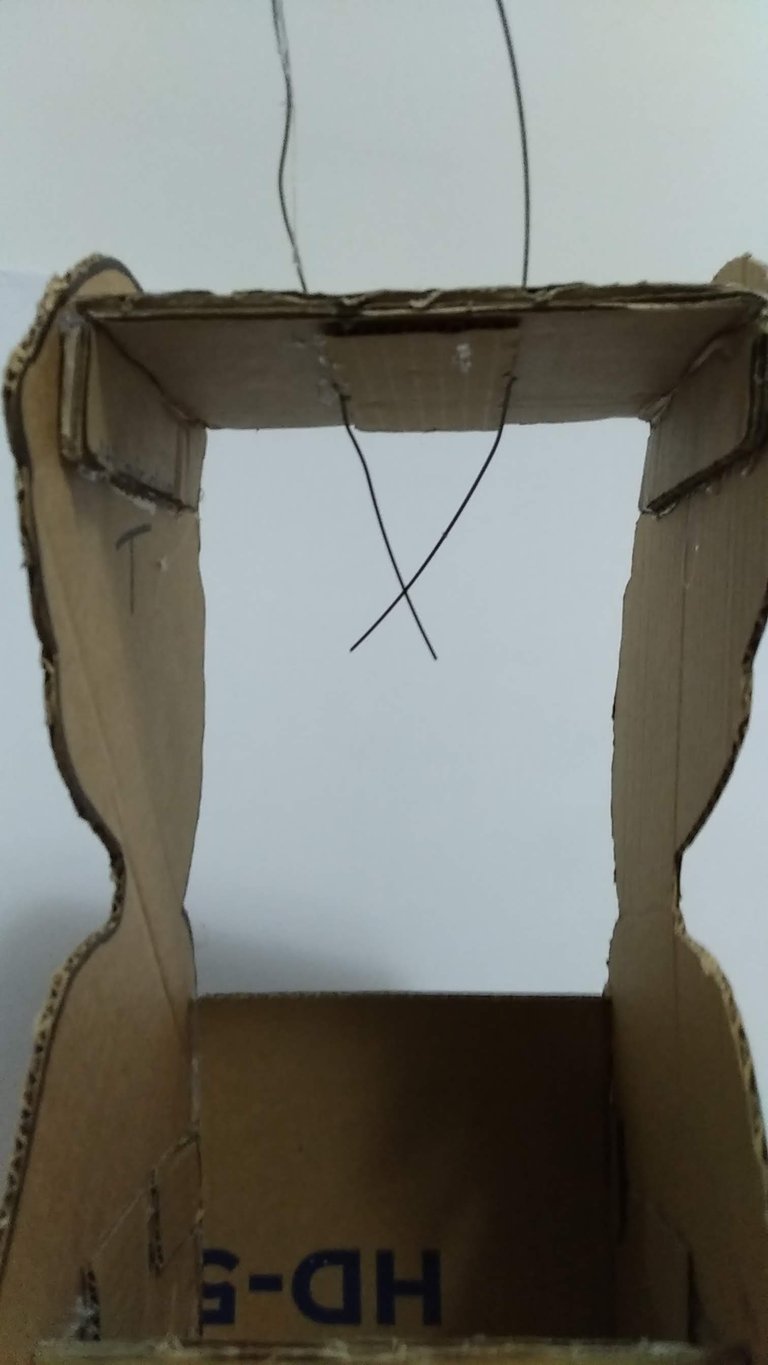
- A la parte superior de la Piñata colocar un trozo de alambre por donde se guindará. Este alambre deberá quedar bien apretado a fin de evitar se mueva y afloje el cartón.
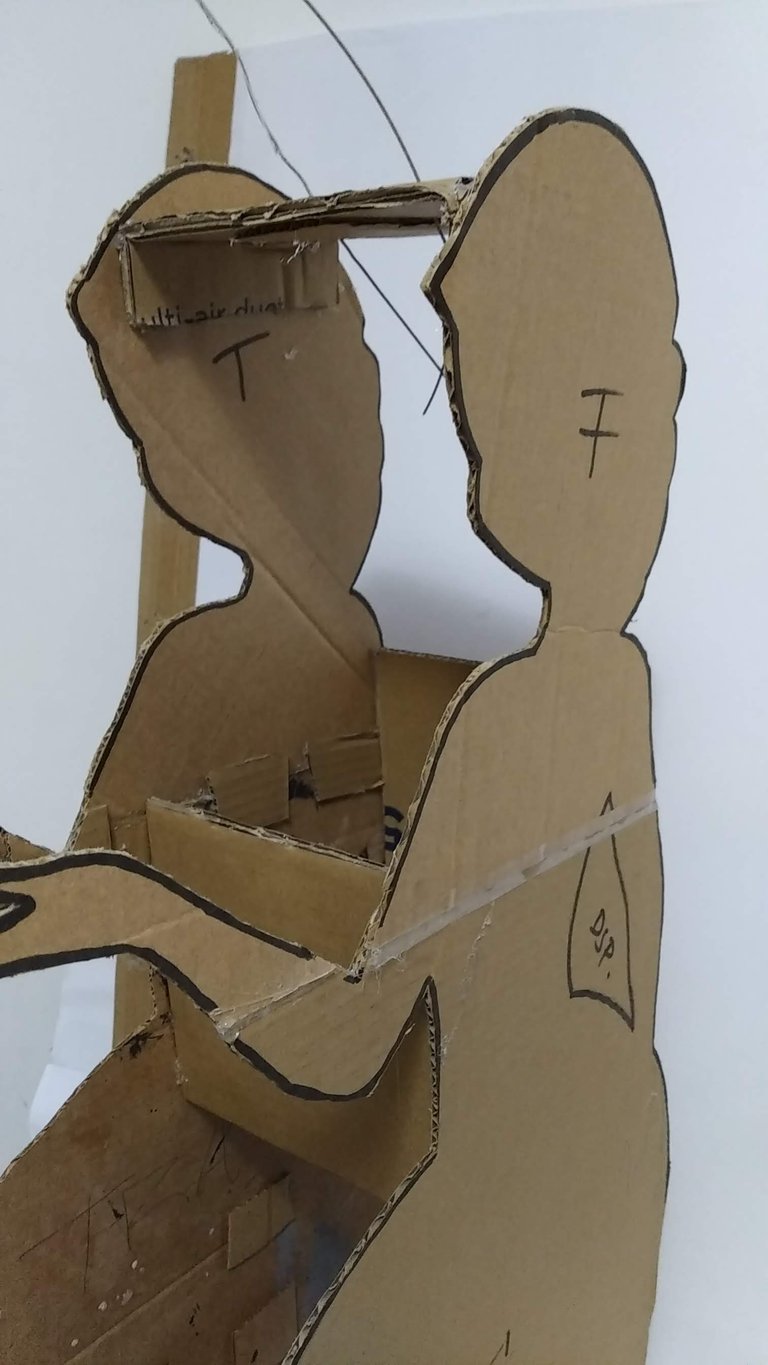
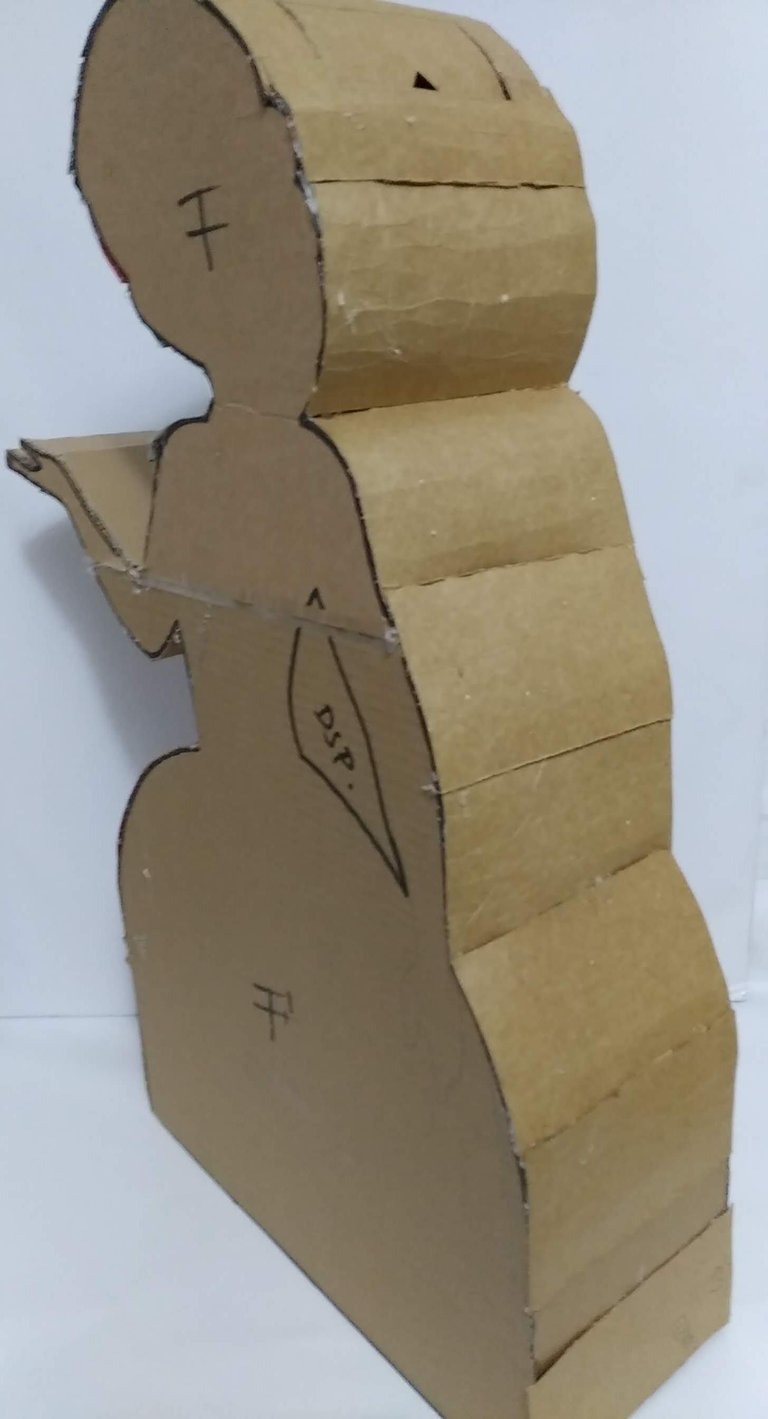
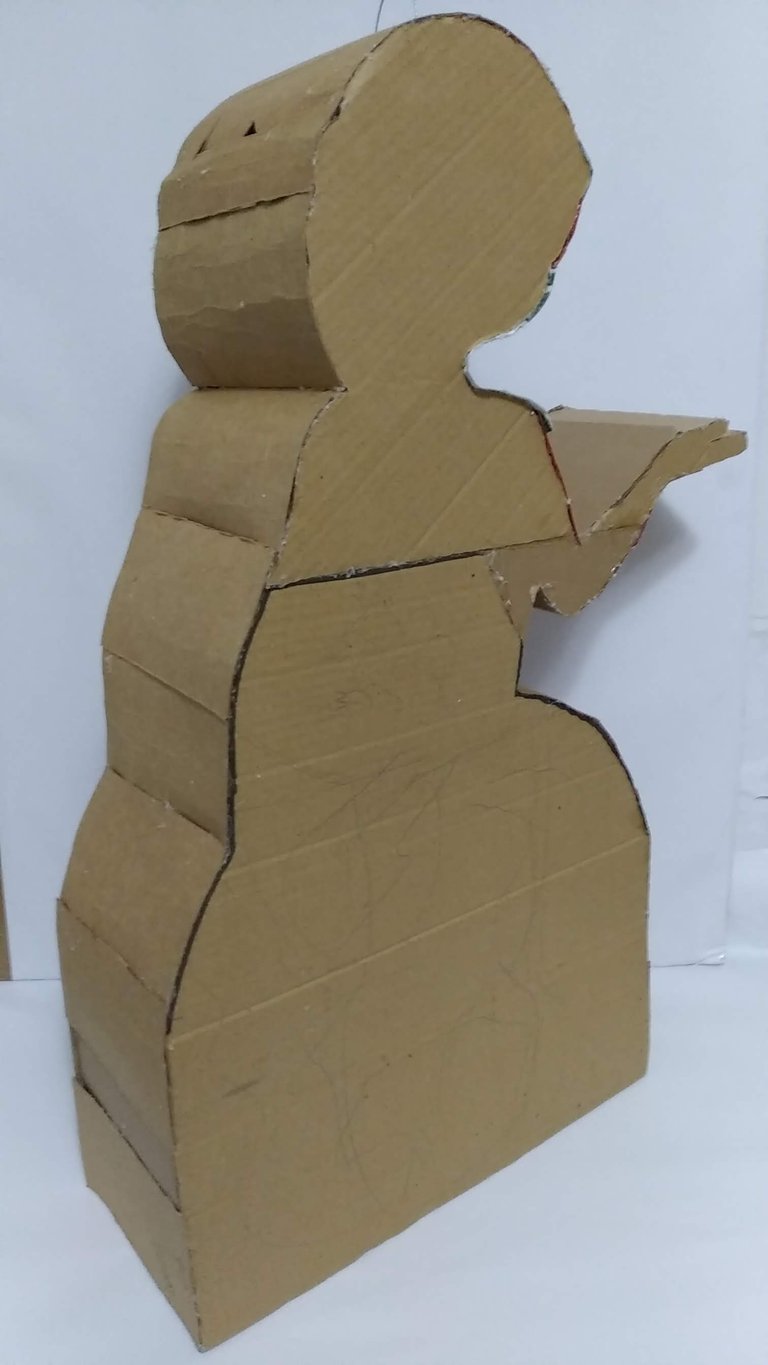
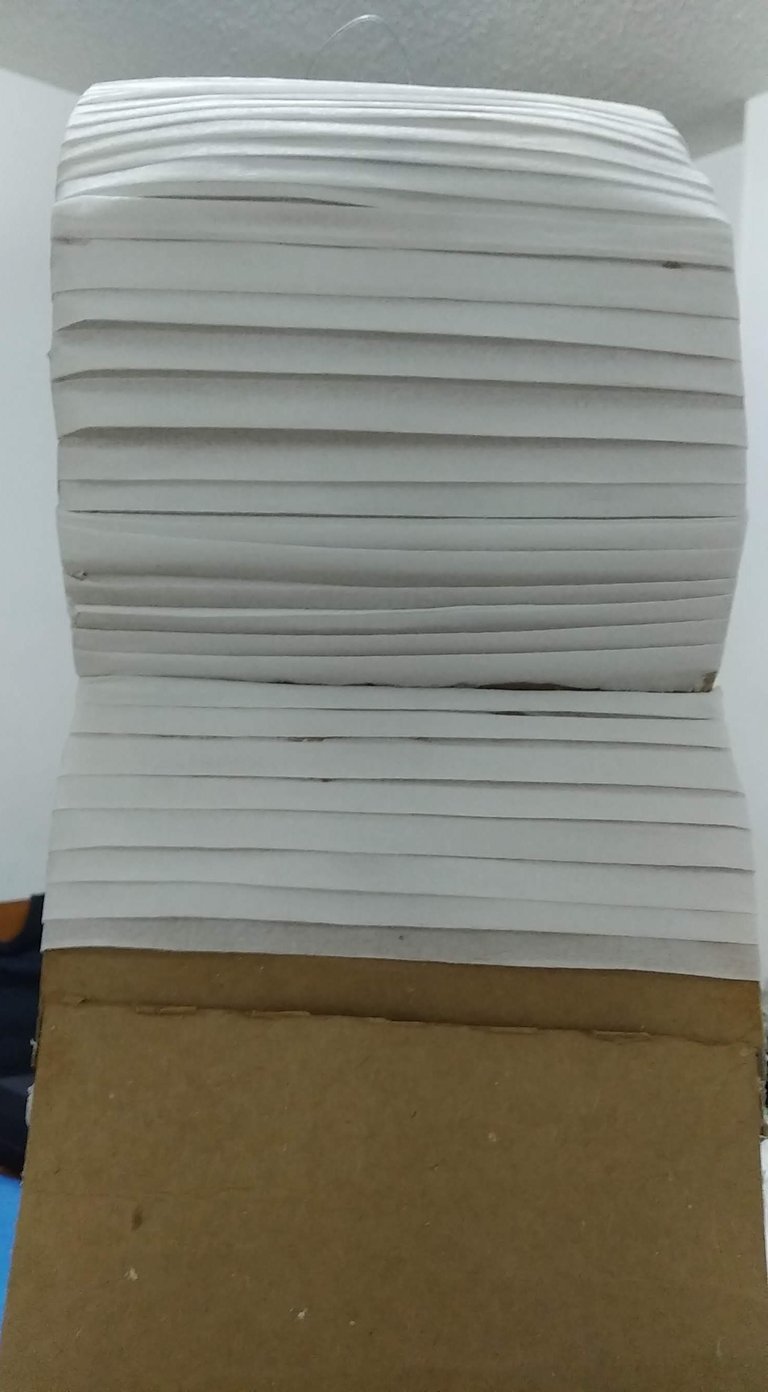
- Una vez unidas ambas caras con trozos de cartón duro, forrar con cartón liviano previamente preparado, es decir recortado y enrollado para ayudarle a que tome mejor la forma de la muñeca. El cartón deberá fijarse por todos sus bordes con silicón caliente.
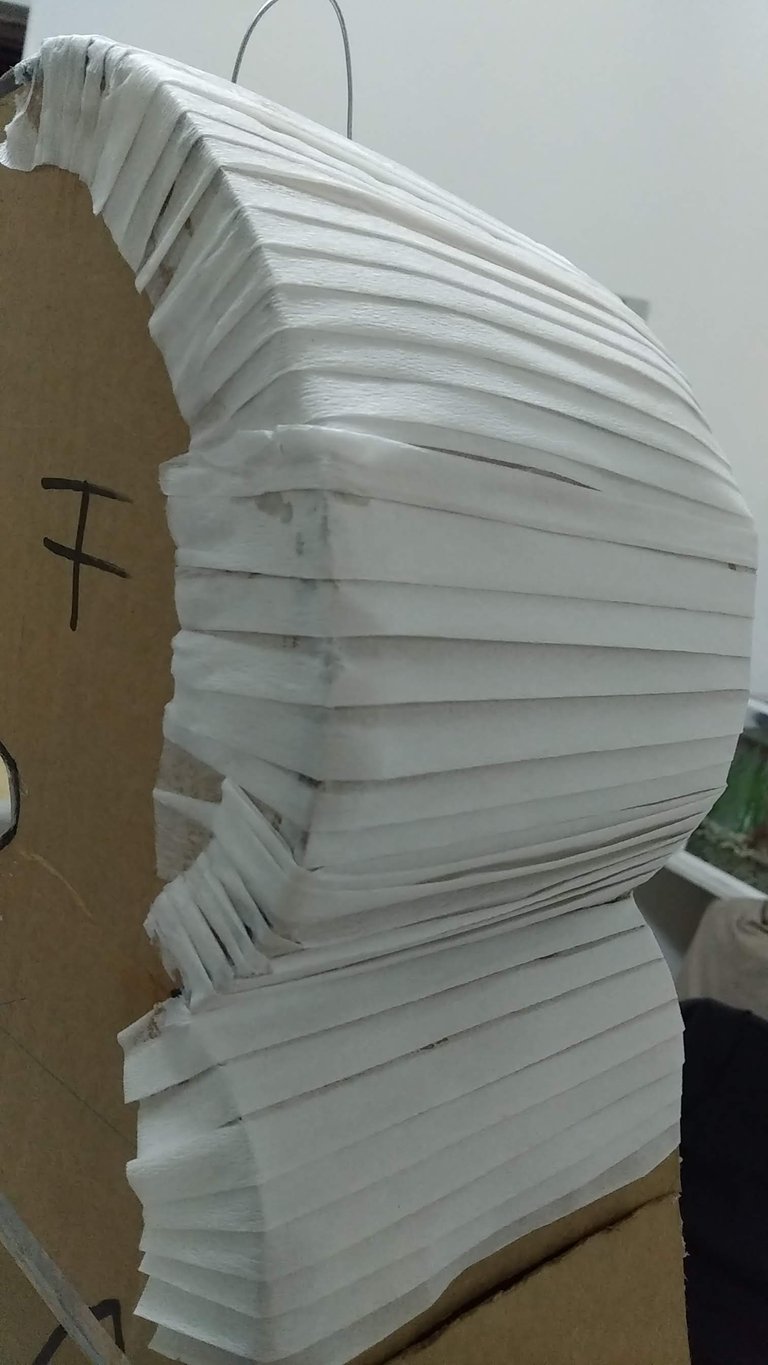
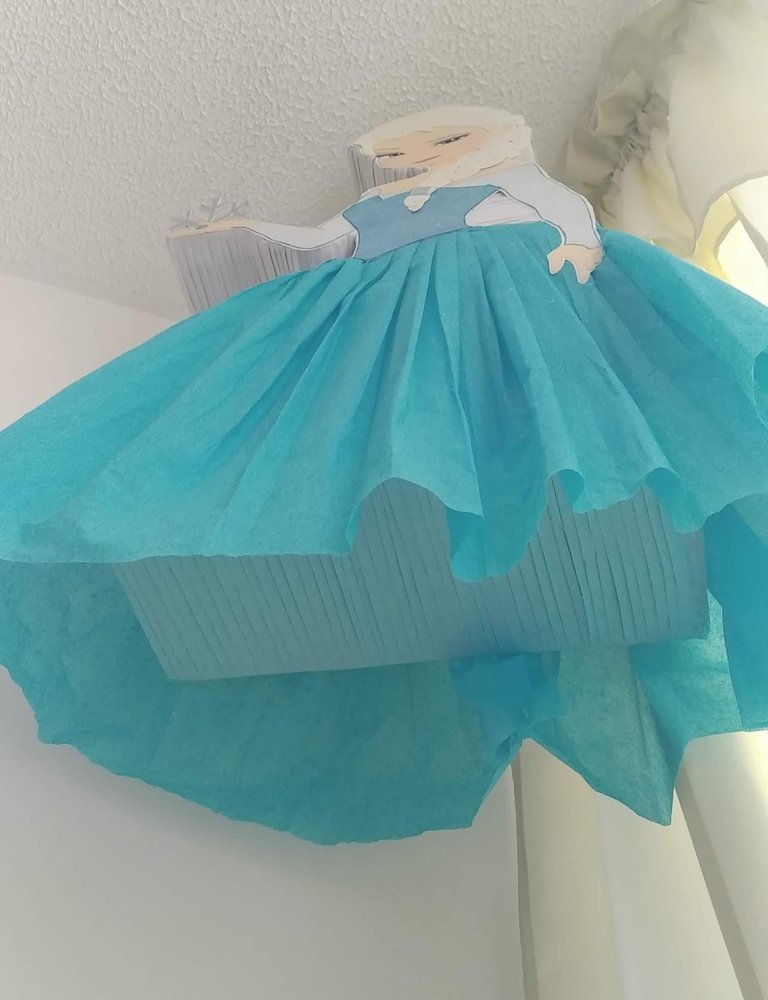
- El orificio para introducir los juguetes y golosinas puede hacerse por cualquier lado y deberá hacerse antes de forrarse con el papel crepé.
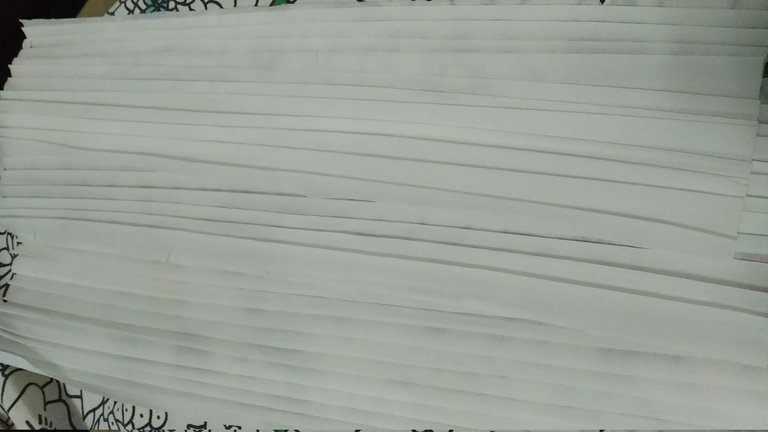
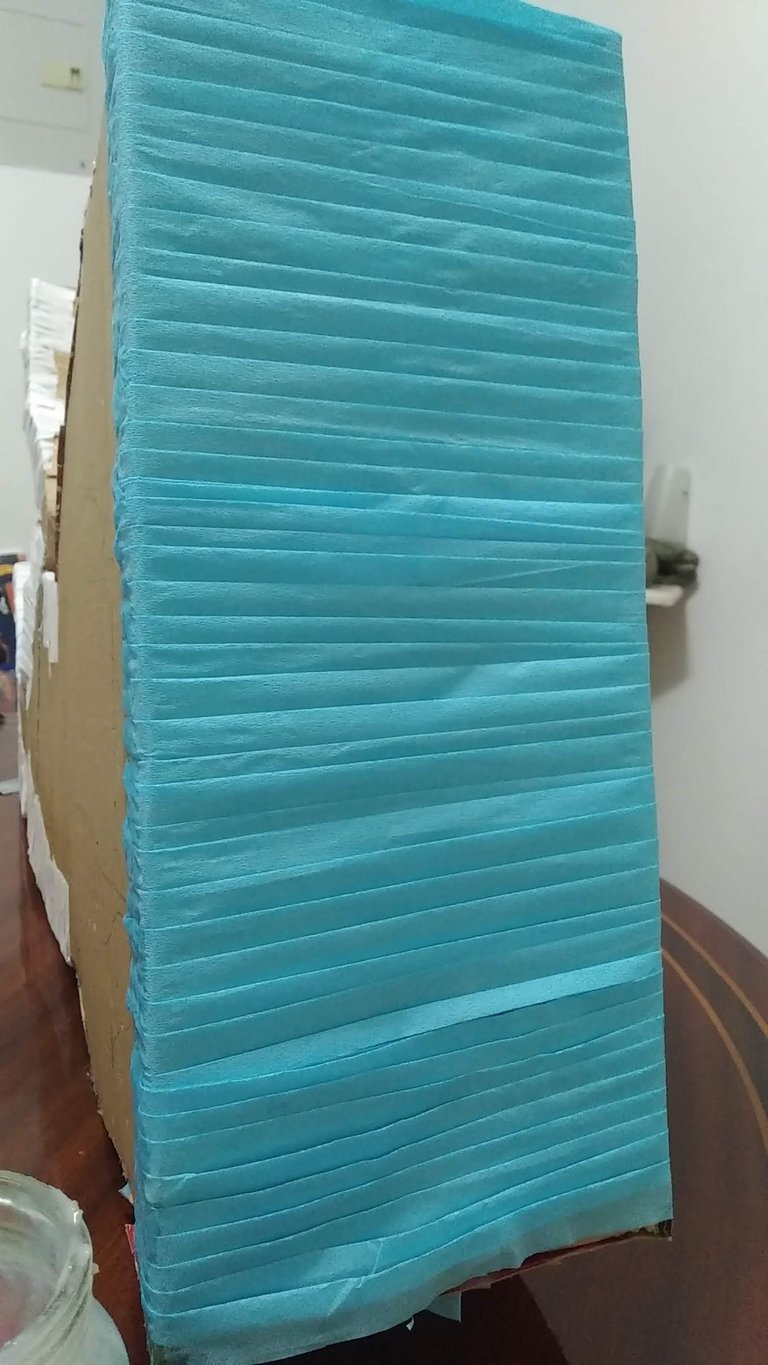
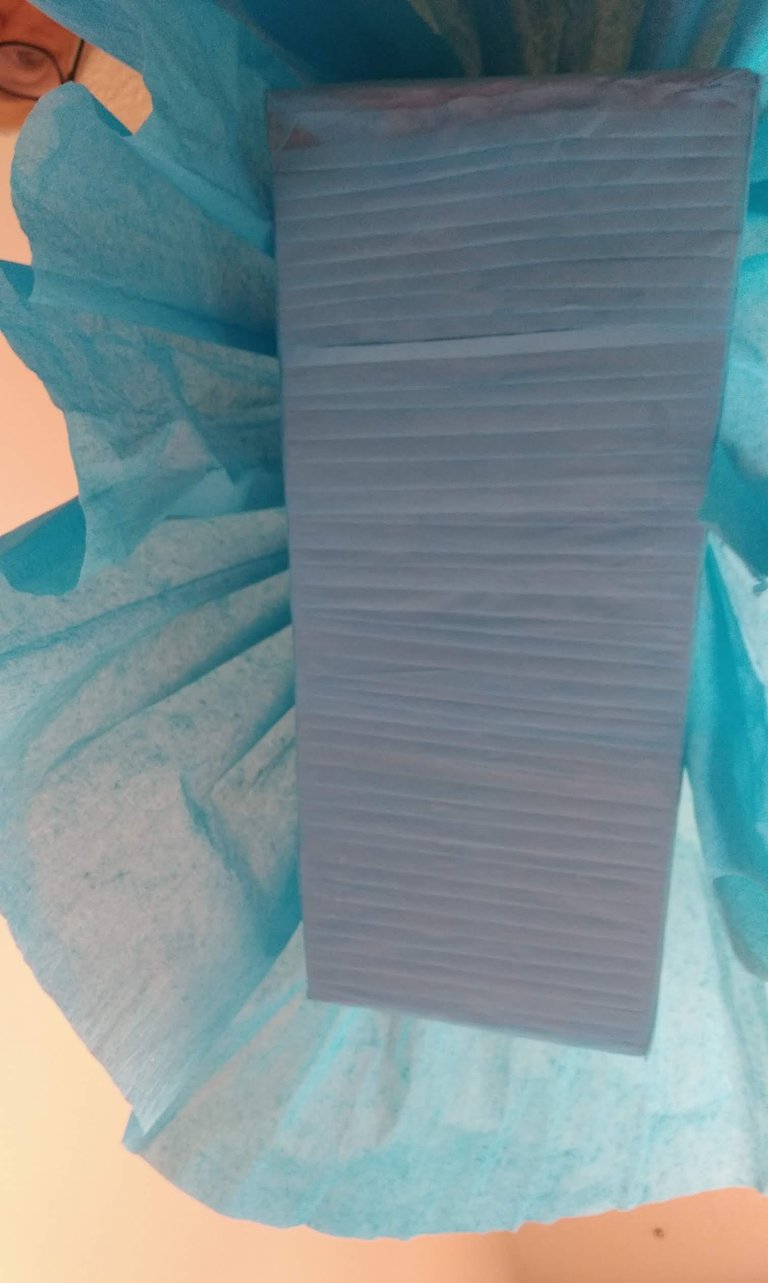
- La parte superior llevará papel crepé blanco y la inferior azul. Como es una piñata delicada, la técnica utilizada para la parte superior es el “pliego”, es decir, en vez de picar el papel en flecos, se pega en pliegos para un acabado más prolijo. Esta técnica se utilizará solo en los bordes de profundidad.
- Forrado todos los bordes, pegar con silicón frío la figuras de Elsa, en la parte frontal y reversa.
- En la parte inferior de la piñata, justo en la cintura de la figura, se creara un efecto de faldón para darle un acabado maravilloso. Para lograr este efecto, se deberá arruchar el papel crepé e ir pegando con silicón caliente para un secado inmediato.
- En el foami escarchado plateado, marcar y cortar la forma de un copo de nieve y pegar a la mano de la piñata. Así mismo, pegar un pedacito en lo que seria la cola de la clineja.
- Terminar el trabajo colocando detalles con escarcha plateada en cabello, vestido y faldón.
- ¡listo a disfrutar de la magia de los creado!
English
Hello Friends
I hope this week is full of blessings and surprises for all of us.
Today I want to show you how to make a piñata of Elsa from Frozen 1. It is a piñata made with love for a cute little girl fan of this character. It is very original, because it mixes a flat cardboard figure on a cardboard and crepe figure. The effect was wonderful and the honoree didn't even want to be touched (laughs).
At first glance it may seem complex to make, but I assure you that it is not, so I invite you to create your own work and surprise the most beautiful of the house, the children ....
Without further ado and hoping you enjoy the work done with love, I leave you the materials used, the process and the images of the work.
- Thin cardboard (for both sides and sides).
- Color cardboard according to the design: deep blue, light blue, white, skin.
- Colored markers.
- Assorted colors (wood or wax).
- Eye shadow.
- Cold paint, colors: blue, black and white (for the eyes).
- Blue frosting (fine texture).
- Thick wire (a piece for hanging).
- Colored crepe paper: blue and white.
- Silver-colored frosted Foami.
- Cold silicone
- Hot silicone
- Scissors
- Cutter
- Pencil
- Draw the design of Elsa in the measurements you want. This piñata in total, has a measurement of 65 cm high by 50 cm wide and a depth of 15 cm.
- Mark the different parts that make up the design (face, arms, chest, etc.) on the colored cards that correspond to each piece and cut them out. Keeping in mind that you will have to cut double (front and reverse) of each piece.
- Once all the pieces are cut out, work separately. The part of the body corresponding to the dress at the top, apply fine blue frosting and let it dry very well.
- The pieces corresponding to the arms, apply fine pearly frosting or pearly cold paint, this to give the effect of brightness characteristic of the character. Let dry very well.
- The piece corresponding to the hair, do it on white cardboard and to the design, with the help of the colors brown, gray, black and yellow make lines that simulate the hair. Once all the colored lines are ready, apply a coat of cold white paint. Let it dry very well and then cut out carefully so that Elsa's hairline is well defined.
- The piece corresponding to the face should be worked differently. The eye area should be cut with a cutter and painted separately on white cardboard. To avoid excess color, apply real eye shadow in the eyelid area and blend very well. The lips should be painted with an intense pink color.
- With all the pieces dry and cut out, assemble the parts according to the original design to create the character. The pieces should be glued with cold silicone in the areas where they connect with each other.
- With the Elsa piece ready, place it on the thin cardboard and mark the entire edge with a pencil and cut with a cutter. After cutting the first piece, mark and cut the second piece, the back piece.
- With small pieces of hard cardboard, 15 cm wide, join both sides of the piñata. To fix them use hot silicone.
- At the top of the Piñata place a piece of wire where it will be hung. This wire should be well tightened in order to avoid moving and loosening the cardboard.
- Once both sides are joined with pieces of hard cardboard, cover with light cardboard previously prepared, that is to say, cut and rolled to help it take the doll's shape better. The cardboard should be fixed on all edges with hot silicone.
- The hole to insert the toys and candies can be made on any side and should be made before lining with the crepe paper.
- The upper part will have white crepe paper and the lower part will have blue crepe paper. As it is a delicate piñata, the technique used for the top is the "folding", that is, instead of cutting the paper into bangs, it is glued in folds for a neater finish. This technique will be used only on the deep edges.
- Once all the edges are lined, glue the Elsa figures on the front and back with cold silicone.
- At the bottom of the piñata, just at the waist of the figure, create a skirt effect to give it a wonderful finish. To achieve this effect, crepe paper should be crumpled and glued with hot silicone for immediate drying.
- On the silver frosted foami, mark and cut out the shape of a snowflake and glue it to the piñata's hand. Likewise, glue a small piece on what would be the tail of the clineja.
- Finish the job by placing details with silver frosting on the hair, dress and skirt.
- Ready to enjoy the magic of the created ones!
Translated with www.DeepL.com/Translator (free version)
![IMG_20210523_234931.jpg]  )
)


SALUDOS / REGARDS
Todas las Fotos fueron tomadas con mi teléfono Redmi 7A.
Contenido original de @keco (fotos y texto) - Todos los derechos reservados Publicado en HIVE así como en mi instagram : http://instagram.com/carton_pintura_algo_mas
All Photos were taken with my Redmi 7A phone.
Original content from @keco (photos and text) - All rights reserved Posted on HIVE as well as on my instagram: http://instagram.com/carton_pintura_algo_mas
Your content has been voted as a part of Encouragement program. Keep up the good work!
Use Ecency daily to boost your growth on platform!
Support Ecency
Vote for Proposal
Delegate HP and earn more
Gracias @ecency por el apoyo, un fuerte abrazo.
Saludos, bendiciones y éxitos.
Thank you @ecency for the support, a big hug.
Greetings, blessings and success.
ohh! esa piñata incluye maquillaje jajaja :) esta genial el trabajo y es grande :) esa nene va disfrutar su fiesta... Aprovecho a darle amor a tu post #malomilove
Hola @malomi, gracias por revisar y comentar. Me gusta a los rostros aplicarle maquillaje, es menos denso que los marcadores y pinturas y el efecto queda realmente bien... siempre suave y jamas exagerado. Te cuento la niña no quería ni que le tocaran la piñata, quedó enamorada jejeje.
Saludos, bendiciones y éxitos.
Te quedo muy linda la piñata :3
Hola @rawecz, gracias por visitar y comentar.
Saludos, bendiciones y éxitos.
Wow, que trabajo tan bonito, me encantaron los detalles del rostro de Elsa, quedo super bien.
Hola @mariale07, gracias por visitar y comentar. El rostro es siempre un punto clave en cualquier creación, hay que tratar de mantener la naturalidad lo más que se pueda, me alegra te gusten los detalles del rostro. Básicamente tiene sombra, un pequeño delineado negro y color en los labios. Lo rosado de las mejillas es tiza rosada, es fantástica para este tipo de trabajo en cartulinas.
Saludos, bendiciones y éxitos.
Congratulations, your post has been upvoted by @dsc-r2cornell, which is the curating account for @R2cornell's Discord Community.
Enhorabuena, su "post" ha sido "up-voted" por @dsc-r2cornell, que es la "cuenta curating" de la Comunidad de la Discordia de @R2cornell.
Hola @dsc-r2cornell y @blessed-girl, gracias por apreciar mi piñata y tomarla en cuenta para curación.
Saludos, bendiciones y éxitos.
Hi @dsc-r2cornell and @blessed-girl, thanks for appreciating my piñata and taking it into account for healing.
Greetings, blessings and success.
Te quedó espectacular esa piñata! Me hizo recordar cuando mi mamá me hizo una de la princesa Aurora, la bella durmiente. No quería que nadie la tocara, me encantaba 💜 mi mamá también me hacía todas las piñatas. La tuya quedó excelente!