Airplane Crochet /avion Crochet


I am a lover of crochet, crafts and everything you can do with your hands, I also love to share my knowledge with others, because I also learn a lot from other people, this is my first tutorial and I hope that you like it, This is a beautiful airplane that can be used as a key ring, as a mobile for the cradle of children, as a toy, in short, whatever your imagination desires, enjoy it.
This tutorial is for people with medium knowledge in weaving, although if you are a beginner is a great challenge that I'm sure you can achieve
Supplies
knitting needle or knitting crochet (the number of the needle will depend on what thread thickness you are using)
Crochet yarns for weaving (different colours)
Needle
Thread to sew the pieces
´
..........................
Español
Soy amante del crochet, las manualidades y todo lo que puedas hacer a mano, ademas me encanta compartir mis conocimientos con las demás personas, pues también aprendo mucho de otros, este es mi primer tutorial y pues espero que se les haga fácil y les guste Este es un hermoso avión que puede ser usado Como llavero, Como móvil para la cuna de los niños, como juguete, en fin, lo que tu imaginación desee, que lo disfrutes.
Este tutorial es para personas con conocimiento medio en el tejido, aunque si eres principal es un gran reto que estoy seguro que puedas lograr
Materiales
aguja de tejer o ganchillo de tejer (el número de la aguja dependera de Que grosor de hilos estes utilizando)
Hilos crochet para tejer (diferentes colores)
Aguja
Hilo para unir las piezas
Step 1: Body / Cuerpo
First we must know the abbreviations of the points to make our plane
ca:chain
pb: low point
Inc. increment (two low points on each previous chain)
dis: diminution (a low point in two previous chains)
Let's get started!
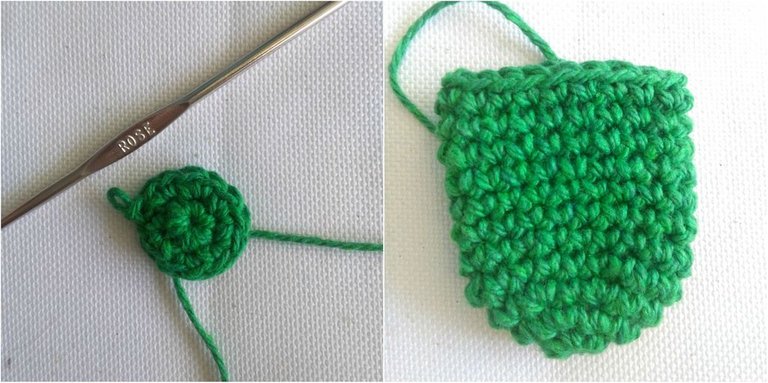
With green color (you can make it the color you want)

Round 1: we make a magic ring, 6 pb (6)
Round 2: 1 inc in each previous pb (12)

Round 3: 1 pb, 1 inc, 1pb and so on for the entire lap (18)
We change to orange
Round 4: 1pb,1pb, 1 inc, 1pb, 1pb and so on for the whole lap (24)
Roun 5: 1 bp on each previous bp (24)
We change to yellow

Round 6: 1 pb, 1pb, 1pb, 1 inc, 1pb , 1pb, 1pb, 1pb and so on for the entire lap (30)
Round 7: 1 bp on each previous bp (30)
Round 8: 1pb, 1pb, 1pb, 1pb, 1 inc, 1pb, 1pb, 1pb, 1pb, 1pb and so on for the entire lap (36)
tips: I have placed a piece of thread of another color to mark where I have started to make the turns and so take control (see photo 3)
Round 9-17: 1 pb on each previous pb (central part of the body, there are 8 laps)
Round 18: 1pb, 1pb, 1pb, 1pb, 1 dis , 1pb, 1pb, 1pb, 1pb, 1pb and so on for the entire lap (30)
Round 19: 1 bp on each previous bp (30)
Round 20: 1 pb, 1pb, 1pb, 1 dis, 1pb , 1pb, 1pb, 1pb and so on for the entire lap (24)
Round 21: 1 bp on each previous bp (24)
Round 22: 1pb,1 pb, 1 dis, 1 pb, 1pb and so on for the whole lap (18)
Round 23: 1 bp on each previous bp (18)
Round 24: 1 pb, 1 dis, 1 pb and so on for the whole lap (12)
Round 25: 1 bp on each previous bp (12)
We fill in (See photo 5)
Round 26: 1 dis, 1 dis and so on for the whole lap (6)
Round 27: 1 bp on each previous bp (6)

We close and cut the thread.
Español
Primero debemos conocer las abreviaciones de los puntos para realizar nuestro avioncito
ca:cadeneta
pb: punto bajo
Inc. incremento (dos puntos bajos en cada cadeneta anterior)
dis: diminucion ( un punto bajo en dos cadenetas anteriores)
¡Comencemos!
Con color verde (puedes hacerlo del color que desees)
Ver foto 1
Vuelta 1: hacemos un anillo magico, 6 pb (6)
Vuelta 2: 1 inc en cada pb anterior (12)
Ver foto 2
Vuelta 3: 1 pb, 1 inc, 1pb y asi por toda la vuelta (18)
Cambiamos a color naranja
Ver foto 2
Vuelta 4: 1pb,1 pb, 1 inc, 1 pb, 1pb y asi por toda la vuelta (24)
Vuelta 5: 1 pb en cada pb anterior (24)
Cambiamos a color amarillo
Ver foto 3
Vuelta 6: 1 pb, 1pb, 1pb, 1 inc, 1pb , 1pb, 1pb y asi por toda la vuelta (30)
Vuelta 7: 1 pb en cada pb anterior (30)
Vuelta 8: 1pb, 1pb, 1pb, 1pb, 1 inc, 1pb, 1pb, 1pb, 1pb y asi por toda la vuelta (36)
tips: he colocado un pedacito de hilo de otro color para marcar donde he comenzao a hacer las vueltas y asi llevar el control (ver foto 3)
Vuelta 9 -17 : 1 pb en cada pb anterior (parte central del cuerpo, son 8 vueltas)
Vuelta 18: 1pb, 1pb, 1pb, 1pb, 1 dis , 1pb, 1pb, 1pb, 1pb y asi por toda la vuelta (30)
Vuelta 19: 1 pb en cada pb anterior (30)
Vuelta 20: 1 pb, 1pb, 1pb, 1 dis, 1pb , 1pb, 1pb y asi por toda la vuelta (24)
Vuelta 21: 1 pb en cada pb anterior (24)
Vuelta 22: 1pb,1 pb, 1 dis, 1 pb, 1pb y asi por toda la vuelta (18)
Vuelta 23: 1 pb en cada pb anterior (18)
Vuelta 24: 1 pb, 1 dis, 1pb y asi por toda la vuelta (12)
Vuelta 25: 1 pb en cada pb anterior (12)
Rellenamos (Ver foto 5)
Vuelta 26: 1 dis, 1 dis y asi por toda la vuelta (6)
Vuelta 27: 1 pb en cada pb anterior (6)
Cerramos y cortamos el hilo.
Step 2: Propeller / Helice
Propeller / Helice

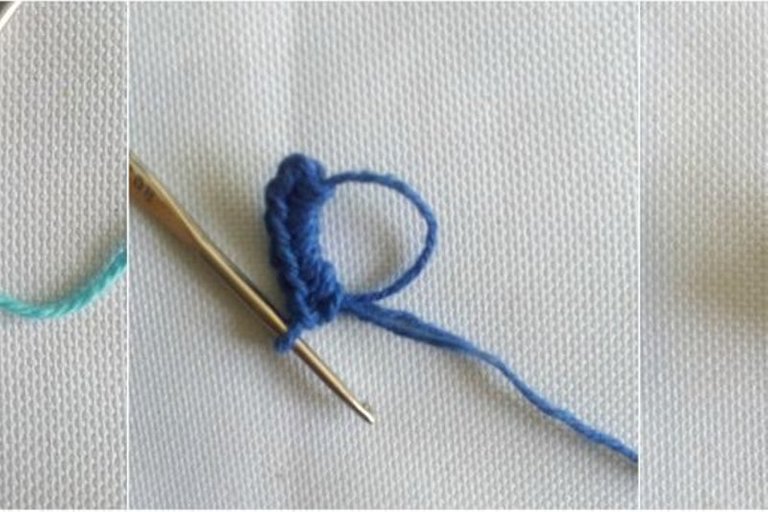
In blue
Round 1: we make a magic ring, 5 pb (5)
Round 2: inc in each previous pb (10)
Round 3 - 6 : 1 bp at each previous low point (10, that's 4 laps)
Round 7: 1pb, 1 dis, 1pb and so on for the whole lap (5)
Round 8: 1 bp on each previous bp (5)
Round 9: 1 pb, 1 inc, 1pb and so on for the entire lap (10)
Round 11-14 : 1 bp on each previous bp (10, that's 4 laps)
Round 15: 1 pb, 1 dis, 1 pb and so on for every lap (5)
We close and cut the thread.
Propeller button (optional)
In red
Round 1: We make a magic ring, 6 pb (6)
Round 2 : 1 bp on each previous bp (6)
We close and cut the thread.
Español
En color azul
Vuelta 1: hacemos un anillo mágico, 5 pb (5)
Vuelta 2: inc en cada pb anterior (10)
Vuelta 3 – 6 : 1 pb en cada punto bajo anterior (10, son 4 vueltas)
Vuelta 7: 1pb, 1 dis, 1pb y asi por toda la vuelta (5)
Vuelta 8: 1 pb en cada pb anterior (5)
Vuelta 9: 1 pb, 1 inc, 1pb y asi por toda la vuelta (10)
Vuelta 11-14 : 1 pb en cada pb anterior (10, son 4 vueltas)
Vuelta 15: 1 pb, 1 dis, 1 pb y asi por toda vuelta (5)
Cerramos y cortamos el hilo.
Boton de la helice (opcional)
En color rojo
Vuelta 1: Hacemos un anillo mágico, 6 pb (6)
Vuelta 2 : 1 pb en cada pb anterior (6)
Cerramos y cortamos el hilo.
Step 3: Side Wings ( X 2) / Alas Laterales
English
Round 1: we make a magic ring, 6 pb (6)
Round 2: 1 inc in each previous pb (12)
Round 3: 1 pb, 1 inc, 1pb and so on for the entire lap (18)
Round 4-10: 1 bp on each previous bp (18, that's 6 laps)
We close and cut the thread
Español
Vuelta 1: hacemos un anillo magico, 6 pb (6)
Vuelta 2: 1 inc en cada pb anterior (12)
Vuelta 3: 1 pb, 1 inc, 1pb y asi por toda la vuelta (18)
Vuelta 4-10: 1 pb en cada pb anterior (18, son 6 vueltas)
Cerramos y cortamos el hilo.
Step 4: Upper Wing (x1) / Ala Superior
Upper Wing (x1) / Ala Superior
English
Round 1: we make a magic ring, 6 pb (6)
Round 2: 1 inc in each previous pb (12) Lap 3-5: 1 bp on each previous bp (12, that's 3 laps)
We close and cut the thread.
Español
Vuelta 1: hacemos un anillo magico, 6 pb (6)
Vuelta 2: 1 inc en cada pb anterior (12)
Vuelta 3-5: 1 pb en cada pb anterior (12, son 3 vueltas)
Cerramos y cortamos el hilo.
Step 5: Rear Wings (X2) / Alas Traseras (x2)

Rear Wings (X2) / Alas Traseras (x2)
English
Round 1: we make a magic ring, 8 pb (8)
Round 2-4: 1 pb on each previous bp (8, that's 3 laps) We close and cut the thread.
Español
Vuelta 1: hacemos un anillo magico, 8 pb (8)
Vuelta 2-4: 1 pb en cada pb anterior (8, son 3 vueltas)
Cerramos y cortamos el hilo.
Step 6: Windows / Ventanas

Windows / Ventanas
English
Round 1: we make a magic ring, 8 pb (8)
We close and cut the thread.
Español
Vuelta 1: hacemos un anillo magico, 8 pb (8)
Cerramos y cortamos el hilo.
Step 7: Assembly / Ensamblaje

English
We join all the pieces with needle and thread, if you want you can also stick with glue.
Ready!
Español
Unimos todas la piezas con aguja e hilo, si quieres también puedes pegar con
pega.
Listo!