You have your own website and would like to present your Steemit posts or your Steemit profile on your site? Then @mkt's Steemit Widget Generator is the right tool for you.

The Steemit Widget Generator is intuitive to use. You can select all options to be displayed in your widget and the generator does the rest by generating the appropriate code for you. Just insert it in the right place on your website and the whole thing will run. More on this below.
The options
As widget type you define what your widget should display at all. The following options are available:
- Profile – Profile overview with number of posts, followers, reputation etc. You can also hide each point by unchecking the corresponding box.

- Blog – Shows chronologically your Steemit contributions among each other. Use checkboxes to decide which details to display or not to display.

- Ticker – Displays the exchange rate of a selected currency
You can also display the Steemit standard categories HOT, NEW, TRENDING and your FEED.
The blog function is probably the most relevant one for integration into a website, which is why I would like to go into it in more detail.
If you choose the widget type "Blog" and enter your username (you can create this for every Steemian, not only for yourself), you will see the preview directly under the options. Now you can choose a Design. Default surrounds your post with a frame whose corner curves and colors you can influence. Condenser is a more modern layout without borders. Just try it out.
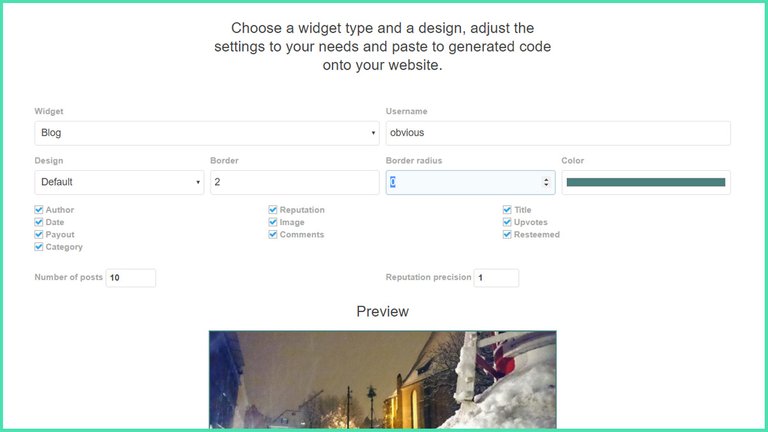
Blog options
All other options are relatively self-explanatory and can be viewed directly with the practical preview function in case of changes.
Once you have made your settings and are satisfied with the result, you can now scroll down and view the generated code.
This consists of two parts. The first part is a div container. You have to place it where you want your Steemit blog to appear on your website. The second part is the code that regulates the implementation. This must be placed in the source code of your website before the closing -tag.
Embed Steemit Blog in Wordpress
Since many people run a website based on Wordpress, here is the quick guide for integrating the Steemit blog on a Wordpress page:
- create a new page (e.g. Steemit Blog)
- copy the first part of the generated code (<div id="steemit-widgets-profile">) and paste it in the text editor (not in visual) of your new page
- publish the page
The second part must now be inserted directly into the source code of your theme. The easiest way is via the footer.php of your theme. And this is how it works:
Click on Design > Editor in the backend. Click on the footer.php in the file overview on the right side. The file opens in the editor. Depending on the theme you see little to a lot of code. Scroll down to the bottom and search the closing </body> tag. Now insert the second part of the generated code above the </body> tag and save the file.
Done. If you now call up your new Steemit Blog page, you will see your Steemit posts on your website.
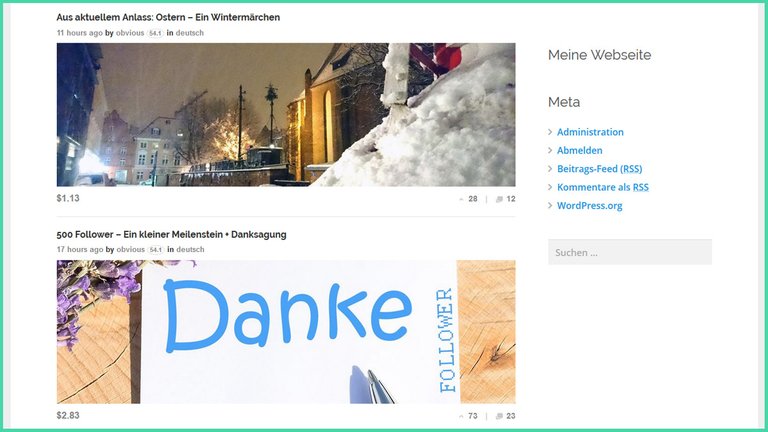
This is what it could look like
The solution via footer.php is not update secure, as long as you do not use a child theme. This means that if you update your theme, footer.php will be overwritten and your customizations will disappear. You can work around the problem with a child theme. You can find out how this works, for example, at https://codex.wordpress.org/Child_Themes
You can also insert the second part of the code using a plugin. There are several plugins that allow you to do this. One of these would be the WP Insert Code (https://de.wordpress.org/plugins/wp-insert-code/)
The generated code can be used on any system. You just need to know how to insert the second part of the code into the source code of your page. You will find enough instructions for each system if you ask Uncle Google :)
Steemit-Widget-Generator
- You can find the Steemit Widget Generator here: https://mktcode.github.io/steemit-widgets/generator.html
- An overview of all functions can be found here: https://mktcode.github.io/steemit-widgets/
On the overview page you can see all options for frontend output, so that you can adjust all variables if you want to design your own template, for example. @mkt has done a very cool job here. For that, my thanks.
Do you have any more questions? Then post them in the comments. I like to help :)
Diesen Beitrag gibt es auch in deutscher Sprache / This article is also available in German
Awesome. Thank you.