
Greetings to the Hive DIY community! I'm happy to be back with you all. It's been a very productive few days. I hope you're having a good week too.
As I mentioned before, my health has improved a bit, and I can now go out and do repairs at people's homes, not too far from my area, but it's progress.
I need to find some more time and get organized to post, so here I am again, sharing with you all.
This time, I'm showing you a repair I did on an Oster orange juicer. The client told me that one day the juicer stopped working and she left it stored in a drawer.

It's a very practical juicer, easy to clean, and despite its age, it looks quite good.

It's easy to disassemble, just remove the rubber supports that protect access to the screws. These models didn't use special screws; they're common Phillips screws, or as we usually call them here: spline screws.

The main problem with kitchen appliances is insects. They might not be noticeable, but if they find a way into an appliance, they'll invade it without hesitation.

I've seen microwaves, blenders, mixers, and many other appliances ruined by insect infestations. In this case, I had to disassemble it to clean and disinfect the entire interior and all the components.

After thoroughly cleaning the inside of the appliance, I soaked all the rusted screws in rust remover to try and restore those that were in good condition. I also had to wash the electric motor to remove the dirt so I could work without worry.

With everything ready, I disassembled the motor and all the parts, and upon disassembly, the problem became quite obvious when I found the broken parts loose inside the motor.

The armature or motor shaft in this model is a bar magnet surrounded by a kind of plastic cage, which centers it in its working position and acts as a horn or separator.

This is an example of planned obsolescence in design. Inevitably, with a certain amount of use, the plastic piece that centers the motor shaft would become damaged and eventually break, rendering the motor useless.
To save this motor, I had to rebuild the piece that centers the magnet, which is the motor's shaft.
The plastic was quite deteriorated and cracked. I had to secure it with clear tape and mount it in the vise. I generously applied cyanoacrylate glue to the cracks, then applied baking soda.

After drying, the repair was strong but very rough, so I had to carefully and patiently sand it to the correct size.

It had to be the right size and have a smooth surface so that it would rotate freely in its position inside the electric motor.

I reassembled the motor, and the original screws were salvaged. I put the whole assembly back together.

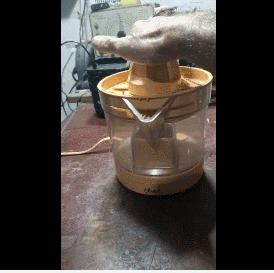
The image shows the juicer being tested; it's quite powerful.
We've salvaged a great appliance and saved it from planned obsolescence. It's a simple, attractive, and very useful device.
I'll try to organize myself better and post more often. The problem is that when I'm working outside the workshop, I can't take all the photos I'd like.
The bosses have fallen asleep, who knows when I'll be able to get up, hehe.


I used Google Translate for the English language.
I used TextStudio for the Spanish header.
I used GifCam for the GIF image in the post.
Unless otherwise stated, all images are my own screenshots.

Saludos para la comunidad DIY de Hive, me alegra estar con ustedes una vez mas, han sido días muy productivos. Espero que ustedes estén teniendo una buena semana también.
Como les contaba anteriormente, mi salud ha mejorado un poco ya puedo salir a hacer reparaciones a domicilio, no muy lejos de mi zona, pero ya es un avance.
Tengo que rascar algo mas de tiempo y organizarme para publicar, así que aquí estoy nuevamente compartiendo con ustedes.
En esta ocasión les presento una reparación que le realice a un exprimidor de naranjas de la marca Oster, la clienta me dijo que el exprimidor un día ya no funciono y lo dejo guardado en un cajón.
Es un exprimidor muy practico, fácil de limpiar y a pesar del tiempo luce bastante bien.
Es fácil desarmarlo, solo retire los soportes de goma que protegen el acceso a los tornillos, en estos modelos no se usaban tornillos especiales, son unos comunes tornillos philips o como solemos llamarles aquí: tornillos de estrías.
El principal mal de los electrodomésticos de la cocina son los insectos, puede que no se noten pero si encuentran como entrar en algún aparato lo invaden sin ningún miramiento.
He visto microondas, licuadoras, batidoras y muchos mas equipos arruinados por la invasión de insectos. En este caso tuve que desarmar para limpiar y desinfectar todo el interior y los componentes.
Después de un buen mantenimiento del interior del artefacto, deje todos los tornillos oxidados en remojo con antioxidante para tratar de recuperar los que estuviesen en las mejores condiciones, también. tuve que lavar el motor eléctrico para eliminar la suciedad y poder trabajar tranquilo.
Con todo listo desarme el motor y todas las partes y al desarmar se hizo bastante evidente la falla al encontrar las partes rotas sueltas adentro del motor.
El inducido o el eje del motor en este modelo es una barra de imán que esta rodeada por una especie de jaula plástica, que lo centra en su posición de trabajo y hace las veces de bocina o separador.
>Esta es una muestra del diseño orientado a la obsolescencia programada, inevitablemente con cierto tiempo de uso el plástico que centra el eje del motor se dañaría terminando por romperse, haciendo que el motor ya no funcionase mas.
Para salvar este motor tengo que reconstruir la pieza que centra el imán que es eje del motor.
El plástico esta bastante deteriorado y agrietado tuve que sujetarlo con cinta transparente y montarlo en la prensa, aplique generosamente cianocrilato en las grietas, luego le fui aplicando bicarbonato.
Después de secar, la terminación de la reparación era fuerte pero muy rustica, así que tuve que lijarlo con cuidado y paciencia para llevarlo a la medida correcta.
Tenia que quedar en la medida correcta y estar suave en la superficie, para que girar sin problemas en su posición adentro del motor eléctrico.
Arme el motor y los tornillos originales se pudieron recuperar, monte todo el conjunto nuevamente.
En la imagen muestro la pruebas del exprimidor, tiene bastante fuerza.
Hemos recuperado un buen artefacto y evitado una victima de la obsolescencia programada, es un electrodoméstico simple bonito y muy útil.
Voy a tratar de organizarme mejor y publicar mas seguido, lo complicado es que en los trabajos que no son hechos en el taller no puedo estar sacando todas las fotos que quisiera.
Los jefes se han quedado dormidos, a saber cuando pueda levantarme, je je.
Bueno, muchas gracias por pasar a leerme.
Que tengan una excelente semana.
Paz.
He usado el traductor de Google para el idioma inglés.
Use el programa GifCam para la imagen GIF de la publicación.
Use el programa de TextStudio para el encabezado en español.
Las imágenes a menos que se indique son capturas de imagen propias.
Me llama la atención que, siendo una marca que suelo asociar con buenos electrodomésticos, tuviera un diseño enfocado en fallar, pero entiendo que es una tendencia de la industria en general.
Fue una buena reparación, y hay que decir que el aparato se veía asqueroso al abrirlo.
Es gracioso que ahora los gatos van en tándem; ya no es que se suba uno a interrumpir el trabajo, sino que van los dos a dormir encima de quien está trabajando.
Aproveché para pasarle esto a Droida.
!ALIVE !PIMP !BBH !HOP
Aprecio el detalle mucho en verdad, muchas gracias.
Ahora tengo dos jefes, y los dos tienen garra.
!discovery
Saludos, en verdad muy agradecido por el apoyo.
This post was shared and voted inside the discord by the curators team of discovery-it
Join our Community and follow our Curation Trail
Discovery-it is also a Witness, vote for us here
Delegate to us for passive income. Check our 80% fee-back Program
Thank you for your support of the @discovery-it community.
I hope you have a good and productive month of May.
This is pure work weldone. Your tutorial is neat and easy to understand. The mixer owner must be happy to see his or her appliance back to normal state.
I am happy to hear that you are now recovering from your sick bed. Congratulations dear.
Hello, thank you so much for your kind comment.
It's an enjoyable challenge when these kinds of projects come up in the workshop; being able to complete them is very satisfying.
I apologize for the late reply; my internet service has been unreliable lately.
This post has been manually curated by @bhattg from Indiaunited community. Join us on our Discord Server.
Do you know that you can earn a passive income by delegating to @indiaunited. We share more than 100 % of the curation rewards with the delegators in the form of IUC tokens.
Here are some handy links for delegations: 100HP, 250HP, 500HP, 1000HP.
100% of the rewards from this comment goes to the curator for their manual curation efforts. Please encourage the curator @bhattg by upvoting this comment and support the community by voting the posts made by @indiaunited.
Really very grateful to curator @bhattg and @indiaunited community for the support.
I wish you an excellent month of May.
!BEER
Saludos, muchas gracias por el apoyo.
Que tenga un excelente mes de mayo.
Un placer amigo, muchas gracias!!!
I'm always impressed with what you share in our DIYHub community. You work with great dedication and passion, and you even make good and very useful posts for those who need support in the future. Well done, my friend!...
selected by @jesuslnrs
Thanks to curator @jesuslnrs and community @diyhub, I'm really encouraged that you like my work.
I hope you have a very good month of May.
Sending you some Ecency curation votes!
Thanks for using Ecency!
Thank you very much.
I hope you have a great weekend.