
⚜️ Bienvenid@ ⚜️
Holaa hiver, ¿cómo te va? Yo personalmente he estado un poco desanimada por asuntos personales, no he sido frecuente en el blog gracias a eso. Tenía tiempo queriendo subir este post, de hecho lo tengo guardado desde hace mucho pero no tenía confianza en subirlo, siempre lo dejaba para después por inseguridad sobre él, pero decidí no dejarme comer por mis problemas, simplemente aprender a llevarlos y si hay algo que me ayuda a distraerme y a salir de mi nube gris es el mundo del maquillaje, solo sé lo básico pero sé que con práctica y esmero iré mejorando poco a poco, solo tengo que ponerle ganas y hacer lo que me gusta hacer. Ya la época decembrina pasó, pero igual quería subirlo, e iré prontamente subiendo otros post de maquillajes (acepto sugerencias).
Quise traerte en esta oportunidad un tutorial de maquillaje artístico, con tema navideño ya que me fascina todo lo que tenga que ver con la navidad, creo que estamos de acuerdo en que esta época no fue la misma por lo que está aconteciendo con la pandemia, pero me trae tantos recuerdos hermosos con mi familia, así que, por eso elegí hacer este post sobre un maquillaje decembrino.
Primero que nada, necesito que saques tu belleza interior quiero que te pares en frente del espejo, te vas a mirar y te vas a decir lo orgullos@ que estas de ti, de lo que has logrado hasta ahora por mucho o poco que sea, que estás orgullos@ de lo mucho o poco que has conseguido, porque aun en los fracasos hay éxito, y tú de éxito lo tienes todo.
Sin más nada que agregar, comencemos:
Hello hiver, how you doing? I personally have been a bit discouraged by personal matters, I have not been frequent on the blog thanks to that. I wanted to upload this post for a long time, I always left it for later due to insecurity about it, but I decided not to let myself eat because of my problems and insecurities, just learn to wear them and if there is something that helps me distract myself, it is the world of makeup, I know the basics but I know that with practice and dedication I will improve little by little, I just have to put in the desire and do what I like to do.
I wanted to bring you this time an artistic makeup tutorial, with a Christmas theme since we are in December and I am fascinated by everything that has to do with Christmas, I think we agree that this Christmas will not be the same as what is happening with the pandemic, but it brings back so many beautiful memories with my family, so that's why I chose to do this post about a December makeup.
First of all, I need you to bring out your inner beauty I want you to stand in front of the mirror, you are going to look at yourself and you are going to tell yourself how proud you are of yourself, of what you have achieved so far, no matter how much or little, May you be proud of how much or little you have achieved, because even in failures there is success, and you have everything with success.
With nothing more to add, let's get started:
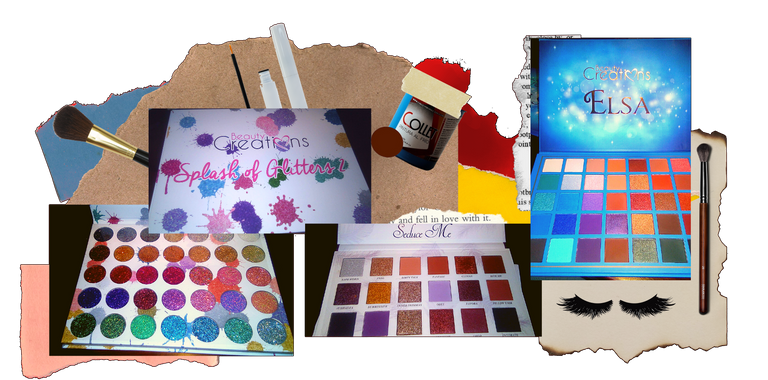
Estaré utilizando / I´ll be using:
Paso a paso / Step by step :
Paso 1️⃣:
Tenemos que prepararnos la piel para todo lo que le viene, siempre es importante mantenerse la piel limpia e hidratada, yo lo haré con aceite de Rosa Mosqueta, este lo conseguí en una tienda naturista, las cremas de NIVEA también son buenísimas para cualquier tipo de piel..
Step 1️⃣:
We have to prepare our skin for everything that comes to it, it is always important to keep our skin clean and hydrated, I will do it with Rosehip oil, I got it in a health food store, NIVEA creams are also great for any skin type.
Paso 2️⃣:
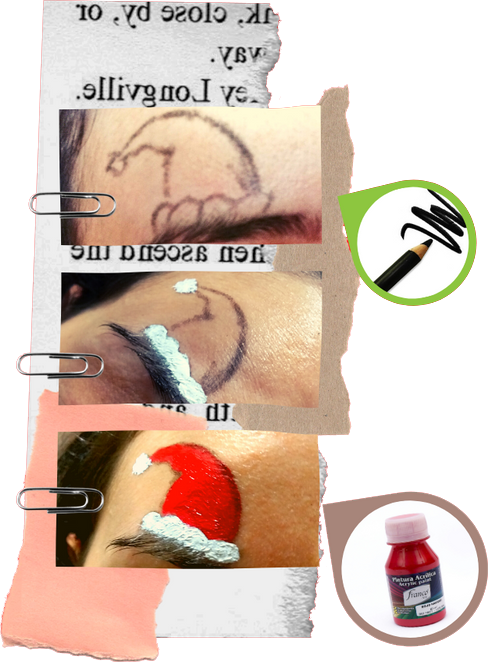
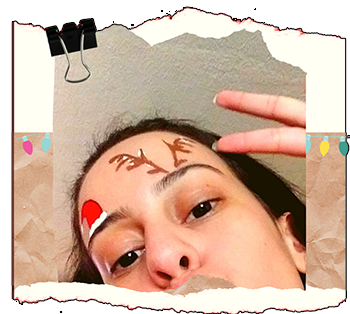
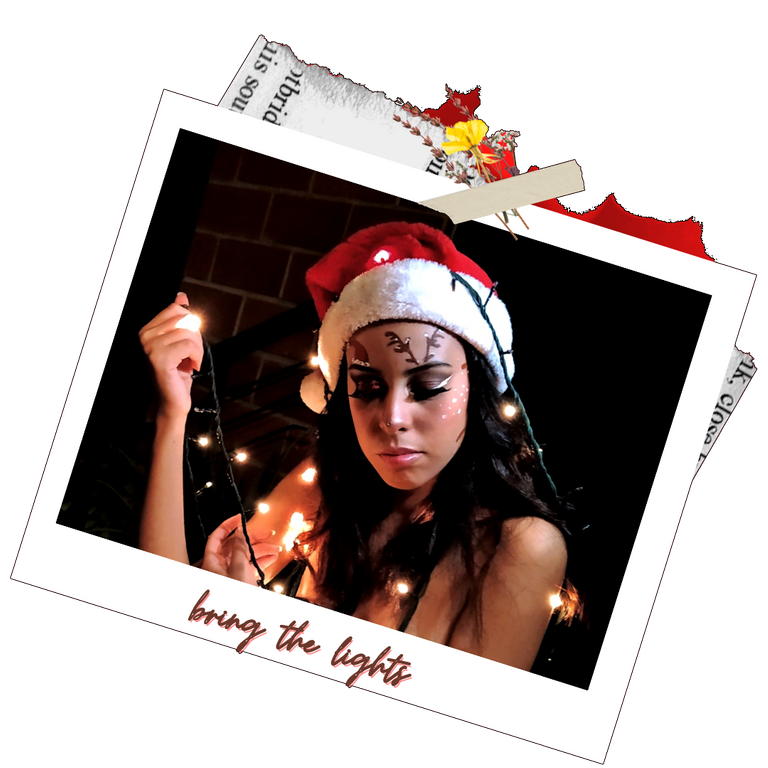
Generalmente se comienza con la base, pero por mi parte comencé con los diseños de un gorrito de Santa y unas astas de reno sobre las cejas, la base la dejo de ultima junto con el polvo sellador, ya que me pasa que cuando hago la parte de las sombras de ojos siempre caen residuos al rostro, entonces tengo que retocar la base, y mayormente cuando intento limpiar se cae la base, por eso prefiero empezar por la parte de los ojos
Busqué en internet unos diseños que me llamaran la atención y utilicé pintura al frio para rellenarlos y hacerle los detalles, en mi caso la pintura me ha funcionado bastante bien, pero cada piel es diferente, así que, lo que te recomiendo es que te apliques pinturas hechas para el rostro al menos que tengas otra manera de hacerlo. Sinceramente no soy muy buena dibujando, tengo que admitir que me costó unos 4 o 5 intentos logarlo jajajaja
Consejo: Primero haz los dibujos con un lápiz de ojos negro o el color de tu preferencia, así no tendrás que poner tantas veces pintura sobre tu rostro y que éste se irrite
Step 2️⃣:
Generally, you start with the foundation, but for my part I started with the designs of a Santa hat and some reindeer antlers on the eyebrows, I leave the foundation last together with the sealing powder, since it happens to me that when I do the part from the eyeshadows residues always fall on the face, so I have to touch up the base, and mostly when I try to clean the base falls off, that's why I prefer to start with the eyes
I looked on the internet for some designs that caught my attention and I used cold paint to fill them and make the details, in my case the paint has worked quite well for me, but each skin is different, so, what I recommend is that you apply paints made for the face unless you have another way to do it. Honestly, I'm not very good at drawing, I have to admit that it took me about 3 attempts to achieve it hahaha
Tip: First make the drawings with a black eyeliner or the color of your choice, so you won't have to put paint on your face so many times and it will get irritated
Paso 3️⃣:

Continuaremos con la parte de los ojos. Aplica corrector o base en los parpados esto será para que la sombra que uses no se corra y ésta pigmente más.
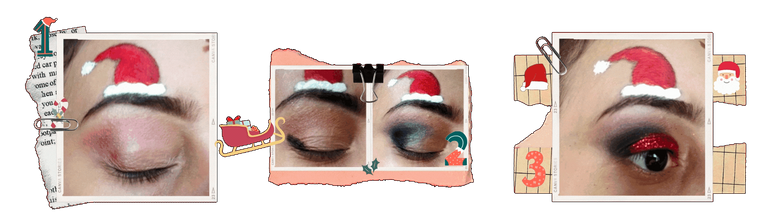
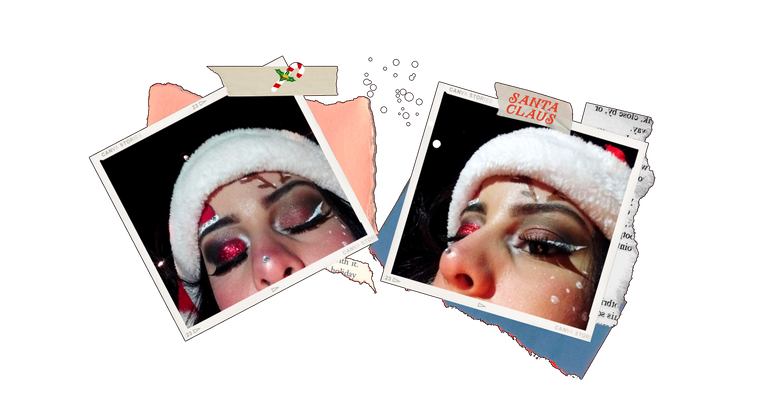
Maquillaje “Santa Claus”
Estaré usando de base el tono rosa pastel "Dirty Talk" de la paleta Seduce me de Beauty Creations, pondré en total 4 capas de rosa difuminando entre cada una hasta lograr una tonalidad cálida.
Aplicaré tono negro "Intimate" en la esquina externa, y difumino de adentro hacia afuera con movimientos circulares para que las sombras se unan y no se vea parchado.
Paso a aplicar Glitter color rojo de la paleta Splash of Glitter 2 sobre una pega para el mismo, yo en especial recomiendo la Prebase para Glitter de Nyx, de igual manera un buen truco para hacerlo es también aplicar algún labial tipo "gloss" así el glitter quedará en el parpado.
Makeup "Santa Claus"
I will be using the pastel pink "Dirty Talk" tone from the Seduce me palette by Beauty Creations as a base, I will put a total of 4 layers of pink, blending between each one until I achieve a warm tone.
I will apply black "Intimate" in the outer corner, and blend from the inside out with circular movements so that the shadows come together and do not look patchy.
Step to apply Red Glitter from the Splash of Glitter 2 palette on a glue for it, I especially recommend the Nyx Glitter Primer, in the same way a good trick to do it is also apply some lipstick type "gloss" so the glitter will remain on the eyelid.
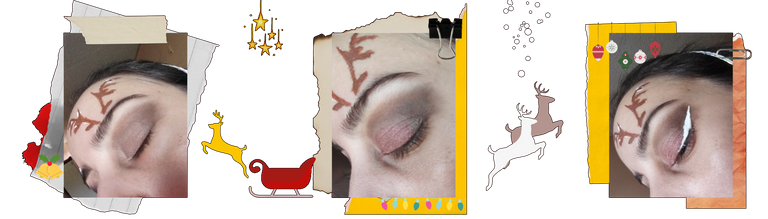
Maquillaje “Reno de Santa”
- Usaré el tono marrón "Bite me" de la paleta Seduce me de Beauty Creations para la cuenca del ojo
- Utilice luego un tono rosa satinado en el parpado móvil
- Hice un delineado blanco, que la verdad me costó bastante ya que no soy muy buena con los delineados, pero al final resultó
Make-up "Santa's Reindeer"
- I'll be using "Bite me" brown shade from Beauty Creations Seduce me palette for the eye socket
- Then use a satin pink shade on the moving eyelid
- I did a white eyeliner, which really cost me a lot since I'm not very good with eyeliners, but in the end it turned out.
Paso 4️⃣ :
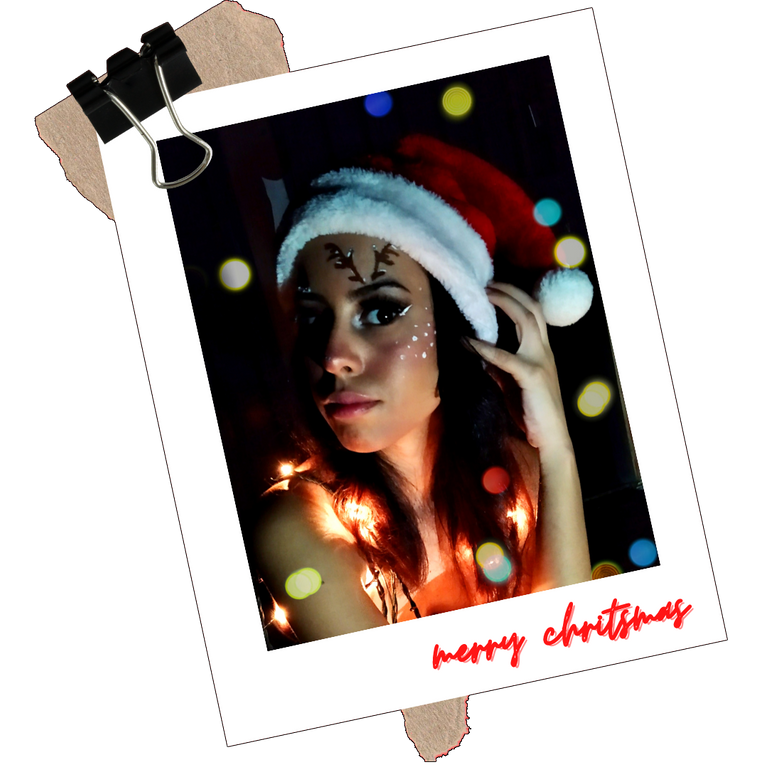
Ahora sí, hora de la base. La base que yo utilizo es de cobertura baja, tú usa la de tu preferencia. Agregué con pintura al frío unas pequeñas manchitas blancas en mi pómulo izquierdo simulando nieve
Detalles:
Yo tenía unos apliques guardados y realmente olvidados en una gaveta, buscando la pintura al frio los encontré y se me ocurrió agregarlos al maquillaje, por mí parte los coloque en la parte blanca del gorrito y en mi nariz.
Me puse pestañas postizas de M.A.C número 30-10
Step 4️⃣:
Now, time for the foundation. The foundation that I use is low coverage, you use the one of your preference. I added with cold paint some small white spots on my left cheekbone simulating snow
Details:
I had some appliqués saved and really forgotten in a drawer, looking for the cold paint I found them and it occurred to me to add them to the makeup, for my part I placed them on the white part of the hat and on my nose.
I put on M.A.C eyelashes number 30-10
Creo que me extendí un poco, pero quería darte un tutorial detallado y sin saltarme absolutamente nada, daré todo lo mejor de mí para seguirte trayendo lo mejor. Ahora, siendo ésta mi primera publicación de maquillaje, estoy abierta a escuchar tu opinión e ideas.
Espero que te haya gustado y que lo recrees, si es así, quiero las fotitos del resultado.
Recuerda que lo importante es que te guste y disfrutes de lo que sea que hagas, siempre sentirte cómoda y segura, si fallas solo vuelve a empezar, y aprende de los errores, de eso se trata el maquillaje.
I think I extended a bit, but I wanted to give you a detailed step by step and without skipping absolutely anything, I will do my best to keep bringing you the best. Now, this being my first makeup post, I'm open to hearing your thoughts and ideas.
I hope you liked it and that you recreate it, if so, I want the photos of the result.
Remember that the important thing is that you like it and enjoy whatever it is you do, always feel comfortable and safe, if you fail, just start over, and learn from mistakes, that's what makeup is all about.

Sígueme en mis Redes Sociales:


Congratulations @vvgm! You have completed the following achievement on the Hive blockchain and have been rewarded with new badge(s) :
You can view your badges on your board and compare yourself to others in the Ranking
If you no longer want to receive notifications, reply to this comment with the word
STOP¡Felicidades! Esta publicación obtuvo upvote y fue compartido por @la-colmena, un proyecto de Curación Manual para la comunidad hispana de Hive que cuenta con el respaldo de @curie.
Si te gusta el trabajo que hacemos, te invitamos a darle tu voto a este comentario y a votar como testigo por Curie.
Si quieres saber más sobre nuestro proyecto, acompáñanos en Discord: La Colmena.
Your post has been voted as a part of Encouragement program. Keep up the good work!
Try https://ecency.com and Earn Points in every action (being online, posting, commenting, reblog, vote and more).
Boost your earnings, double reward, double fun! 😉
Support Ecency, in our mission:
Ecency: https://ecency.com/proposals/141
Hivesigner: Vote for Proposal