Fonte PIXABAY - CC0 Creative Commons
English version of my previous post
Home Automation System - PZEM004T con SONOFF e TASMOTA
I'm so happy...Finally I got time to update again my blog.
During last year I kept on building my smart home automation system by adding or modifying "things"...unfortunately I never got time to keep the blog updated with all the progress made...I hope now to keep my blog constantly updated.
Let'b begin with my last night experiment ... Integrating a consumption meter (the famous PZEM004T already used with ESP8266 cards) in a SONOFF 4CH already installed at home for other purposes, so you don't have to add another ESP8266 just to manage the PZEM004T!
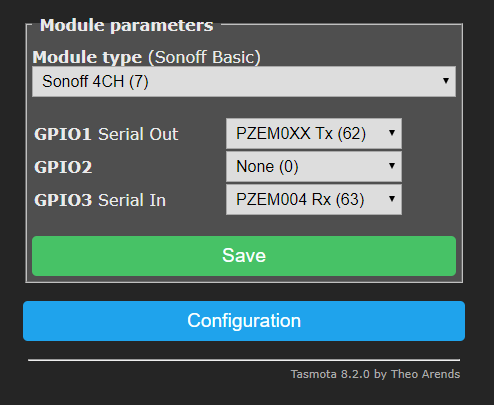
Obviously the SONOFF has been customized with the TASMOTA firmware (now in version 8.2.0); this firmware allows the use of the PZEM004T natively, simply by making the right setup via the webui of TASMOTA
The PZEM004T is logically divided into a "power" zone and a "signal" zone.
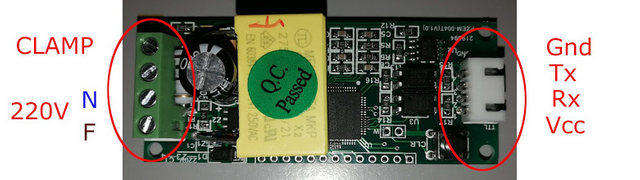
In the power zone you have to power up the pzem004t with standard voltage (220v) and you can connect the terminals of the clamp.
"Signal" side instead requires 5V power supply; this allows the serial port to transmit measurement information.
The serial port is the point of contact with the SONOFF, therefore you must connect the RX and TX pins of the PZEM004T with two GPIOs of the sonoff. Here TASMOTA will help us. It allows us to manage 3 GPIOs for configuring external devices. Based on where we are going to connect the TX and RX of the PZEM004T we will configure the SONOFF appropriately.

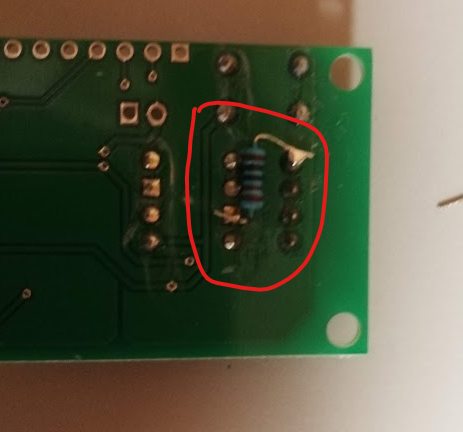
To optimize the spaces and the devices involved I decided to take the low power supply voltage for the PZEM004T from the Vcc pin of the SONOFF, without having to use another power supply only for this.
There is only one point of attention: the SONOFF delivers 3.3V while the PZEM004T works on 5V. Using a 1KOhm resistor, placed as in the figure, the PZEM004T become compatible with the 3.3V of the SONOFF.
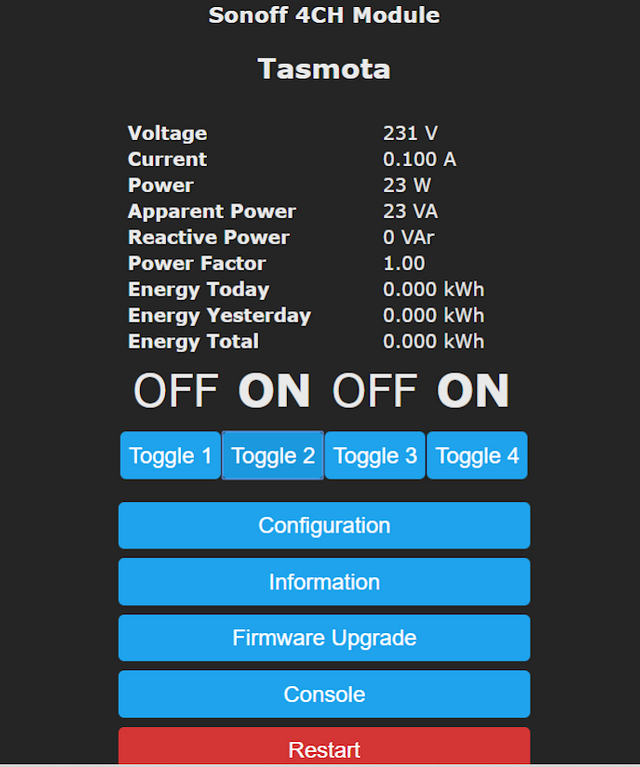
Now you're done. Just put the wire of the load to monitor inside the toroid to see the data on the screen. Here is an example of output with a lamp
Now that we have the data available, we can use Tasmota to send them to OpenHAB through MQTT protocol
Soon I will publish a video with the experiment carried out.
All images are free or owned by author
During the COVID-19 pandemic when there were options for entertainment, my family was tired of sitting at home. Using phone and laptop are not the option for us because of getting bored. So, my dad, one day brought a team of custom home theater to install a home theater in our home. In the next couple of days, the team installed a theater in our home and now we watch movies and sports on Netflix.