In this post we announce what we've been working on for the last couple of months: an alternative command line interface to EOS, aimed to be the foundation for future development tools for the EOS ecosystem. We also announce the creation of a public endpoint for accessing EOS testnet.
Rationale
For those less familiar with EOS codebase, eosc is the official CLI (Command Line Interface) for EOS. It interacts with the EOS blockchain by connecting to a full node called eosd, which can run either locally or on a remote server.
When working with EOS smart-contracts, we've found that eosc has some inconvenient limitations:
- Firstly, it's quite heavyweight in terms of external dependencies, as it's tightly connected to the entire EOS codebase.
- Secondly, it's not ready to be used in Windows environment.
- And finally, it's hard to use
eoscprogrammatically, as it doesn't offer an API.
It could be enough for us to develop a minimal C++ library acting as an EOS API and this way implement all the commands supported by eosc. However, it was a short step to provide such a library with a command line interface, and thus create a full-blown eosc replacement, which we've named teos.
Here are the benefits of using teos instead of eosc:
- With
teosyou can do everything available ineoscand much more, as we've added a richer & more useful command option list. - Also, as
teosis not dependent on the entire EOS codebase, it can be easily compiled on any platform, including Windows, which is not the case witheosc. - And last but not least,
teoshas an underlying library which offers a proper API which you can use to interact programmatically witheosd(EOS full node).
For obvious reasons everything we do is open source. The source code of teos is located in this repository.
Note: To make our project fully cross-platform (including Windows), we needed to clone and modify some of the support libraries from the EOS codebase. For more details please refer to this document.
The ultimate goal
Our plans include opening up EOS for smart-contract development on any platform, including Windows. Once we're finished building the underlying API, teos will be an excellent starting point for creating a truly cross-platform set of development tools, including a smart-contract deployment framework similar to Ethereum's Truffle.
Public endpoint
As teos is foremost an EOS client, this announcement includes opening up Tokenika's publicly accessible endpoint as a gateway for trying out EOS and the official testnet without the trouble of running your own full node. This endpoint can be accessed no matter if you're going to use eosc, the official CLI, or teos, our alternative.
Our endpoint is available at eos-testapi.tokenika.io. It's not only fully featured, general purpose API but also has wallet API enabled for testing purposes - this should never be done on production!
It is all for you to use it, test it, brake it. We want to be aware of all possible flaws before the end of the testing period.
Our endpoint is connected to the official EOS testnet. Here are the details:
- API: eos-testapi.tokenika.io:8888
- P2P: eos-testp2p.tokenika.io:9876 (or p2p-testnet1.eos.io:9876, if you want to use the official one)
For endpoint configuration please refer to this document.
Disclaimer: Use it at your own risk and when you really know what are you doing. Do not store any key material that has or will have any value in future.
Comparison
As it was mentioned above, teos covers the same functionality as eosc, but it's more user friendly and offers a wider selection of options.
Let's take a look at the get block command and the response eosc gives regarding its options:
./eosc get block --help
ERROR: RequiredError: block
Retrieve a full block from the blockchain
Usage: ./eosc get block block
Positionals:
block TEXT                  The number or ID of the block to retrieve
A similar command in teos will produce something like this:
./teos get block --help
Retrieve a full block from the blockchain
Usage: ./teos get block [block_num | block_id] [Options]
Usage: ./teos get block [-j "{"""block_num_or_id""":"""int | string"""}"] [OPTIONS]

Options:
  -n [ --block_num ] arg          Block number
  -i [ --block_id ] arg           Block id
  -h [ --help ]                   Help screen
  --wallet-host arg (=localhost)  The host where eos-wallet is running
  --wallet-port arg (=8888)       The port where eos-wallet is running
  -V [ --verbose ]                Output verbose messages on error
  -j [ --json ] arg               Json argument
  -v [ --received ]               Print received json
  -r [ --raw ]                    Raw print
  -e [ --example ]                Usage example
Now, let's consider using the get block command in eosc:
./eosc get block 25
{
  "previous": "00000018b5e0ffcd3dfede45bc261e3a04de9f1f40386a69821780e063a41448",
  "timestamp": "2017-11-29T09:50:03",
  "transaction_merkle_root": "0000000000000000000000000000000000000000000000000000000000000000",
  "producer": "initf",
  "producer_changes": [],
  "producer_signature": "2005db1a193cc3597fdc3bd38a4375df2a9f9593390f9431f7a9b53701cd46a1b5418b9cd68edbdf2127d6ececc4d66b7a190e72a97ce9adfcc750ef0a770f5619",
  "cycles": [],
  "id": "000000190857c9fb43d62525bd29dc321003789c075de593ce7224bde7fc2284",
  "block_num": 25,
  "refBlockPrefix": 623236675
}
A similar command in teos will produce a response which is less verbose by default, thus more readable:
./teos get block 25
## block number: 25
## timestamp: 2017-11-29T09:50:03
## ref block prefix: 623236675
But you can make it verbose, if you need:
./teos get block 25 --received
{
    "previous": "00000018b5e0ffcd3dfede45bc261e3a04de9f1f40386a69821780e063a41448",
    "timestamp": "2017-11-29T09:50:03",
    "transaction_merkle_root": "0000000000000000000000000000000000000000000000000000000000000000",
    "producer": "initf",
    "producer_changes": "",
    "producer_signature": "2005db1a193cc3597fdc3bd38a4375df2a9f9593390f9431f7a9b53701cd46a1b5418b9cd68edbdf2127d6ececc4d66b7a190e72a97ce9adfcc750ef0a770f5619",
    "cycles": "",
    "id": "000000190857c9fb43d62525bd29dc321003789c075de593ce7224bde7fc2284",
    "block_num": "25",
    "refBlockPrefix": "623236675"
}
Furthermore, you can make it both verbose and unformatted:
./teos get block 25 --received --raw
{"previous":"00000018b5e0ffcd3dfede45bc261e3a04de9f1f40386a69821780e063a41448","timestamp":"2017-11-29T09:50:03","transaction_merkle_root":"0000000000000000000000000000000000000000000000000000000000000000","producer":"initf","producer_changes":"","producer_signature":"2005db1a193cc3597fdc3bd38a4375df2a9f9593390f9431f7a9b53701cd46a1b5418b9cd68edbdf2127d6ececc4d66b7a190e72a97ce9adfcc750ef0a770f5619","cycles":"","id":"000000190857c9fb43d62525bd29dc321003789c075de593ce7224bde7fc2284","block_num":"25","refBlockPrefix":"623236675"}
Also, you can supply the arguments in json format:
./teos get block --json '{"""block_num_or_id""":"""56"""}'
##         block number: 56
##            timestamp: 2017-11-29T10:02:18
##     ref block prefix: 273573026
And finally, for each command you can invoke an example showcasing its usage:
./teos get block --example
// Invoke GetInfo command
ptree getInfoJson;
GetInfo getInfo(getInfoPostJson);
cout << getInfo.toStringRcv() << endl;

/*
output:
{
    "server_version": "9703495c",
    "head_block_num": "1707240",
    "last_irreversible_block_num": "1707225",
    "head_block_id": "001a0ce87ca6e2d0fc19b8a02e9241c658bea0365f4e6f035ce6602db04611bd",
    "head_block_time": "2017-12-25T14:11:31",
    "head_block_producer": "inito",
    "recent_slots": "1111111111111111111111111111111111111111111111111111111111111111",
    "participation_rate": "1.00000000000000000"
}
*/

// Use reference to the last block
ptree GetBlockJson;
GetBlock_poGetBlockJsont_json.put("block_num_or_id", getInfo.get<int>("last_irreversible_block_num"));

// Invoke GetBlock command
GetBlock GetBlock(GetBlock_post_json);
cout << GetBlock.toStringRcv() << endl;

/*
output:
{
    "previous": "001a0cd8422216f2828ef5056e9371439f80665cee99d72a5f3162ae7c0495fd",
    "timestamp": "2017-12-25T14:11:16",
    "transaction_merkle_root": "0000000000000000000000000000000000000000000000000000000000000000",
    "producer": "initn",
    "producer_changes": "",
    "producer_signature": "1f382b4fe716f683c8a7ebd15fe5f5266c75a24f75b9b212fc3cc3f7db11f5258b08e5aebc7680784c240e0f8d0ea7540dfb4ab8dcbe5cd8b492876e8f59bb4ea8",
    "cycles": "",
    "id": "001a0cd98eb6f7e0f8e7803b098082b35f1348672561af193ead3d1b1a281bcf",
    "block_num": "1707225",
    "ref_block_prefix": "998303736"
}
*/
Using teos as EOS API
In our view, the real value of our efforts is actually the library that's behind teos. As we mentioned before, the teoslib library acts as a full-blown API for EOS.
Let's consider a code snippet illustrating its usage:
#include <stdio.h>
#include <stdlib.h>
#include <iostream>
#include <string>

#include "teoslib/teos_get_commands.hpp"

int main()
{
  using namespace tokenika::teos;

  teosCommand::host = TEST_HOST;
  teosCommand::port = TEST_PORT;

  ptree getInfoJson;

  // Invoke GetInfo command:
  GetInfo getInfo(getInfoJson);
  cout << getInfo.toStringRcv() << endl;

  if (getInfo.isError()) {
    return -1;
  }

  ptree getBlockJson;

  // Use reference to the last block:
  getBlockJson.put("block_num_or_id",
    getInfo.get<int>("last_irreversible_block_num"));

  // Invoke GetBlock command:
  GetBlock getBlock(getBlockJson);
  cout << getBlock.toStringRcv() << endl;

  if (getBlock.isError()) {
    return -1;
  }

  return 0;
}
Here is the outcome of the above code:
{
    "server_version": "9703495c",
    "head_block_num": "1707240",
    "last_irreversible_block_num": "1707225",
    "head_block_id": "001a0ce87ca6e2d0fc19b8a02e9241c658bea0365f4e6f035ce6602db04611bd",
    "head_block_time": "2017-12-25T14:11:31",
    "head_block_producer": "inito",
    "recent_slots": "1111111111111111111111111111111111111111111111111111111111111111",
    "participation_rate": "1.00000000000000000"
}
{
    "previous": "001a0cd8422216f2828ef5056e9371439f80665cee99d72a5f3162ae7c0495fd",
    "timestamp": "2017-12-25T14:11:16",
    "transaction_merkle_root": "0000000000000000000000000000000000000000000000000000000000000000",
    "producer": "initn",
    "producer_changes": "",
    "producer_signature": "1f382b4fe716f683c8a7ebd15fe5f5266c75a24f75b9b212fc3cc3f7db11f5258b08e5aebc7680784c240e0f8d0ea7540dfb4ab8dcbe5cd8b492876e8f59bb4ea8",
    "cycles": "",
    "id": "001a0cd98eb6f7e0f8e7803b098082b35f1348672561af193ead3d1b1a281bcf",
    "block_num": "1707225",
    "ref_block_prefix": "998303736"
}
List of currently supported commands
At this very initial stage of our project, we haven't ported all the commands available in eosc. Below is the list of commands teos supports in this release:
version client
get info
get block
get account
get code
get table
create key
wallet create
wallet list
wallet keys
wallet import
wallet open
wallet lock
wallet lock all
wallet unlock
Building on Ubuntu 16.04
Dependencies
If you are on Ubuntu, the only thing you need to do is have the EOS codebase complied and installed. Just follow the instructions listed in the official EOS repository.
We don't really need any of the code contained there, however we recommend to make use of the fact that EOS automated build script sorts out all the external dependencies (i.e. Boost, OpenSSL, GMP & Secp256k1) that teos requires. And, unless you want to use our remote server for this purpose, you will need a locally running EOS full node anyway to play with teos, so no effort is actually wasted.
What you will also need is cmake version 3.8 or higher. You can verify it using this command:
cmake --version
If your cmake is lower than 3.8, run this command to remove it:
sudo apt-get purge cmake
And then run these commands to build it from the source code:
version=3.8
build=0
wget https://cmake.org/files/v$version/cmake-$version.$build.tar.gz
tar -xzvf cmake-$version.$build.tar.gz
cd cmake-$version.$build
./bootstrap
make -j4
sudo make install
cd .. && rm -rf cmake-$version.$build
When the build process is complete, open a new terminal window and make sure cmake is actually version 3.8:
cmake --version
Cloning the source code
Navigate to a location of your choice and clone teos repository:
git clone https://github.com/tokenika/teos.git
Compilation
Navigate to the teos/teos folder and create a new folder named build:
cd teos/teos
mkdir build && cd build
Run CMake:
cmake ..
Make sure there are no errors, and then proceed with the actual compilation:
make install
As the result of the compilation, you should be able to find those two files in the install folder:
lib/libteoslib.ais a static library acting as an API for EOSbin/teosis the CLI executable making use of the above library
Testing on remote sever
Open a terminal window, navigate to the install/bin folder and run teos:
./teos eos-testapi.tokenika.io:8888 get info
The above command will connect to EOS full node running on one of our testnet servers.
Alternatively, you can use the predefined placeholder tokenika instead of eos-testapi.tokenika.io:8888:
./teos tokenika get info
You can try simple queries, e.g.
./teos tokenika get block 25
##         block number: 25
##            timestamp: 2017-12-05T19:55:56
##     ref block prefix: 1139663381
Or you can test private key generation:
./teos tokenika create key
##             key name: default
##          private key: 5JyL28JPQbPTYwTpjKRcXvfj6nwUKgCmHnJaD28nmmWMpHXukVn
##           public key: EOS7TxBhoCwAWXoV8uhtgjz4inTLwiwcySvrVhGNYcjhw75wFJ9uA
Testing on localhost
If you have complied the entire EOS codebase and have eosd running on your local machine, you can also test teos locally:
./teos localhost get info
Or just:
./teos get info
Building on Windows 10
Prerequisites
We assume that your computer is 64bit.
We also assume that you have Git 2.15.1, CMake 3.10.1 and MS Visual Studio 2017 installed. If not, please follow the instructions available in the above links.
As far as Visual Studio is concerned, you will only need the most basic module called Universal Windows Platform Development (and from optional tools C++ Universal Windows Platform Tools).
Dependencies
For most of its functionality teos is only dependent on Boost. However, because it also needs to able to generate private keys, additionally teos is dependent on OpenSSL, GMP and Secp256k1, as specified in EOS documentation.
On Windows the main difficulty is to have all those dependencies as Windows-compiled libraries. Advanced Windows users might want to build everything from source files (it's certainly doable) and ultimately we will aim for that. However, at this stage we recommend using pre-compiled binaries:
- Boost version 1.64 (not higher as it might be incompatible with CMake)
- Windows binaries are available here (for a 64bit machine select
boost_1_64_0-msvc-14.1-64.exe). - Define an environment variable
BOOST_INCLUDEDIRpointing to the location you've chosen to store the Boost libraries (e.g.C:\Local\boost_1_64_0). - Define an environment variable
BOOST_LIBRARYDIRpointing to thelib64-msvc-14.1folder inside the location you've chosen to store the Boost libraries (e.g.C:\Local\boost_1_64_0\lib64-msvc-14.1).
- Windows binaries are available here (for a 64bit machine select
- OpenSSL version 1.1.0
- Windows binaries are available here (for a 64bit machine select
Win64OpenSSL-1_1_0g.exe). - Run the installer and when prompted choose to copy the DLLs to the
bindirectory. - Define an environment variable
OPENSSL_ROOT_DIRpointing to the location you've chosen to store the OpenSLL libraries (e.g.C:\Local\OpenSSL-Win64).
- Windows binaries are available here (for a 64bit machine select
- GMP version 4.1 (Please note that MPIR may be considered as a good Windows-ready alternative to GMP, as described here. In a future release of
teoswe will probably switch to MPIR, as it seems to be better suited for Windows).- Window binaries are available here (choose static ones for MinGW, i.e.
gmp-static-mingw-4.1.tar.gz). You might need 7-Zip to extract them. - Define an environment variable
GMP_DIRpointing to the location you've chosen to store the GMP libraries (e.g.C:\Local\gmp-static-mingw-4.1). - Inside
GMP_DIRnavigate to thelibfolder and renamelibgmp.atogmp.libto match Windows conventions.
- Window binaries are available here (choose static ones for MinGW, i.e.
- Secp256k1 - as there are no pre-compiled binaries available what you'll need to do is cross-compilation between Linux and Windows. This will be described in the next section. But first do these preliminary steps:
- Create a location of your choice where Secp256k1 libraries will be stored. In our case it's
C:\Local\secp256k1. - Define an environment variable
SECP256K1_DIRpointing to the above directory.
- Create a location of your choice where Secp256k1 libraries will be stored. In our case it's
Secp256k1 cross-compilation
Secp256k1 is not available directly on Windows, so the only way to go is apply cross-compilation between Linux and Windows. For this purpose, you'll need access to a Linux environment. In our view, the easiest option is using Windows Subsystem for Linux, and the rest of this section is based on this choice.
If you haven't already done so, enable Windows Subsystem for Linux on your Windows machine, as described in this guide.
While on Windows, run Ubuntu bash and start with making sure you are running Ubuntu 16.04:
lsb_release -a
And before you continue, update & upgrade Ubuntu:
sudo apt update
sudo apt upgrade
Make sure that you have these tools installed:
sudo apt install autoconf
sudo apt install make
sudo apt install libtool
sudo apt install mingw-w64
Get a copy of the secp256k1 repository and navigate to its folder:
git clone https://github.com/cryptonomex/secp256k1-zkp.git
cd secp256k1-zkp
Define an environment variable called installDir. Please note that its value needs to match the Windows destination for your Secp256k1 libraries (in our case C:\Local\secp256k1), as described in the previous section. So probably you'll need to apply a different path than the one used below, unless you've chosen the same location as we did.
export installDir=/mnt/c/Local/secp256k1/
And now you're ready to build and install Secp256k1:
./autogen.sh
./configure --host=x86_64-w64-mingw32 --prefix=${installDir}
make
make install
Rename the libsecp256k1 file to match Windows conventions:
mv ${installDir}/lib/libsecp256k1.a ${installDir}/lib/secp256k1.lib
Copy the libgcc library from Ubuntu to Windows:
cp /usr/lib/gcc/x86_64-w64-mingw32/5.3-posix/libgcc.a ${installDir}/lib/gcc.lib
And finally, copy the executable tests which will be used for testing:
cp tests.exe ${installDir}/tests.exe
Before you exit Ubuntu bash, you might want to clean the workspace:
cd .. && rm -rf secp256k1-zkp
Open PowerShell, navigate to SECP256K1_DIR (in our case it's C:\Local\secp256k1) and run tests.exe to make sure Secp256k1 works properly on Windows:
cd C:\Local\secp256k1
./tests.exe
Cloning the source code
Open Visual Studio 2017 Developer Command Prompt, navigate to a location of your choice and clone teos repository:
git clone https://github.com/tokenika/teos.git
Compilation
Still using Visual Studio 2017 Developer Command Prompt, navigate to the teos\teos folder and run the following commands:
cd teos\teos
mkdir build && cd build
cmake -G "Visual Studio 15 2017 Win64" ..
msbuild teos.sln
msbuild INSTALL.vcxproj
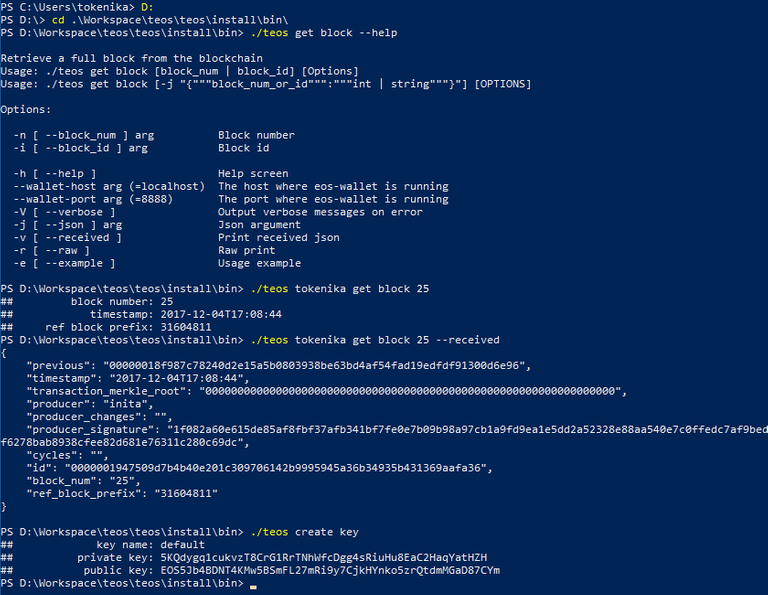
Testing on remote sever
Open Power Shell and navigate to the location of your teos repository, and then inside the repository navigate to the teos\install\bin folder:
cd teos\install\bin
And now you should be able to run teos and access EOS full node running on one of our servers:
./teos eos-testapi.tokenika.io:8888 get info
Alternatively, you can use the predefined placeholder tokenika instead of eos-testapi.tokenika.io:8888:
./teos tokenika get info
You can try simple queries, e.g.
./teos tokenika get block 25
##         block number: 25
##            timestamp: 2017-12-05T19:55:56
##     ref block prefix: 1139663381
Or you can test private key generation:
./teos tokenika create key
##             key name: default
##          private key: 5JyL28JPQbPTYwTpjKRcXvfj6nwUKgCmHnJaD28nmmWMpHXukVn
##           public key: EOS7TxBhoCwAWXoV8uhtgjz4inTLwiwcySvrVhGNYcjhw75wFJ9uA
Conclusion
We dare to hope that teos could become an interesting alternative to the original eosc CLI, and maybe one day be included as part of EOS codebase. To our knowledge this is the first fully cross-platform EOS client, and also a good foundation for an EOS API.
In our subsequent release, we're going to cover the entire EOS API, so you'll be able to compile and deploy an EOS smart-contract on the testnet via our full node, and do it from any operating system, including Windows.
I have added teos to awesome-eos.
Aiming for Truffle like tooling will add a lot of value to the ecosystem, by saving thousands of hours of engineering time. I'll be keeping an eye on this one, kudos so far :)
I am guessing the instructions for Ubuntu are valid for any Linux as well as MacOS. You'll read me here complaining otherwise ;)
Great work and thanks for sharing guys.
Wow, thats a good step on a way to EOS decentralization.
i really like your post and i enjoy it very with all post 👍
Resteemed.
Wooow Great stuff :)
This is very good for me, because I work on Windows. You are doing a great work. Thanks.
I love new toys! Thank you!
incredible work! bravo... 👍🏼
I like your work @tokenika and I'll give teos a try in my future dev. Thanks!