¿Sabes en qué consiste la técnica de Granny Square?
Son cuadrados de ganchillo que unidos tienen múltiples aplicaciones, puedes realizar manteles, bolsos, mantas, hermosas prendas de vestir, agarraderos o cojines, entre otras cosas. Los más comunes son aquellos de forma cuadrada, pero también puedes encontrar en forma hexagonal, circular, poligonales.

Les presento un tutorial paso a paso para hacer el cuadrado de un video realizado por Elena de Ahuyama Crochet.
- V-1. Comenzamos con un nudo inicial y realizamos 4 cadenetas uniendo la primera cadeneta con la última con punto deslizado.
- V-2. Realizamos tres cadenetas que será nuestro primer punto alto, en el agujero o aro central hacemos 2 puntos altos, 2 cadenetas, realizamos en el agujero 3 puntos altos y 2 cadenetas repetimos 2 veces más terminando con las dos cadenetas y en la tercera cadena del inicio cerramos con punto deslizado.

Fuente: Foto tomada por el autor @xeliram en un celular.
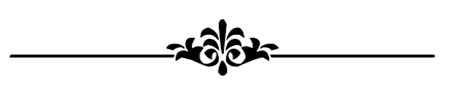
- V-3. Hacemos dos puntos deslizado y hacemos cambio de color en azul, en el agujero realizamos un punto deslizado, tres cadenetas, dos puntos altos, dos cadenetas y tres puntos altos. En el siguiente agujero hacemos 3 puntos altos, dos cadenetas y 3 puntos altos repetimos el mismo procedimiento en cada agujero hasta terminar la vuelta y cerramos con punto deslizado.
Fuente: Foto tomada por el autor @xeliram en un celular.
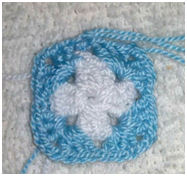
- V-4. Dos puntos deslizado y cambiamos a color fucsia en el primer agujero hacemos un punto deslizado, 3cadenetas 2 puntos altos, 2 cadeneta y 3 puntos altos. En siguiente punto 3 puntos altos. En los agujeros de las esquinas se hacen 3 puntos altos, dos cadenetas y 3 puntos altos, para los agujeros del centro realizamos 3 puntos altos, hasta terminar la vuelta.
Fuente: Foto tomada por el autor @xeliram en un celular.
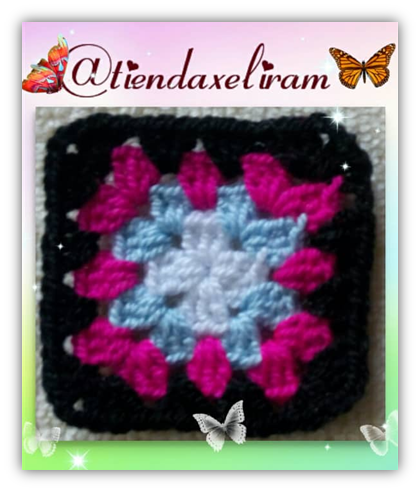
- V-5. Dos puntos deslizado y hacemos cambio de color a negro en el agujero hacemos un punto deslizado, 3 cadenetas, dos puntos altos, dos cadenetas y 3 puntos altos. En cada esquina 3 puntos altos, dos cadenetas y 2 puntos altos y en los demás agujero 3 puntos altos.

Fuente: Foto tomada por el autor @xeliram en un celular.
Posteriormente realice con los mismos pasos uno más grande para hacer un porta papel higiénico. En este caso hice cuadro granny.
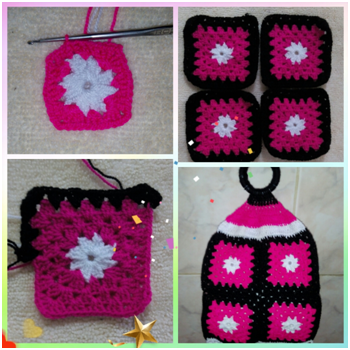
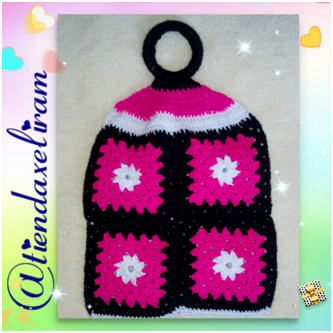
Fuente: Foto tomada por el autor @xeliram en un celular.
Do you know what the Granny Square technique is?
They are crochet squares that together have multiple applications, you can make tablecloths, bags, blankets, beautiful clothes, handles or cushions, among other things. The most common ones are those with a square shape, but you can also find them in hexagonal, circular, polygonal shapes.

I present a step-by-step tutorial to make the square of a video made by Elena de Ahuyama Crochet.
- V-1. We start with an initial knot and we make 4 chains joining the first chain with the last one with slipped stitch.
- V-2. We make three chains that will be our first high point, in the hole or central ring we make 2 high points, 2 chains, we make in the hole 3 high points and 2 chains we repeat 2 times more finishing with the two chains and in the third chain of the beginning we close with a slip stitch.
Source: Photo taken by the author @xeliram on a cell phone.
- V-3. We make two stitches slide and change the color in blue, in the hole we make one stitch slide, three chains, two high stitches, two chains and three high stitches. In the next hole we make 3 high stitches, two chains and 3 high stitches. We repeat the same procedure in each hole until we finish the turn and we close with a slide stitch.
Source: Photo taken by the author @xeliram on a cell phone.
- V-4. Two stitches slipped and we change to fuchsia in the first hole we make a stitch slipped, 3 chains 2 high stitches, 2 chain and 3 high stitches. In the next point 3 high points. In the holes of the corners we make 3 high points, two chains and 3 high points, for the holes of the center we make 3 high points, until finishing the turn.
Source: Photo taken by the author @xeliram on a cell phone.
- V-5. Two stitches slipped and we make change of color to black in the hole we make a stitch slipped, 3 chains, two high stitches, two chains and 3 high stitches. In each corner 3 high points, two chains and 2 high points and in the other holes 3 high points.
Source: Photo taken by the author @xeliram on a cell phone.
Please follow the same steps to make a toilet paper holder. In this case I made a granny picture.
Source: Photo taken by the author @xeliram on a cell phone.


Congratulations @xeliram! You received a personal badge!
You can view your badges on your board And compare to others on the Ranking
Do not miss the last post from @hivebuzz:
Support the HiveBuzz project. Vote for our proposal!