Primeramente Felicito a la comunidad @hivefood y a @mariale07 por su primer año en la Blockchain, que sean muchos más los que vengan por delante, creando y compartiendo delicioso contenido.
Esta vez pasó por aquí a dejarle otra de mis preparaciones con mucho cariño. Le puse mucha dedicación para explicarle paso a paso como la realice.
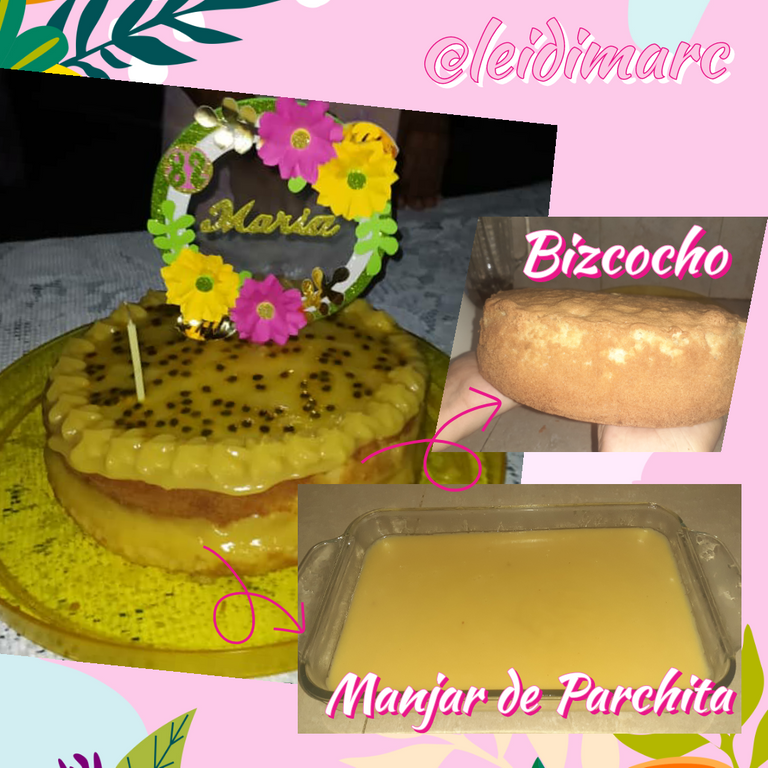
Aunque la foto de la torta, no tenga la mejor de las presentaciones, les aseguro que está divina y sobre todo lo práctica y productiva que es la receta.
Por lo general, para celebrar nuestros cumpleaños en casa, hacemos las tortas con 1 kilo de harina de trigo, que quede grande y rinda para todos los invitados y hasta para los que no vienen.
Cuando es algo más para los que estamos en casa la hacemos con ½ kilo de harina, pero con esta receta usé menos ingredientes y el resultado fue genial. Por favor te invito a que prestes atención y la puedas preparar en casa.
En mi penúltimo post en mi blog, les estuve contando qué hice Mi primer Cake Topper para mi suegra la Sra. María en su cumpleaños #82 y este era para decorar su Torta, que es la que les voy a compartir.
Para lo cual quise hacerla con un Bizcocho, que es una preparación más densa y esponjosa, especial para mojar con almíbar y rellenar con cualquier tipo de cremas, en este caso Majar de Parchita.

Bizcocho y Manjar de Parchita | Recipes
Firstly I congratulate the @hivefood community and @mariale07 for their first year on the Blockchain, may there be many more to come, creating and sharing delicious content.
This time I stopped by to leave you another of my preparations with a lot of love. I put a lot of dedication to explain step by step how to make it.
Although the photo of the cake does not have the best presentation, I assure you that it is divine and above all how practical and productive the recipe is.
Usually, to celebrate our birthdays at home, we make the cakes with 1 kilo of wheat flour, so that it is big enough for all the guests and even for those who are not coming.
When it is something more for those of us at home, we make it with ½ kilo of flour, but with this recipe I used less ingredients and the result was great. Please I invite you to pay attention and you can prepare it at home.
In my penultimate post on my blog, I was telling you what I made My first Cake Topper for my mother-in-law Mrs. Maria on her birthday #82 and this was to decorate her Cake, which is the one I am going to share with you.
For which I wanted to make it with a Bizcocho, which is a more dense and spongy preparation, special to dip with syrup and fill with any kind of creams, in this case Majar de Parchita.

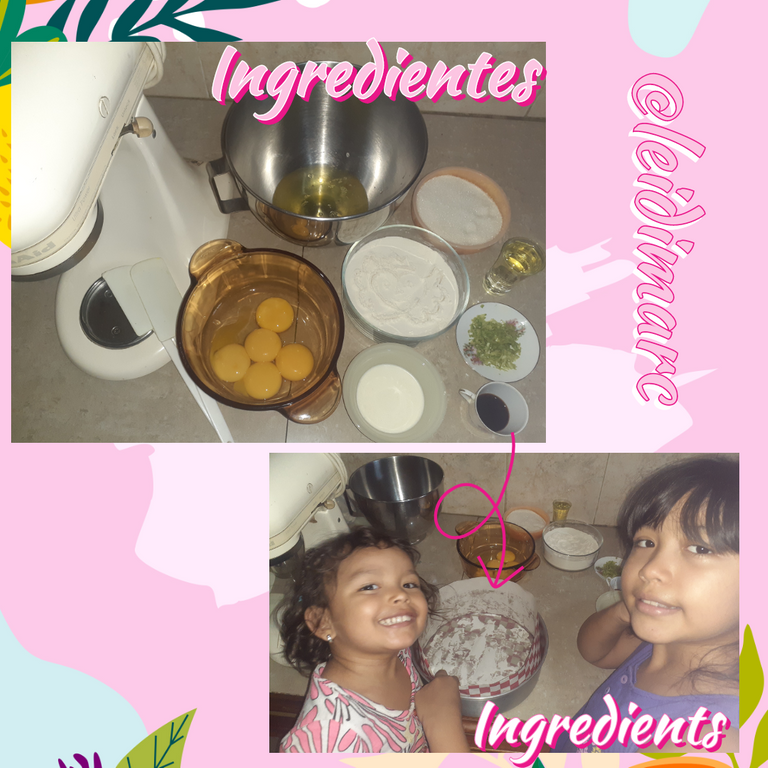
Estos son los Ingredientes para el Bizcocho:
| 300 g | Harina de Trigo leudante |
|---|---|
| 250 g | Azúcar |
| 5 | huevos |
| 50 ml | Aceite vegetal, use de soya |
| 30 ml | Leche |
| 2 Cda | Rayadura de limón o naranja |
| 2 Cda | Vainilla |
| 1 | Papel de horno, para la bandeja |
These are the ingredients for the sponge cake:
| 300 g | Wheat leavening flour |
|---|---|
| 250 g | Sugar |
| 5 | eggs |
| 50 ml | Vegetable oil, use soybean oil |
| 30 ml | Milk |
| 2 Tbsp | Lemon or orange zest |
| 2 Tbsp | Vanilla |
| 1 | Baking paper, for the baking pan |
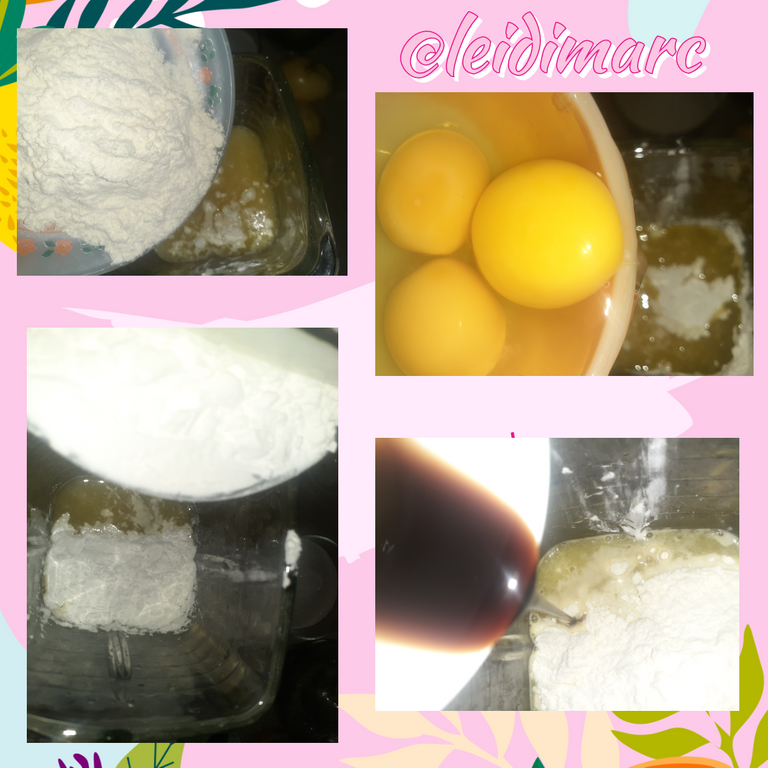
Vamos con la preparación, primero como ven en las imágenes más arriba, busque todos los ingredientes con sus medidas. Mis niñas ayudaron a echarle aceite a la bandeja, cortar y colocar el papel de horno a la bandeja.
También ayudaron con la separación de los huevos, sí, estaban disputándose quien echaba las yemas en la taza je, je, je. Por supuesto yo separé las claras, que por cierto tienen que estar a temperatura ambiente los huevos, para mejores resultados.
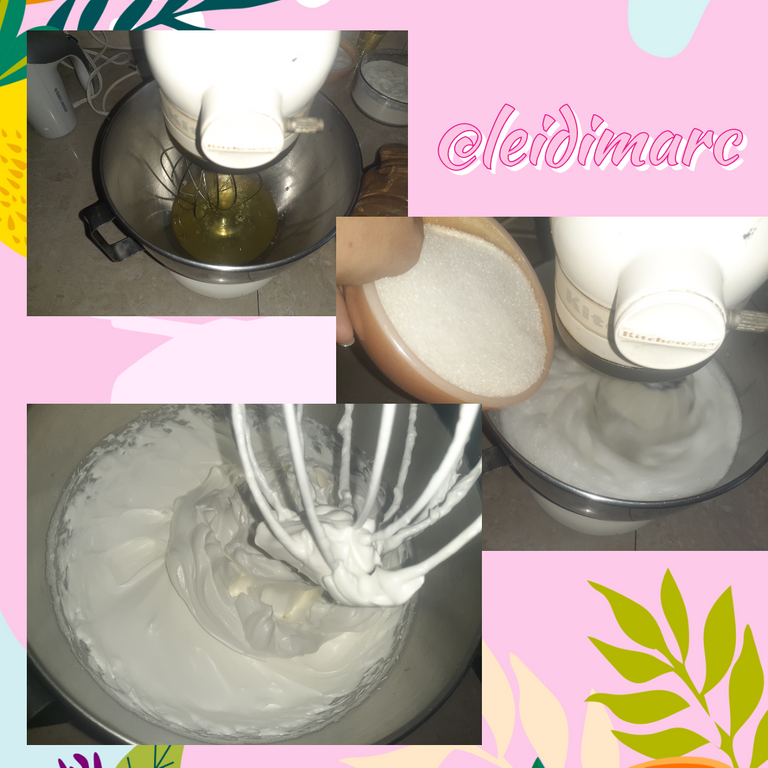
Las claras las empecé a batir a temperatura media, hasta que levantaran y se vieran espumosas, para luego echarle la mitad del azúcar y subirle la velocidad al máximo. Quedando como un merengue.
Let's go with the preparation, first as you can see in the pictures above, look for all the ingredients with their measurements. My girls helped with the oiling of the tray, cutting and placing the baking paper on the tray.
They also helped with the separation of the eggs, yes, they were fighting over who would put the yolks in the bowl heh, heh, heh. Of course I separated the egg whites, which by the way have to be at room temperature for best results.
I started beating the egg whites at medium temperature, until they rose and looked foamy, then I added half of the sugar and increased the speed to the maximum. It turned out like a meringue.
Luego empecé a batir todas las yemas en otro recipiente a velocidad alta, una vez que se estaba aclarando su color y estaba doblando su volumen, le incorporé la otra mitad del azúcar.
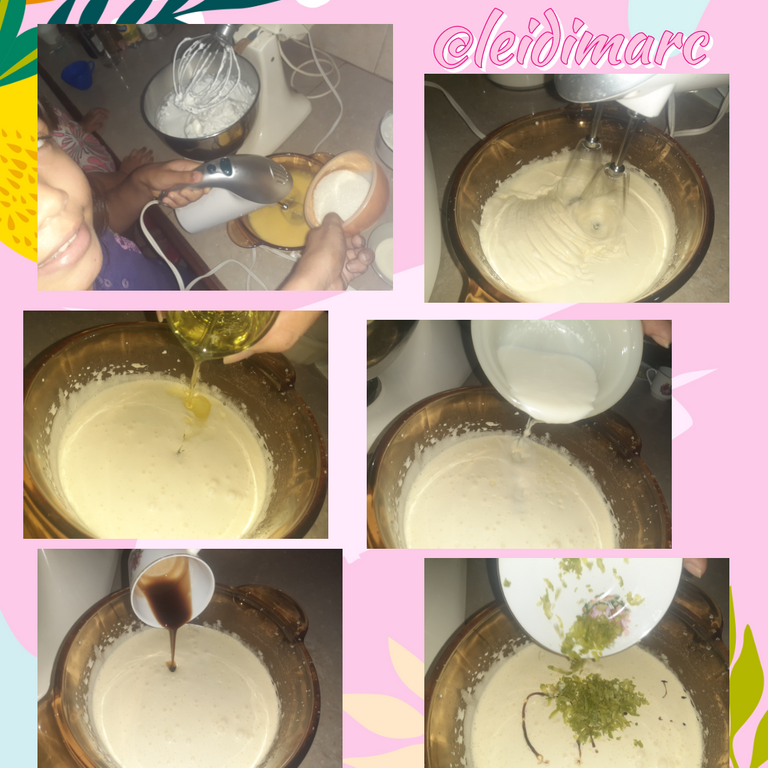
Cuando ya tenía como unos 5 minutos batiendo y estaba así de cremosa la mezcla, le fui incorporando el aceite, la leche, la vainilla y la rayadura de limón.
Ahora mezclamos todos estos ingredientes con una paleta.
Then I started to beat all the egg yolks in another bowl at high speed, once they were getting lighter in color and doubling in volume, I added the other half of the sugar.
When I had been beating for about 5 minutes and the mixture was creamy, I added the oil, milk, vanilla and lemon zest.
Now we mix all these ingredients with a paddle.
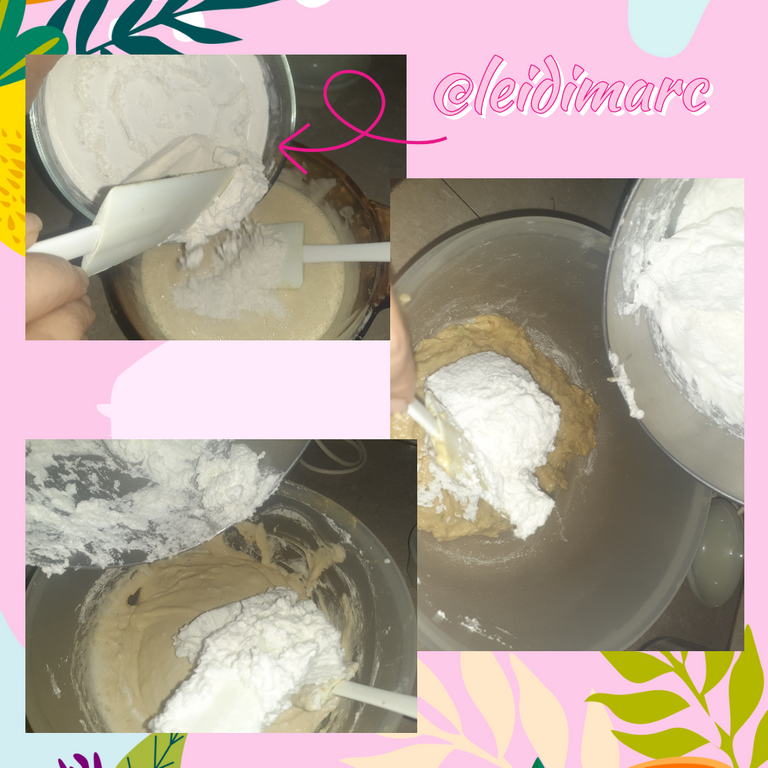
A esta mezcla en donde están las yemas, vamos a ir incorporando la harina de trigo en 3 partes, esa que indica la flecha, se hace en forma envolvente, dándole movimiento a la paleta como se muestra en el GIF.
Después que se le echó toda la harina, se pasa para otro envase más grande, en donde se le va a echar también en 3 partes las claras montadas, en forma envolvente para que no se pierda el aire de las claras.
To this mixture where the egg yolks are, we are going to add the wheat flour in 3 parts, the one indicated by the arrow, it is done in an enveloping way, giving movement to the paddle as shown in the GIF.
After all the flour has been added, it is passed to another larger container, where the whipped egg whites will also be added in 3 parts, in an enveloping way so that the air of the egg whites is not lost.
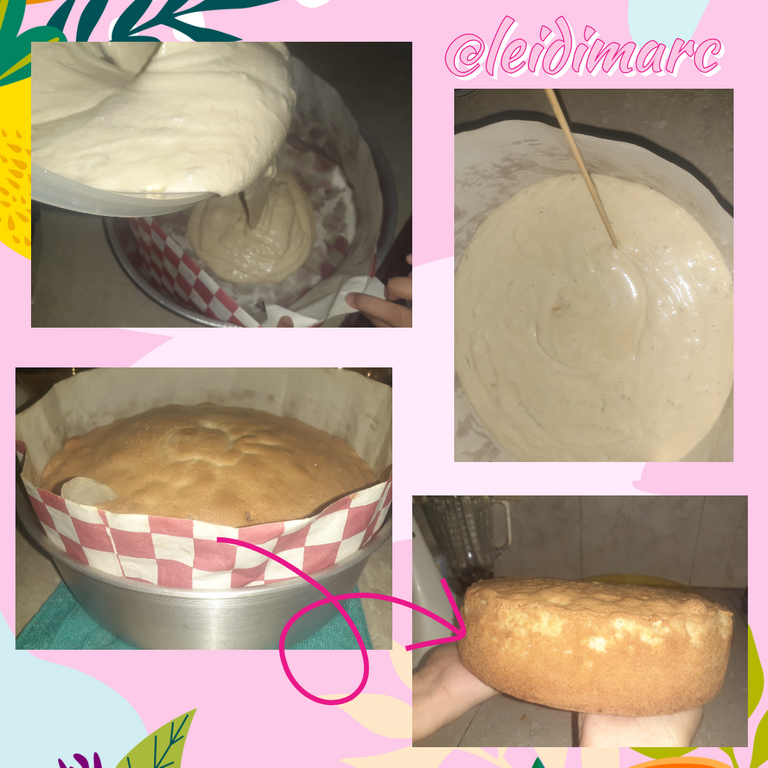
Con la mezcla lista, la echamos en la bandeja que teníamos preparada y con un palillo de altura de madera le damos vueltas, para explotar cualquier burbuja, que haya quedado por ahí.
La metemos al horno, que ya había prendido a 180 °C cuando comencé a preparar la mezcla, para que esté bien caliente.
La mezcla se veía poca y cuando vi que al pasar los minutos comenzó a levantar como la espuma, estaba supercontenta, había sido todo un éxito, se veía linda y dorada.
Miren lo grande que se ve, para la cantidad de ingredientes que se utilizó. De ese mismo tamaño me quedan cuando la hago como una torta normal de medio kilo. Pero este es más bizcocho que torta; sin embargo, a pesar de que es esponjoso como un bizcocho, también tiene el sabor y textura de una torta.
La verdad que con esta receta me quedo para preparar mis tortas de ahora en adelante, ya que sirve para rellenar, como para decorar una torta normal. Y con menos ingredientes, lo que indica, que es a menor costo.
With the mixture ready, pour it into the prepared pan and turn it with a wooden toothpick to pop any bubbles that may have been left around.
We put it in the oven, which had already been turned on at 180 °C when I started to prepare the mixture, so that it is very hot.
The mixture looked a little and when I saw that as the minutes passed it began to rise like foam, I was super happy, it had been a success, it looked nice and golden.
Look how big it looks, for the amount of ingredients used. That's the same size I get when I make it as a normal pound cake. But this is more sponge cake than cake; however, even though it is spongy like a sponge cake, it also has the taste and texture of a cake.
The truth is that I will use this recipe to prepare my cakes from now on, since it can be used to fill, as well as to decorate a normal cake. And with fewer ingredients, which means it is less expensive.


Manjar de Parchita
Mientras el bizcocho se iba haciendo, iba preparando el Manjar, para rellenarlo y decorarlo. Para esto utilicé los siguientes ingredientes:
| 5 tazas | Agua |
|---|---|
| 1 kg | Parchitas |
| 2 tazas | Azúcar |
| 3 | Huevos |
| 4 Cdas | Maicena |
| 4 Cdas | Harina de trigo |
| 1 Cda | Vainilla |
Manjar de Parchita
While the cake was being made, I was preparing the Manjar, to fill it and decorate it. For this I used the following ingredients:
| 5 cups| Water|
|- | -|
| 1 kg|Parchitas |
| 2 cups|Sugar|
|3 |Eggs |
|4 Tbsp |Maicena |
|4 tablespoons|Wheat flour|
|1 Tbsp|Vanilla|
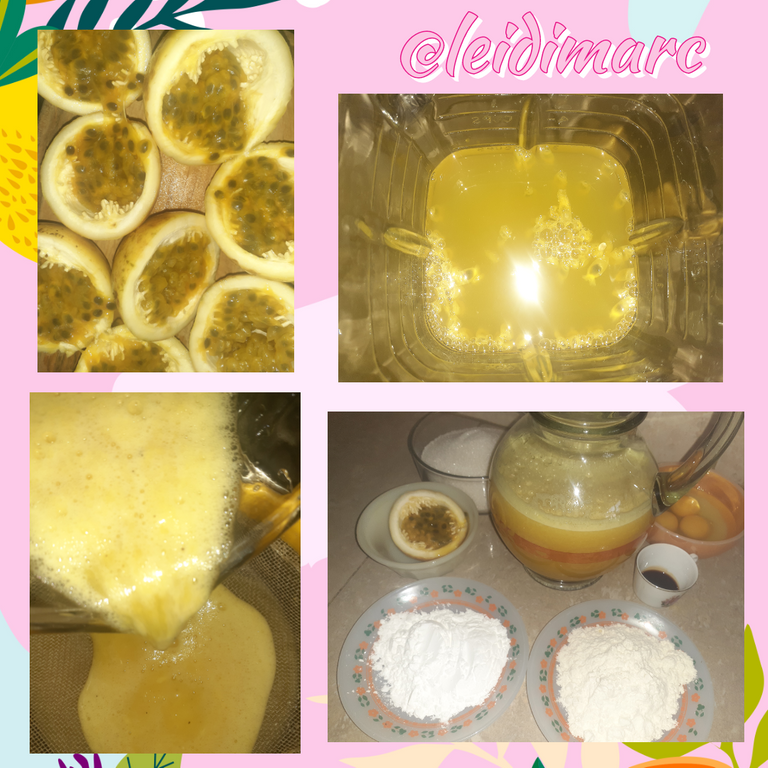
Lave y corte las Parchitas, eche la pulpa en la licuadora con el agua e hice el jugo, luego lo colé en el colador, para así tener todo listo y a la mano.
Wash and cut the Parchitas, put the pulp in the blender with the water and made the juice, then strain it in the strainer, so as to have everything ready and at hand.
Una vez con el jugo colado, lo volví a echar en la licuadora la mitad, para ir incorporando la harina de trigo, los huevos, la maicena, y la vainilla. Lo licué y reservé.
Once the juice was strained, I put half of it back in the blender to incorporate the wheat flour, eggs, cornstarch, and vanilla. I blended it and set aside.
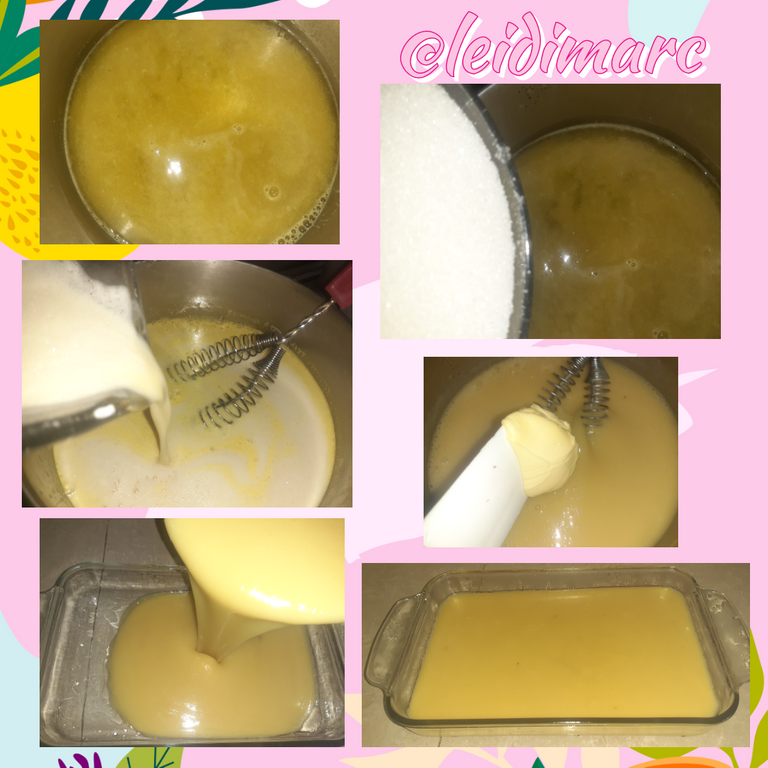
Luego la otra mitad la puse en la cocina a fuego lento con el azúcar, cuando ya iba a hervir le saque 1 1/2 taza, para que fuera el almíbar con que iba a mojar el Bizcocho.
Después la mezcla que tenía en la licuadora, la eche en la olla para preparar el Manjar. Lo fui revolviendo enérgicamente, sin dejar de batir, para que no se pegue a la olla. Si te descuidas contestando un comentario en Hive, se te quema un poco je, je, je.
Cuando ya esté espeso, que te duela la espalda de tanto batir, en ese momento le echas una cucharada de mantequilla, por cierto no lo coloque en los ingredientes. Sigues batiendo.
Pruebas que ya esté bien rico y lo apagas. En este momento le puedes echar un poco de licor, se me olvido ese punto.
Lo sirves así en un envase de vidrio, le colocas una bolsa plástica pegada a la crema, para que no forme costra (capa gruesa), lo dejas reposar, que se enfríe bien, antes de meterlo a la nevera un buen rato.
¿Cierto que se ve bien rico? Pues así estaba, lo de la olla y lo quemado, lo que se pegó, por estar en Hive, eso no se perdió, no los comimos también je, je, je.
Then I put the other half on the stove on low heat with the sugar, when it was about to boil I took out 1 1/2 cup, so that it would be the syrup with which I was going to dip the sponge cake.
Then the mixture that I had in the blender, I poured it into the pot to prepare the Manjar. I kept stirring it vigorously, without stopping whisking, so that it would not stick to the pot. If you are careless answering a comment in Hive, it burns a little heh, heh, heh.
When it is thick enough, that your back hurts from whisking so much, at that moment you add a spoonful of butter, by the way I didn't put it in the ingredients. Continue whisking.
Taste it and turn it off. At this moment you can add a little liqueur, I forgot that point.
Serve it like this in a glass container, put a plastic bag attached to the cream, so that it does not form a crust (thick layer), let it rest, let it cool down well, before putting it in the fridge for a while.
Doesn't it look good? Well, that's how it was, the pot and the burnt part, what stuck, because it was in Hive, that was not lost, we didn't eat them too heh, heh, heh.
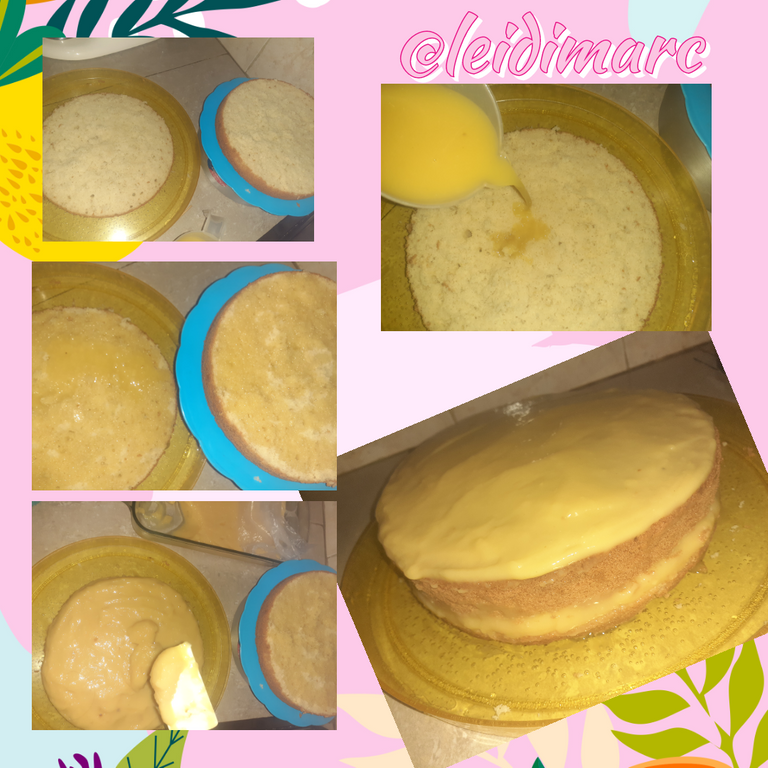
Para el proceso de armado de la torta para mi querida suegra, corte el Bizcocho a la mitad, le eché el almíbar, para mojarlo, umm ya queríamos comerlo de una vez, je, je, je.
Pero no, esperamos y seguimos con el procedimiento, le echamos una buena capa de Manjar de Parchita, colocamos la otra capa de Bizcocho y seguimos echándole por la parte de arriba, no le coloque por los lados, porque quería que se viera así desnuda, deliciosa, que se le saliera la crema. No sé, ve muy estética, pero sabe buenísima.
For the process of assembling the cake for my dear mother-in-law, I cut the cake in half, I poured the syrup, to wet it, umm we wanted to eat it at once, heh, heh, heh, heh.
But no, we waited and continued with the procedure, we poured a good layer of Manjar de Parchita, placed the other layer of sponge cake and continued pouring it over the top, I did not put it on the sides, because I wanted it to look naked, delicious, so that the cream would come out. I don't know, it looks very esthetic, but it tastes great.
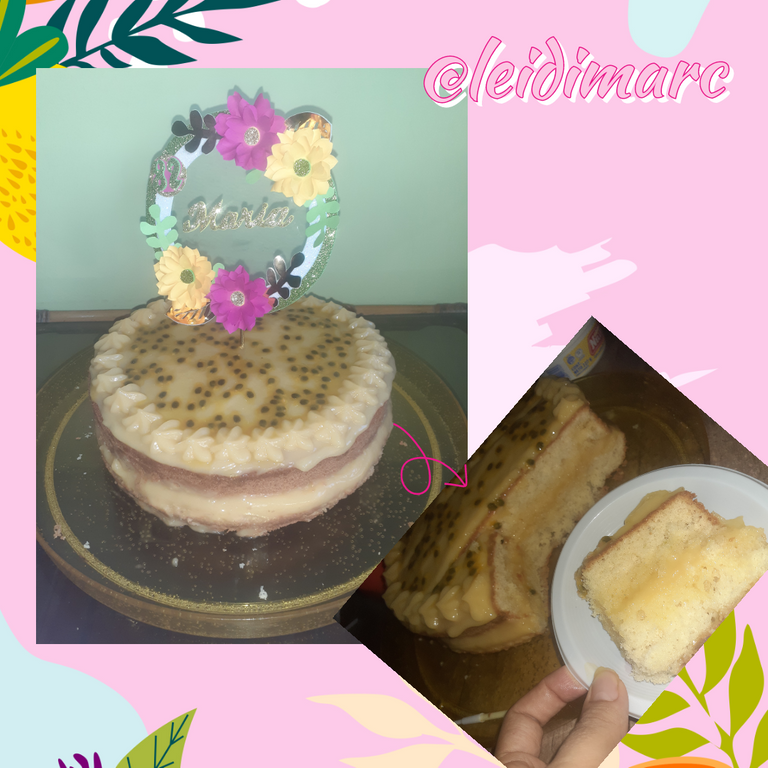
Y aquí está la protagonista de este post, una torta tipo Bizcocho, cubierta de Manjar de Parchita, luciéndose con su lindo Cake Topper que también realicé para este especial Cumpleaños de la Sra. María.
And here is the protagonist of this post, a sponge cake, covered with Manjar de Parchita, showing off with her pretty Cake Topper that I also made for this special Birthday of Mrs. Maria.

Bueno, amigos de Hive food, espero que les haya gustado el procedimiento de la elaboración de estas #recetas, fue un gusto compartirlas con ustedes.
Al mismo tiempo les dejo unas imágenes que me envió por WhatsApp, mi sobrino, del pequeño compartir en donde se lucieron mis creaciones. A la cumpleañera le gustó mucho.
A ustedes gracias por su lectura, me disculpan si me extiendo y les paso más que la receta, me emociono y termino contando desde la A hasta la z, de como va todo je, je, je. Dios me los bendiga.
Well, friends of Hive food, I hope you liked the procedure of the elaboration of these #recipes, it was a pleasure to share them with you.
At the same time I leave you some images that my nephew sent me by WhatsApp, of the small sharing where my creations were shown off. The birthday girl liked it very much.
Thank you for reading, excuse me if I go on and on and on, I get more than the recipe, I get excited and end up counting from A to z, how it all goes heh, heh, heh, heh. God bless you.
Fotos tomadas por | Photos taken by @leidimarc
Dispositivo | Device | Samsung Galaxy A20
Fotos editadas en: |Photos edited in | CC Express for Samsung
Separadores hechos en | Separators made in | CC Express for Samsung
Gif creado en | Gif created in | App Video Maker
Traducción con | Translation with| DeepL
The rewards earned on this comment will go directly to the people( @leidimarc ) sharing the post on Twitter as long as they are registered with @poshtoken. Sign up at https://hiveposh.com.
Congratulations @leidimarc! You have completed the following achievement on the Hive blockchain and have been rewarded with new badge(s):
Your next payout target is 2000 HP.
The unit is Hive Power equivalent because post and comment rewards can be split into HP and HBD
You can view your badges on your board and compare yourself to others in the Ranking
If you no longer want to receive notifications, reply to this comment with the word
STOPTo support your work, I also upvoted your post!
Que bueno, me alegra cuando veo estos mensajes, quiere decir que cada día voy avanzando.
Muchas gracias.
De nada @leidimarc, es merecido 😊👍 ¡Felicitaciones por su participación constante en en Hive!
Preciosa y luce bien sabrosa esa Maria la dueña de esa torta, debe estar feliz con esa tremenda torta que les has hecho con todo tu amor y con ese cake topper coronando elegantemente ese manjar de parchita . Excelente @leidimarc
Si que bueno que le gusto.
Me hizo sentir muy bien que me lo hiciera saber. A veces uno se desvive haciendo algo y ni las gracias dan.
Si quedo todo bien rico, el Bizcocho sensacional.
Gracias amiga. Bendiciones.
Your content has been voted as a part of Encouragement program. Keep up the good work!
Use Ecency daily to boost your growth on platform!
Support Ecency
Vote for new Proposal
Delegate HP and earn more
Eso ve súper buena y está muy linda, ya me provocó 😚🥰
Gracias amiga @no333 por pasar por mi post.
Ojalá la puedas hacer, queda súper buena y más económica que una torta normal.
Me encantó esta receta amiga @leidimarc 👏👏👏, se ve demasiado rica y ya de por si voy a buscar la parchita para tratar de hacer una 😜
Gracias por compartir esta publicación en #hivefood🤗
Me alegra amiga @janettyanez que le haya gustado,ambas recetas quedaron muy buena.
Espero la prepare tal cual y le quede mucho más linda claro jejeje.
Saludos y bendiciones.
Amiga, no importa si la foto se ve rara, mientras la torta haya quedado espectacular!
Me hiciste acordar cuando mi abuelita nos hacía manjar de cualquier fruta que hubiese en la casa, para las meriendas, mientras estábamos de vacaciones en su casa
Así es amiga, de verdad que me hubiera gustado que quedara más bonita.
Pero quede encantada con ese Bizcocho, es como mitad bizcocho y mitad torta. Porque el bizcocho no lleva líquido, ni grasa y esta llevaba un poco de leche y un poco de aceite. De verdad que quedó de un bueno.
El manjar rico, deje un poco en la nevera para compartir y cuando fui a buscar solo me dejaron la bandeja para lavar.
Amiga noooo, me acabas de antojar terriblemente, lo peor es que aquí no es tan fácil conseguir parchita o maracuyá como le dicen aquí, pero cuando encuentre quiero hacer tu receta de manjar, me pareció muy sencilla y bastante rica para combinar con hot cakes o crepas.
Muchas gracias por compartir con nosotros estas delicias ❤️😍
Ahora quiero comer de esta torta, se ve muy buena, aunque con solo el manjar me conforma, se ve muy bueno, la ventaja es que sirve con cualquier galleta o pan.
Aún me pregunto, porque a esta hora veo este tipo de recetas 😂
Momento Sad 😢
Un abrazo en la distancia, voy a tener que anotar la dirección de todos los que hacen pasteles jajajajaja 💪 😁
La parchita es de mis fritas favoritas y sobre todo los postres con ella. El toque de acidez es súper rico. Debieron darse vida en ese cumpleaños!
Por cierto felicidades para tu suegra y que cumpla muchos más.
Volviendo al tema! Todo está tan bien explicado que no hay manera de equivocarse y los gif resultan una ayuda genial.
Gracias amiga por compartirla.
Abrazos
Se ve muy rica la torta, la parchita o mayacuyá es una de mis frutas favoritas, estoy segura que fue toda una delicia. Saludos.
Si es demasiado buena y cuando está fría mucho mejor.
Que bueno que te gusto.