Yes, it's the next episode in my slow and steady refurbishment of one of my spare Z650 engines !
In the last one, Z650 Engine Rebuild Winter Project - #6: Bottom End Inspection & Sump Refitted it was all about the bottom end of the engine. Now I'm moving onto the sides.
The plan is to pull off each side cover in turn and see what it looks like underneath. In the process I should be able to identify any problems that need an immediate solution, and any issues which can be left for now but might need attention in the future. The goal at this stage is to get a functional engine at minimal cost, not necessarily take it back to factory-new.
Today, it's the turn of the clutch.
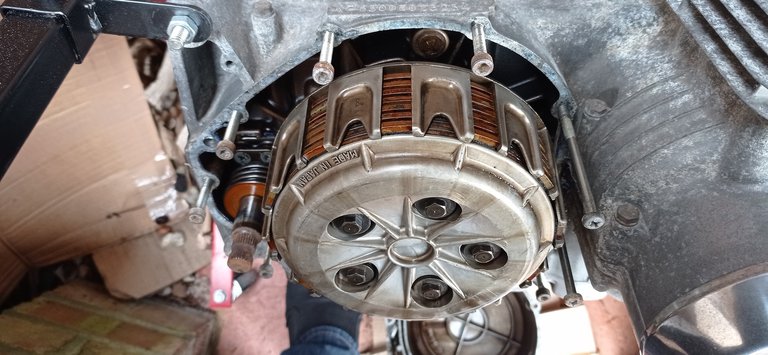
This photo is what it was like after I took the cover off - I've put it first because it makes for a better thumbnail image 😀
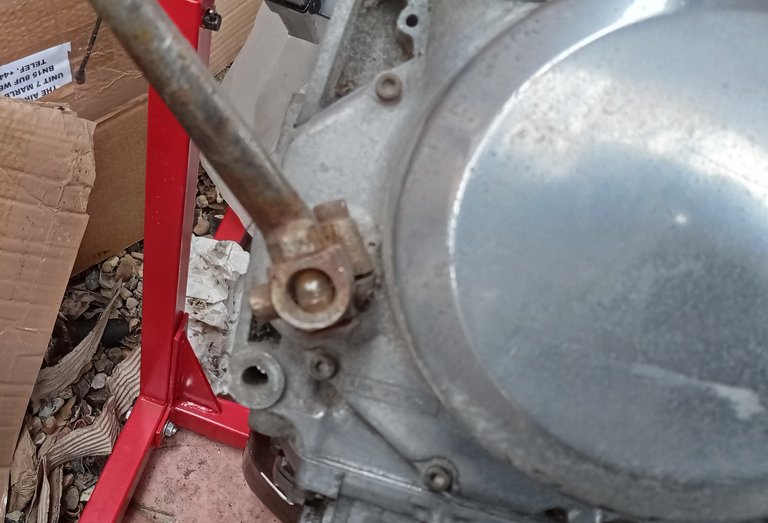

The first job was to take the kickstarter off. It's horribly rusty, but I've got a good one on the bike and a passable one in my spares box, so this one is just going to be kept in case I ever need it in an emergency. It might be a bit too far gone for successful re-chroming.
The kickstarter lives on a double spline, with the bolt that tightens the base going down the valley between the two parts of spline. It's a bit unclear from the photo (hard to take because I've only got so many hands !), but what I did was loosen the bolt and tap a small chisel into the gap in the base to open it up.
Then it was a case of wiggling the kickstarter off the spline. I had to add a little oil to help the process, after all, it had been on there for at least 30 years ! It took about half an hour of constant wiggling (and a few profanities) to persuade it to come off......

With the kickstarter removed, the next job was to remove the case. Before starting, I went all around it to clean any loose debris off that might fall in.
All the bolts holding the case on undid remarkably easily. There was a tiny amount of galvanic corrosion where the steel of the bolts had reacted with the alloy to seize them in place, but they all overcame that with a nice crack, and undid smoothly. The case itself is dulled and has some fairly deep gouges in, but I'll give it a preliminary polish to see what it looks like. I'm hesitant to try to sand the gouges out completely because it might thin the metal too much.
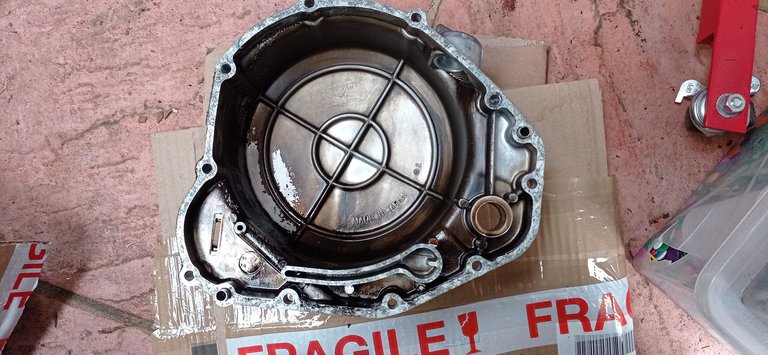
This is the inside of the casing. It looks horrible, but most of the brown is actually nicely cooked on oil, I gave it a good rub and there were no loose particles coming off. The shiny bit sits near the end of the secondary shaft, so I'm guessing the turbulence it generates in the oil was enough to prevent too much sticking. The good news is that there was no sludge, bits of metal or other undesirable debris present.
The actual clutch itself (as seen in the top photo) appears to be in good shape. Again, there is some staining from cooked-on oil. I didn't want to get into dismantling the clutch, because it would mean getting or making some special tools, and (more importantly) replacing a number of nuts and washers that can't be re-used once they're removed. Plus it's just a really difficult, horrible job that I'd only do if I absolutely had to !
Looking down inside the clutch basket, I could see that all the friction plates appeared to have plenty of material left on them. I can test the clutch from the other side when I get to that point, just to make sure it all feels as good as it looks.

By the time I finished polishing the casing, it was almost dark. This image doesn't do it justice - apart from the gouges, the alloy itself came up to a really good almost mirror-like finish. You can even see the reflection of our hazelnut tree in it ! I was able to replace the eight rusty old 6mm x 30mm Allen bolts with new ones (it's a common size, so I keep a bag of spare new ones handy), but didn't have replacements for the two 6mm x 80mm screws. I also fitted a new gasket.
The manual says nothing about torque settings for the clutch casing bolts, or whether any gasket compound should be used. Since they were originally all screws (with special Kawasaki Plasticine heads.....) I only tightened them a little, to simulate how tightly a screwdriver would have done them.
I also took a gamble by only using the new gasket but no Hylomar. Having seen the amount of gunge in the sump pan and oil filter mesh, I've decided I'll only use gasket compound where the manual says I should. The worst that'll happen is that I'll get an oil leak to fix, so when the engine runs for the first few times I'll have to monitor it closely. But I reckon that's a price worth paying to avoid filling my sump with goo !
You're making fantastic progress. I'm excited to see your bike restoration process as you go along! What on earth will you do when you've finished though? Is there another project up your sleeve?
There's still a good way to go before it's done, and I suspect there will always be more to do cosmetically.
But I've had the bike for over 30 years, and have accumulated quite a collection of spares in various conditions. I've worked out that if I can pick up a frame, swinging arm and centre stand, I've got enough spare parts to build a second Z650 :D
Goodness me! That's incredible. So it's been somewhat of a life project? That's incredible. You must be thrilled to watch it all come together now. Of course there's still lots to do, but if you've collected as many spares as you have and you can build a second one, then why not? 🤣
Hi @alonicus the work is getting better and better visually, it definitely looks well polished, and it's good that you had the majority of spare screws to replace the rusty ones, I hope to see soon when you will start that engine.
Hi @alonicus,
Thank you for participating in the #teamuk curated tag. We have upvoted your quality content.
For more information visit our discord https://discord.gg/8CVx2Am
I have to say I am fond of this rebuild of yours... We don't see alot of motorcycles being rebuilt.. With that said I did miss a whole bunch of your posts! I should back track and check some of them out..
Working on a motorcycle clutch is something that I am a little bit schecthy of. But that's just me xD
Thank you ! Bike clutches are pretty simple, but working on them is definitely not my favourite job, although I've done clutches on Kawasaki's (multi-plate wet clutches) and BMW K100's (single plate dry clutches, like cars). It tends to need special tools, and you have to pay attention to the torque settings - the hub nut tends to need a really high torque.
I can imagine, and you'll have to know those torque sets.... Otherwise they might slip right?