Hello, dear friends Hiveasrtists.
I'm Zulay Pulido, Pixelart Apprentice, with Philosophical Thought.
" What is the art? If I knew, would take good care not to reveal. I do not seek, I find." - Pablo R. Picasso.
All the images in this publication are my own.
Today is Saturday, September 12, 2020.

Mis Secretos para Crear PixelArt en Photoshop - Tutorial (Español – English)
Hola, queridos amigos Hiveartistas.
Soy Zulay Pulido, Aprendiz de Pixelart, con Pensamiento Filosófico.
“ ¿Qué es el arte? Si lo supiera, tendría buen cuidado de no revelarlo. Yo no busco, encuentro.” - Pablo R. Picasso.
Todas las imágenes de esta publicación son de mi autoría.
Hoy es sábado 12 de septiembre de 2020.
For today, I set out to create a Tutorial on how to make PixelArt works with Photoshop. I am not an expert, but my idea is to share what I have learned about this technique, for those who want to improve the finish of their work.
Without further ado, I leave you the complete list of my secrets and tips for your works to level up, if you wish.
Remember, these are only my suggestions, based on my personal experience. For sure, you will have another better procedure that, perhaps, you could share.
Para el día de hoy, me dispuse a crear un Tutorial sobre cómo hacer obras en PixelArt con Photoshop. No soy una experta, pero mi idea es compartir lo que he aprendido sobre esta técnica, para quienes deseen mejorar el acabado de su trabajo.
Sin más preámbulo, les dejo la lista completa de mis secretos y consejos para que tus obras suban de nivel, si así lo deseas.
Recuerda, son solo mis sugerencias, de acuerdo a mi experiencia personal. Con seguridad, tendrás otro procedimiento mejor que, tal vez, podrías compartir.
Secret # 1:
Learn about what Pixelart is.
The first time I entered the Pixelart Contest promoted by @kristyglas, I had no idea what PixelArt is. I received flattering comments, but there was one in particular that made me understand that I didn't know anything about this technique. So, I decided to study it and learn it in-depth, since I really liked it.
On the internet, there are a lot of free resources on this topic. However, I recommend you read this small tutorial that I found and that, in summary, brings excellent information that will guide you in complying with the rules of this pictorial practice.
Secreto N° 1:
Aprende sobre lo que es Pixelart.
La primera vez que participé en el Concurso de Pixelart promovido por @kristyglas, no tenía idea de lo que era PixelArt. Recibí halagadores comentario, pero hubo uno en particular, que me hizo entender que no sabía nada sobre esta técnica. Así, me propuse a estudiarla y aprenderla con profundidad, ya que me agradó mucho.
En internet hay una gran cantidad de recursos gratuitos sobre este tema. Sin embargo, te recomiendo leer este pequeño tutorial que encontré y que, en resumen, trae excelente información que te guiará en el cumplimiento de las reglas de esta práctica pictórica.
También es conveniente ver algunos videotutoriales en Youtube sobre este tópico. Conseguí algunos cortos y muy interesantes.
Secret N ° 2
Prepare a pencil sketch with all the details you want to add to the drawing.
There are those who like to start a drawing freely, but sincerely, I recommend coming to Photoshop with a clear sketch, so as not to wander and waste a lot of time. But, as I say, everyone has a different workflow. We must choose the procedure with which we feel most comfortable.
It is easier to create the design on paper and pencil than to do it on the computer, even if you have a graphic tablet. The great digital cartoonists will surely think differently.
VERY IMPORTANT NOTE:
The success of everything we do in life is exalted with the details.
If your original drawing has well-defined details, it is likely to be better seen.
When I talk about details in the drawing, I mean small things that attract the attention of the human eye: changes in color, simulation of movements, well-done gradients, small objects that denote the care when carrying out the work, well-distributed lights and shadows, and others.
Secreto N° 2
Preparar un boceto a lápiz con todos los detalles que quieras agregarle al dibujo.
Hay quienes gustan de iniciar un dibujo libremente, pero sinceramente, recomiendo llegar al Photoshop con el bosquejo claro, para no divagar y perder mucho tiempo. Pero, como digo, cada uno tiene su flujo de trabajo diferente. Hay que elegir aquel procedimiento con el cual nos sintamos más cómodos.
Es más fácil crear el diseño en papel y lápiz que hacerlo en el computador, aunque se tenga tableta gráfica. Los grandes dibujantes digitales, seguramente pensarán diferente.
NOTA MUY IMPORTANTE:
El éxito de todo lo que hacemos en la vida se exalta con los detalles.
Si tu dibujo original tiene detalles bien definidos, es probable que sea mejor visto.
Cuando hablo de detalles en el dibujo, me refiero a pequeñas cosas que llaman la atención del ojo humano: cambios en el color, simulación de movimientos, degradados bien hechos, objetos pequeños que denotan el esmero al realizar el trabajo, luces y sombras bien repartidas, y otros más.
Secret N ° 3
Photoshop Settings
In this section, I am going to show you how Photoshop CC 2017 can help me to obtain clear and well-pixelated images.
Secreto N° 3
Configuración de Photoshop
En este apartado voy mostrarte cómo hago para que Photoshop CC 2017 me ayude a obtener imágenes claras y bien pixeladas.
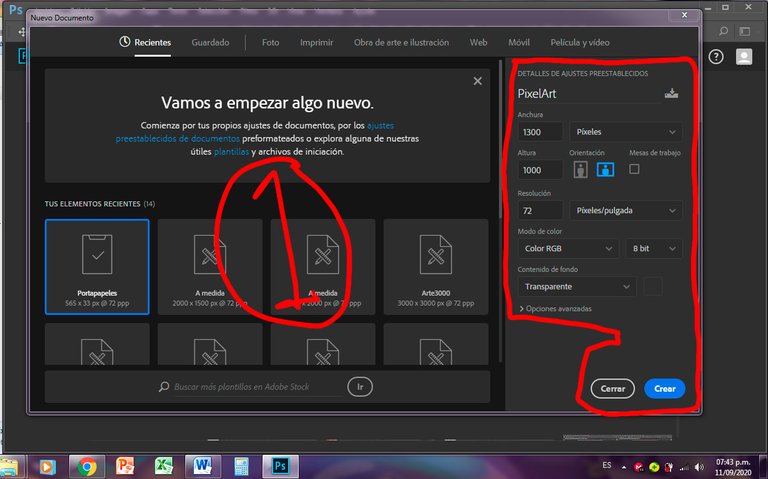
Step 1:
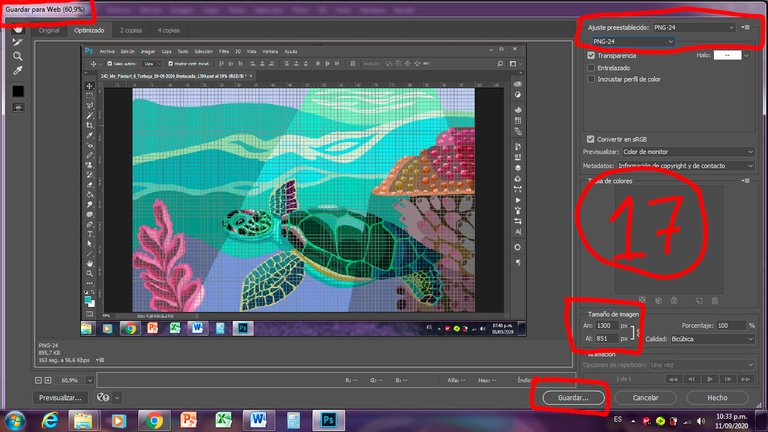
I generate a new canvas, like this: Width: 1300 px; Height: whatever you like; Resolution: 72 dpi (for web); Color Mode: 8-bit RGB color (It is not necessary to use 16 bit, because you can hardly notice the difference and it takes away resources from the machine); background content: Transparent; Create.
For me, it is very important to draw the PixelArt on a large canvas (1300 px), since it can accommodate more details that embellish the work. However, it has its difficult side and that is that it takes much more time to paint the job than with a smaller canvas. The great PixelArt artists use canvases with larger work areas.
Normally, it takes me about 6 hours to complete a PixelArt of that size, but chances are, you are faster than me.
Paso 1:
Genero un lienzo nuevo, así: Ancho: 1300 px; Altura: la que gustes; Resolución: 72 dpi (para web); Modo de Color: Color RGB de 8 bit (No hace falta usar 16 bit, pues apenas se nota la diferencia y le resta recursos a la máquina); contenido de fondo: Transparente; Crear.
Para mí, es muy importante dibujar el PixelArt en un lienzo de gran tamaño (1300 px), puesto que puede albergar mayor cantidad de detalles que embellecen la obra. Sin embargo, tiene su lado difícil y es que toma mucho más tiempo el trabajo de pintura, que con un lienzo de menores dimensiones. Los grandes artistas del PixelArt utilizan lienzos con mayores áreas de trabajo.
Normalmente, me toma unas 6 horas completar un PixelArt de ese tamaño, pero es muy probable que tú seas más rápido que yo.
Step 2:
To make the tip of the pencil so I will draw a square and not round, as the default configuration that Photoshop brings.
I go to Edit> Preferences> General
Paso 2:
Para hacer que la punta del lápiz conque dibujaré sea cuadrada y no redonda, como la configuración por defecto que trae Photoshop.
Voy a Edición > Preferencias > Generales
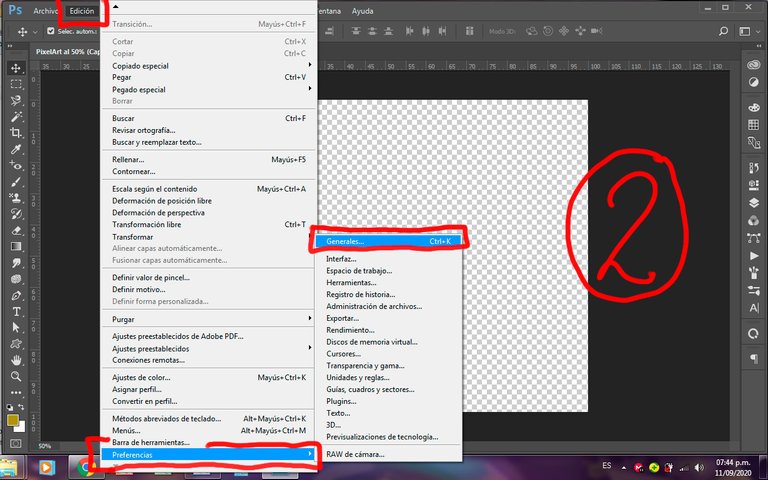
Step 3:
Image interpolation> By approximation (preserves sharp edges)
Paso 3:
Interpolación de imagen > Por aproximación (conserva bordes definidos)

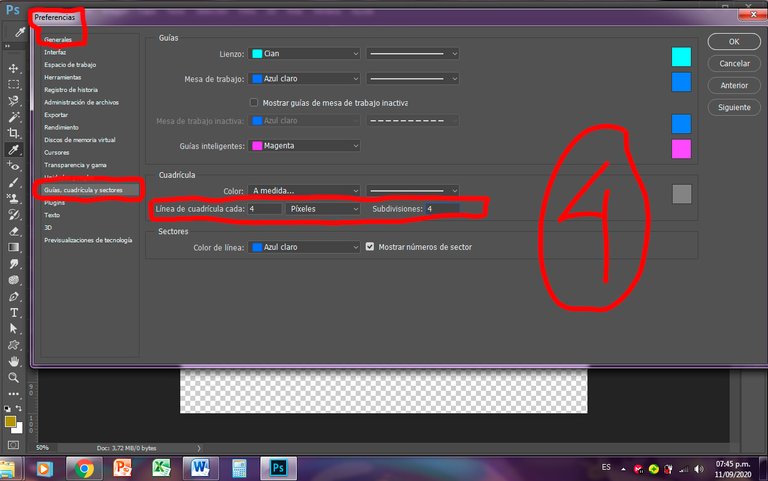
Step 4:
To determine the size of the boxes to be seen on the drawing grid.
In the same Preferences panel> Guides, Grids and sectors> Grid line every: 4 pixels> Subdivisions: 4> Ok
Paso 4:
Para determinar el tamaño de los cuadros que se verán en la cuadrícula de dibujo.
En el mismo panel de Preferencias > Guías, Cuadrículas y sectores > Línea de cuadrícula cada: 4 pixeles > Subdivisiones:4 > Ok
Step 5:
I choose the pencil tool, which I previously configured with a square tip, and not the brush that has a round tip, to draw.
Paso 5:
Escojo la herramienta lápiz, que ya configuré previamente con punta cuadrada, y no el pincel que tiene punta redonda, para dibujar.
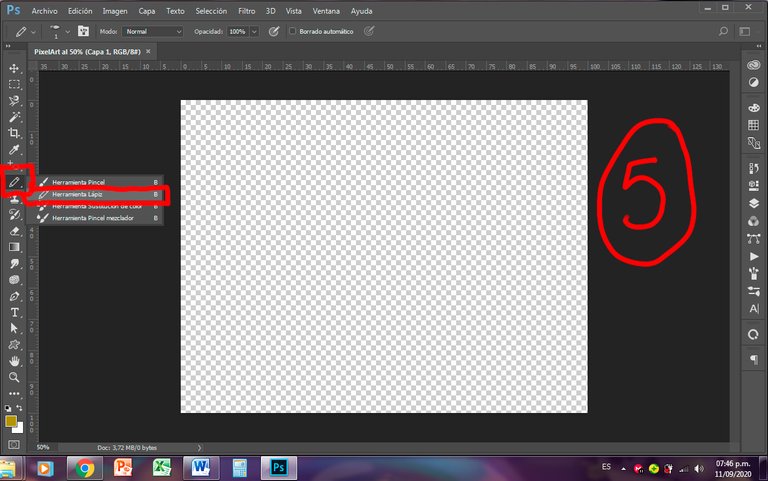
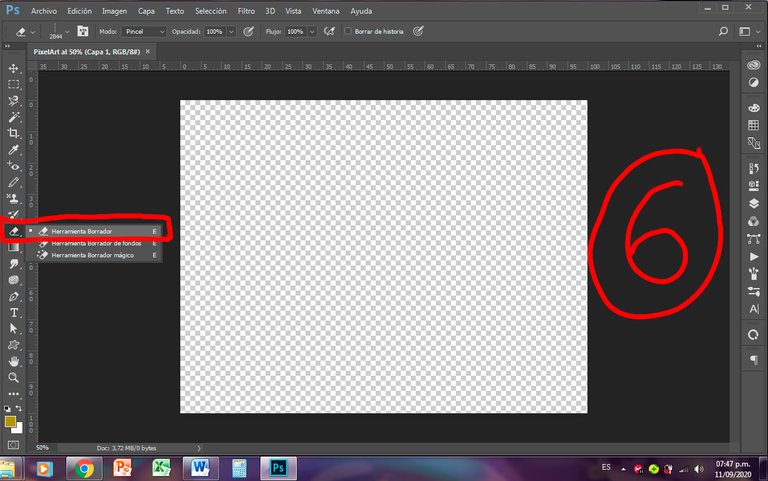
Step 6:
I select the eraser tool
Paso 6:
Selecciono la herramienta borrador
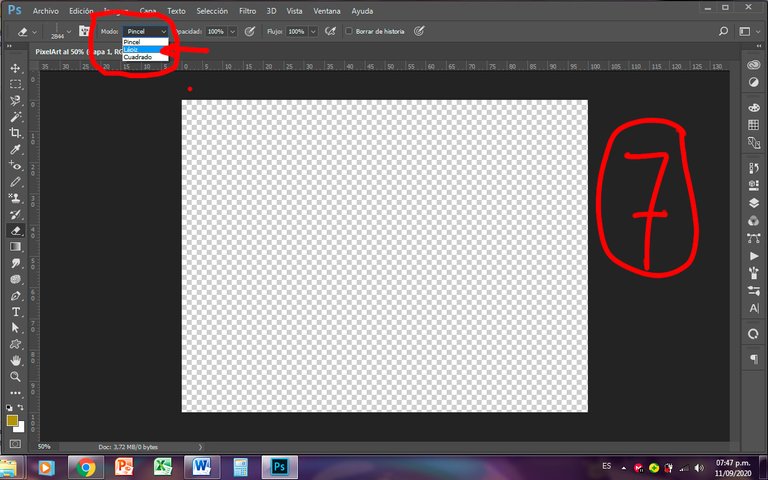
Step 7:
I choose the Mode: Pencil, so that when erasing, it has the square shape of the Pencil with which I will draw.
Paso 7:
Escojo el Modo: Lápiz, para que al borrar, tenga la forma cuadrada del Lápiz con el que dibujaré.
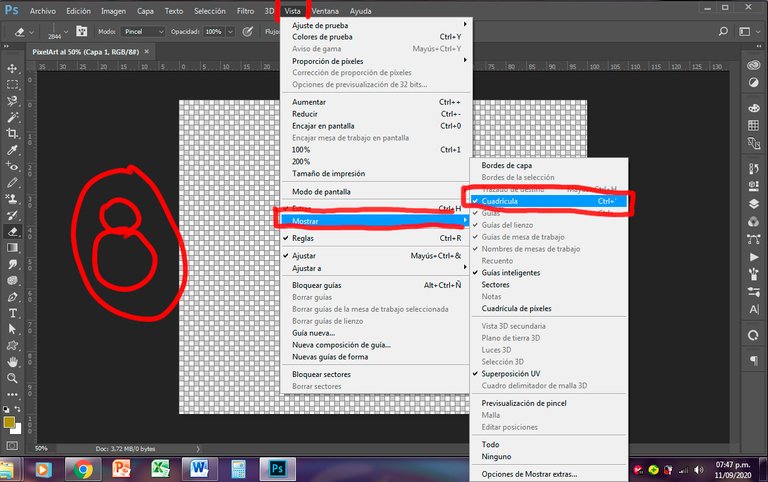
Step 8:
So that you can see the grid that will guide me during the drawing, and that, previously, in step 3, I configured with 4-pixel boxes in the Preference panel.
View> Show> Grid
Ready. Photoshop is ready for my work on Pixel Art.
Paso 8:
Para que se vea la cuadrícula que me orientará durante el dibujo, y que, previamente, en el paso 3, configuré con cuadros de 4 pixeles en el panel Preferencia.
Vista > Mostrar > Cuadrícula
Listo. Ya Photoshop está preparado para mi trabajo en Pixel Art.
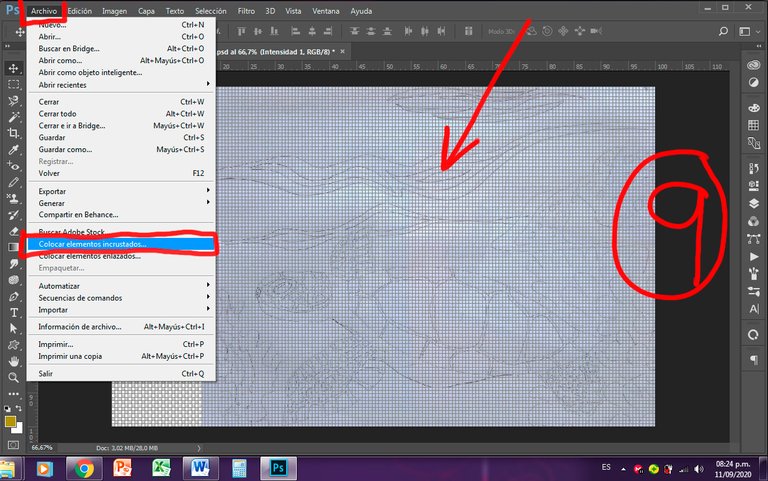
Step 9:
View the photo or scan of our pencil drawing on the Photoshop screen
File> Place Embedded Elements
Paso 9:
Ver la foto o el escaneado de nuestro dibujo a lápiz en la pantalla de Photoshop.
Archivo > Colocar elementos incrustados
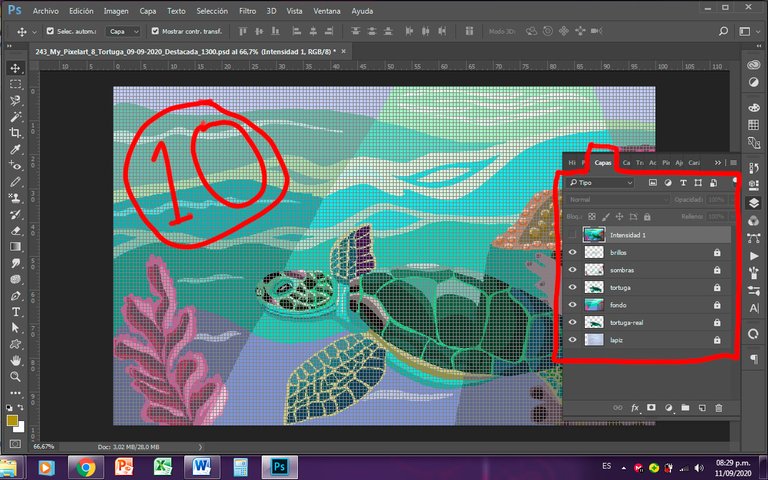
Step 10:
I paint each sector of the drawing in a different layer and when I am sure that it has turned out well, I combine the layers, so as not to leave too many layers open and I put a lock on it, in order not to paint on it by mistake.
Paso 10:
Pinto cada sector del dibujo en una capa diferente y cuando estoy segura de que ha quedado bien, combino las capas, para no dejar demasiadas capas abiertas y le pongo un candado, con el fin de no pintar sobre ella por error.
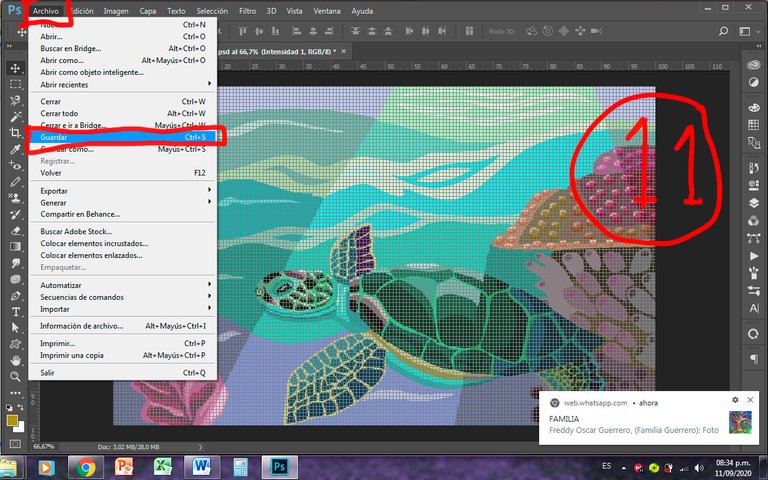
GREAT FINAL SECRET
Step 11:
Once the drawing is finished and I am satisfied with my work, I do the following:
Save: This will save the 1300 px wide image.
GRAN SECRETO FINAL
Paso 11:
Una vez terminado el dibujo y satisfecha con mi obra, hago lo siguiente:
Guardar: Así te quedará guardada la imagen original creada de 1300 px de ancho.
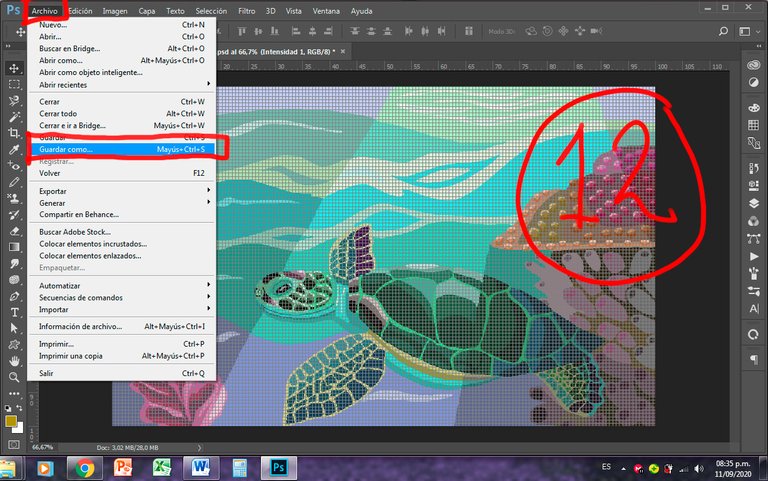
Step 12:
Save as> the same image with another name. I am creating a new image.
Paso 12:
Guardar como > la misma imagen con otro nombre. Estoy creando una imagen nueva.
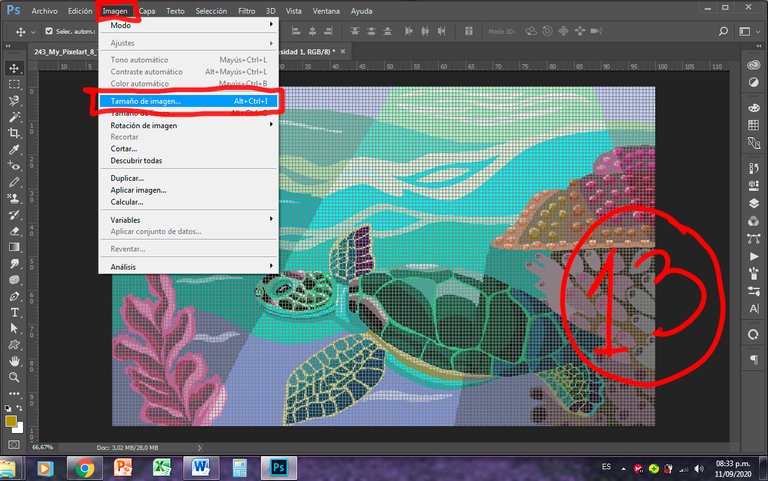
Step 13:
Image> Image size
Paso 13:
Imagen > Tamaño de imagen
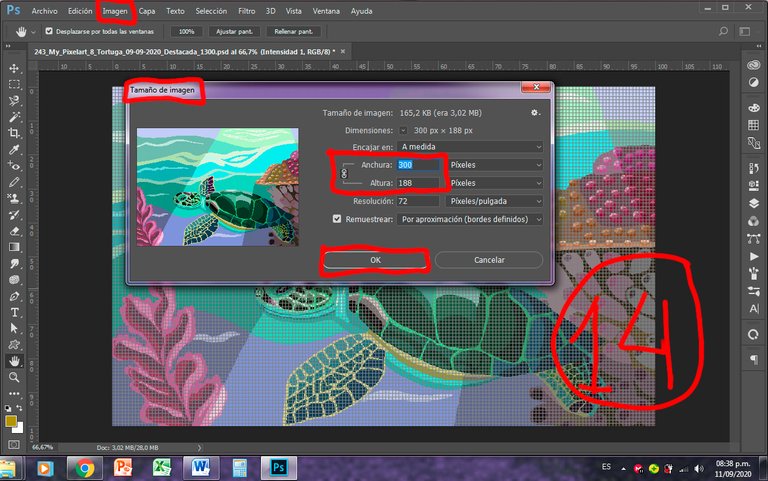
Step 14:
I reduce the size of the image to 300 px.
Image> Image size> Width: 300 px with the link closed so that it maintains the aspect ratio of the image> Ok
Paso 14:
Reduzco el tamaño de la imagen a 300 px.
Imagen > Tamaño de imagen > Ancho: 300 px con el eslabón cerrado para que mantenga la proporción de la imagen > Ok
Step 15:
Then, I repeat the Save procedure and enlarge the 300 px image to 1300 px.
Save> Save as> the same 300 px wide image with another name> Image> Image size> Width: 1300> Ok.
Paso 15:
Luego, repito el procedimiento de Guardar y amplío la imagen de 300 px hasta llevarla a 1300 px.
Guardar > Guardar como > la misma imagen de 300 px de ancho con otro nombre > Imagen > Tamaño de la imagen > Ancho: 1300 > Ok.
With this last Secret, first I reduce the image that I originally drew to 300 px, then I enlarge it again to 1300 px, and with this, I achieve that when Exporting the image that goes to the Internet it looks pixelated and with all the details that I have put in it. I do this, because the original image obtained in step 10, looks very good, but little pixelated.
You will understand better what I say when you apply the procedure previously indicated.
Con este último Secreto, primero reduzco la imagen que dibujé originalmente a 300 px, posteriormente la vuelvo a ampliar a 1300 px, y con esto logro que al Exportar la imagen que va a Internet se vea pixelada y con todos los detalles que he puesto en ella. Esto lo hago, porque la imagen original obtenida en el paso 10, se ve muy bien, pero poco pixelada.
Entenderás mejor lo que digo, cuando apliques el procedimiento previamente señalado.
Step 16:
Export the final image in .png format, since the pixels will be better preserved than in another format.
File> Export> Save for Web (Legacy)
Paso 16:
Exportar la imagen final en formato .png, ya que se conservarán mejor los pixeles que en otro formato.
Archivo > Exportar > Guardar para Web (heredado)

Step 17:
Save to Web> PNG-24> Save
Paso 17:
Guardar para Web > PNG-24 > Guardar
Hope this Tutorial helps you create better PixelArt works.
Espero que este Tutorial te ayude a crear mejores obras de PixelArt.
Mis Redes Sociales personales son:
Facebook: https://www.facebook.com/zupulido,
y Twitter: https://twitter.com/zupulido, pero no las uso con frecuencia.
Sin embargo, las de la FAVTachira,
Facebook: https://www.facebook.com/FAVTachira/,
Twiiter: https://twitter.com/favtachira
e Instagram: https://www.instagram.com/favtachira/,
sí se actualizan constantemente.
If you liked this post, I thank you for leaving your kind comment and some recommendations to improve my work.
Remember, you can find me at https://hive.blog/@librepensadora
Greetings from Venezuela, a country with Great Drawers.
Si te gustó esta publicación, te agradezco dejar tu gentil comentario y algunas recomendaciones para mejorar mi trabajo.
Recuerda, puedes encontrarme en https://hive.blog/@librepensadora
Un saludo desde Venezuela, un país con Grandes Dibujantes.
Welcome dear friend.
I recommend you join the @theterminal Community, the best option that exists in Hive, specialized in teaching the most advanced techniques and methods of creating quality articles. That will undoubtedly serve you throughout your journey through this important Blockchain.
If you want to be part of this great initiative, you just have to contact via Discord to @brittandjosie or @justclickindiva
Bienvenido, querido amigo.
Te recomiendo unirte a la Comunidad @theterminal , la mejor opción que existe en Hive, especializada en la enseñanza de las más aventajadas técnicas y métodos de creación de artículos de calidad. Eso te servirá, indiscutiblemente, en todo tu trayecto por esta importante Blockchain.
Si deseas formar parte de esa grandiosa iniciativa, solo tienes que contactar, a través de Discord, a @brittandjosie o @justclickindiva

![]()
amazing stuff, with your tutorial now I feel I could make my own pixel art too.
That's the idea, my friend @stevenson7
Share knowledge so that we all have the opportunity to make good Art.
I hope to see your works.
A big hug
thanks
This is very cool! You are pretty skilled with Photoshop. I wouldn't even know where to start! 🤭
I'm bookmarking this article for future reference.
Hi, my dear friend @trincowski
Thanks for your nice comment.
Dare yourself! and start drawing something in Photoshop. It is extraordinary software.
I hope to see your artwork very soon
Now I see you you obtained the beautiful turtle and how long it took you to accomplish it. You are an awesome designer. I really like the work you produce because it's always so colorful and detailed.
Thank you very much, my dear friend @justclickindiva
This work requires many hours of dedication, but the result is worth it.
Hugs and kisses
Excelente tutorial, este tipo de arte siempre lo comparo con bordar (valga la comparación) aquel que ha bordado comprende. De hecho, tu diseño bien puede usarse para ello, quedaría estupendo, un abrazo.
Muchísimas gracias, amigo de @equipodelta , por tu visita e interesante comentario.
Un abrazote
Excelente posh quedo muy lindo.
Muchas gracias, amiga @tati126
Bienvenida a mi blog
Thank you for sharing this amazing post on HIVE!
Your content got selected by our fellow curator @stevenson7 & you just received a little thank you via an upvote from our non-profit curation initiative!
You will be featured in one of our recurring curation compilations and on our pinterest boards! Both are aiming to offer you a stage to widen your audience within and outside of the DIY scene of hive.
Join the official DIYHub community on HIVE and show us more of your amazing work and feel free to connect with us and other DIYers via our discord server!
If you want to support our goal to motivate other DIY/art/music/homesteading/... creators just delegate to us and earn 100% of your curation rewards!
Stay creative & hive on!
Thank you, friend @stevenson7 of the team @diyhub
I am very grateful for your good valuation to my job
Saludos amiga excelente tutorial que sirve de guía para mejorar nuestros pixelart.
Por supuesto, mi amigo @cetb2008
La idea es que todos progresemos en conjunto, en nuestras obras. De eso, se trata Hive.
Excelente amiga un abrazo.
Congratulations, your post has been upvoted by @dsc-r2cornell, which is the curating account for @R2cornell's Discord Community.
Enhorabuena, su "post" ha sido "up-voted" por @dsc-r2cornell, que es la "cuenta curating" de la Comunidad de la Discordia de @R2cornell.
Thank you, friends of @dsc-r2cornell @r2cornell and @blessed-girl for your positive valuation
That’s a great tutorial
Thank you, my dear friend @brittandjosie
I hope for your PixelArt works
Buenísimo el tutorial y las referencias! Cuando prepare mi próximo dibujo PixelArt definitivamente voy a utilizarlo, súper detallado y organizado, te felicito.
Me quedé con la curiosidad de saber cuál fue el comentario, hahahaha.
Saludos, que pases buen resto del día.
Hola, mi querida amiga @tripode
jajaja no te voy a decir
Espero ver tus próximos trabajos de PixelArt.
Un gran abrazo
Excelente Tutorial @librepensadora! El Conocimiento es Vida y Quien lo comparte Ayuda a Salvar Vidas!! Espero que más personas se Animen a Crear sus Pixel Art. Aunque no soy Muy Experta también voy a compartir mi Tutorial pero con el Programa Adobe (Ai). El primer pixel Art lo Hice con el Programa Excel!! Existen muchisimas Herramientas y programas para crear Artes Digitales, sólo se necesita tiempo , empeño y dedicación para mejorar y crecer como Artistas!!!
Hola, amiga @ykroys
Me encantaría aprender con tu tutorial en Illustrator.
Muchas gracias por tu importante mensaje.
Un gran abrazo
This post was shared and voted inside the discord by the curators team of discovery-it
Join our community! hive-193212
Discovery-it is also a Witness, vote for us here
Delegate to us for passive income. Check our 80% fee-back Program
I am so grateful with your curation work, friends of @discovery-it
A Big Hug
:)
muchas gracias pr compartir tu experiencia con la comunidad muy util tu tutorial @librepensadora
Muchas gracias, por tu amable comentario, amiga @lisbethseijas
Espero ver tus obras de PixelArt, muy pronto jeje
Un gran abrazo
Congratulations @librepensadora! You have completed the following achievement on the Hive blockchain and have been rewarded with new badge(s) :
You can view your badges on your board and compare yourself to others in the Ranking
If you no longer want to receive notifications, reply to this comment with the word
STOPThanks for the reminder, @hivebuzz friends
A big hug
You're welcome @librepensadora👍🙂