
Finding no attribution photos is now easier, my go-to is always Unsplash, but sometimes, I can't find something I like.
I tried searching for mockup tools online, but requires registration and payment.
TL;DR
While writing Running a Fake SMTP Server and Sending Emails to Gmail, I needed a banner image that visualizes the post.
Unable to find no attribution photos, I decided to create my own mockups,through simple HTML and CSS.
Mockups
A mockup is a "sample" look and feel of your UI in various device and in different scenarios. It can be a PC in a office, a smartphone on hand, or a tablet in the living room.
While this is easy using image editors, I prefer using HTML and CSS. I have been doing this before when I created printable, digital letters with fancy designs for different occasions.
Concept
It will be more difficult to add hands and real backgrounds to simulate real situations, so I decided to simplify the mockups.
All I need is white wall (white gradient), the device (black gradient), the screen (any appopriate screenshot), cameras, and notch (optional).
I used the screenshot feature of Mozilla Firefox, but if you want some automatic downloads, check out html2canvas to download your HTML into an image.
There are many available CSS tools online, for the gradient, I used CSS Gradient.
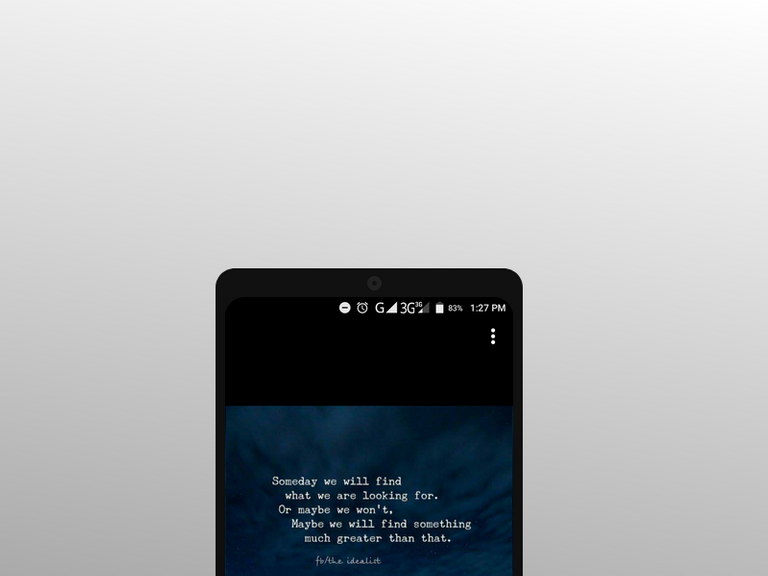
Mockup #1
The concept of this would be a 1080x2340 pixel smartphone displayed on half of the frame. I found an old screenshot with that resolution and copied it to the img folder in the repo.
The HTML document is just div tags with classes where I can manage the design through the android1.css stylesheet.
<!DOCTYPE html>
<html>
  <head>
    <title>Mockups</title>
    <link rel="stylesheet" href="android1.css">
  </head>
  <body>
    <div class="background">
      <div class="android edge low center">
        <div class="camera"></div>
        <div class="screen"></div>
      </div>
    </div>
  </body>
</html>
For the CSS, the body is set to black and the frame is sized to 800x600 px, given the ratio of the screenshot plus some padding, the whole smartphone is 320x560px.
To add the look-and-feel, I smoothen the edges with border radius set to 20px, added some black gradients, and a front camera on top.
To align the smartphone at the center, subtract the half of the smartphone width to the half of the frame width:
x = ((800 / 2) - (320 / 2)) px
To align the smartphone on the frame while showing half of its frame, subtract the half of the smartphone height to the frame height:
y = (600 - (563 / 2)) px
Here's the full CSS for the Mockup #1:
* {
  box-sizing: border-box;
}
body {
  background-color: #000;
  overflow: hidden;
}
.background {
  position: fixed;
  margin-left: Calc(50% - 400px);
  margin-top: 0;
  width: 800px;
  height: 600px;
  background: rgb(170,170,170);
  background: linear-gradient(10deg, rgba(170,170,170,1) 0%, rgba(255,255,255,1) 100%);
  overflow: hidden;
}
.low {
  margin-top: 280px;
}
.center {
  margin-left: 225px;
}
.android {
  padding: 30px 10px;
  width: 320px;
  height: 563px;
  border-radius: 20px;
  overflow: hidden;
}
.edge {
  background: rgb(10,10,10);
  background: linear-gradient(25deg, rgba(10,10,10,1) 0%, rgba(16,16,16,1) 50%, rgba(17,17,17,1) 100%);
}
.camera {
  position: absolute;
  margin-left: 148px;
  margin-top: -22px;
  width: 15px;
  height: 15px;
  background-color: #111;
  border: 5px solid #222;
  border-radius: 100%;
}
.screen {
  width: 300px;
  height: 503px;
  background-color: #cccccc;
  background-image: url('img/android1.png');
  background-size: cover;
  border: 1px solid rgba(0, 0, 0, 0.05);
  border-radius: 20px;
  overflow: hidden;
}
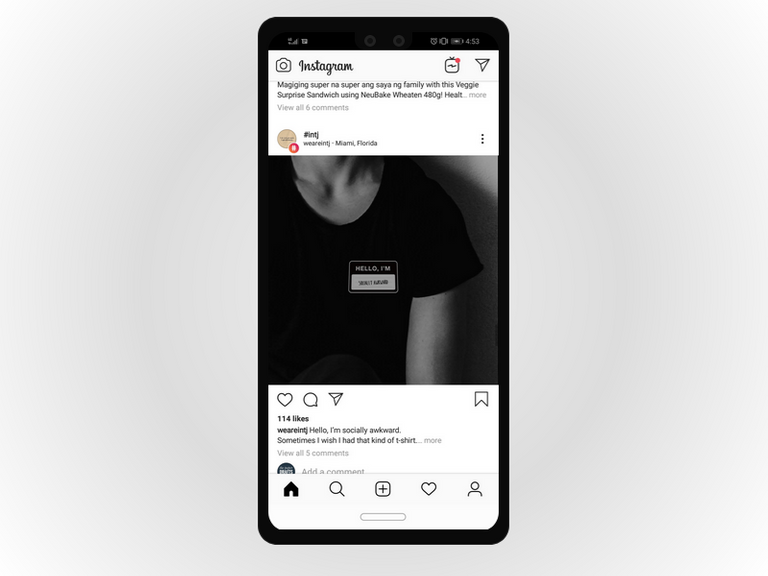
Mockup #2
The concept of this would be a 720x2340 pixels smartphone displayed center-middle of the frame. I also had an old screenshot of that resolution and copied it to the img folder in the repo.
Same with the previous mockup the HTML document is just div tags with classes where I can manage the design through the android1.css stylesheet. I added a notch and an extra camera.
<html>
  <head>
    <title>Mockups</title>
    <link rel="stylesheet" href="android2.css">
  </head>
  <body>
    <div class="background2">
      <div class="android edge center mid">
        <div class="camera1"></div>
        <div class="camera2"></div>
        <div class="notch"></div>
        <div class="screen"></div>
      </div>
    </div>
  </body>
</html>
For the CSS, the body is set to black and the frame is sized to 800x600 px, given the ratio of the screenshot plus some padding, the whole smartphone is 262x550px.
To add the look-and-feel, I smoothen the edges with border radius set to 20px, added some black gradients, and two front camera with a notch behind it by adjusting the using z-index of the elements.
To align the smartphone at the center, subtract the half of the smartphone width to the half of the frame width:
x = ((800 / 2) - (262 / 2)) px
To align the smartphone at the middle of the framd, subtract the half of the smartphone height to the half of the frame height:
y = ((600 / 2) - (550 / 2)) px
Here's the full CSS for the Mockup #2:
* {
  box-sizing: border-box;
}
body {
  background-color: #000;
  overflow: hidden;
}
.background2 {
  position: fixed;
  margin-left: Calc(50% - 400px);
  margin-top: 0;
  width: 800px;
  height: 600px;
  background: rgb(238,238,238);
  background: radial-gradient(circle, rgba(238,238,238,1) 0%, rgba(221,221,221,1) 50%, rgba(255,255,255,1) 100%);
  overflow: hidden;
}
.mid {
  margin-top: 18px;
}
.center {
  margin-left: 269px;
}
.android {
  padding: 15px 10px;
  width: 262px;
  height: 550px;
  border-radius: 20px;
  overflow: hidden;
}
.edge {
  background: rgb(10,10,10);
  background: linear-gradient(0deg, rgba(10,10,10,1) 0%, rgba(11,11,11,1) 50%, rgba(10,10,10,1) 100%);
  border: 1px solid rgba(255, 255, 255, 0.1);
}
.notch {
  position: absolute;
  margin-left: 90px;
  width: 60px;
  height: 18px;
  background: rgb(10,10,10);
  background: linear-gradient(0deg, rgba(10,10,10,1) 0%, rgba(11,11,11,1) 50%, rgba(10,10,10,1) 100%);
  border-radius: 0 0 10px 10px;
  z-index: 222;
}
.camera1 {
  position: absolute;
  margin-left: 100px;
  margin-top: 3px;
  width: 12px;
  height: 12px;
  background-color: #111;
  border: 3px solid #222;
  border-radius: 100%;
  z-index: 333;
}
.camera2 {
  position: absolute;
  margin-left: 130px;
  margin-top: 3px;
  width: 12px;
  height: 12px;
  background-color: #111;
  border: 3px solid #222;
  border-radius: 100%;
  z-index: 333;
}
.screen {
  width: 240px;
  height: 520px;
  background-color: #cccccc;
  background-image: url('img/android2.jpg');
  background-size: cover;
  background-position: -1px -1px;
  border: 1px solid rgba(0, 0, 0, 0.05);
  border-radius: 20px;
  overflow: hidden;
}
Below are other variations that I animated using Animated GIF Maker.

Takeaways
HTML and CSS is fun, you can make a lot of things with the basics such as mockups.
This project is a great way to make mockups for your posts, just screenshot or printscreen on your device and make it look like a photograph of your device with a clear screen and clean look.
CSS3 has secret features to add flair to your web projects, but like most things, keep it simple.
Just a bit more UI elements and some JQuery, the size, color, image, background, blurs, etc. can be tweaked live.
If you have thoughts, suggestions, or violent reactions, feel free to comment down below.
PREVIOUS POST
I Used Bitcoin Cash to buy Hive
With a soaring ETH price, I only have few options left to buy Hive—BTC and BCH.
HiveHealth BETA
Check your performance in Hive, find out your top performing post, and more. TRY IT!
HiveHealth Weekly Reports #1
Welcome to HiveHealth's aggregated weekly reports!
Coin Alerts BETA
Check HIVE exchange rate in your currency. TRY IT!
Buy and Sell on Coinbase
Get Started
About Me
@oniemaniego is a test engineer, but outside work, he experiments in the kitchen, writes poetry and fiction, paints his heart out, or toils under the hot sun.
 | Onie Maniego was born in Leyte, PH. He grew up in a rural area with a close-knit community and a simple lifestyle, he is often visiting his father's orchards during summer and weekends, which has a great impact on his works. |
Sign Up