TUTORIAL:
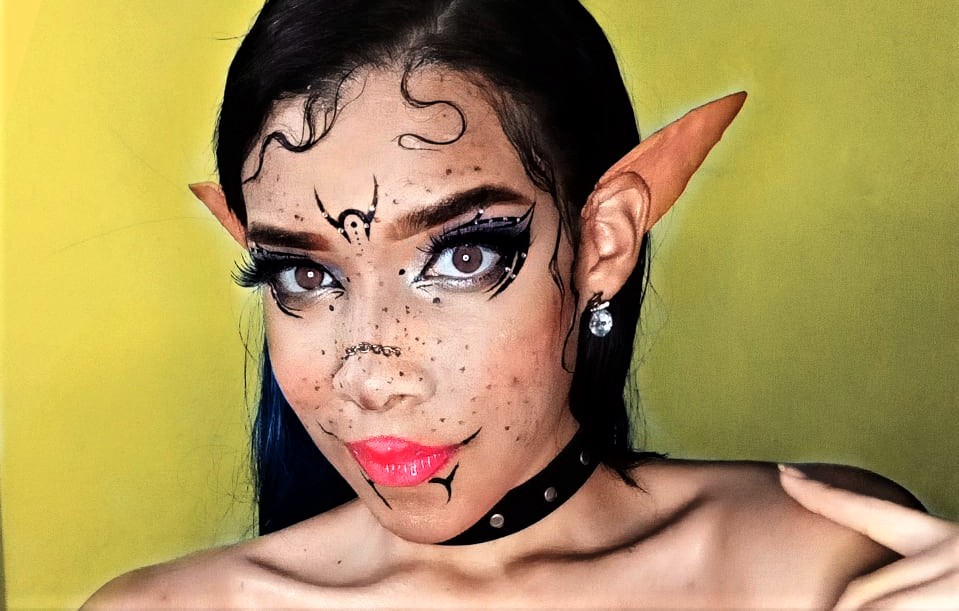
Esta de tendecia este tipo de maquillajes y quise hacer mi propia recreación, por lo mismo aquí les traigo el tutorial del paso a paso, los materiales que usé y cómo lo realicé.
TUTORIAL:
This type of makeup is in trend and I wanted to do my own recreation, so here is the step by step tutorial, the materials I used and how I did it.

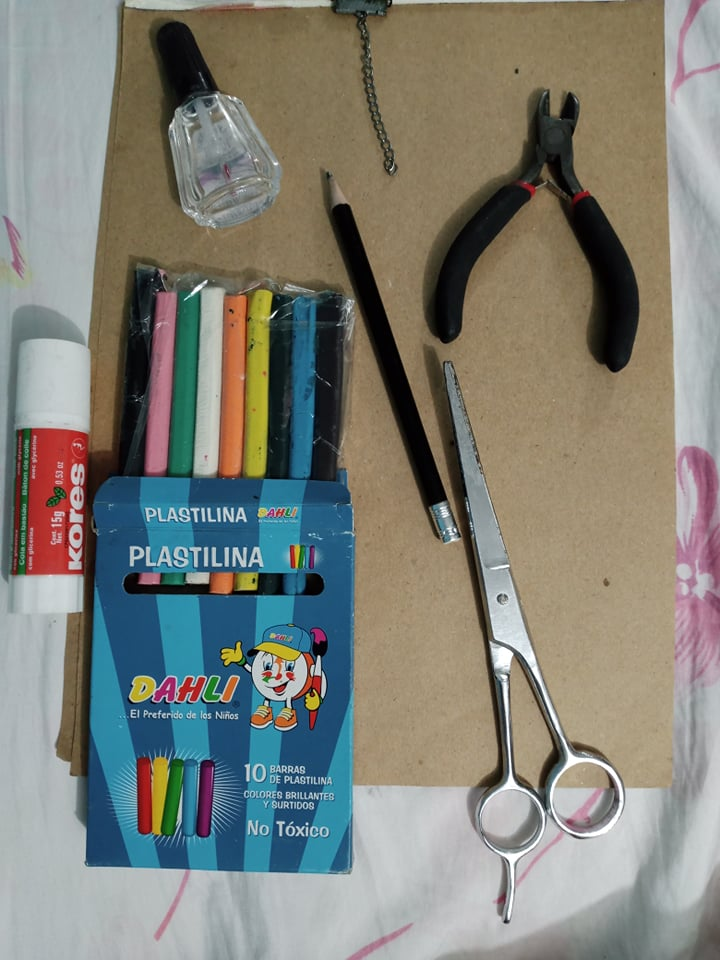
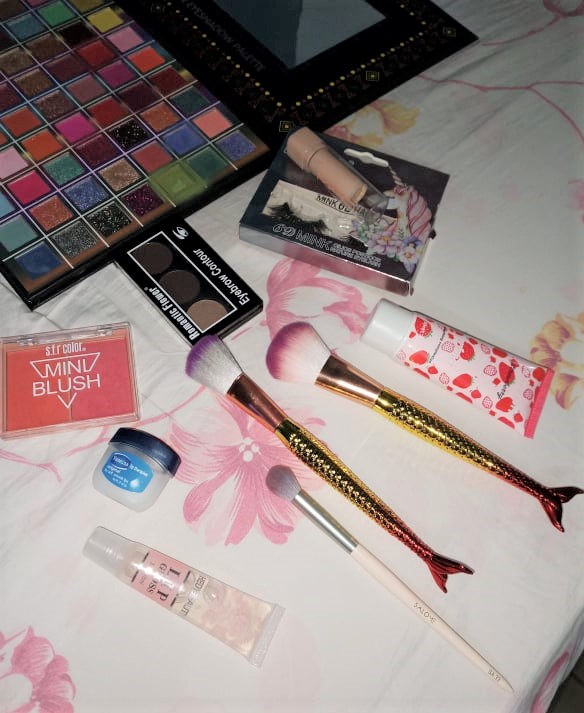
MATERIALES:
Tijeras
Alicate
Pega en barra
Brillo de uñas
Lapiz
Cadena pequeña
Cartón
Plastilina
Paletas de Maquillaje
Brochas
Pestañas Postizas
Pedrería de adorno para maquillaje
Brillo de Labios
Pega para Pestañas
Contorno
Iluminador
Vaselina
Cepillo para cejas
Sombra de Cejas
Polvos sueltos
Rubor
MATERIALS:
Scissors
Pliers
Glue stick
Nail polish
Pencil
Small chain
Cardboard
Plasticine
Makeup Palettes
Brushes
False Eyelashes
Rhinestones for make-up
Lip Gloss
Eyelash Glue
Contour
Illuminator
Vaseline
Eyebrow Brush
Eyebrow Shadow
Loose powder
Blush
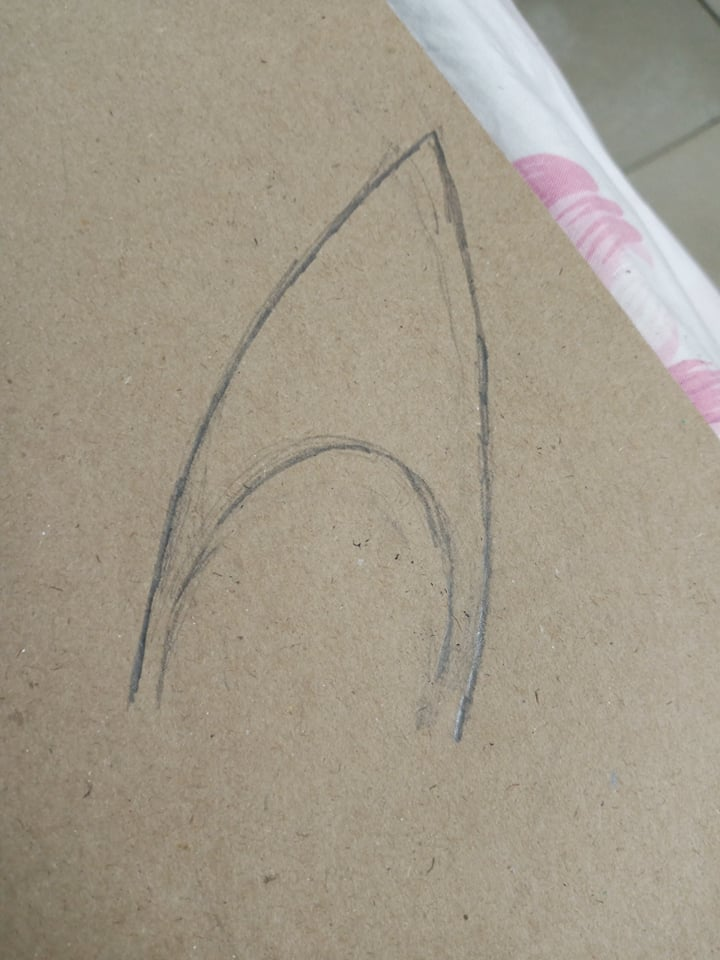
OREJAS DE ELFO:
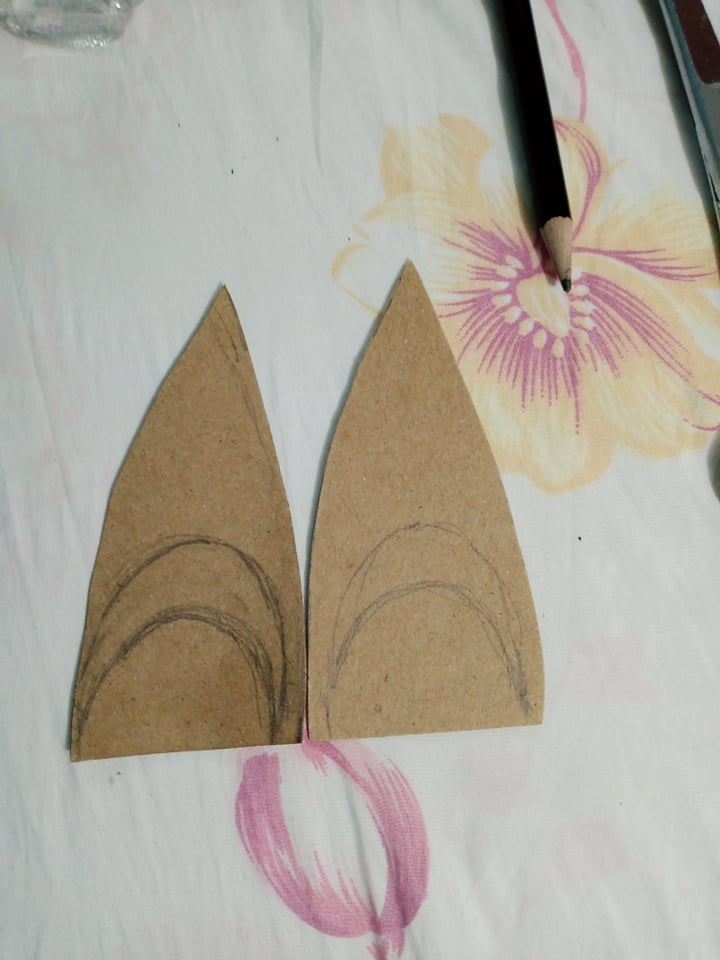
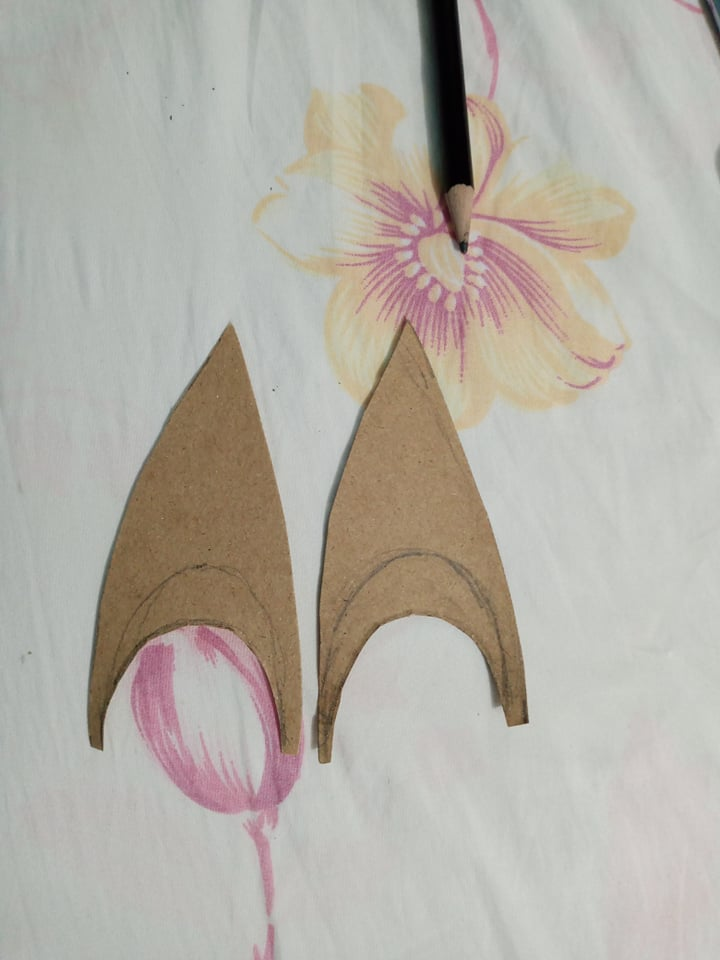
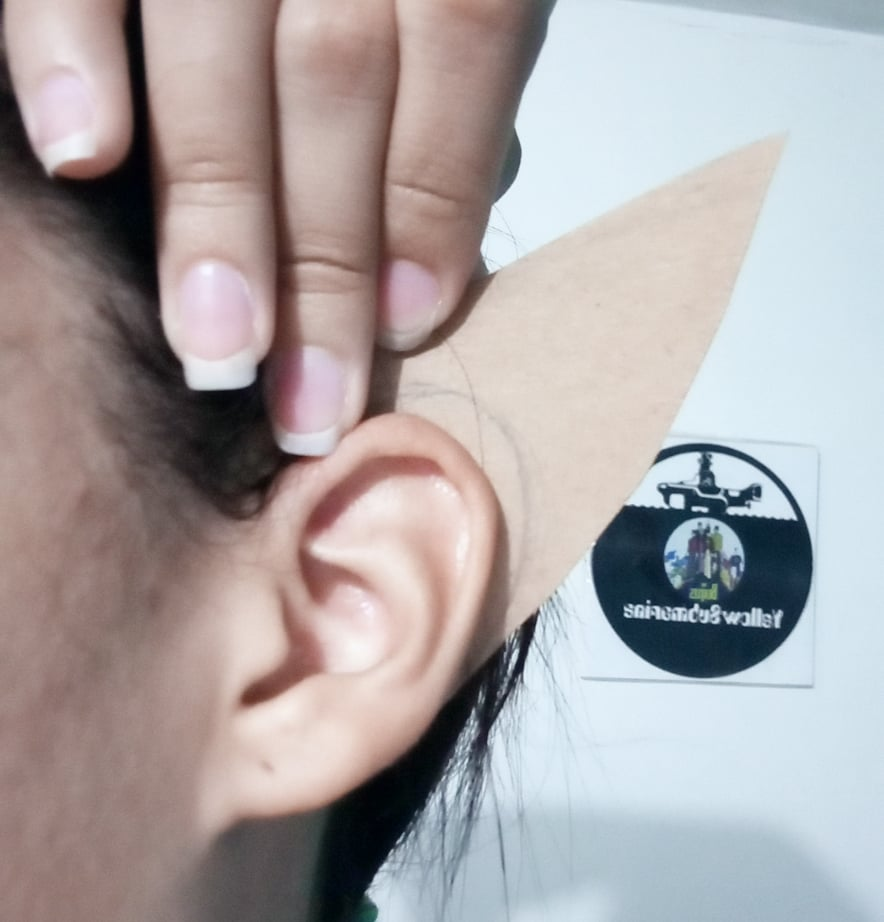
Comenzaremos realizando las orejitas de elfo, y dibujamos el siguiente patrón sobre el cartón, y utilizando un lápiz. Dibujaremos una oreja pero con la punta larga, como en forma de pétalo. Luego, la recortaremos, y la usaremos para dibjuar la otra. Podemos medirla con nuestras orejas para asegurarnos de que calce perfectamente.
ELF EARS:
We will start by making the little elf ears, and draw the following pattern on the cardboard, and using a pencil. We will draw an ear but with a long tip, like a petal. Then, we will cut it out, and use it to draw the other one. We can measure it with our ears to make sure it fits perfectly.
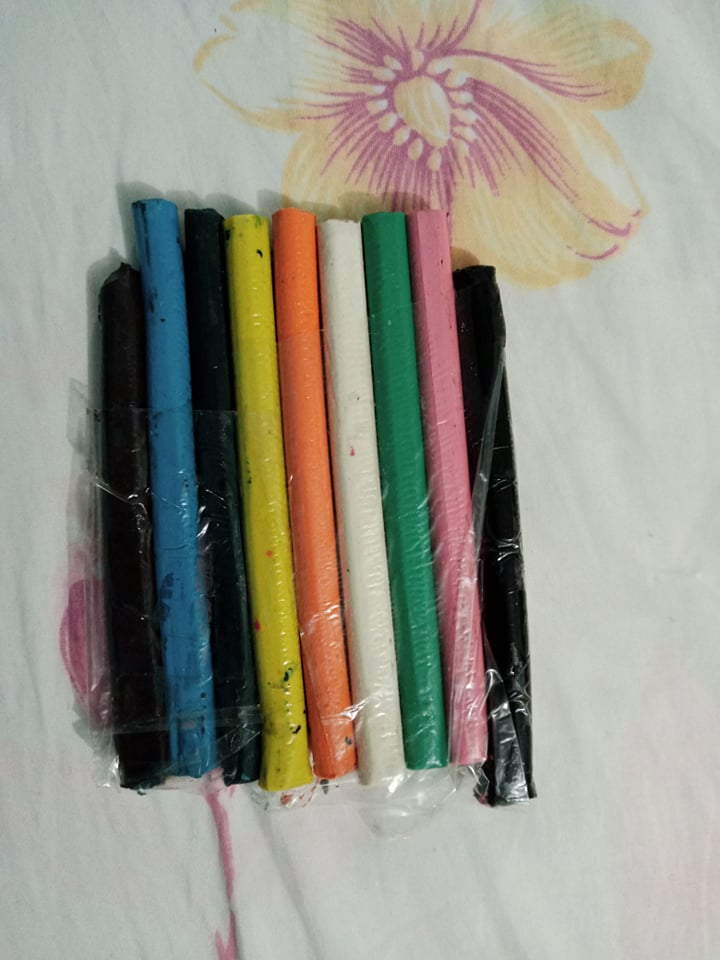
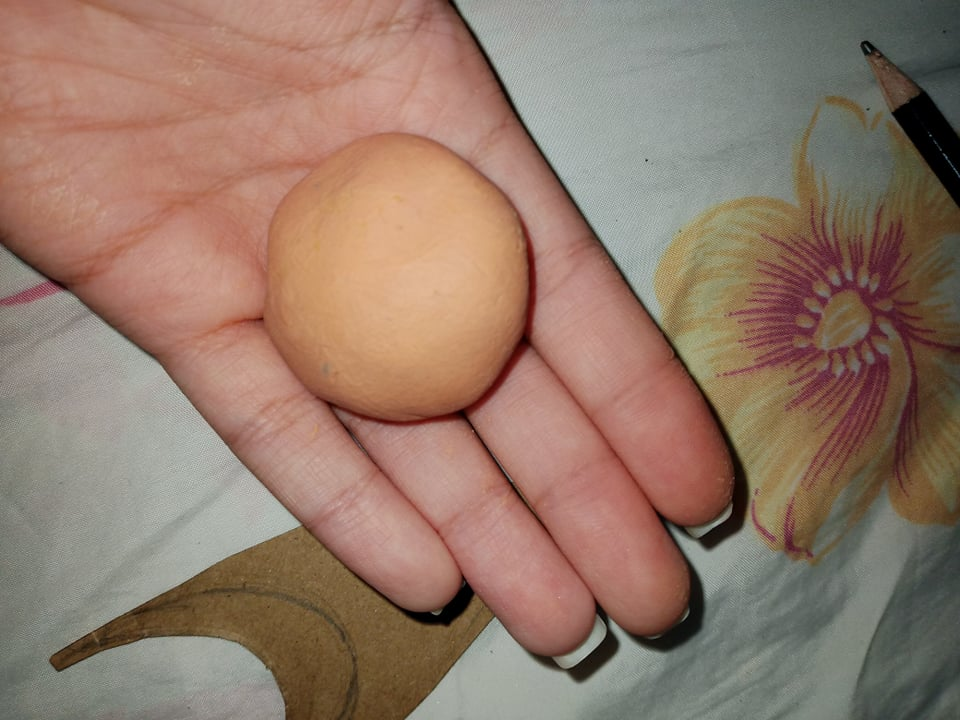
Después, tomaremos plastilina, color naranja, rosado, y blanco, para crear una masa color carne. La amasamos hasta que quede completamente mezclada ylos colores queden integrados.
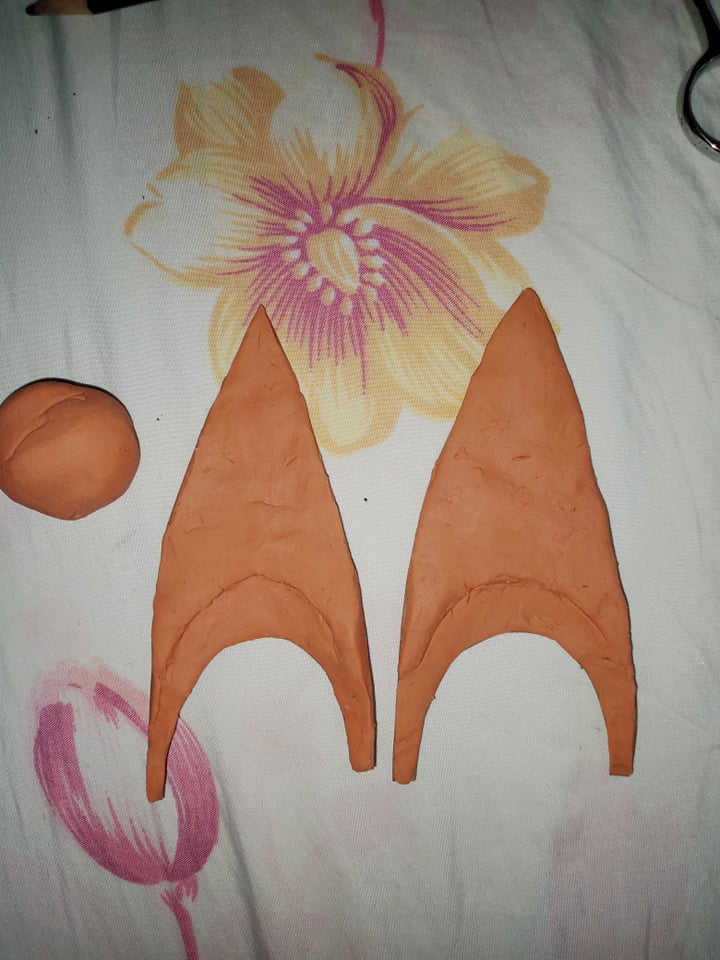
Usaremos la pega en barra, para aplicarla encima del cartón, siguiendo el patrón, le damos forma a la plastilina y la moldeamos para que encaje en este. Cabe destacar que la parte de abajo debe quedar más plana para que quede como espacio en el cual insertaremos nuestra oreja. Así:
Next, we will take orange, pink, and white plasticine to create a flesh-colored dough. We knead it until it is completely mixed and the colors are integrated.
We will use the glue stick to apply it on top of the cardboard, following the pattern, we shape the plasticine and mold it so that it fits into the cardboard. It should be noted that the bottom part should be flatter so that it remains as a space in which we will insert our ear. Like this:
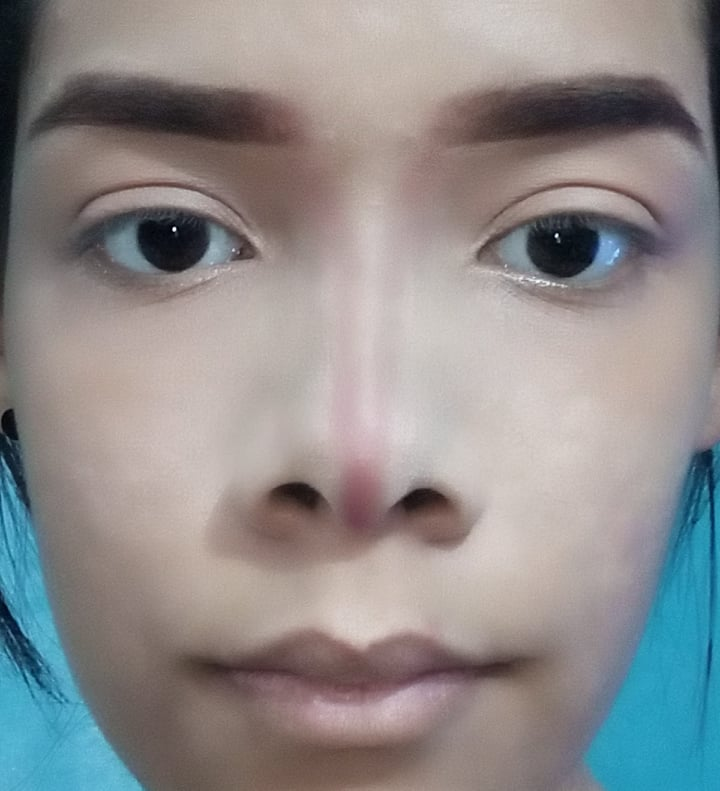
CEJAS Y CONTORNO:
Iniciaremos realizando el controno de nuestra nariz con una brochita pequeña desde la punta de esta, hasta el inicio de las cejas. Luego aplicamos sombra de cejas, siguiendo la forma natural de estas y según nuestro tipo de rostro.
Una vez le hayamos aplicado sombra, utilizaremos un cepillito redondo con vaselina y peinaremos los pelitos hacia arriba en el inicio, y hacia abajo al final de la ceja, para que queden fijados.
También, aplicaremos corrector debajo de la zona de las ojeras, en el centro de la frente y en el mentón, difuminamos con una esponjita y sellamos todo con polvos sueltos.
EYEBROWS AND CONTOUR:
We will start by making the contour of our nose with a small brush from the tip of the nose to the beginning of the eyebrows. Then we apply eyebrow shadow, following the natural shape of the eyebrows and according to our face type.
Once we have applied the shadow, we will use a round brush with Vaseline and comb the hairs upwards at the beginning and downwards at the end of the eyebrow, so that they are fixed.
Also, apply concealer under the dark circles, in the center of the forehead and on the chin, blend with a sponge and seal everything with loose powder.
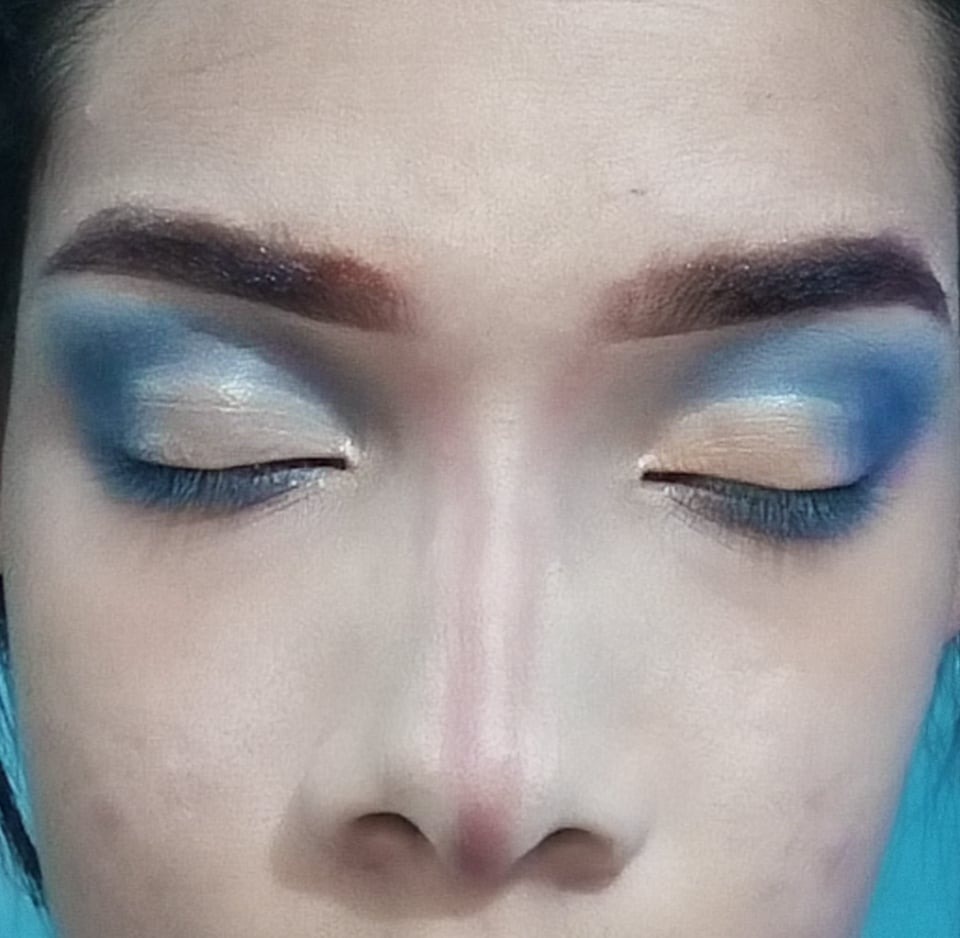
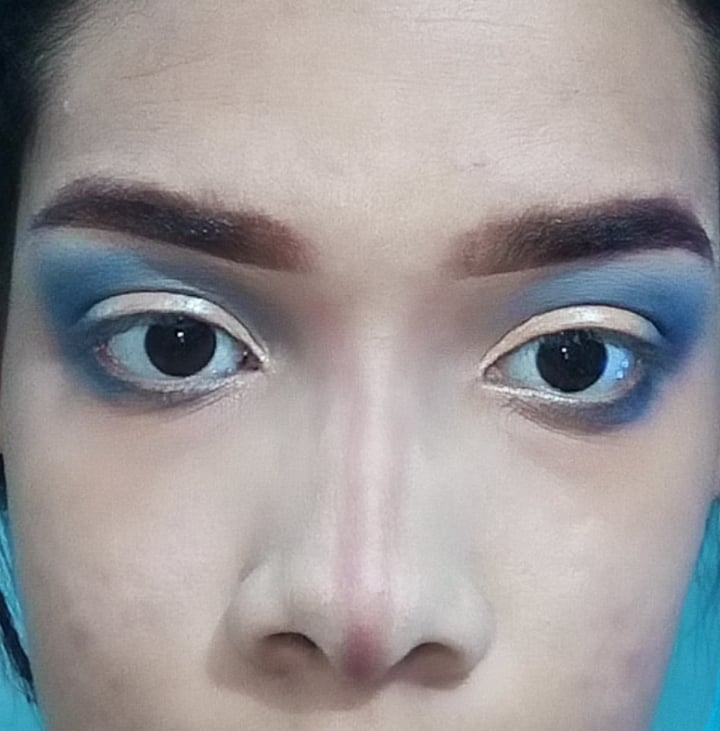
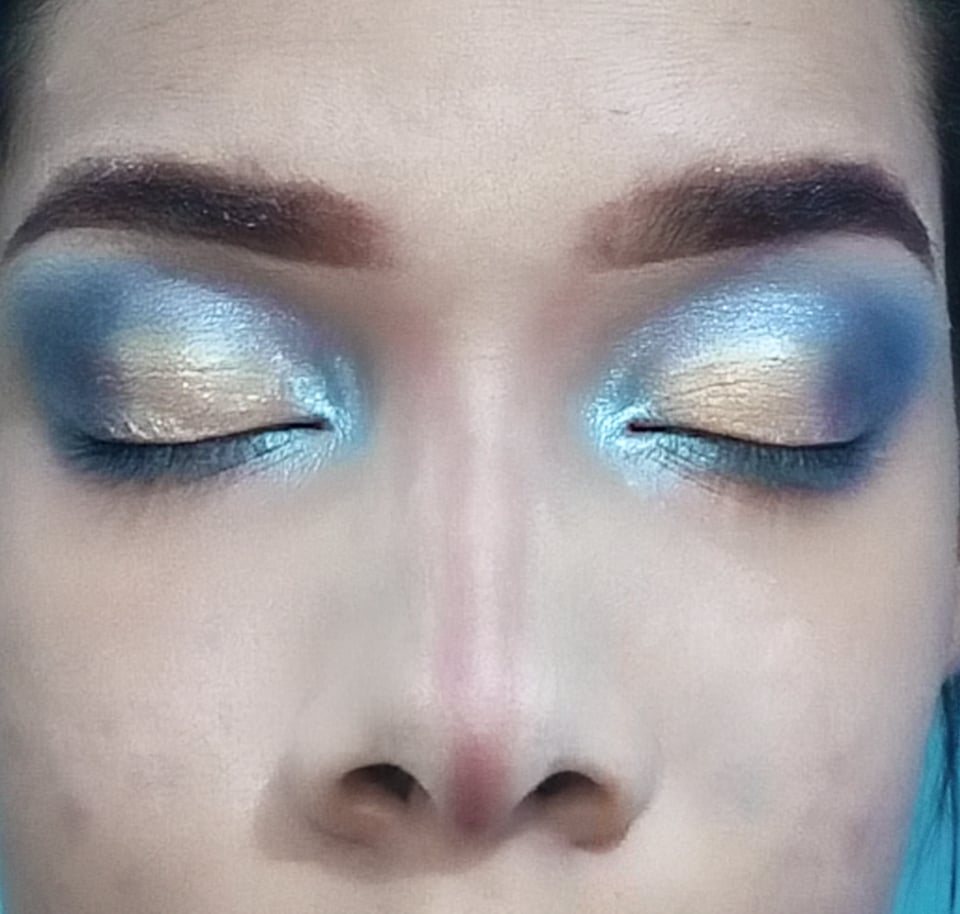
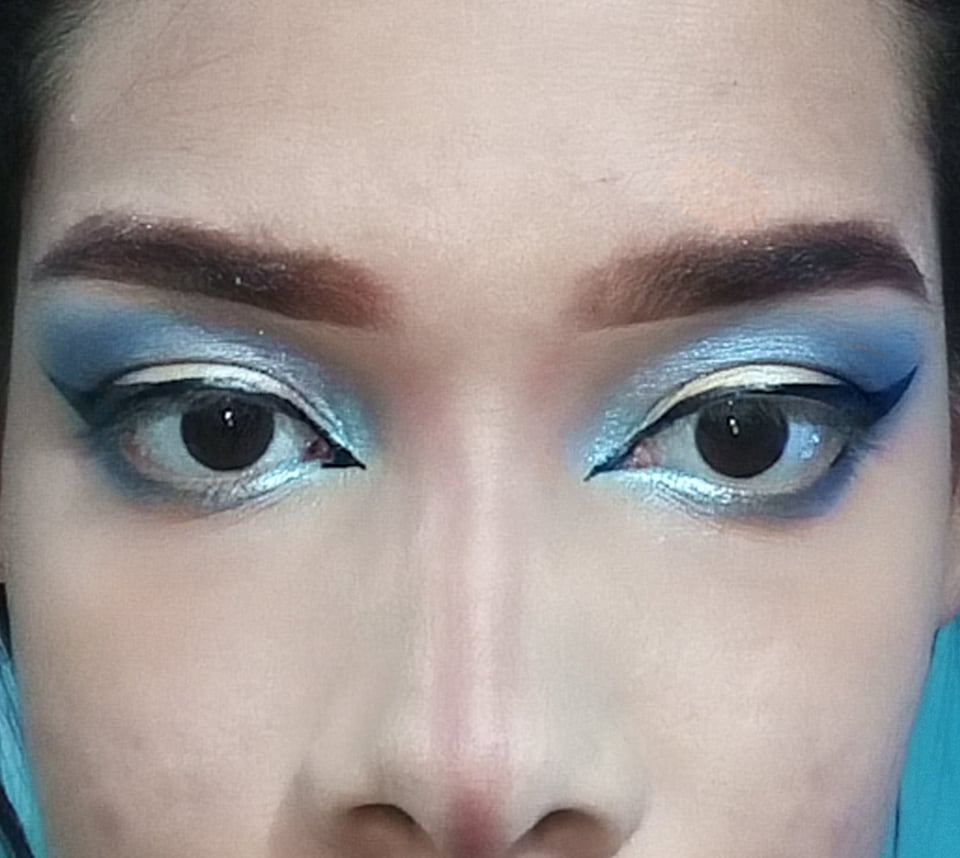
SOMBRA DE OJOS:
Aplicamos corrector en los párpados sin sellar, encima de este, colocamos sombra color azul marino en los extremos hasta el hueso de las cejas y en el párpado inferior.
En el espacio que dejamos vació, colocaremos una sombra metalizada color dorado, y agregaremos otra sombra metalizada color azul plata en el inicio del ojo, cerca del lagrimal.
EYESHADOW:
We apply concealer on the eyelids without sealing, on top of this, we place navy blue shadow on the ends up to the eyebrow bone and on the lower eyelid.
In the space left empty, we will place a golden metallic shadow, and we will add another silver blue metallic shadow at the beginning of the eye, near the tear trough.
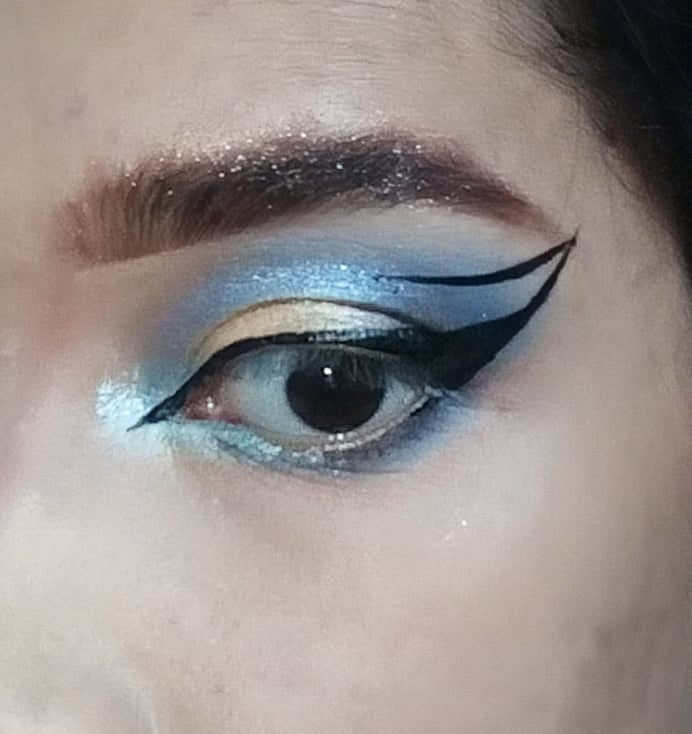
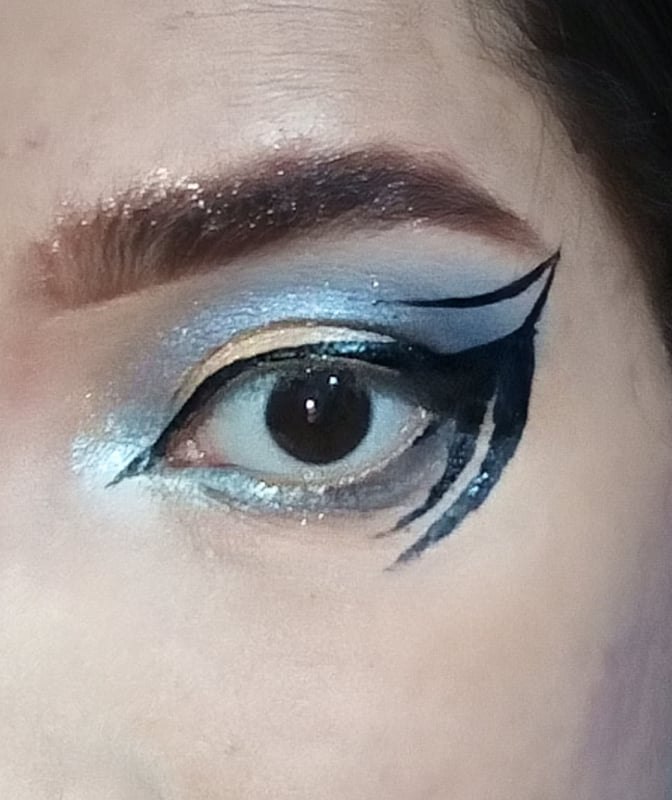
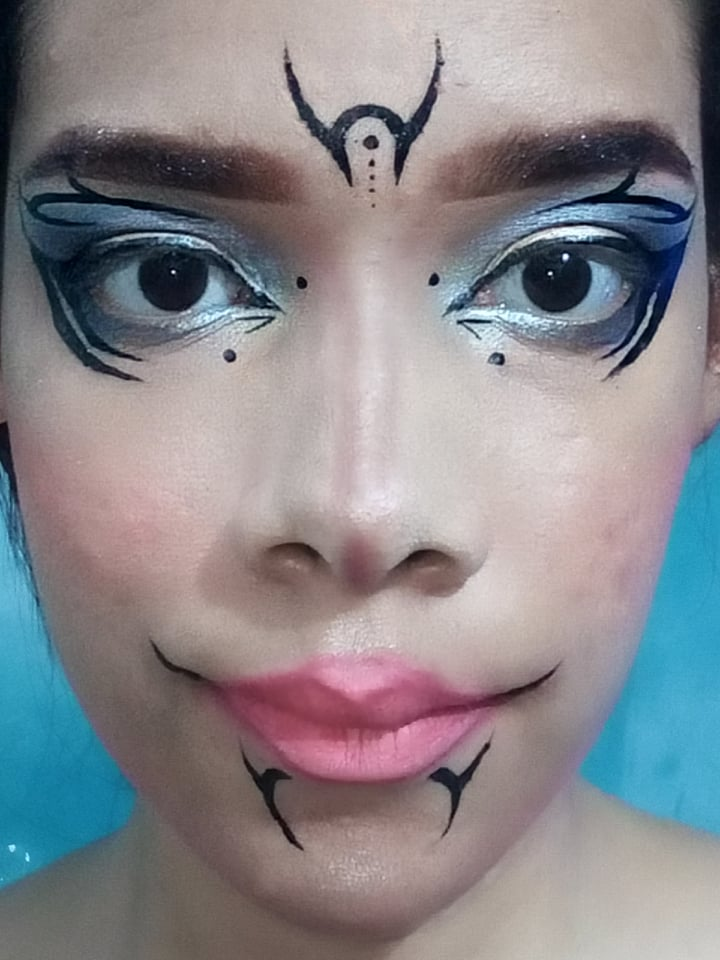
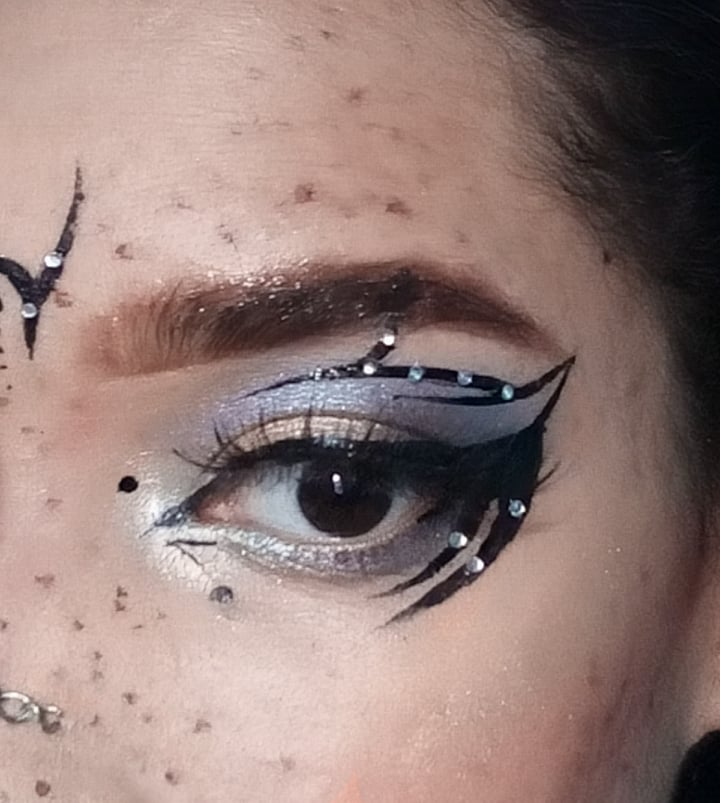
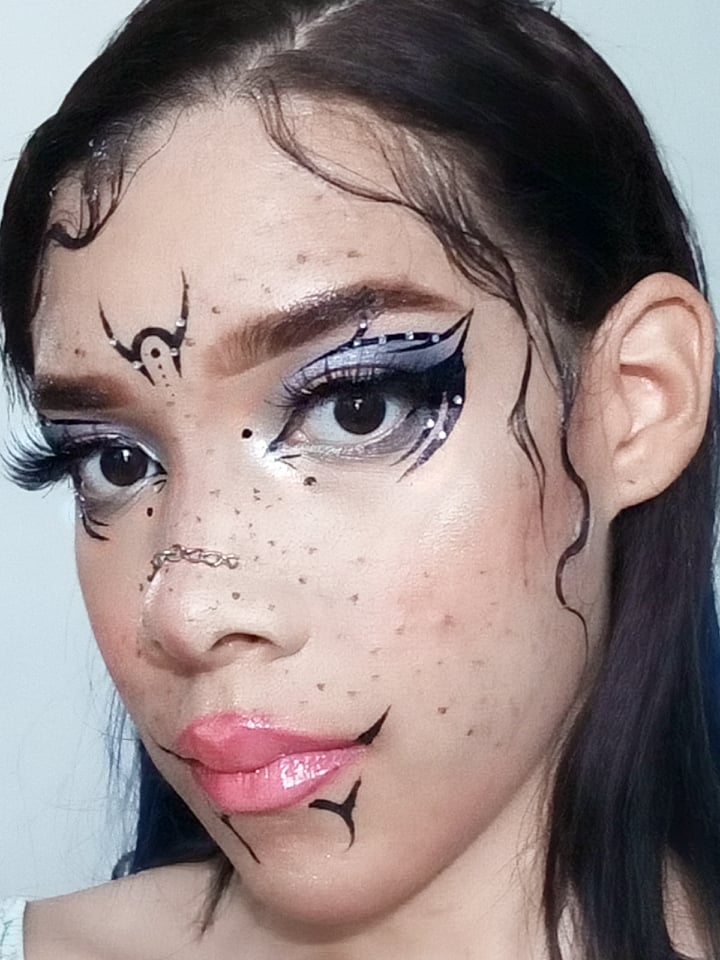
DELINEADO GRÁFICO:
Luego, realizaremos un delineado en el párpado superior cerca de las pestañas, y alargaremos la punta hacia afuera. A partir de esta punta, dibujaremos una línea continuado en la misma dirección, hasta tocar la punta que finaliza la ceja, y luego otra línea hacia el centro del párpado, ligeramente curveada hacia abajo.
GRAPHIC EYELINER:
Next, we will draw an eyeliner on the upper eyelid near the eyelashes, and lengthen the tip outwards. From this tip, we draw a line in the same direction, until we touch the end of the eyebrow, and then another line towards the center of the eyelid, slightly curved downwards.
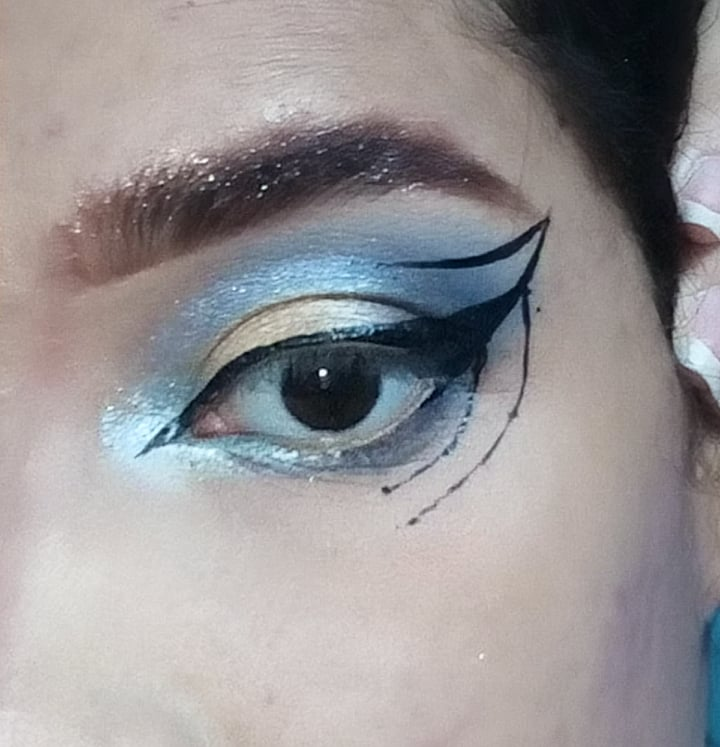
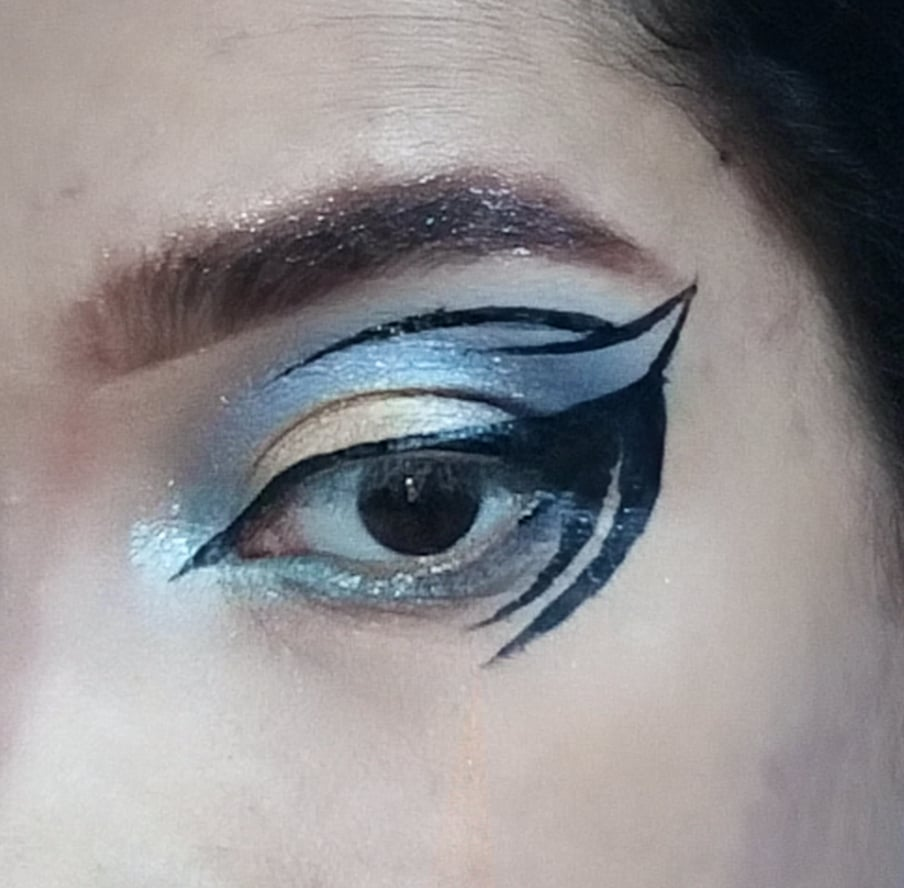
Después, partiendo la misma punta del delineado principal, dibujaremos una línea hacia abajo, en dirección hacia el centro del párpado inferior y también en forma de curva. Luego dibujaremos otra al lado y hacia el interior, en paralelo con la anterior, y las rellenaremos.
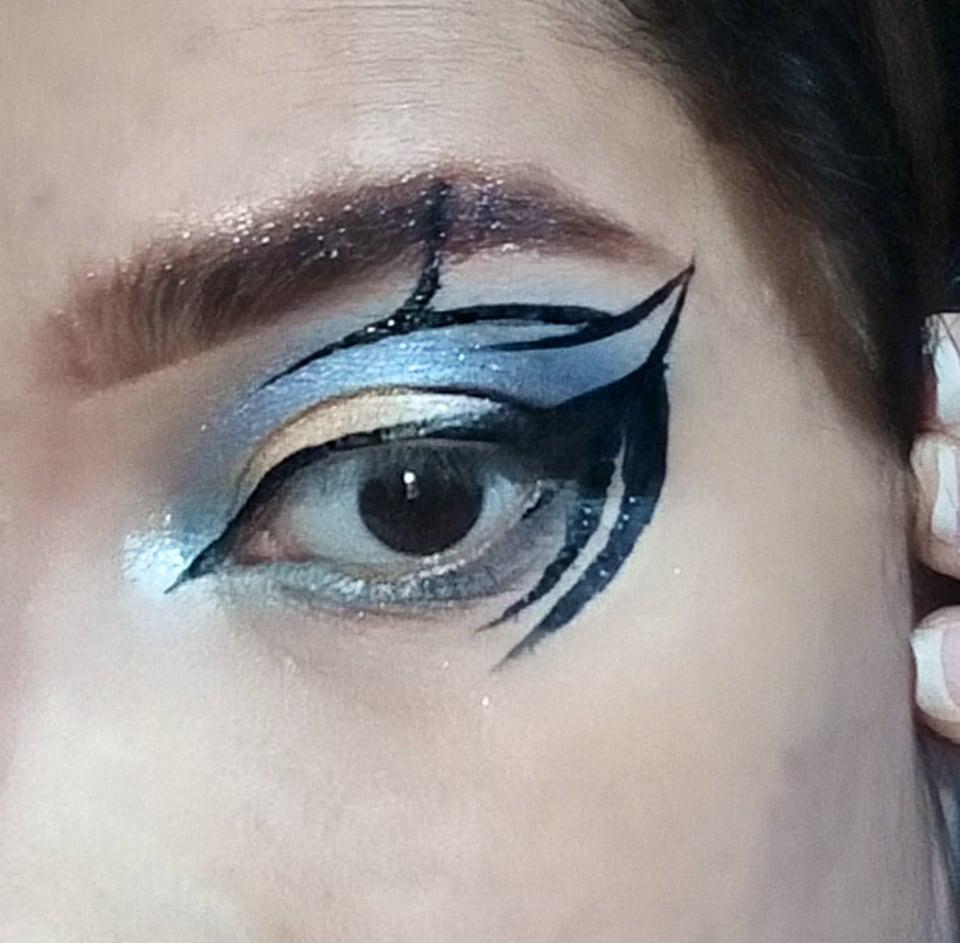
También, realizaremos una línea que salga a la mitad, del segundo delineado, y que llegue hasta el interior del párpado, cerca del hueso de la ceja. Y seguido, a mitad de esta realizaremos otra línea hacia arriba, que pase por encima de la ceja. De esta manera:
Then, starting from the same tip of the main eyeliner, we will draw a line downwards, towards the center of the lower eyelid and also in the shape of a curve. Then we will draw another one to the side and towards the inside, parallel to the previous one, and we will fill them in.
Also, we will draw a line that comes out in the middle of the second outline, and that reaches the inside of the eyelid, near the eyebrow bone. And then, in the middle of this we will make another line upwards, passing over the eyebrow. In this way:
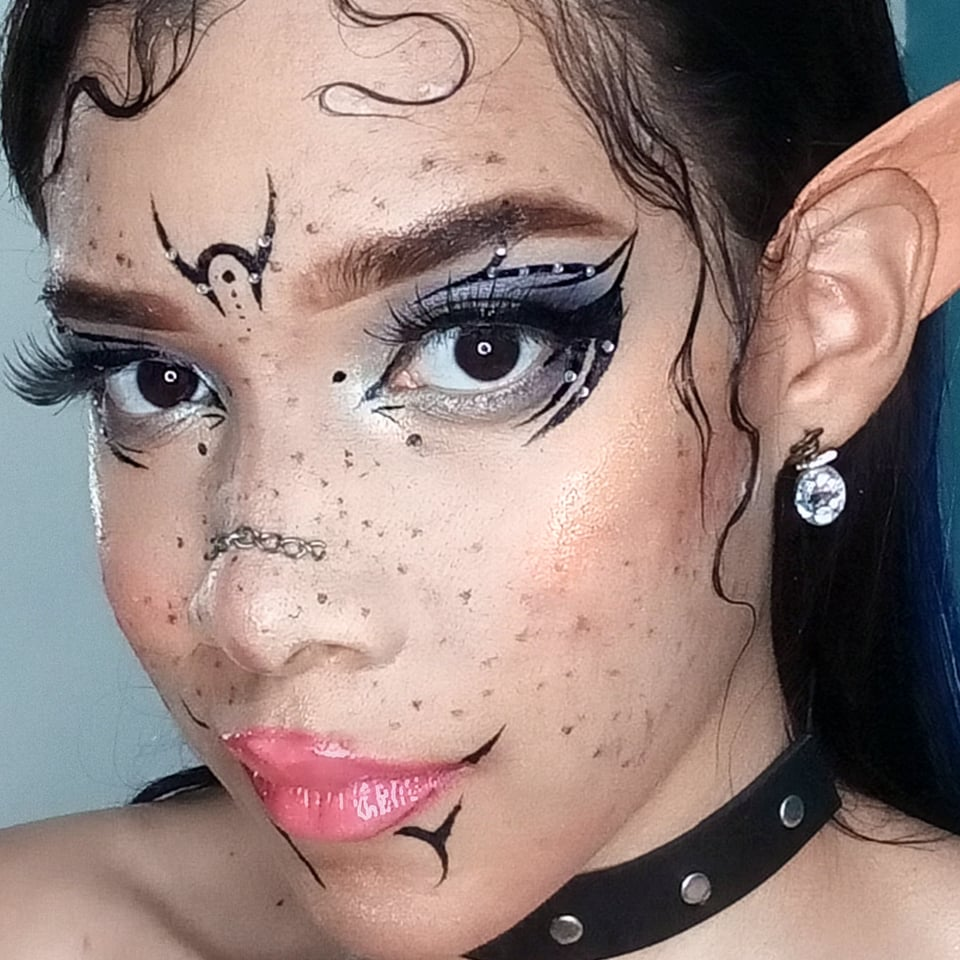
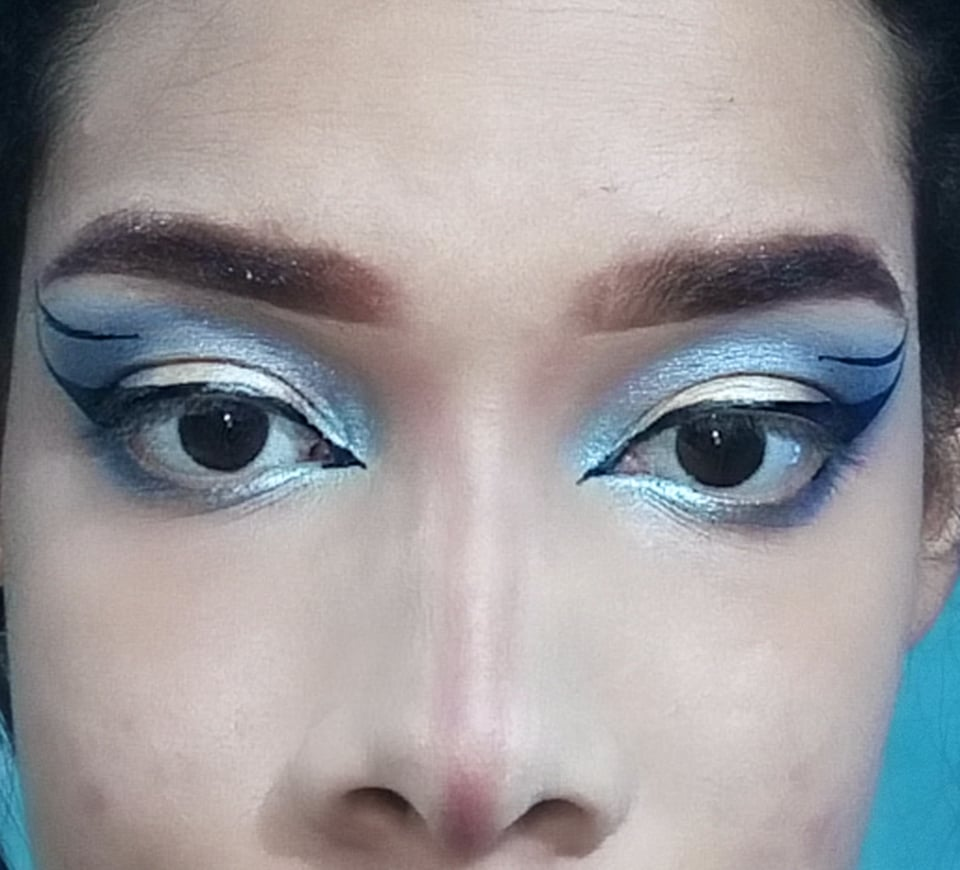
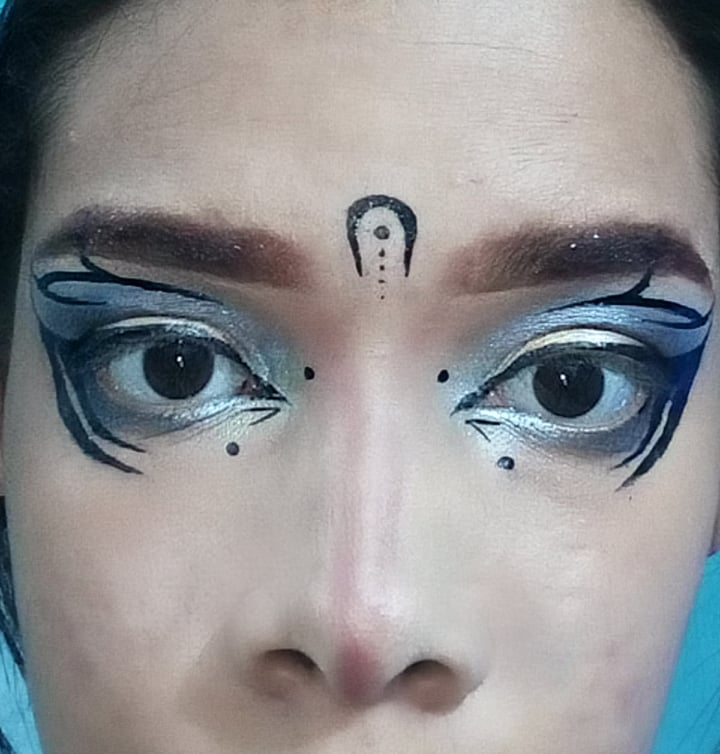
Dibujamos un puntito arriba del largrimal, cerca de la nariz, y otro abjo. Además de dos pequeñas líneas entre estos puntos, formando un semi triángula acostado.
En el centro de las cejas, realizaremos una U, invertida, y dentro de esta dibujaremos, cuatro puntitos verticales, siendo el primero más grande.
We draw a small dot above the larynx, near the nose, and another one below it. In addition to two small lines between these points, forming a semi triangle lying down.
In the center of the eyebrows, we will make an inverted U, and inside this we will draw four vertical dots, the first one being the largest.

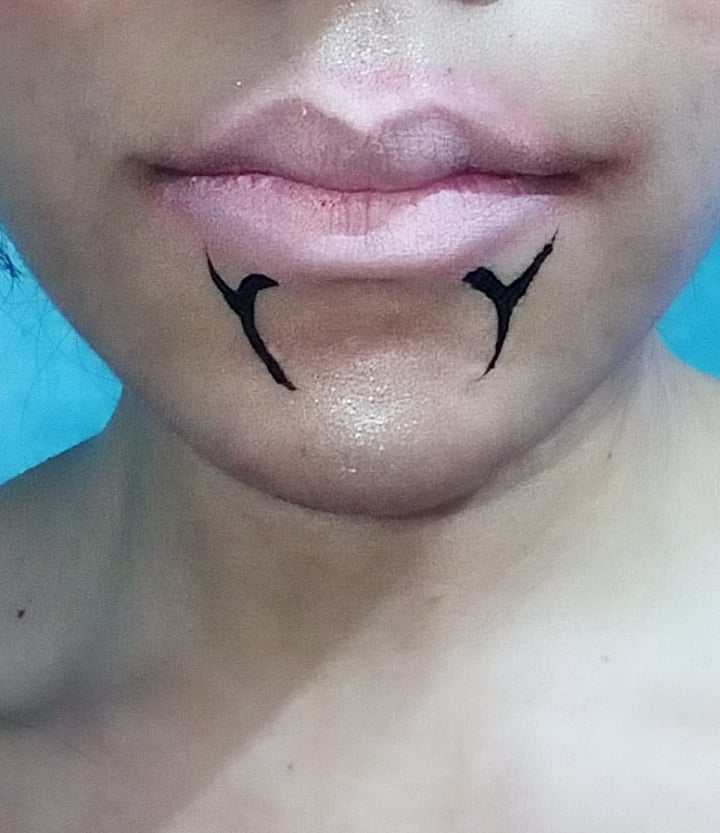
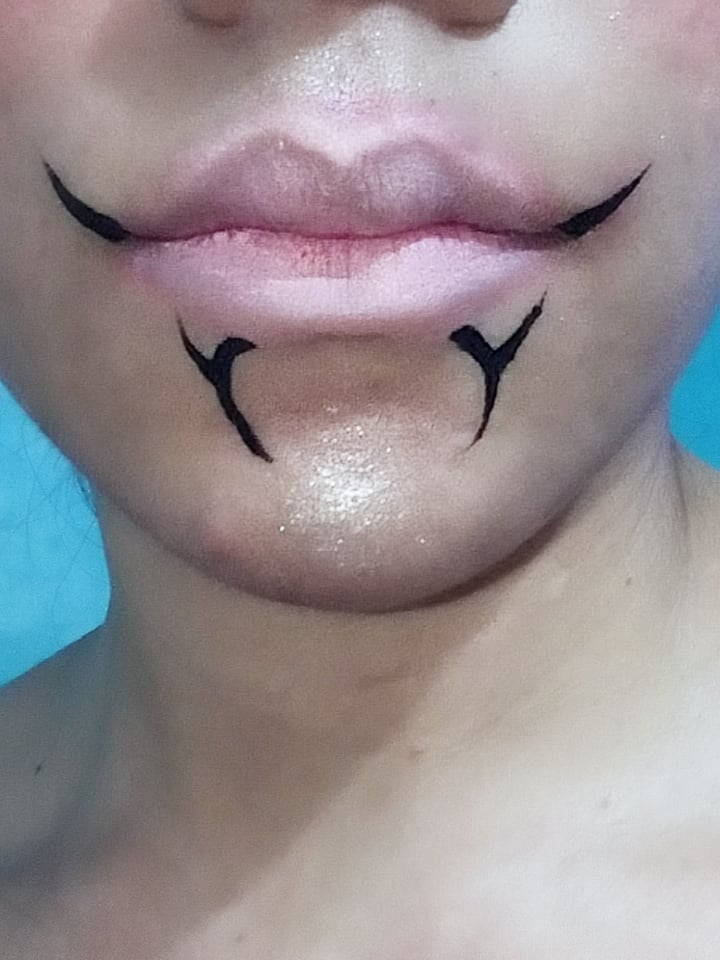
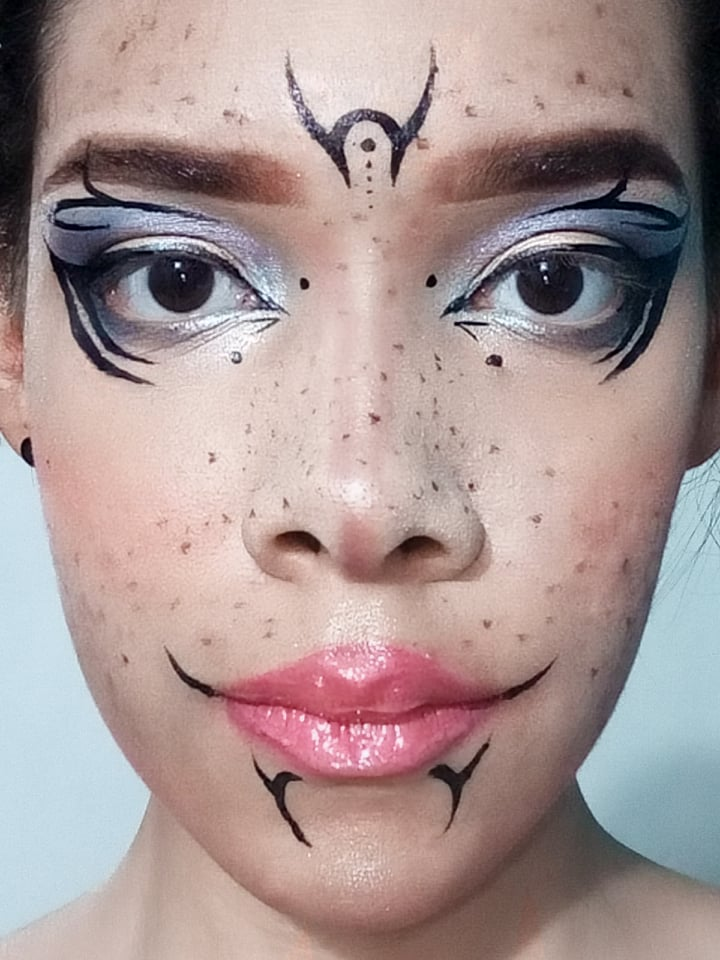
Y en los labios, dibujaremos una línea pequeña hacia afuera en cada esquina, y debajo del labio inferior dos línea semi curveadas hacia adentro, y a mitad de estas saldrá una punta hacia arriba. Así:
And on the lips, we will draw a small line outwards on each corner, and under the lower lip two semi-curved lines inwards, and in the middle of these we will draw a point upwards. Like this:
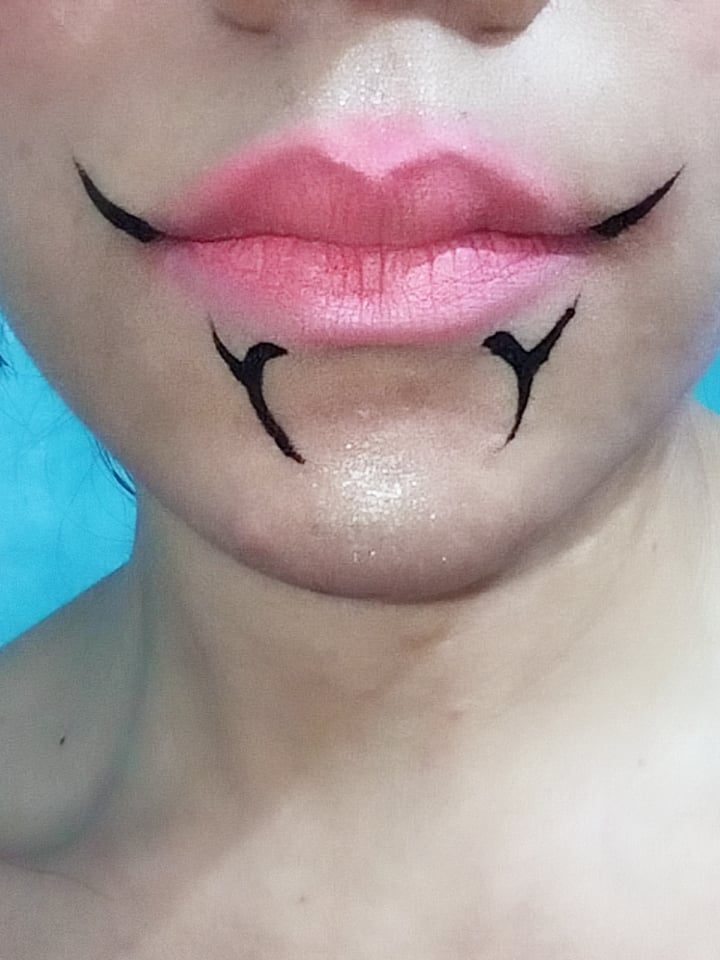
LABIOS Y PECAS:
Aplicamos corrector en los labios, y encima colocamos rubor rosa mediante una brocha pequeña y amplia, salíneadonos un poco de la línea natural de los labios. Y luego agregamos brillo.
LIPS AND FRECKLES:
We apply concealer on the lips, and on top we apply pink blush using a small, wide brush, saline a bit of the natural lip line. Then add gloss.
Además, utilizaremos una brochita fina, y con sombra marrón dibujamos punto por punto al azar, en la zona de la nariz, frente y boca. Con la llema del dedo difuminamos un poquito para que aprezcan pecas.
In addition, we will use a fine brush, and with brown shadow we draw dot by dot at random, in the area of the nose, forehead and mouth. With the tip of the finger we blur a little bit to make freckles appear.
DECORACIONES:
Tomamos la cadena y la medimos en nuestra nariz, para ver cuanto debemos cortar, y con un alicate recortaremos el pedazo que vamos a utilizar. Tomamos pega de pestañas para pegarla a nuestra nariz.
DECORATIONS:
We take the chain and measure it on our nose, to see how much we should cut, and with a pliers we will cut out the piece we are going to use. We take eyelash glue to glue it to our nose.
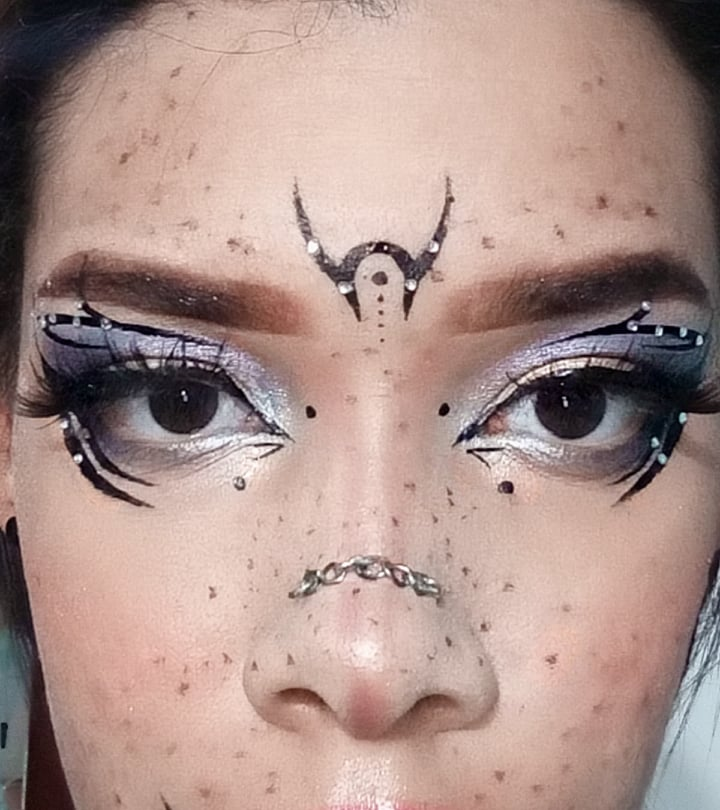
Con la misma pega, colocaremos la pedrería o diamantitos de adornos, encima del delineado en nuestros ojos y frente.
Luego colcoamos pestañas postizas.
With the same glue, we will place the rhinestones or diamond ornaments on top of the eyeliner on our eyes and forehead.
Then we place false eyelashes.
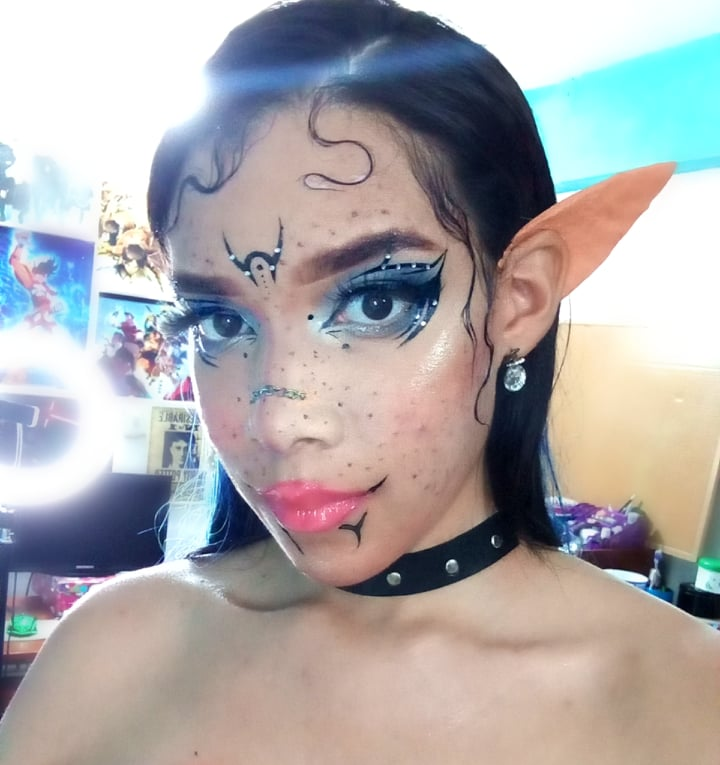
PEINADO:
Realizamor un retiro de un lado en nuestro cabello, y retiramos algunos mechones muy pequeños de cabello que tengamos cerca de la frente o a los lados cerca de las orejas.
Utilizaremos crema para peinar o gelatina, y con un cepillito pequeño, le daremos forma a estos mechones que irán pegados a la piel. Y el resto del cabello debe quedar compeltamento peinado, si es posible podemos utilizar laca.
HAIR STYLING:
Perform a side parting on our hair, and remove some very small strands of hair that we have near the forehead or on the sides near the ears.
We will use styling cream or gelatin, and with a small brush, we will give shape to these locks that will be glued to the skin. And the rest of the hair should be combed, if possible we can use hairspray.
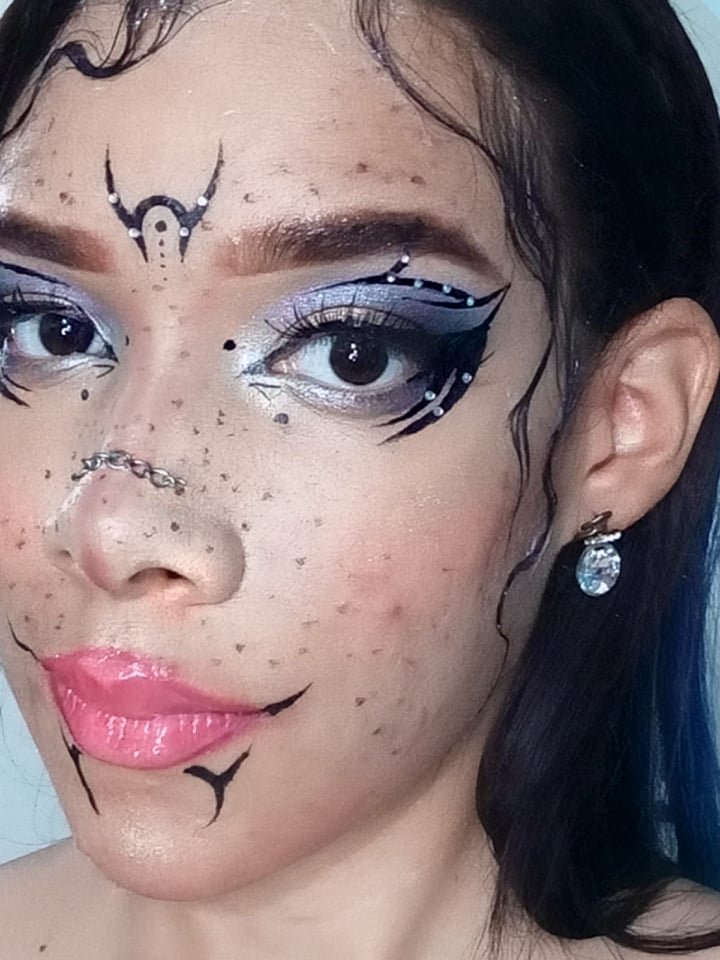
Finalmente, usaremos nuestras orejitas de ELFO, que hicimos desde un principio. Zarcillos, y un collar para decorar.
Finally, we will use our little ELFO ears, which we made from scratch. Earrings, and a necklace to decorate.
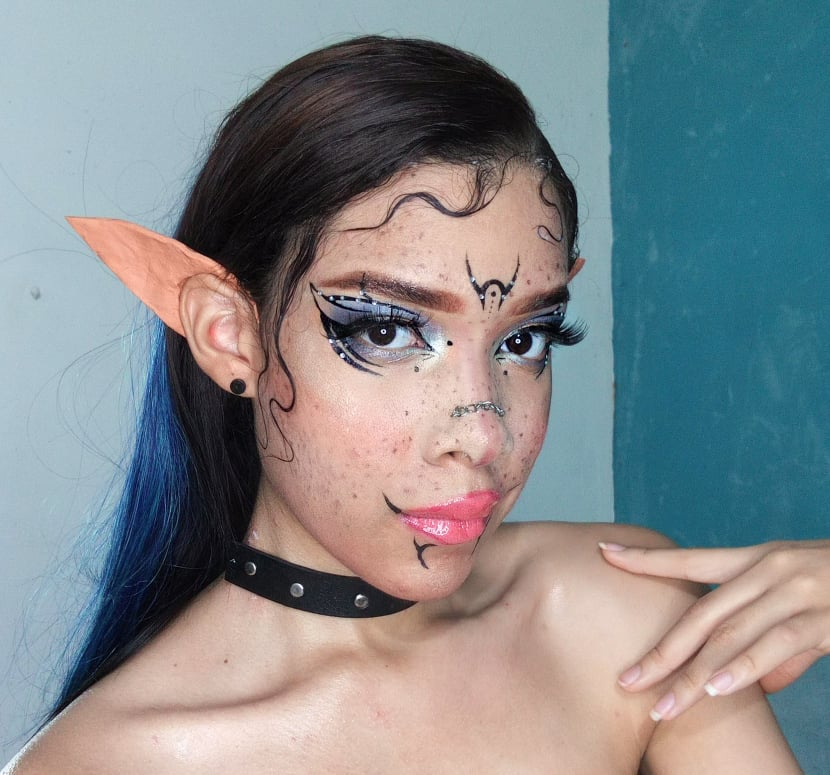
Y este es el tutorial completo amigos, la idea de este maquillaje es que se vea como natural y aesthetic, yo siento es un estilo muy peculiar pero bonito y diferente a lo clásico que siempre solemos ver. Mi isnpiración vino de Aquí
Espero les haya gustado, muchas gracias por leer. Y un abrazo !
And this is the full tutorial friends, the idea of this makeup is to look like natural and aesthetic, I feel it's a very peculiar style but nice and different from the classic we always see. My inspiration came from Here
I hope you liked it, thank you very much for reading. And a hug !
Imágenes editadas en PicsArt. Traducido con www.DeepL.com
Images edited in PicsArt. Translated with www.DeepL.com
.jpg)
Holaaa!! Que hermoso te quedó 😍 me gustó mucho la idea de las orejitas y los detalles de la cadenita en la nariz, está increíble 💓 te felicito 🥺
@mariannysleon muchas gracias amiga 😸💜💜
amazing!
@livinhaapach Thank you so much 💖💖
Quedó super genial,
@yanethstars Muchas gracias 🥰
Yay! 🤗
Your content has been boosted with Ecency Points, by @mayrios.
Use Ecency daily to boost your growth on platform!
Support Ecency
Vote for new Proposal
Delegate HP and earn more
@mayifiestas Graciaas hago mi mayor esfuerzo 💖