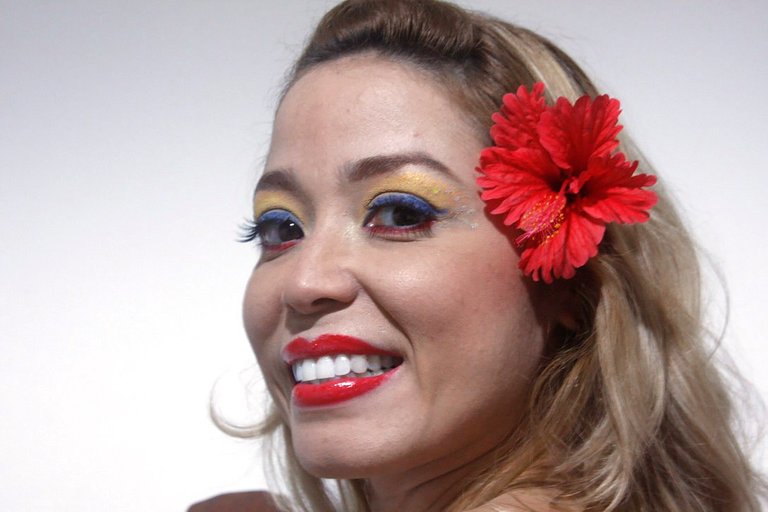
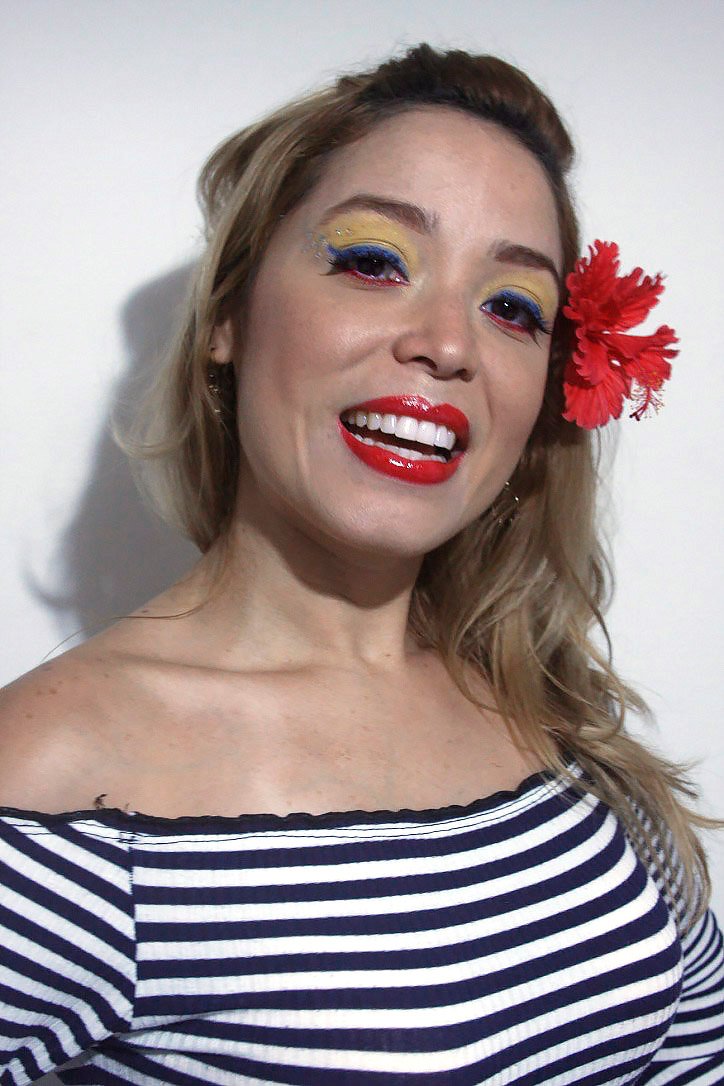
¡Qué bonita bandera es la de mi Venezuela!
What a beautiful flag is the flag of my Venezuela!
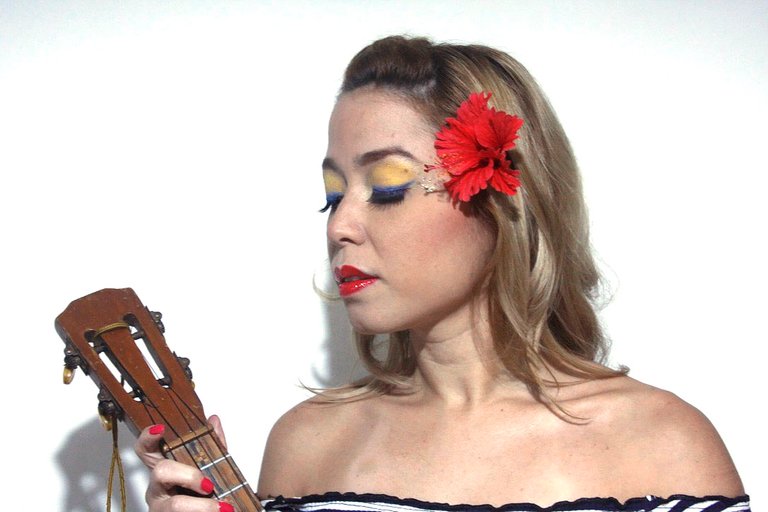
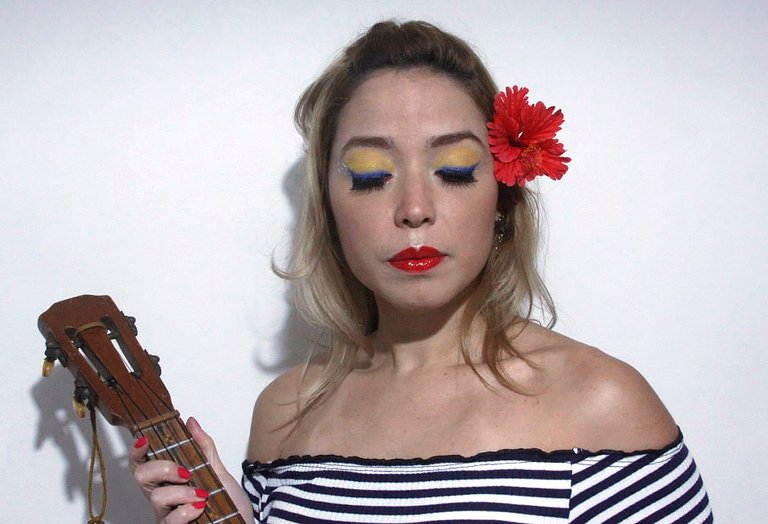
Como accesorios use una flor de Cayena que es muy apreciada en nuestro país por sus colores vibrantes, propiedades cosméticas y medicinales. En mi mano derecha sostengo un cuatro que es un instrumento típico del joropo venezolano (música y baile folklóricos).
As accessories I used a Cayenne flower which is very appreciated in our country for its vibrant colors, cosmetic and medicinal properties. In my right hand I hold a cuatro which is a typical instrument of the joropo venezolano (folkloric music and dance).
🇻🇪 💄 🇻🇪 💄
I feel very proud to be Venezuelan and since I am a nationalist I wanted to make up and play a little with the yellow, blue and red of my beautiful flag. The colors have a powerful meaning in our patriotic symbols. So the yellow represents the richness of our people, the blue evokes the infinite depth of the sea and the sky, the red the blood shed by our heroes in battles and the stars represent the provinces that made up our country after being liberated from the Spanish empire. So my dear community of #hive and #MakeUpPower join me to show you the step by step of this symbolic makeup.
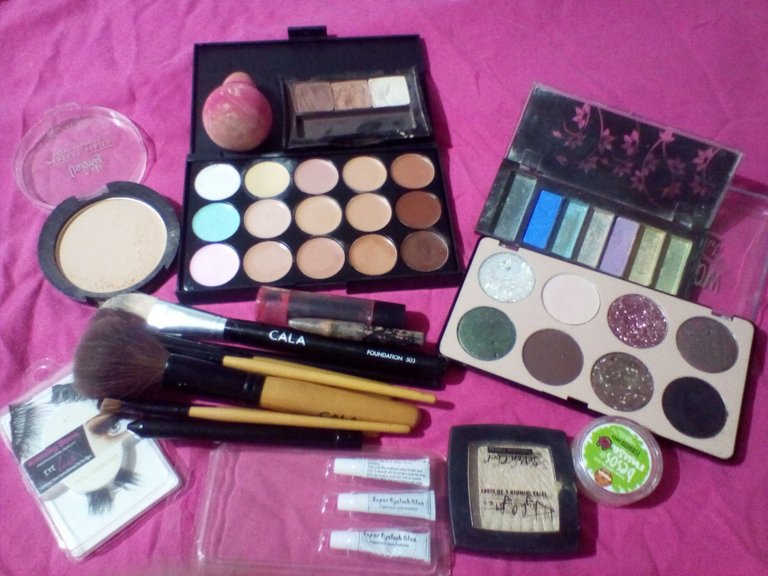
Materiales a utilizar :
- Corrector
- Lápiz corrector
- Base líquida
- Brochas para polvo, lengua de gato (para base), ventilador (para cuenca de ojos) y cejas, pincel delineador.
Iluminador - Sombra blanca, marrón, amarilla, azul y roja
- Labial rojo fuego (como no tenía sombra roja utilice el mismo labial para maquillarme)
- Compacto
- Pestañas postizas
- Estrellas o escarcha plateada
Materials to be used :
💄 Concealer.
💄 Concealer pencil.
💄 Liquid foundation
💄 Powder brushes, cat tongue (for foundation), fan (for eye socket) and eyebrows, eyeliner brush.
💄 Illuminator.
💄 White, brown, yellow, yellow, blue and red eyeshadow.
Fire red lipstick (since I didn't have red shadow I used the same lipstick to apply my makeup).
💄 Compact.
💄 False eyelashes.
💄 Stars or silver glitter.
Piel natural: para lograr una piel natural sólo debes colocarte una base que sea un tono parecido a tu piel.
Tips: antes de maquillarte debes preparar tu rostro con productos que hidraten tu piel. Yo me aplico ácido hialurónico o alguna crema hidratante. El acabado del maquillaje será fabuloso.
Natural skin: to achieve a natural skin you only need to apply a foundation that is similar to your skin tone.
Tips: before applying makeup you should prepare your face with products that moisturize your skin. I apply hyaluronic acid or a moisturizing cream. The makeup finish will be fabulous.
1er paso
Debes aplicarte el corrector en ojeras, luego la base líquida con la brocha lengua de gato y dar toques suaves. Como se puede apreciar en la foto.
Con una esponja de maquillaje coloca polvo suelto en el área de las ojeras.
Maquilla tus cejas con sombra marrón utilizando el pincel de cejas.
Corrige las cejas con corrector.
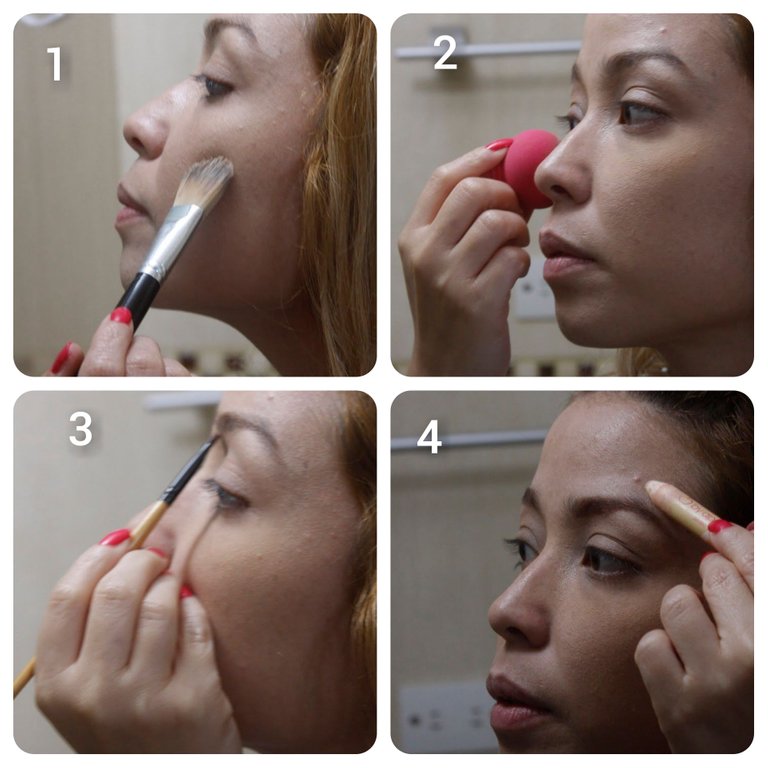
1st step
1) Apply the concealer under the eyes, then the liquid foundation with the cat tongue brush and dab gently. As you can see in the picture.

2) With a makeup sponge place loose powder in the area of the dark circles.

3) Make up your eyebrows with brown shadow using the eyebrow brush.

4) Correct the eyebrows with concealer.
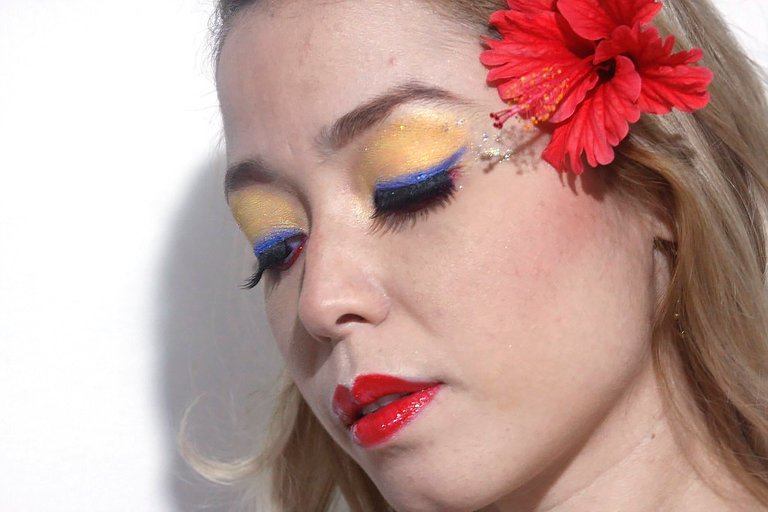
2do paso
Contorno del pómulo: para que tus mejillas se vean definidas.
Mirada profunda: para este maquillaje es súper importante que los ojos resalten con los colores amarillo, azul y rojo.
Debes colocar rubor en el hueso de la mandíbula (es la hendidura que divide la mejilla) esto hace que tus mejillas se vean definidas. El color que utilicé es ámbar.
Coloca sombra amarilla en el párpado móvil y difumina en la cuenca dando toquecitos poco a poco hasta llegar al arco ciliar (el arco ciliar es el borde del hueso debajo de las cejas).
Luego con un delineador azul traza una línea fina a ras de las pestañas y termínala con un “rabillo”.
Tips: si no tienes delineador puedes utilizar una sombra. Simplemente mojas el pincel y lo pasas por la sombra.Procedes a delinear el otro ojo.
Delinea el lagrimal con un creyón de color blanco.
Delinea el borde inferior del párpado con un pincel de sombra roja.
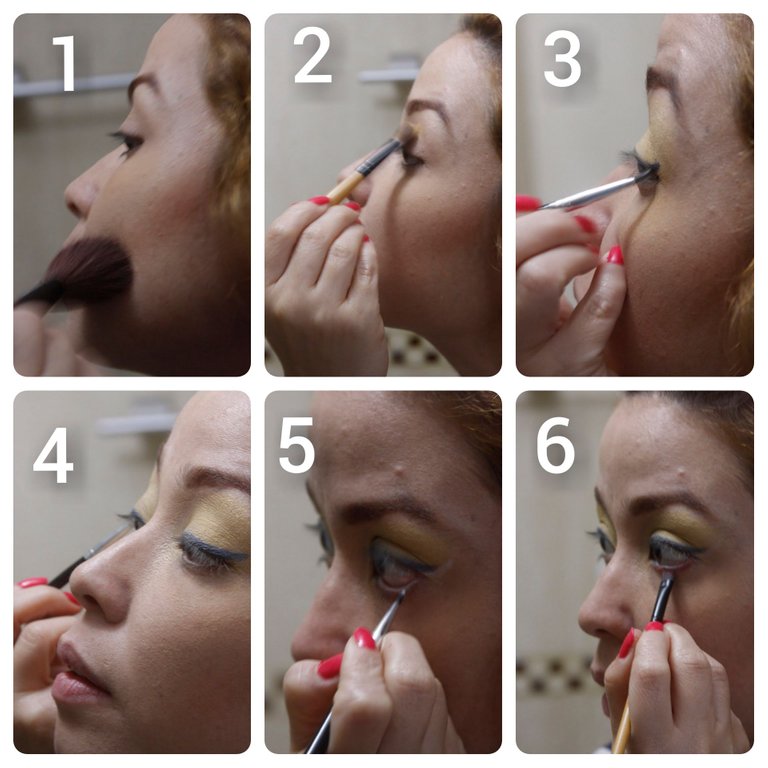
Step 2
Cheekbone contouring: to make your cheeks look defined.
Deep look: for this makeup it is super important that the eyes stand out with yellow, blue and red colors.
1) You should place blush on the jaw bone (this is the indentation that divides the cheek) this makes your cheeks look defined. The color I used is amber.

2) Place yellow shadow on the mobile eyelid and blend in the socket by dabbing a little at a time until you reach the ciliary arch (the ciliary arch is the edge of the bone below the eyebrows).

3) Then with a blue eyeliner draw a thin line at the lash line and finish it with a "corner".
Tips: if you don't have eyeliner you can use a shadow. Simply wet the brush and run it through the shadow.

4) Proceed to line the other eye.

5) Outline the tear line with a white crayon.

6) Line the lower edge of the eyelid with a red shadow brush.
3er paso
Coloca las estrellas poco a poco entre la línea de las pestañas y la cola de las cejas.
Para terminar el área de los ojos coloca unas pestañas postizas.
Sellar el maquillaje con polvo compacto.
Utiliza el iluminador en el arco de cupido (está en el labio superior) pómulos y nariz.
Luego procedes a aplicar el rubor rosado en el pómulo y la nariz.
Rellena tus labios con un labial rojo fuego para que se vean provocativos y sensuales. Coloca un gloss transparente.
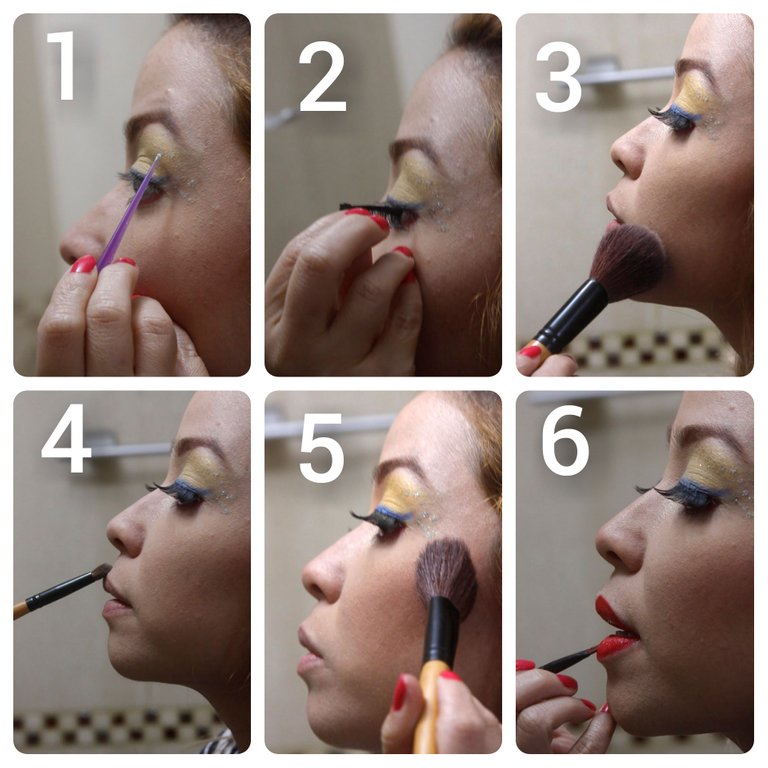
3rd step
1) Place the stars a little at a time between the lash line and the tail of the eyebrows.

2) To finish the eye area place some false eyelashes.

3) Seal the makeup with pressed powder.

4) Use the highlighter on the cupid's bow (it is on the upper lip) cheekbones and nose.

5) Then proceed to apply the pink blush on the cheekbone and  nose.

6) Fill in your lips with a fire red lipstick to make them look provocative and sensual. Apply a transparent gloss.
Espero les haya gustado. Me divertí muchísimo haciendo fotos y maquillándome. Los espero en el próximo post. Gracias por leerme.
Todas las fotos son propias.
Fotógrafo: Charles Prato
Cámara: Canon EOS 4D.
Edición fotográfica: InCollage y Adobe Photoshop
Traductor: https://www.deepl.com/translator
I hope you liked it. I had a lot of fun taking pictures and doing my makeup. I hope to see you in the next post. Thanks for reading.
All photos are my own.
Photographer: Charles Prato
Camera: Canon EOS 4D.
Photo editing: InCollage and Adobe Photoshop.
Translator: https://www.deepl.com/translator
Congratulations @jomarbym! You have completed the following achievement on the Hive blockchain and have been rewarded with new badge(s) :
Your next target is to reach 1750 upvotes.
You can view your badges on your board and compare yourself to others in the Ranking
If you no longer want to receive notifications, reply to this comment with the word
STOPCheck out the last post from @hivebuzz:
Viva Venezuela.... Mi país amado. Bonito Maquillaje Amiga.❤️
@ayleenr Gracias amiga 😘 🇻🇪
Hermoso tu maquillaje, me encantó!!!❤️
@rosemariam muchas gracias 😘
@jomarbym Te quedó hermoso 🥰♥️
@naty16 muchas gracias 😘
That's a very look jomarbym good job.
@simonjay thank you very much 🙂