

Reciban todos un gran saludo, es un placer para mí poder estar en esta comunidad y compartir con ustedes mis trabajos de costura.
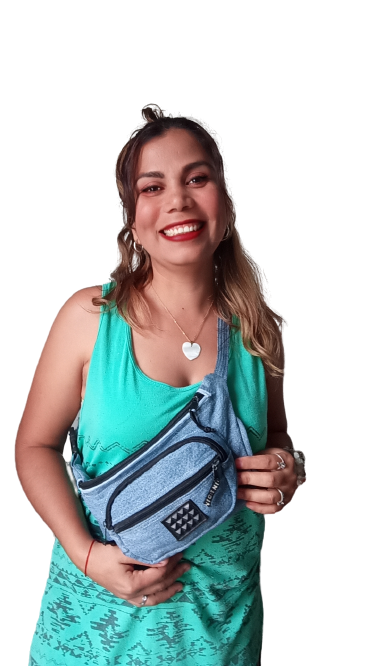
Hoy vengo a compartir con ustedes mi primer trabajo para esta comunidad y es la elaboración de una riñonera, siempre he querido elaborar una riñonera, esta es mi primera vez, no ha sido fácil, pero lo logré, espero que les sea de su agrado.
Sin más preámbulos inicio con la presentación de los materiales que utilice para elaborar esta riñonera.
Las fotografías que verán a continuación, fueron tomadas con mi teléfono modelo Alcatel_5044R.

It is a pleasure for me to be in this community and to share with you my sewing works.
Today I come to share with you my first work for this community and it is the elaboration of a fanny pack, I have always wanted to make a fanny pack, this is my first time, it has not been easy, but I did it, I hope you like it.
Without further ado, I begin with the presentation of the materials I used to make this fanny pack.
The pictures you will see below, were taken with my phone model Alcatel_5044R.

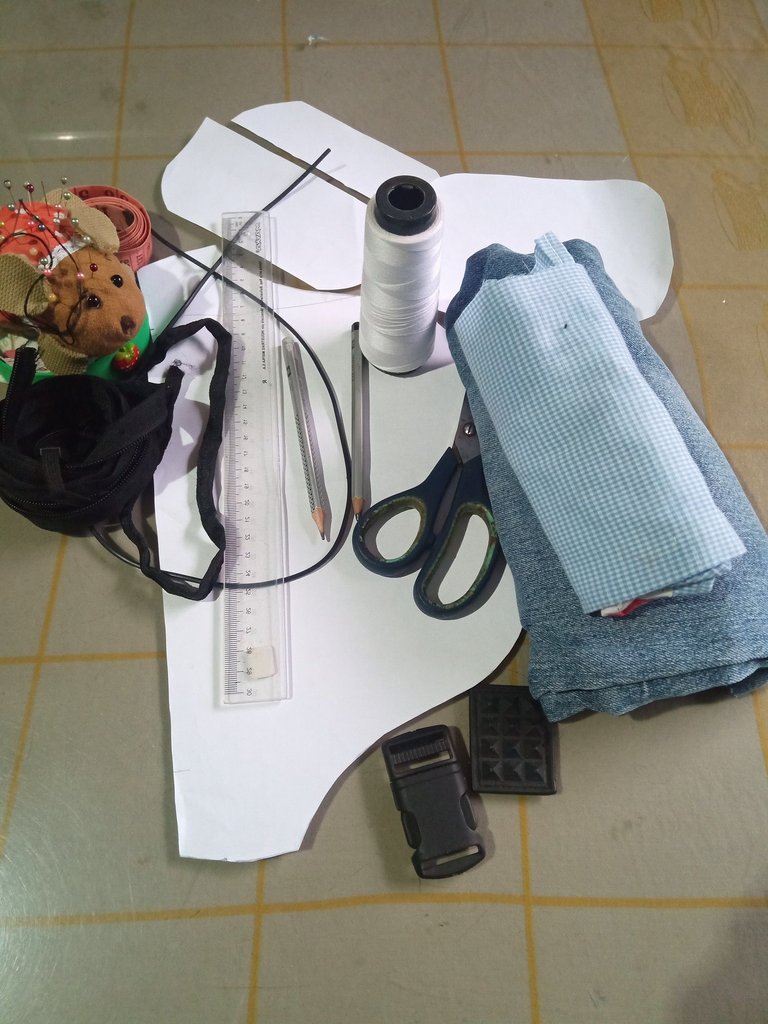
Materiales:
*Hilo de color blanco.
*Tijera de costura.
*Alfileres.
*Cinta métrica.
*Regla.
*Lápiz.
*Patrones.
*Tela de blue jean.
*Tela de vichy.
*Cordón de plástico.
*Hebilla de plástico.
*Accesorios para decoración.
*Cierres.
*Cinta para cubrir imperfecciones.
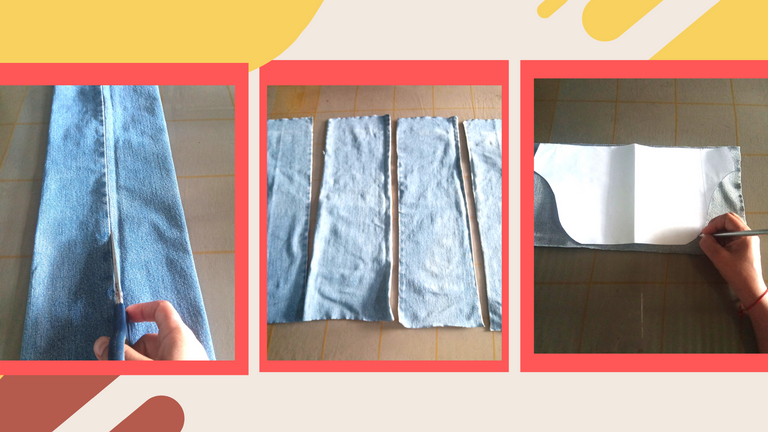
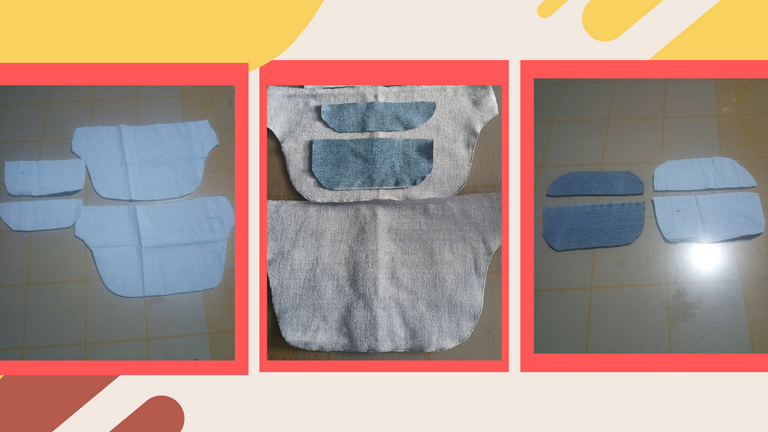
Lo primero que hice fue seleccionar dos mangas de pantalón de Jeans, las mismas las recorte por los lados, donde obtuve cuatro piezas.
Después tome las dos piezas con los lados más anchos y sobre estas coloque el patrón, dibuje la misma forma del patrón para sacar dos piezas principales.
Materials:
*White thread.
*Sewing scissors.
*Pins.
*Measuring tape.
*Ruler.
*Pencil.
*Patterns.
*Blue jean fabric.
*Vichy fabric.
*Plastic cord.
*Plastic buckle.
*Accessories.
*Closures.
*Tape to cover imperfections.
The first thing I did was to select two jean pant sleeves, cut them on the sides, where I got four pieces.
Then I took the two pieces with the widest sides and placed the pattern on them. I drew the same shape of the pattern to get two main pieces.
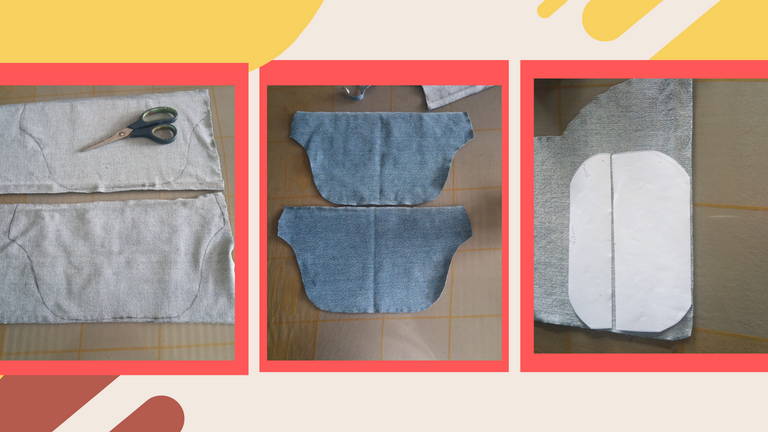
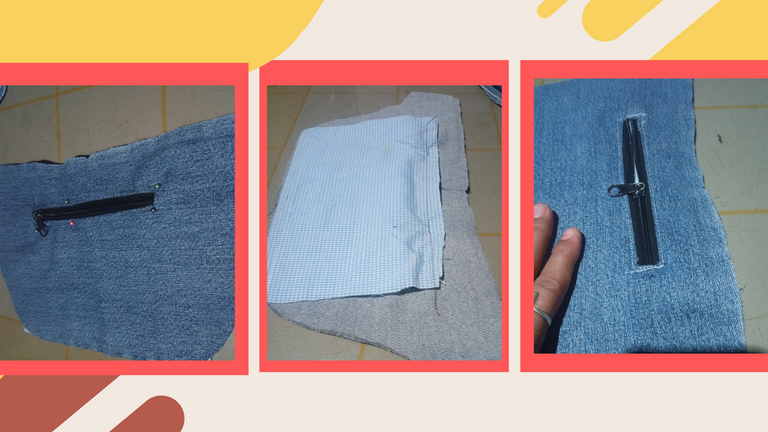
Recorte las piezas que había remarcado anteriormente y procedí a marcar el patrón del bolsillo para luego recortar, Pueden notar que el patrón del bolsillo está dividido en dos piezas, una superior y otra inferior como piezas principales externas.
Seguido a esto marqué unas tiras de 47 centímetros de largo por 5 centímetros de ancho y una de 30 cm de largo por 5 cm de ancho, otra de 27 cm de largo por 4 cm de ancho, esta última va sobre el bolsillo unido al cierre del bolsillo frontal, estas tiras son las que van a darle volumen a esta riñonera lo que vendrá siendo parte de los bolsillos.
Cut out the pieces that I had previously marked and proceeded to mark the pocket pattern and then cut out, you can notice that the pocket pattern is divided into two pieces, one upper and one lower as the main external pieces.
Then I marked some strips of 47 cm long by 5 cm wide and one of 30 cm long by 5 cm wide, another of 27 cm long by 4 cm wide, the latter goes over the pocket attached to the front pocket closure, these strips are the ones that will give volume to this fanny pack which will be part of the pockets.
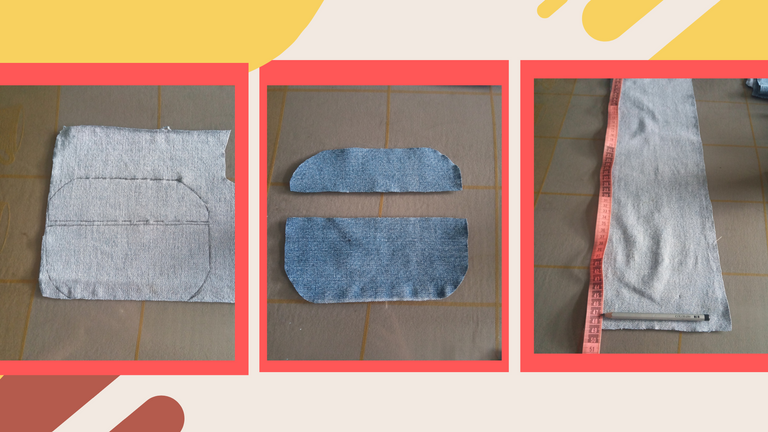
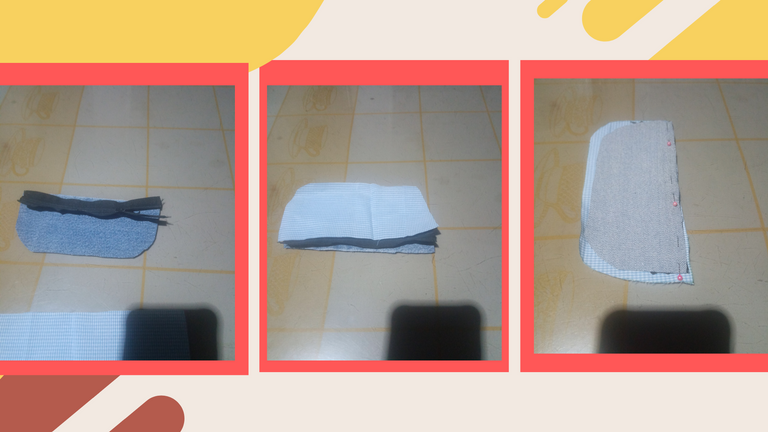
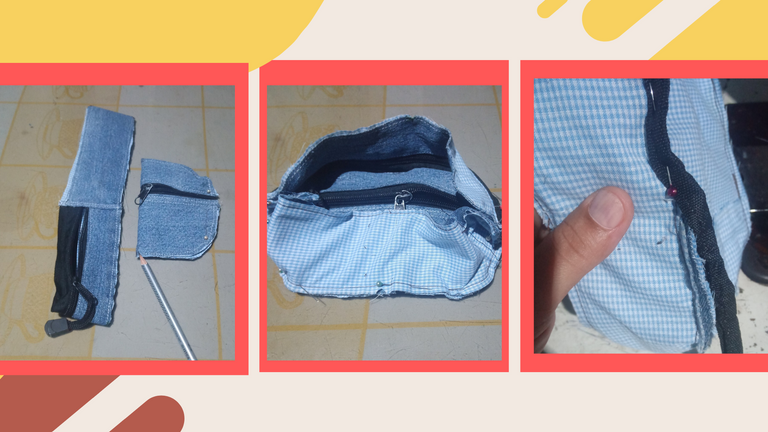
En este paso recorte la parte del forro interno de la riñonera, estos los recorte 1 centímetro más por todos los bordes que el forro principal.
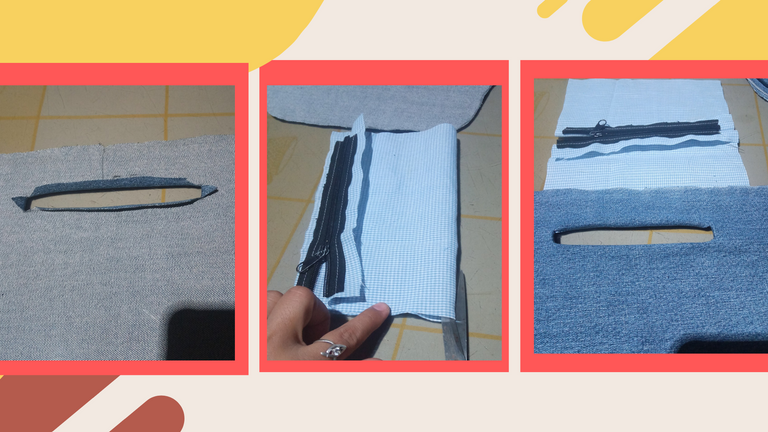
Teniendo todas las piezas listas, lo primero que hice fue armar el bolsillo delantero, primero se coció el cierre en la pieza del forro inferior, se cosió al revés del cierre con el derecho del forro, seguidamente se unen las 3 piezas con alfileres y se cosen.
In this step I cut the inner lining part of the fanny pack, these I cut 1 centimeter more along all the edges than the main lining.
Having all the pieces ready, the first thing I did was to assemble the front pocket, first I sewed the zipper on the bottom lining piece, sewed it to the back of the zipper with the right side of the lining, then I joined the 3 pieces with pins and sewed them together.
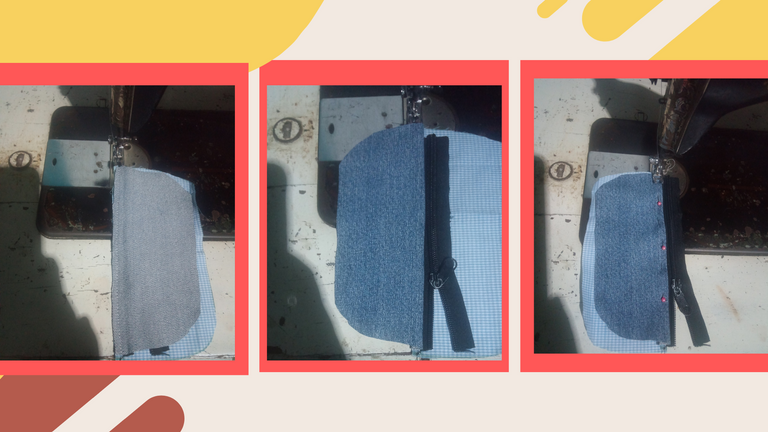
Se voltea y se pasa una costura de repaso para luego realizar el mismo procedimiento con la otra pieza que arma el bolsillo.
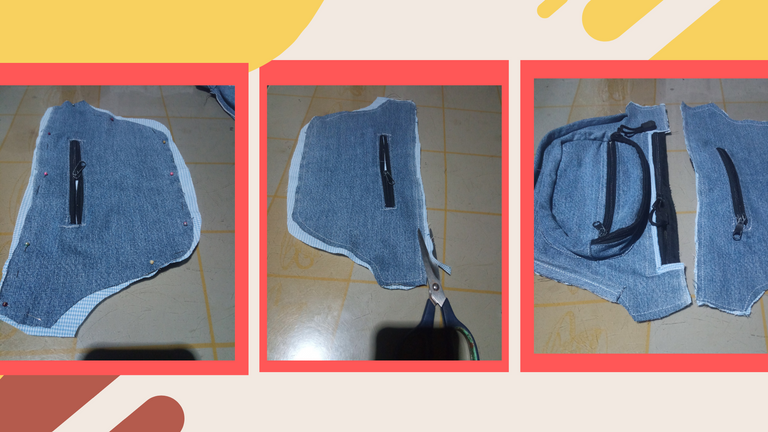
Quedando las dos piezas unidas, en al parte posterior coloque una pieza completa del tamaño del bolsillo, asegure y cocí y recorte el excedente de tela.
Turn it over and sew a seam allowance and then perform the same procedure with the other piece that makes up the pocket.
After joining the two pieces together, place a complete piece the size of the pocket on the back, secure, sew and trim the excess fabric.
Lo siguiente que hice fue armar la pieza del segundo cierre que va sobre el bolsillo con las tiras de 30 cm de largo por 5 cm de ancho y otra de 27 cm de largo por 4 cm de ancho, estas irán unidas y pegadas por el borde del bolsillo principal, finalizando la costura, culmine con una cinta para cubrir las imperfecciones internas del forro, cociendo por todo el contorno.
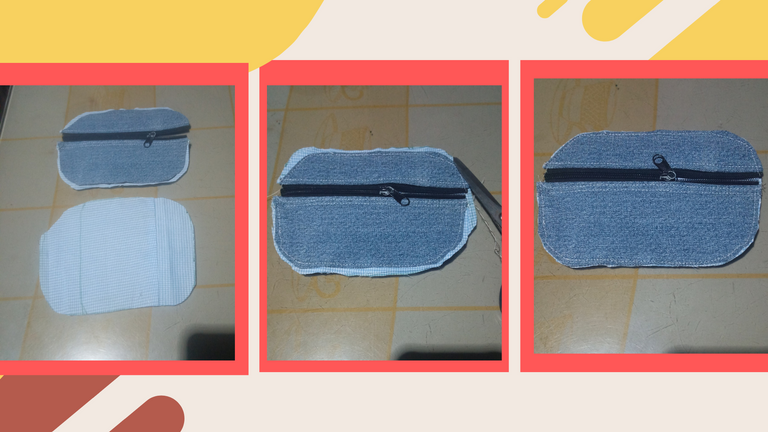
De esta manera viene quedando el bolsillo, luego de voltearlo, sobre la pieza principal de la riñonera, coloque el bolsillo superior volteado y marque unos puntos para que pudiese quedar centrado al momento de cocerlo en esta pieza.
The next thing I did was to assemble the piece of the second zipper that goes over the pocket with the strips of 30 cm long by 5 cm wide and another of 27 cm long by 4 cm wide, these will be joined and glued along the edge of the main pocket, finishing the seam, culminate with a tape to cover the internal imperfections of the lining, cooking around the contour.
This is how the pocket will look like, after turning it over, on the main piece of the fanny pack, place the top pocket turned over and mark some points so that it could be centered at the moment of sewing it on this piece.

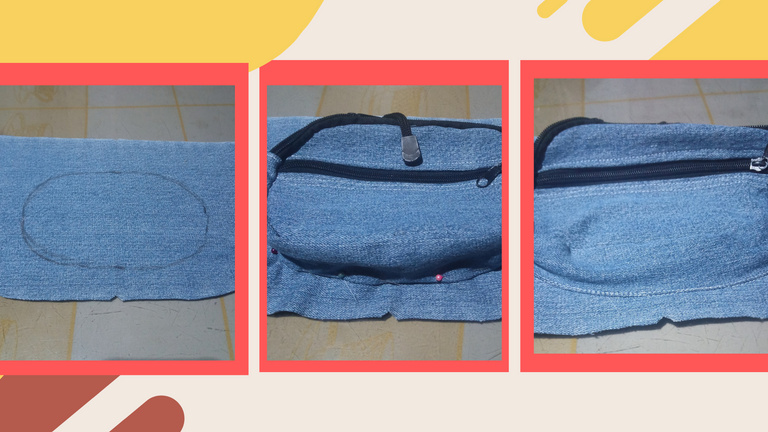
Estando dibujado el bolsillo frontal, lo fui asegurando con alfileres por todo el contorno, haciendo un pequeño doble interno para luego cocer sobre este.
Listo el bolsillo frontal, realice un corte superior donde colocaré un cierre de 27 centímetro de largo, a este corte le coloque un forro que sobresaldrá como decorativo por el borde del cierre.
Luego procedo a cocer este con el cierre, seguido colocaré el forro interno revés con revés.
Once the front pocket was drawn, I secured it with pins all around the contour, making a small internal double and then sewing over it.
Once the front pocket is ready, make a top cut where I will place a 27 centimeter long zipper, to this cut I placed a lining that will protrude as decorative along the edge of the zipper.
Then I proceed to sew this with the zipper, followed by placing the inner lining inside out.
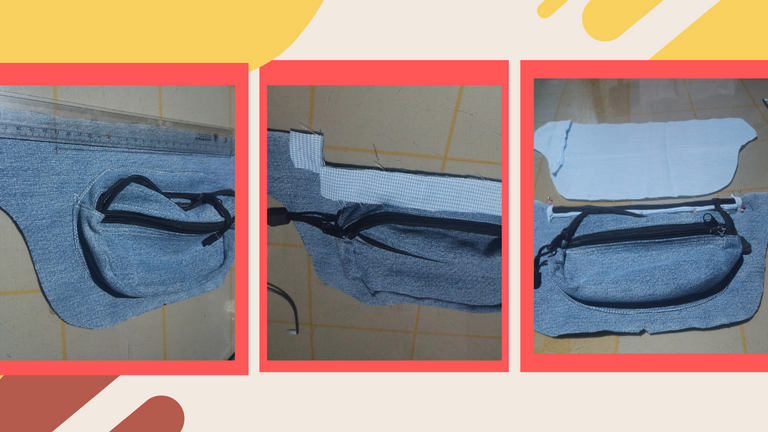
Teniendo listo esta capa principal, forre el cordón plástico con tela Blue Jeans de 47 centímetros de largo y lo reserve para luego cocerlo sobre esta capa principal.
Pueden notar como queda después de estar cocida esta trenza, primero lo fije con la ayuda de unos alfileres y después lo cocí en la máquina.
Estando listo este paso, comencé a realizar la parte de atrás de la riñonera, donde realice un corte de 15 centímetros por 1 de ancho, haciendo unos cortes en forma de triángulo en cada lado y un corte en el centro, doblando hacia atrás los bordes sobrantes de estos cortes.
Después de esto, coloque el cierre en el bolsillo interno por el derecho, cortando la parte inferior y pegándolo a la capa de Jeans por la abertura que realice anteriormente.
Seguidamente de haber cocido este cierre a la capa externa, selle los extremos del bolsillo con una costura sencilla y de esta forma queda el bolsillo interno.
En el próximo paso coloque el forro de la capa de atrás revés con revés, asegurándolo con alfileres y cociendo todo el contorno, después de estar cocidos recorto todos los excedentes y ya tendría listo esta segunda capa de la riñonera.
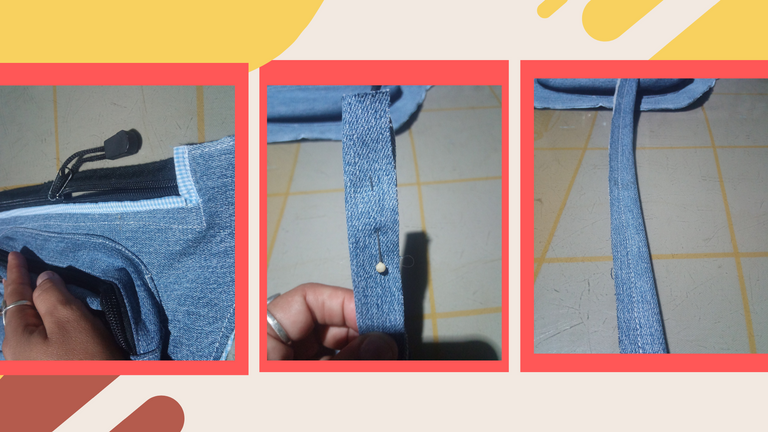
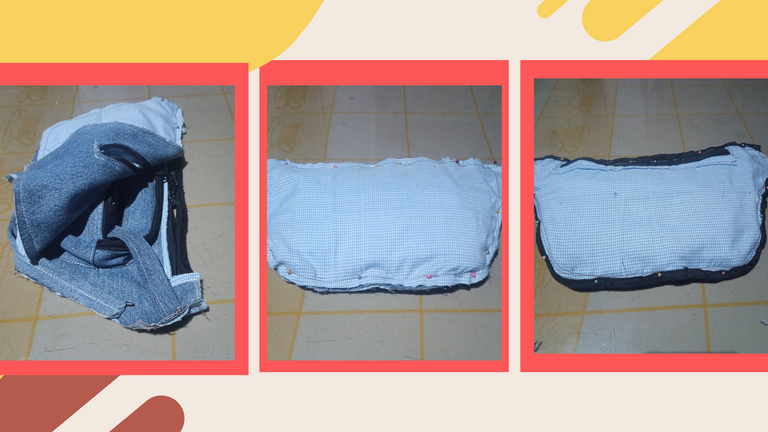
Con el sobrante de retazos de Jean, recorte unas piezas que uni hasta llegar a 62 centímetros de largo para la correa y 20 centímetros para el otro extremo, doblando en tres partes y cociéndolo recto con varias costuras para darle firmeza a esta correa, seguidamente asegure la corre por ambos lados de la capa principal y cocí los lados de modo que queden hacia adentro de la capa superior.
Después de tener fijada las correas, coloque capa sobre capa por los lados derechos, uniéndola con alfileres por el revés, cerrándola totalmente para luego cocer y colocarle la cinta que cubrirá los detalles de la costura.
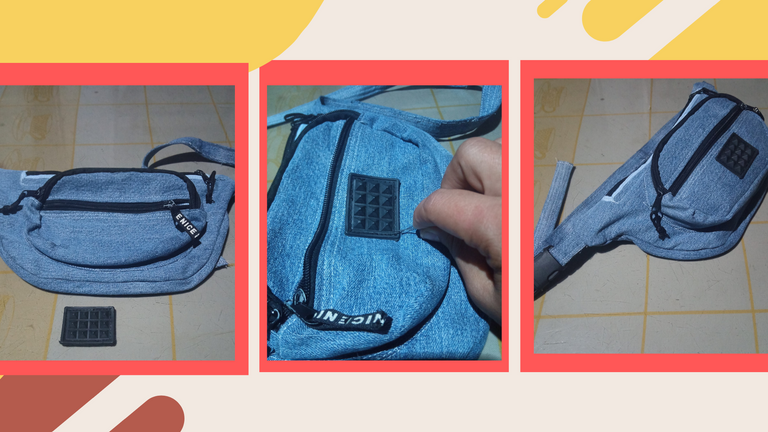
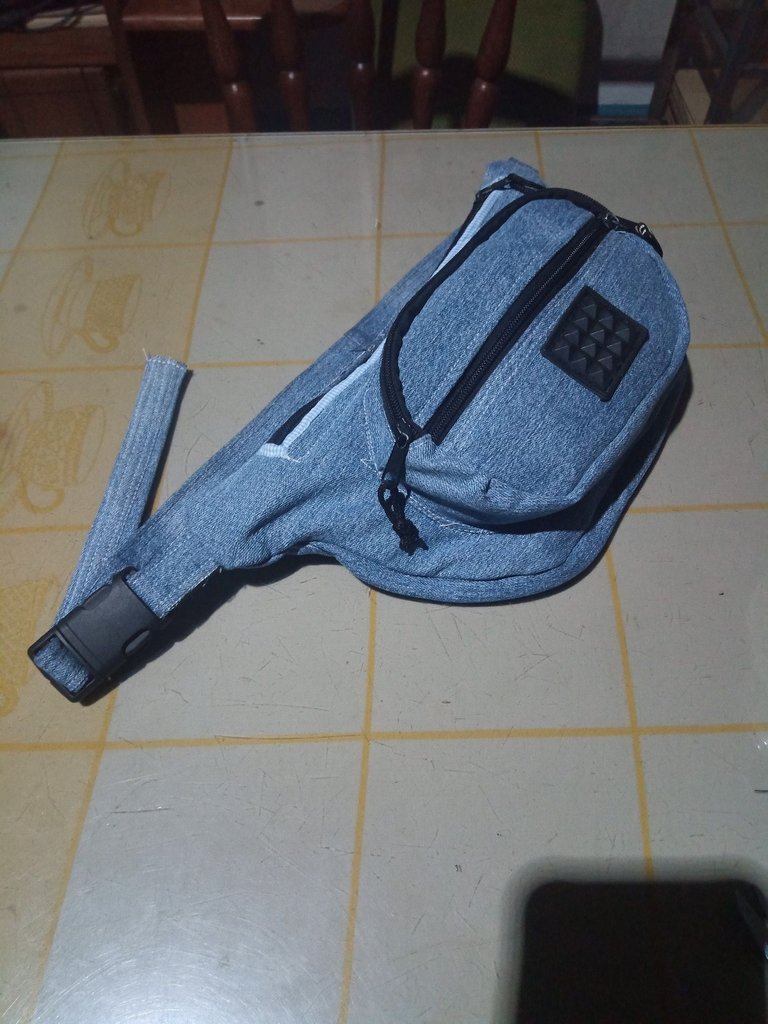
Estando cocido todo el contorno de esta riñonera por el lado del cierre externo, procedí a voltearla y cocí el accesorio decorativo a mano con hilo negro, así queda mi hermosa riñonera.
Espero que hayan entendido un poco del proceso de la elaboración de esta riñonera y les haya gustado, gracias por visitarme, nos vemos en una próxima publicación.
Having this main layer ready, I lined the plastic cord with Blue Jeans fabric 47 centimeters long and set it aside to bake it on top of this main layer.
You can see how it looks after this braid is baked, first I fixed it with the help of some pins and then I baked it in the machine.
Once this step was ready, I began to make the back of the fanny pack, where I made a cut of 15 centimeters by 1 centimeter wide, making triangle cuts on each side and a cut in the center, folding back the excess edges of these cuts.
After this, place the zipper on the inside pocket on the right side, cutting the bottom part and gluing it to the Jeans layer through the opening you made earlier.
After you have sewn this zipper to the outer layer, seal the ends of the pocket with a single seam, leaving the inner pocket.
In the next step place the lining of the back layer back to back, securing it with pins and sewing all around the contour, after being sewn I cut all the excess and I would have ready this second layer of the fanny pack.
With the leftover scraps of Jean, cut some pieces that I joined until reaching 62 centimeters long for the strap and 20 centimeters for the other end, folding it in three parts and cooking it straight with several seams to give firmness to this strap, then secure the strap on both sides of the main layer and cooked the sides so that they are inside the top layer.
After securing the straps, place layer upon layer on the right sides, pinning it together on the back side, closing it completely and then baking and placing the tape that will cover the details of the stitching.
Once all the outline of this fanny pack is cooked on the side of the external closure, I proceeded to flip it over and sew the decorative accessory by hand with black thread, this is how my beautiful fanny pack looks like.
I hope you have understood a little of the process of making this fanny pack and you liked it, thank you for visiting me, see you in a future publication.

social networks / redes sociales
![]()
![]()
Traductor Deepl
Translated Deepl
Ediciones Canva
Editions Canva


Y pensar que hiciste eso con tela de jean, me encanta de verdad y ahora está muy moda usar este tipo de bolsitos, tienes bastante talento en la costura amiga.
Gracias amiga, me alegro de que te haya gustado, no fue fácil hacerlo, me tomo varios días, pero finalmente lo hice, no es lo mismo que usar telas especiales para este tipo de riñonera, pero de igual forma lo logre, abrazos para ti amiga @jennyzer
Wonderful work! I'm ald you shared thtem here, I have a hard time making a bag , at least now I have some ideas about it
Thank you friend, I was in the wrong community, I had problems with the internet and I was very confused.
that happnes to me too. I hope you'l get e a good internet connection soon
Me han super encantado todas tus fotografías y el tutorial! super genial! te felicito.
Muchas gracias amiga @equipodelta ! es gratificante este tipo de comentarios, ya que nos animan y nos motivan a hacer las cosas cada día mejor
Welcome to the NeedleWorkMonday Community @lauracraft!
This is truly impressive work! I can tell by the photos and the process that you took your time to take care of every detail and it looks amazing. I would think you purchased this from a store it looks so good! You should feel very accomplished of a job well done! 😍
Every week needleworkers from around the globe get together to share our work, patterns, tips, ideas and shortcuts as we support one another. Our goal is to inspire the Hive blockchain to give crafting a try.
On Monday’s we use the #needleworkmonday tag and on all other days we use the #needlework tag without the word Monday attached. We share and post our work directly from the Community page.
We encourage our members to share about their needlework life with us. We love hearing stories and what types of things inspired your projects. We challenge you to put some feeling and emotion into your publications and help us get to know the needler behind the fabric.
Feel free to share photos of your work but it’s optional if you choose to share the steps with us (we do require you share the step process in at least one of your posts for validation purposes as you have already accomplished in this post). If you just want to needle and share about that time we’d love to hear about it. 😊
For more information about what we do and for our posting guidelines please visit our FAQs.
Thank you for sharing today ~
I feel very moved by such inspiring words, truly for me it is a pleasure to be in this community and learn every day and share a little of my knowledge with all the users of this wonderful platform, thank you for your support, guidance and the opportunity to be here with you.
Congratulations, your post has been upvoted by @dsc-r2cornell, which is the curating account for @R2cornell's Discord Community.
Enhorabuena, su "post" ha sido "up-voted" por @dsc-r2cornell, que es la "cuenta curating" de la Comunidad de la Discordia de @R2cornell.
Thank you for sharing this post on HIVE!
Your content got selected by our fellow curator semarekha & you just received a little thank you upvote from us for your great work! Your post will be featured in one of our recurring compilations which are aiming to offer you a stage to widen your audience within the DIY scene of Hive. Next time make sure to post / cross-post your creation within the DIYHub community on HIVE and you will receive a higher upvote ;) Stay creative & HIVE ON!
Please vote for our hive witness <3
The rewards earned on this comment will go directly to the people( @equipodelta ) sharing the post on Twitter as long as they are registered with @poshtoken. Sign up at https://hiveposh.com.