Good morning hive community, this content is focused on the repair of the transformer nintendo NES FAMICOM ANARANJADA, this console is the one presented in a previous post where I made the unboxing. For those who could not see it I present them I will be leaving the link at the end of the publication, buy second hand consoles so many years on the market that since they are collector's items, always bring a detail is impossible to find one in perfect condition but that is why these contents are created for when this problem arises.
Buenos días comunidad de hive, este contenido está enfocado a la reparación del transformador de nintendo NES FAMICOM ANARANJADA, esta consola es la presentada en un post anterior donde realice el unboxing. Para los que no pudieron verla se las presento estaré dejando en link al final de la publicación, comprar consolas de segunda mano de tantos años en el mercado que ya que son piezas de colección, siempre traen un detalle es imposible encontrar una en perfectas condiciones pero para eso están creados estos contenidos para cuando se presente este problema.
We always have several possibilities when restoring, first we can buy a new transformer there are still these pieces of nintendo but are difficult to locate and expensive depending on the country but it would be a viable option because it is current and if we do something wrong we can end up damaging the equipment, causing burn the console board. Another solution would be to buy a generic transformer in the market we can see different models and with different tips that we could look for one that sends the same voltage that tells us that is 9V 850mA and use the tip of the damaged transformer, but if we do not have that tip we will have another problem and we must change the charging pin.
The third solution that we can perform, is expensive because we require some plates to transform the current to the appropriate voltages and amperage is used cell phone charger we have in our homes, is an extremely delicate process we can find many tutorials on the internet we can guide us this is laborious but we lose the originality of the console. Now let's go with the most important thing, what was the problem with my transformer. When I bought the console she did not turn on because the transformer was bad when I made the general check to take the transformer to make sounds when I moved it sideways looked like a maraca in a nutshell.
Siempre tenemos varias posibilidades a la hora de restaurar, primero podemos comprar un transformador nuevo aún quedan estas piezas de nintendo pero son difíciles de ubicar y costosas depende del país pero sería una opción viable porque es corriente y si hacemos algo mal podemos terminar dañando el equipo, originando quemar la placa de la consola. Otra solución sería comprar un transformador genérico en el mercado podemos ver distintos modelos y con diferentes puntas que podríamos buscar uno que mande el mismo voltaje que nos indica que es 9V 850mA y utilizar la punta del transformador dañado, pero si no contamos con esa punta vamos a tener otro problema y debemos cambiar el pin de carga.
La tercera solución que podemos realizar, es costosa ya que requerimos de unas placas para transformar la corriente a los voltajes y amperajes adecuados se utiliza cargador de celular que tenemos en nuestros hogares, es un proceso sumamente delicado podemos encontrar muchos tutoriales en internet podemos guiarnos esto es laborioso pero perdemos la originalidad de la consola. Ahora vamos con lo más importante que problema presentaba mi transformador. Cuando compre la consola ella no prendía porque el transformador estaba malo cuando realizo el chequeo general al tomar el transformador hacia sonidos cuando lo movía hacia los lados parecía una maraca en pocas palabras.
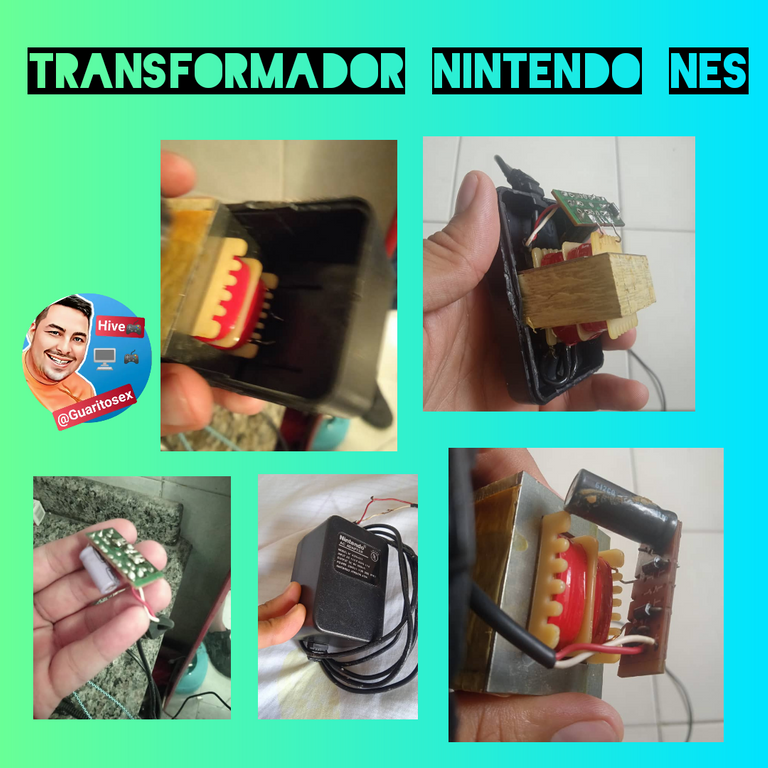
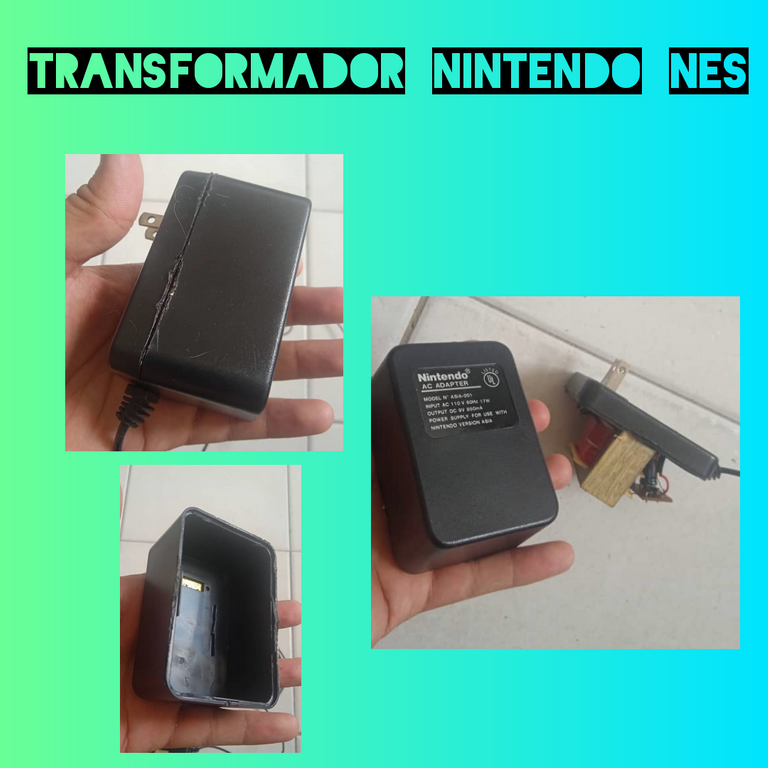
Because of my occupations I have little time but one day I set out to find the solution to this problem, from the beginning I had the hope that it would be perfect we always have to have good energy for everything to go well, the first thing to do was to open this transformer that was the challenge number 1 the particularity of this transformer is that it was sealed we can not open it with screws, I set out to heat the area and with a spatula was doing force, in an area of the transformer that you can see in the picture.
Por mis ocupaciones tengo poco tiempo pero un día me dispuse a buscar la solución para este problema, desde el inicio tenía la esperanzas de que iba quedar perfecto siempre tenemos que tener buenas energías para que todo salga bien, lo primero que debía hacer era abrir este transformador ese fue el reto número 1 la particularidad de este transformador es que estaba sellado no podemos abrirlo con tornillos, me dispuse con a calentar el área y con una espátula iba haciendo fuerza, en una área del transformador que la pueden observar en la imagen.
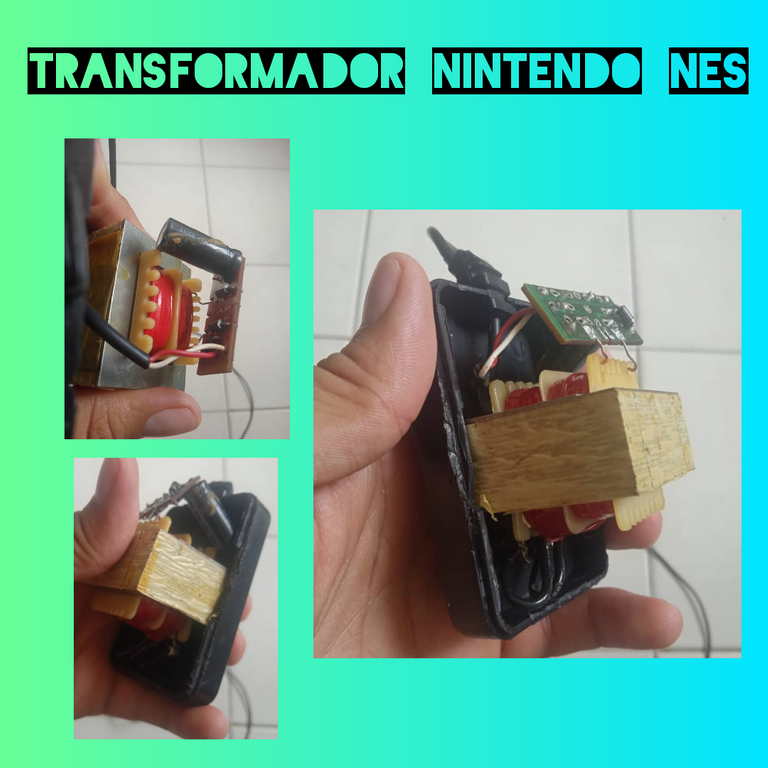
This process takes time is delicate to do, we do not want to damage the plastic but doing the most meticulous way we can do a clean job, do the least possible damage to our housing. In the same way I ended up splitting a little area, when I had uncovered as I imagined the plate that transforms the current was separated from the metal sheets what I had to do was to weld them look in a diagram where the positive and negative, as it was open I took the opportunity to change the purple capacitor for black, the power cable had black TEIPE I changed it for heat shrink, the restoration work was perfect.
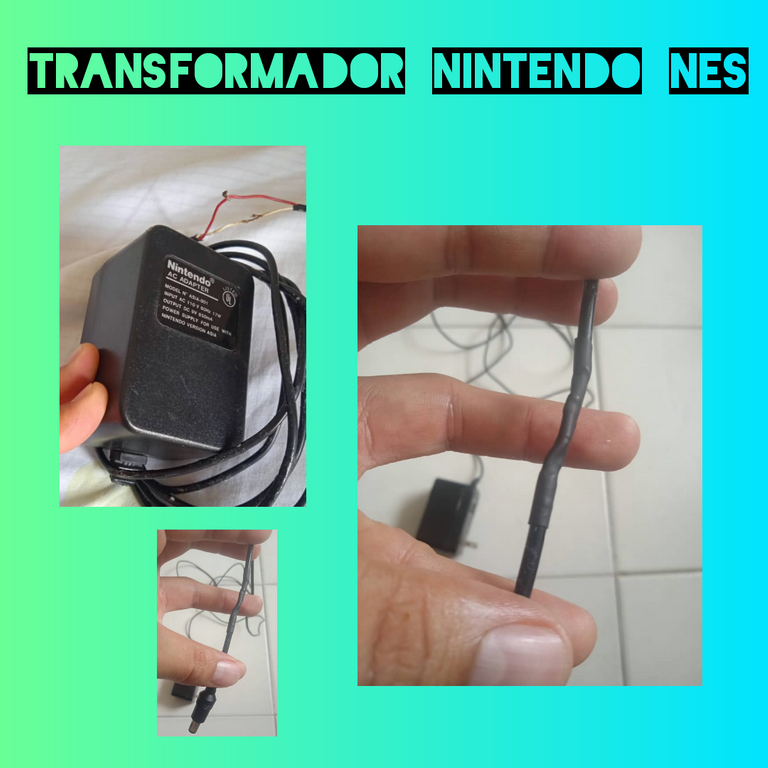
Este proceso lleva tiempo es delicado hacer, no queremos dañar el plástico pero haciendo de la manera más meticulosa podemos hacer un trabajo limpio, hacer el menor daño posible a nuestra carcasa. De igual forma se me termino partiendo un poco el área, cuando tenía destapado como me imagine la placa que transforma la corriente estaba separada de las láminas de metal lo que debía hacer era soldarlas buscar en un diagrama donde iba el positivo y negativo, como estaba abierto aproveche de cambiar el condensar morado por el negro, el cable de corriente tenia TEIPE negro lo cambie por termoencogible, el trabajo de restauración quedo perfecto.

 All images are taken from my cell phone / flyer maker editing program.

 Todas las imágenes son tomadas de mi celular / programa para editar flyer maker.

Hermano la solución está muy fácil en ocasiones la placa del dispositivo tiene en si lo mismo signos de positivo y negativo siempre van a estar cerca de donde están los cables separados es allí donde uno debe calcular junto con el amperaje y el voltaje que salen de allí para verificar que allí vayan los cables y listo hermano
Si realmente fue fácil lo más complicado es abrir esa carcasa sin hacerle daño.
A very well prepared and useful post.... Thanks for sharing!
!discovery 15
clear asset to hive community initiatives and foster the retro community.
This post was shared and voted inside the discord by the curators team of discovery-it
Join our community! hive-193212
Discovery-it is also a Witness, vote for us here
Delegate to us for passive income. Check our 80% fee-back Program
Su post ha sido valorado por @ramonycajal