On today's episode, I'll be sharing with y'all the work I did over the weekend.
As a fashion designer, my goal is to always look good and rock at least one new dress every weekend to service.
The perks of being a tailor. Hehe
I was inspired to make a box pleated bustier dress, as I never had maxi dresses before.
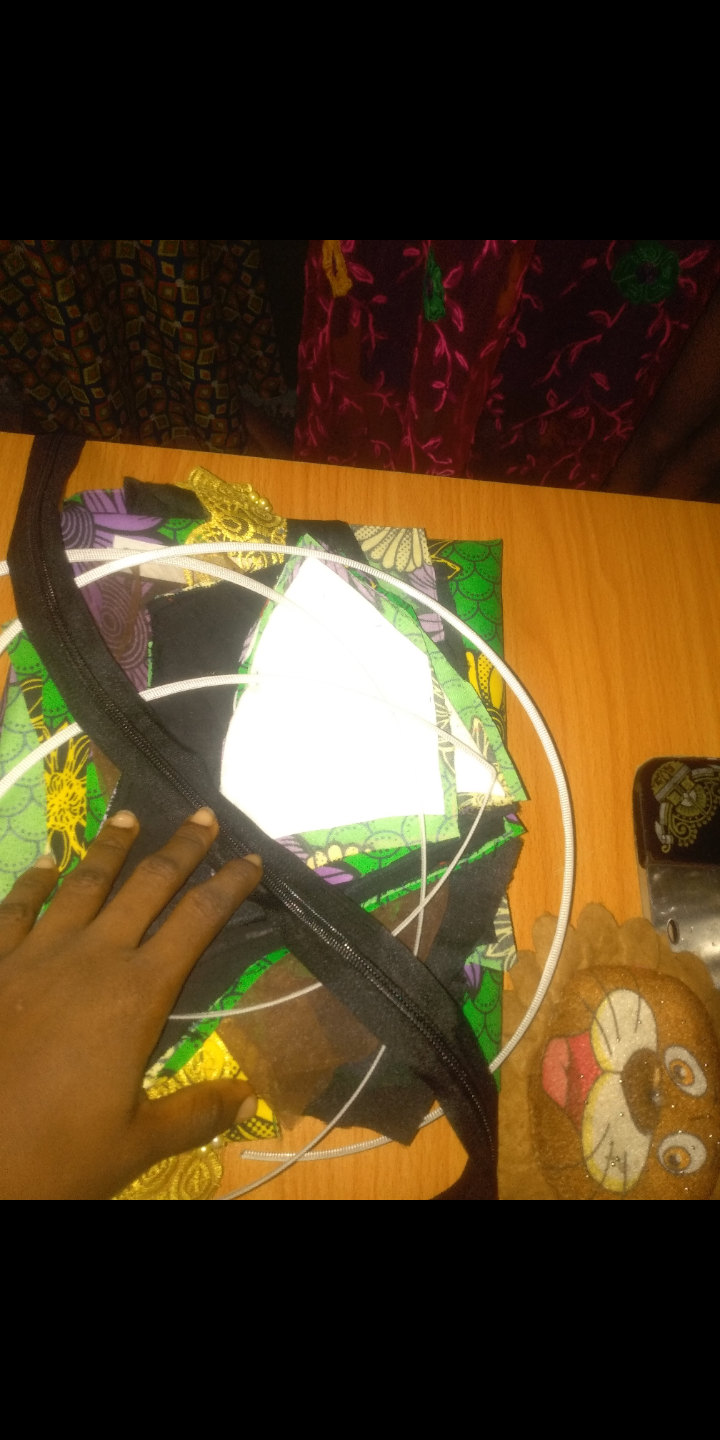
Materials used.
Ankara fabrics
Plain fabric (cotton) I used black.
Warden
Rigilene Bonning
Lining
Zipper
Thread
Mesh
Lace scallop
Pencil
pattern paper
French curve
Compass
Tape rule
Client's measurement
The measurement you will be needing.
Shoulder
Bust circumference
Bust point (Apex)
Bust span
Under bust measurement
And under bust circumference
Half-length
Waist circumference
Full dress length
Sleeve length
Round sleeve circumference
I made a corset (bustier) box-pleated dress.
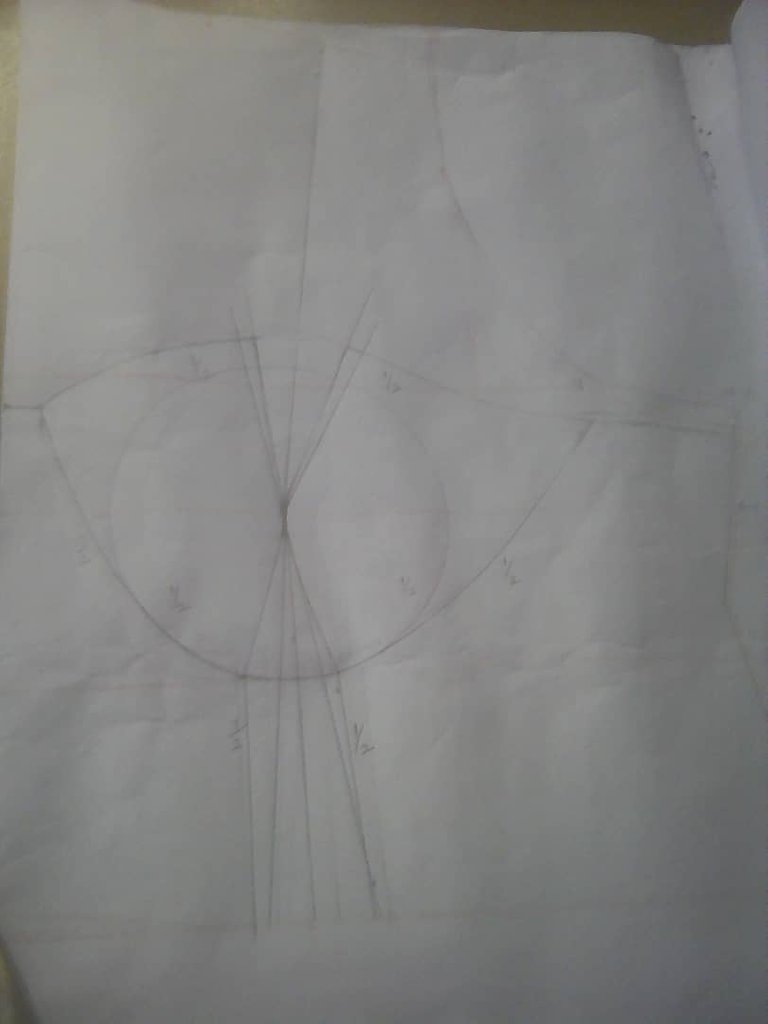
I started by drafting the basic bodice on a pattern paper on a fold.
Drafted the shoulder divided by 2.
I measured the bust point or apex from the shoulder and mark.
I divided the bust span by 2(if the bust span is 8inches, 8÷2=4)
The bust point is where you find the curve in my pattern paper.
I placed my compass on the bust point and made a curve and added 2 inches to the side, it wasn't round like a circle but like an eye shape, and 1.5 inches at the top because I wouldn't want my cleavages to be exposed.
Beneath the bust point, you can add 3 inches or use your client's measurement to find the underbust.
From the waist to the underbust, I took about 2 inches of darts to make it firm.
I measured the waist and snatched it by 1.5 inches, and then I connected all the marks with my pencil and added half an inch allowance all around.
This is the half-cut or the upper part.
I marked the back, it was quite simply a normal back bodice with a zipper.
And then I transferred the pattern paper draft to my actual fabrics and lining.
I cut the warden and added 1.5 to it.

For the lower part:
I subtracted my half-length from my full-length.
60-15= 45.
So my lower part will be 45 inches.
I cut my sleeve length and round length using my mesh fabrics.
I move to my sewing machine, to join all of them together and turn my lining neatly.
I used the Rigilene boning to create a beautiful design on my plain fabrics, I used the Ankara fabrics to cover it and create a design of my choice.
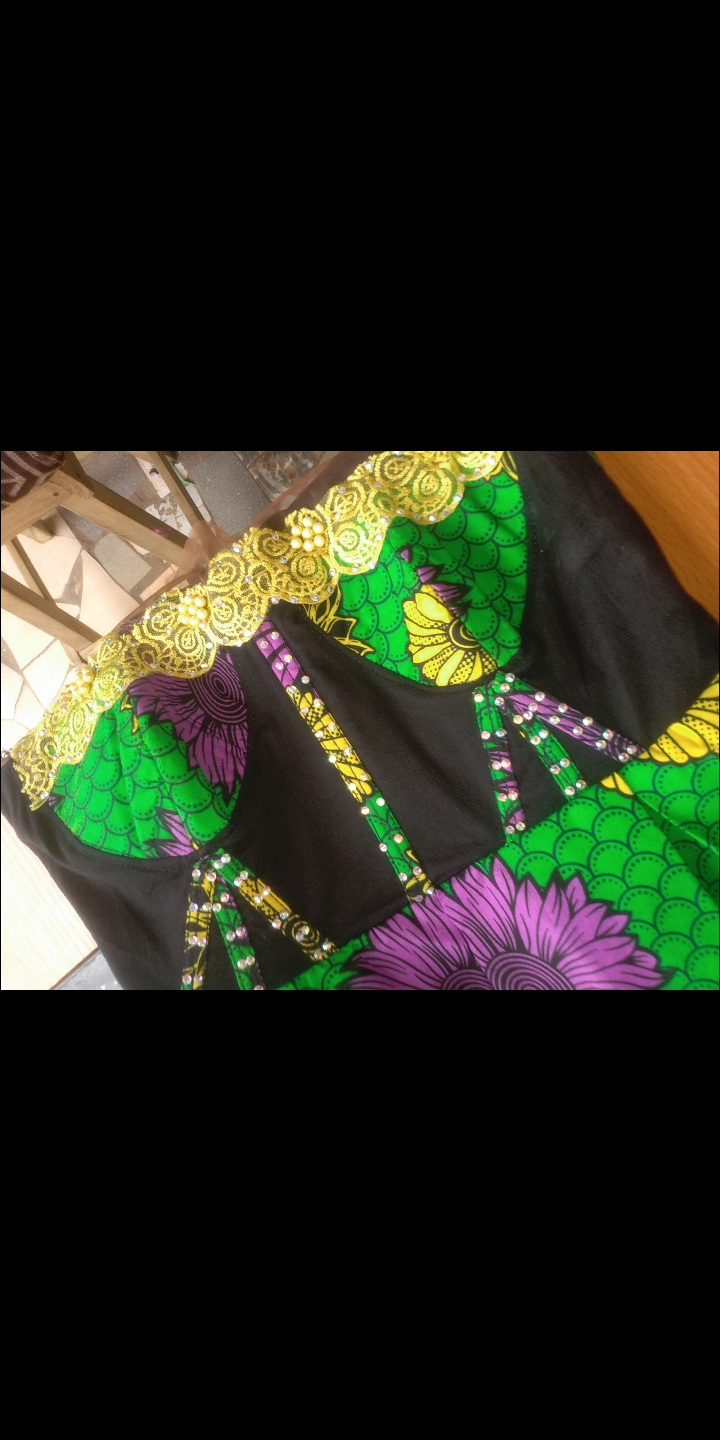
Then I joined my mesh and placed my yellow lace scallop on it to create a beautiful design.
I attached my mesh (net fabrics) to the upper part and used it too as my sleeve.
Made my box pleated and added my zipper.
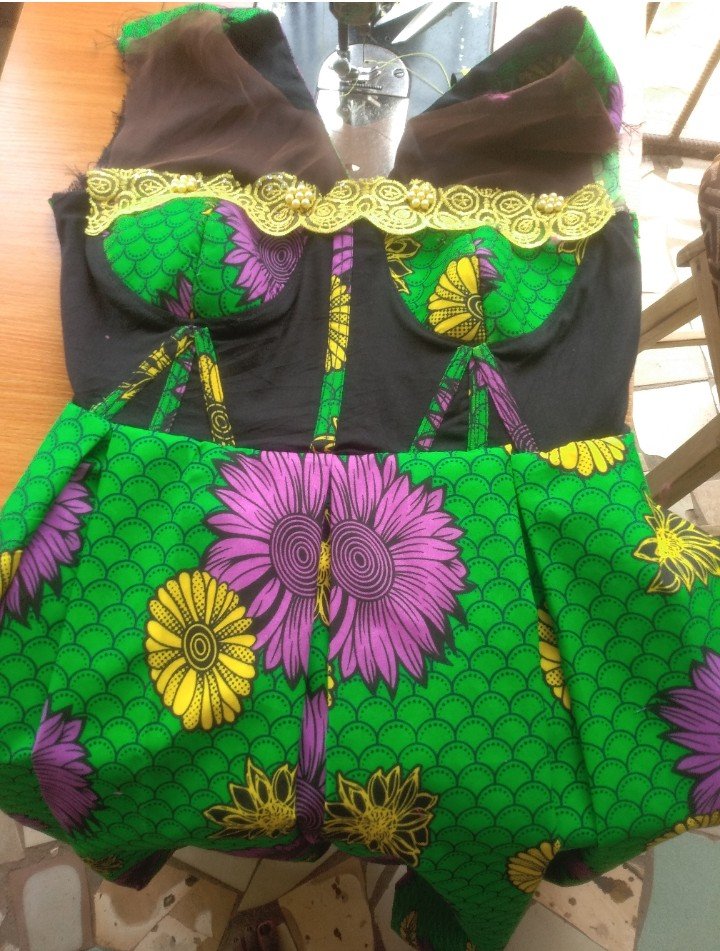
Gave it a good press with a pressing iron.
Here's the outcome.
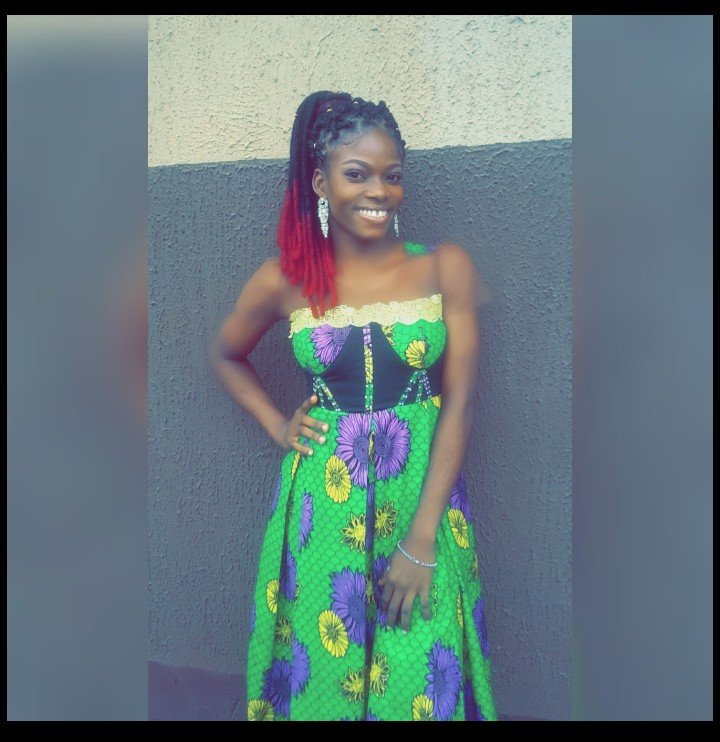
All images used are mine.
I hope you like my dress.
Thank you for reading, I am Amie Geoffrey.
[ESP]
En el episodio de hoy, voy a compartir con ustedes el trabajo que hice durante el fin de semana.
Como diseñadora de moda, mi objetivo es estar siempre guapa y lucir al menos un vestido nuevo cada fin de semana para el servicio.
Las ventajas de ser sastre. Hehe
Me inspiré para hacer un vestido bustier con pliegues en forma de caja, ya que nunca había tenido vestidos maxi.
Materiales utilizados.
Telas de ankara
Tela lisa (algodón) He utilizado el color negro.
Warden
Bonete de rigileno
Forro
Cremallera
Hilo
Malla
Encaje festoneado
Lápiz
papel de patrón
Curva francesa
Compás
Regla de cinta
Medición del cliente
La medida que necesitará.
Hombro
Circunferencia del busto
Punto del busto (vértice)
Envergadura del busto
Medida por debajo del busto
Y bajo la circunferencia del busto
Medio cuerpo
Circunferencia de la cintura
Largo del vestido completo
Longitud de la manga
Circunferencia de la manga redonda
Hice un vestido con corsé (bustier) plisado en caja.
Empecé por dibujar el corpiño básico en un papel de patrón sobre un pliegue.
He dibujado el hombro dividido por 2.
Medí el punto o ápice del busto desde el hombro y marqué.
Dividí la anchura del busto por 2 (si la anchura del busto es de 8 pulgadas, 8÷2=4)
El punto del busto es donde se encuentra la curva en el papel de mi patrón.
Puse mi compás en el punto del busto e hice una curva y añadí 2 pulgadas a los lados, no era redonda como un círculo sino como la forma de un ojo, y 1,5 pulgadas en la parte superior porque no quería que mis escotes estuvieran expuestos.
Por debajo del punto del busto, puedes añadir 3 pulgadas o utilizar la medida de tu clienta para encontrar el bajo pecho.
Desde la cintura hasta el bajo pecho, cogí unos 5 cm de pinzas para que quedara firme.
Medí la cintura y la recorté 1,5 pulgadas, y luego conecté todas las marcas con mi lápiz y añadí media pulgada de margen alrededor.
Este es el medio corte o la parte superior.
Marqué la espalda, era simplemente un corpiño normal con cremallera.
Y luego transferí el borrador del papel del patrón a mis telas reales y al forro.
Corté el guarda y le añadí 1,5.
Para la parte inferior:
Le resté a mi medio largo el largo completo.
60-15= 45.
Así que mi parte inferior será de 45 pulgadas.
Corto el largo de las mangas y el largo de la ronda con mis telas de malla.
Paso a mi máquina de coser, para unirlas todas y dar la vuelta a mi forro limpiamente.
Utilicé el deshuesado de Rigilene para crear un bonito diseño en mis telas lisas, utilicé las telas de Ankara para cubrirlo y crear un diseño de mi elección.
Luego uní mi malla y coloqué mi festón de encaje amarillo sobre ella para crear un hermoso diseño.
Uní mi malla (tejidos de red) a la parte superior y la usé también como mi manga.
Hice mi caja plisada y añadí mi cremallera.
Le di un buen planchado con una plancha.
Aquí está el resultado.
Todas las imágenes utilizadas son mías.
Espero que os guste mi vestido.
Gracias por leer, soy Amie Geoffrey.
Talented and beautiful what a fantastic combination 💗
Awww, thank you so much for your beautiful comment, it made my day.
It was my pleasure take care and keep safe always
Este vestido te a quedado realmente precioso, espero poder hacerme uno parecido gracias por compartir el tutorial 😍
Y me gustaría poder hacer uno para ti también, gracias por pasarte por aquí y dejar un bonito comentario.
Hi dear you did a very good job here Weldone
Thank you so much @moremoney28
Wow this is really beautiful detailed work. I really love the mesh sleeves because unless you look closely it looks like a no-sleeve dress. How you attached the material to the mesh in the back gives it a really cool illusion.
Very nice work, congrats on a beautiful finish ~
Thank you so much ma'am for your kind words.
And thanks for visiting my blog.
You’re welcome ;)
You're so talented. This is super fine.
Thank you for stopping by
Thank you for sharing this post on HIVE!
Your content got selected by our fellow curator sharminmim & you just received a little thank you upvote from us for your great work! Your post will be featured in one of our recurring compilations which are aiming to offer you a stage to widen your audience within the DIY scene of Hive. Next time make sure to post / cross-post your creation within the DIYHub community on HIVE and you will receive a higher upvote ;) Stay creative & HIVE ON!
Please vote for our hive witness <3
Thank you for stopping by.
You're welcome. That's a nice dress. Keep up the excellent work.
@tipu curate
Upvoted 👌 (Mana: 1/51) Liquid rewards.
Thank you so much @sharminmim
Wow! you have made a beautiful dress, the print of the fabric is very nice, I liked the combination with the black color, good job.
Cheers!
Thank you so much for your kind words.
Wonderful, that dress is very beautiful 🙂
Thank you so much.
I love how you designers make your diagrams and actually make the clothes the same way.
Welldone.
Hehe,thank you @draysax