

| Flower embroidery with satin ribbon on shirt. | Bordado de flores con cinta de raso en camisa. |
|---|---|
Greetings dear friends of #needleworkmonday. It is a pleasure to be with you and on this day to share with you the decoration I made to a shirt that belonged to my son Carlos when he was about two years old. I loved this shirt since I saw it in the store five years ago, and I have a special attachment for this shirt, although I don't have a specific reason, as it's been a long time since Carlos hasn't used it, it was time to give it to someone else. But among the many that I have been giving away from my son, I could not get rid of this shirt and although it is a pink and gray color it was a little masculine for my daughter Rafaella to wear. In this sense, I made some feminine flowers of various colors in satin ribbon. | Saludos estimados amigos de #needleworkmonday. Es un gusto estar con ustedes y en este día compartirles la decoración que le hice a una camisa que era de mi hijo Carlos cuando tenía unos dos años. Está camisa la ame desde que la vi en la tiene hace ya cinco años, y tengo un apego especial por esta camisa, aunque no tengo una razón especifica, como hace mucho rato que Carlos no la usa ya se le había acercado el momento de cederla a alguien más. Pero entre muchas que he ido regalando de mi hijo, de esta camisa no me he podido desprender y aunque es de un color rosa y gris era un poco masculina para que la usara mi hija Rafaella. En este sentido, realicé unas femeninas flores de varios colores en cinta de raso. |
Materials
3 mm satin ribbon in various colors.
Large eye needle.
Embroidery hoop.
Materiales
Cinta de raso de 3 mm de varios colores.
Aguja de ojo de grande.
Aro para bordar.

I mounted the shirt on the embroidery ring. I chose to make the design on the back. But I had trouble getting the ribbon through the fabric as it is not the most appropriate for this type of work. The first thing to do is to thread the ribbon through the eyelet of the needle. The one I used is a large needle, about 15 centimeters long and with an eyelet big enough for the ribbon to fit through. Then we place the end at the tip of the needle and pull the opposite end through. We make a knot at the end and we have the threaded needle ready to start embroidering. | Monté la camisa sobre el anillo de bordar. Elegí realizar el diseño en la parte de la espalda. Pero tuve inconvenientes a la hora de pasar la cinta a través de la tela ya que no es la más apropiada para este tipo de trabajos. Lo primero pasar la cinta a través del ojal de la aguja. La que usé es una aguja grande, de 15 centímetros aproximadamente y con un ojal lo suficientemente grande para que entre la cinta. Luego colocamos el extremo en la punta de la aguja y tiramos del extremo contrario. Hacemos un nudo al final y tenemos lista la aguja enhebrada para empezar a bordar. |


We have previously made a pattern of the flowers with a graphite pencil. We pass the needle from back to front and we return it half a centimeter from where we have passed it the first time, so we will have the first petal. We pass the needle from the back to the front and in this way we assemble the first flower that looks like a daisy. We thread needle with yellow ribbon and we pass it from back to front and we give a turn with the ribbon around the needle and we pass it back, it will form a kind of knot that when joining several we will have the center of the flower. | Previamente hemos realizado un patrón de las flores con un lápiz de grafito. Pasamos la aguja de atrás hacia adelante y la regresamos a medio centímetro de dónde la hemos pasado la primera vez, así tendremos el primer pétalo. Vamos pasando la aguja de atrás hacia adelante y de esta forma vamos armando las primeras flor que es parecida a una margarita. Enhebramos aguja con cinta amarilla y la pasamos de atrás hacia adelante y damos un giro con la cinta alrededor de la aguja y la pasamos de regreso, se formará una especie de nudo que al unir varios tendremos el centro de la flor. |
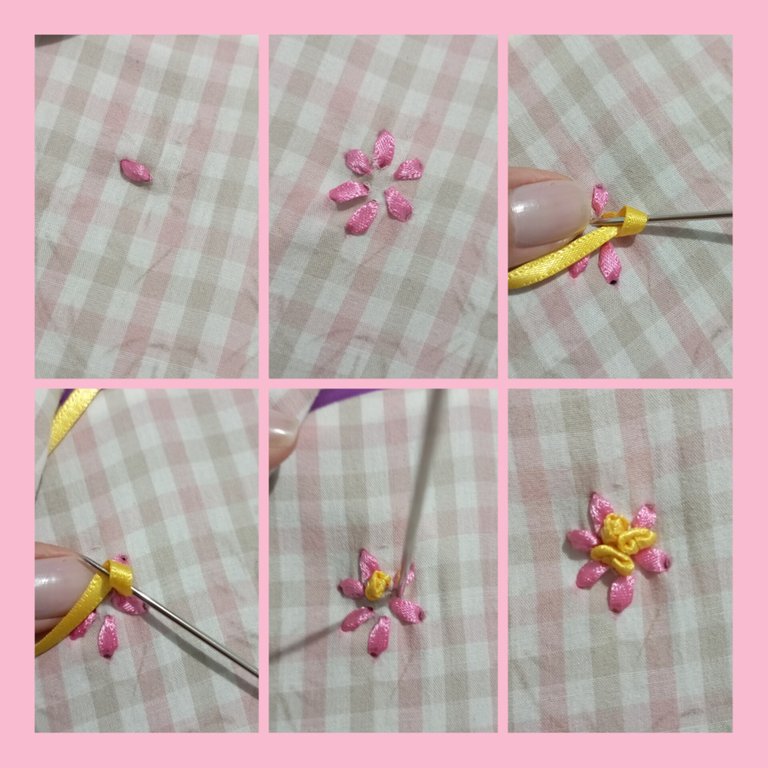
Another model of flower we make it passing the needle threaded in this case with light blue ribbon, then we pass the needle but only the tip and part of the ribbon we place it behind the needle and . When we finish passing the needle we return it to the starting point finishing that stitch but without tightening it. We return the needle and make a small stitch where the curve of the petal is formed. The following image shows the steps to follow for this flower. We finish it with yellow knots like the ones we made in the first flower. | Otro modelo de flor la realizamos pasando la aguja enhebrada en este caso con cinta celeste, luego pasamos la la aguja pero solo la punta y parte de la cinta la colocamos por detrás de la aguja y . Al terminar de pasar la aguja la devolvemos al punto de inicio terminando esa puntada pero sin apretarla. Devolvemos la aguja y realizamos una pequeña puntada dónde se forma la curva del pétalo. En la.siguiente imagen se muestran los pasos a seguir para esta flor. La terminamos con nudos amarillos como los que realizamos en la primera flor. |

Basically these are the main types of flowers that I made in this embroidery because the others are the same with small variations. I think that the type of fabric did not help me much in the realization of this project because the threads that make up the fabric are very closed, perhaps if I had chosen a more open weave fabric the work would have been easier, since it was very difficult to pass the needle and also there was a hole in the fabric because of the thickness of the ribbons; on the other hand I would have obtained a much neater finish. | Básicamente están son los principales tipos de flores que realicé en este bordado porque las demás son iguales con pequeñas variaciones. Pienso que el.tipo de tela no me ayudó mucho en la realización de este proyecto porque los hilos que conforman la tela son muy cerrados, quizás si hubiese elegido una tela de entramado más abierto el trabajo me habría resultado más fácil, ya que me costaba mucho pasar la aguja y además quedaba un orificio en la tela por lo grueso de las cintas ; por otro lado habría obtenido un acabado mucho más prolijo. |


Finally I finished embroidering and ironed the embroidery hoop marks. I tried to take a picture of my daughter's back, but I didn't succeed. She only gave me a few rare front shots. I hope you like them. I hope to do much better next time. Bye Bye | Finalmente terminé de bordar y planché sobre todo dónde estaban las marcas del aro de bordar. Intenté tomarle una foto de espaldas a mi hija, pero no logré el objetivo. Solo me regaló unas escasas fotos frontales. Espero les guste. Espero la próxima hacerlo mucho mejor. Chao Chao. |


Imágenes editadas en: itshot
Fotos tomadas con Redmi 10
Images edited in: itshot
Photos taken with Redmi 10
Te quedó súper ese bordado. Gracias por compartir. Saludos
Gracias amiga.
🤗🤗🤗🤗
Hola Yenys. Te quedó hermoso este bordado, a pesar de la tela difícil, creo que se ve muy bien. Es un toque ideal para darle un toque femenino a esta camisita. Ahora vas a poder seguir conservandola un tiempo más. Tu nena se ve hermosa con ella. Felicitaciones ❣️
Gracias Laura...esa era la intensión, tenerla un tiempo más. Aunque cuando di la primera pintada pensé que la había estropeado porque literalmente me quedó un agujero. Quise desistir de la idea, pero ya tenía que seguir ahora para disimular el agujero, pero al final creo que salió bien. Gracias a Dios. 😁.
Gracias por tu comentario.
Abrazos.
Saludos amiga @artsugar, te quedo super genial me encanta, la pequeña seguro quedo feliz.
Gracias querida @lorennys. Tu comentario me alegra mucho. Que bueno que te gustara.
Siii, Rafaella se pone feliz cuando hago cosas para ella.
Gracias por pasar por mi blog.
Bendiciones.
¡Que talento, amiga! Me encantó ese bordado, en un jean quedaría espectacular también 🤩 La modelo también está de catálogo 😁
Gracias querida Gloria. Es verdad. Tengo un chaleco de jeans, me has dado una gran idea. Jejejeje. Te daré los créditos. 😁😁
Rafaella ni quisiera quería regalarme una foto. 😐
Gracias por pasar por mi blog.
Abrazos.
that turned out really cute!!:)
Thank You. 🤗🤗🤗
Saludos @artsugar, te quedó hermoso el bordado , le da un toque delicado a la blusa, los colores que usaste están geniales, la modelo es muy guapa, Dios la bendiga.
Feliz inicio de semana!
Amén amiga. Muchas gracias. Aprecio que tomes el tiempo para dejarme un bonito comentario.
Abrazos y bendiciones
very cute!!!!
Thank You. ☺️☺️☺️