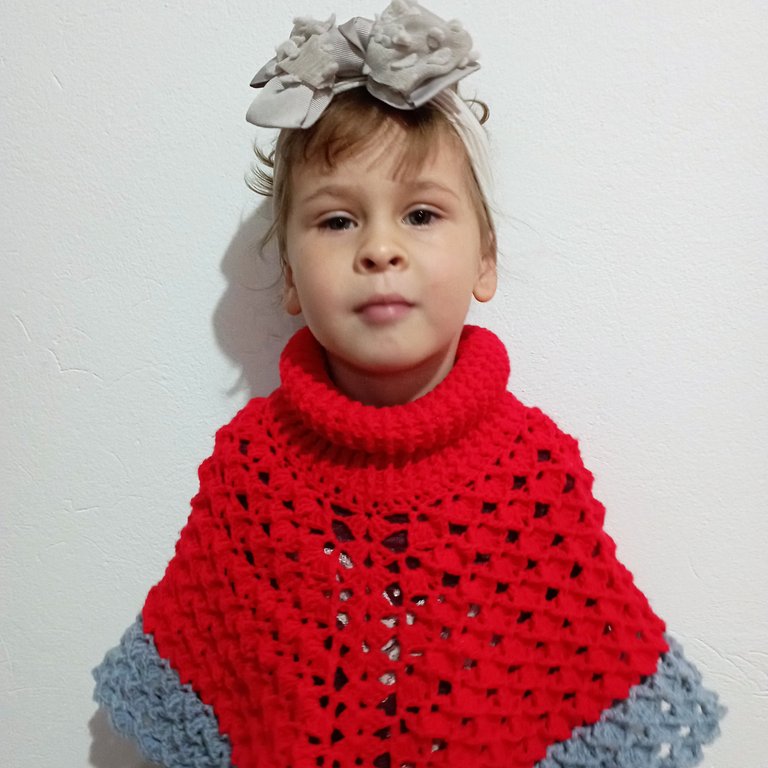

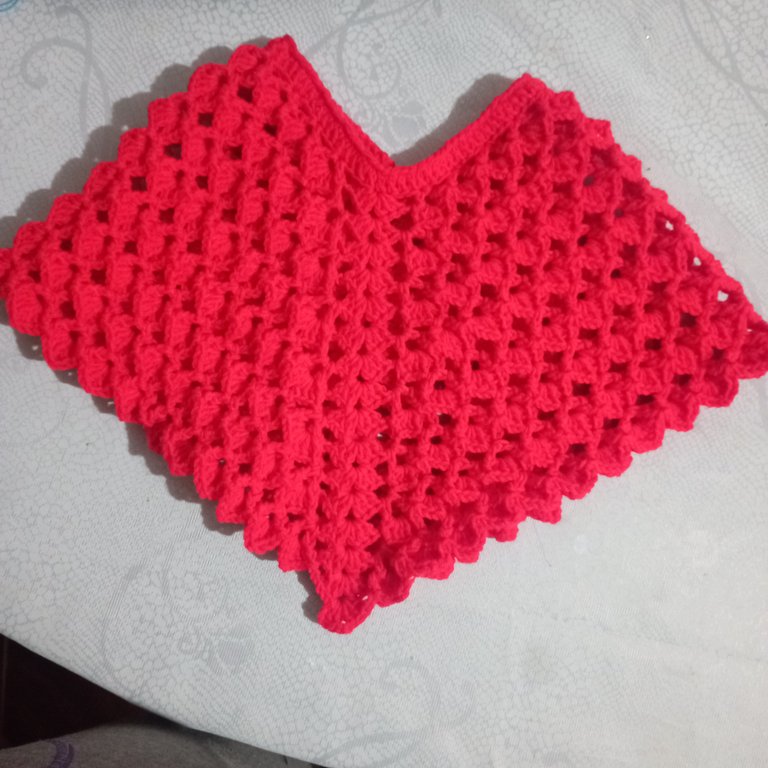
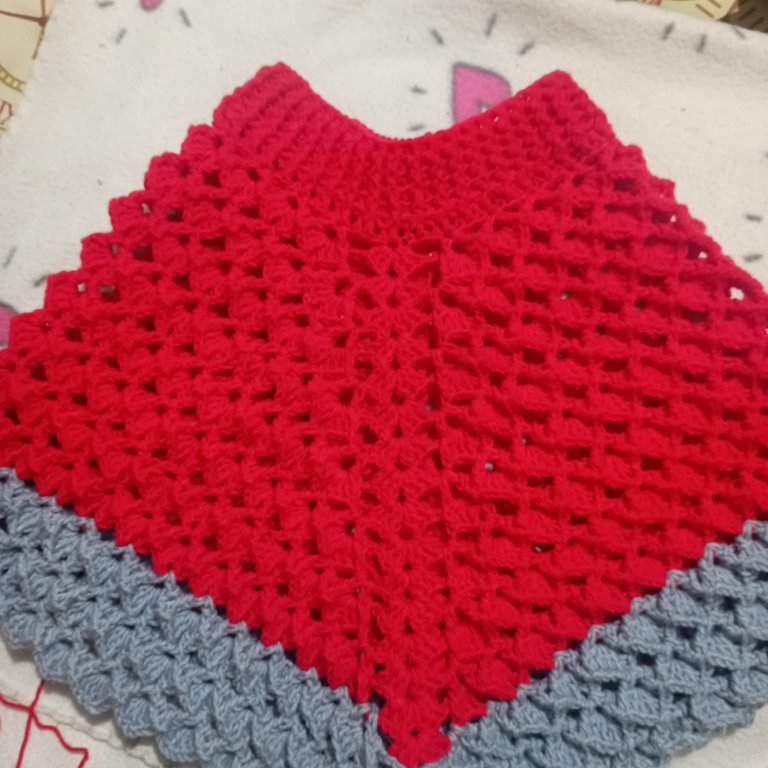
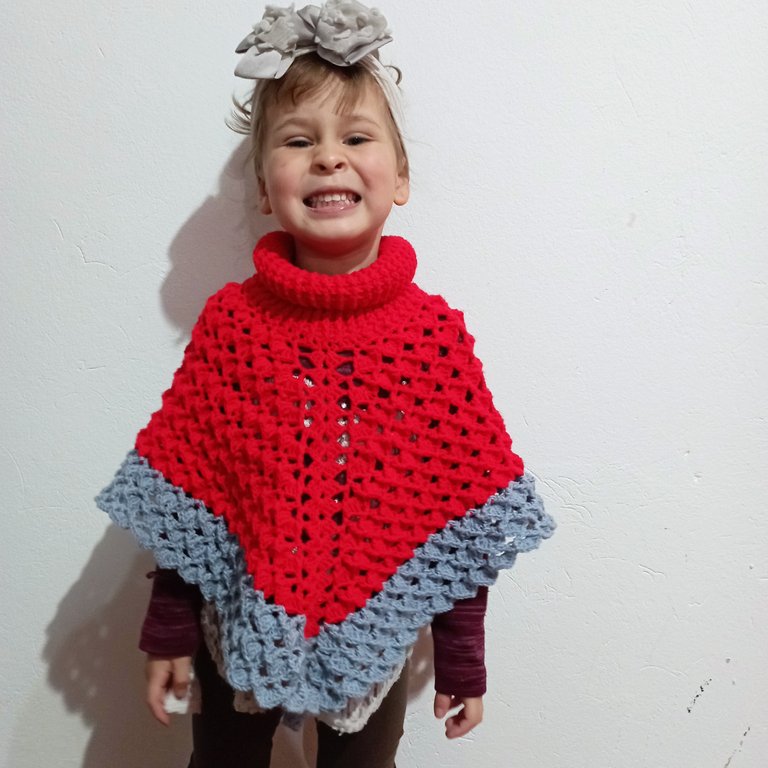
| My first crocheted poncho for my daughter. | Mi primer poncho tejido a crochet para mi hija. |
|---|---|
I'm glad to say hello to the members and friends of #needleworkmonday. This is the first time I am with you and well, I am not a seamstress, nor do I knit very often, actually it had been a long time since I knitted more than a few decorative tablecloths but I always liked to knit, I didn't do it because I didn't really have the tools, at the time when my aunt taught me how to do the basic stitches, there was no other tool than some very old magazines and they were not really within my reach. I let time go by and I remember that one skein of yarn lasted me for years because I would knit and unknit it trying to make something that I never finished. But things today have changed thanks to technology and any kind of tutorial is available on social networks to help us grow and advance in our projects. In this sense I was looking at some tutorials that cleared my doubts on how to make the increases that was my biggest problem and I ventured to make a pretty basic poncho that is ideal for me that I am a beginner. I share with you the process and my progress. | Me da gusto saludar a los miembros y amigos de #needleworkmonday. Es la primera vez que estoy con ustedes y bueno, no soy costurera, ni tejo con frecuencia, en realidad hacia mucho tiempo que no tejía más que unos pocos manteles decorativos pero siempre me gustó tejer, no lo hacía porque en realidad no tenía las herramientas, en la época en que mi tía me enseñó a hacer los puntos básicos, no había otra herramienta que unas revistas muy antiguas y en realidad no estaban a mi alcance. Deje pasar el tiempo y recuerdo que una madeja de hilo me duró años porque la tejía y destejía intentando hacer algo que nunca acababa. Pero las cosas hoy en día han cambiado gracias a la tecnología se dispone en las redes sociales de cualquier tipo de tutorial para ayudarnos a crecer y avanzar en nuestros proyectos. En este sentido estuve mirando algunos tutoriales que aclararon mis dudas de cómo hacer los aumentos que era mi mayor problema y me aventuré a realizar un poncho bastante básico que es ideal para mí que soy principiante. Les comparto el proceso y mi avance. |
Materials
To make this poncho I used 3 skeins of red yarn of 50 grams each.
1 skein of 50 grams of gray wool.
3 mm needle.
Materiales
Para hacer este poncho utilicé 3 madejas de lana roja de 50 gramos cada una.
1 madeja de 50 gramos de lana gris.
Aguja de 3 mm.
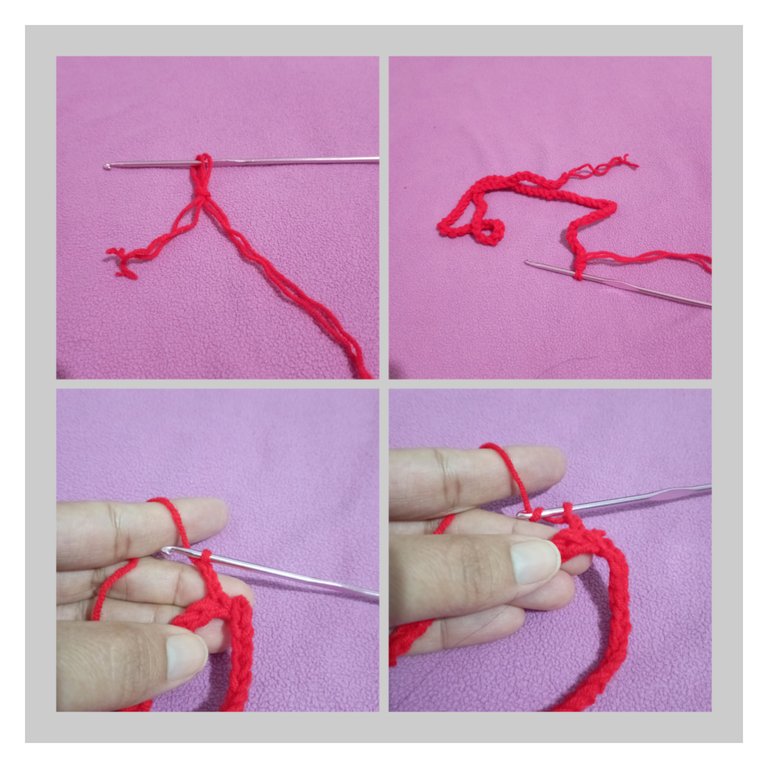
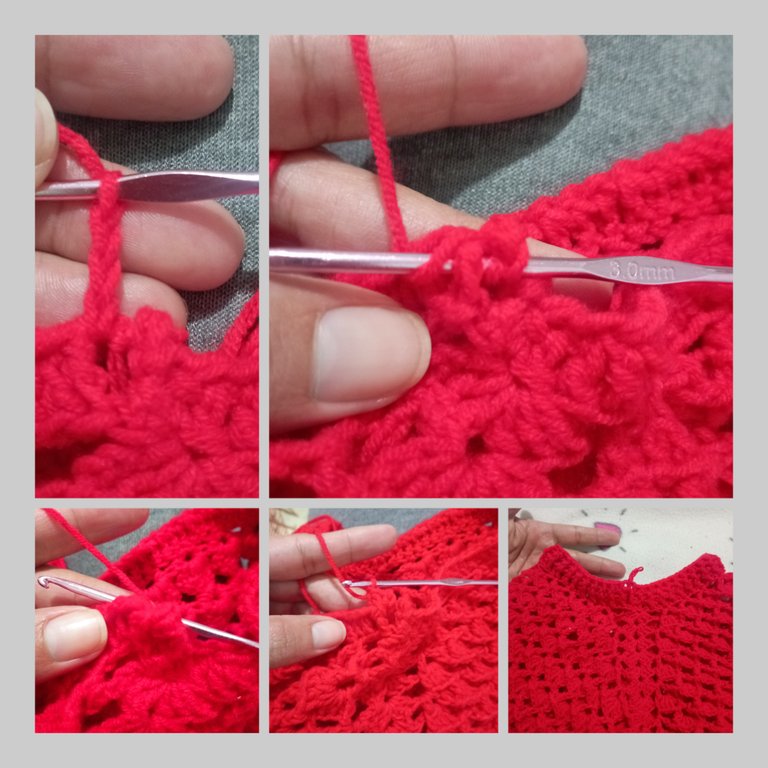
We start making a chain with double yarn, we make 80 chains and I close with slipped stitch, I cut the yarn and a continuous chain remains. Now I start knitting with normal yarn and knit 3 chains in the first stitch with single thread. From there we knit 40 rods and we mark the 40th rod placing a small thread because in that point we will start the increases to give width to the piece and later when we advance in the knitting a peak will be formed which is what will give the piece the poncho shape. We knit the remaining 40 rods and close with a slip stitch. | Empezamos realizando una cadena con hilo doble, realizamos 80 cadenas y cierro con punto deslizado, corto el hilo y queda una cadena continua. Ahora empiezo a tejer con hilo normal y realizó 3 cadenas en el primer punto con hilo sencillo. A partir de allí realizamos hacemos 40 varetas y marcamos la vareta número 40 colocando un pequeño hilo porque en ese punto empezaremos los aumentos para darle amplitud a la pieza y más adelante cuando avancemos en el tejido se formará un pico que es lo que le dará a la pieza la forma de poncho. Tejemos las 40 varetas restantes y cerramos con un punto deslizado. |


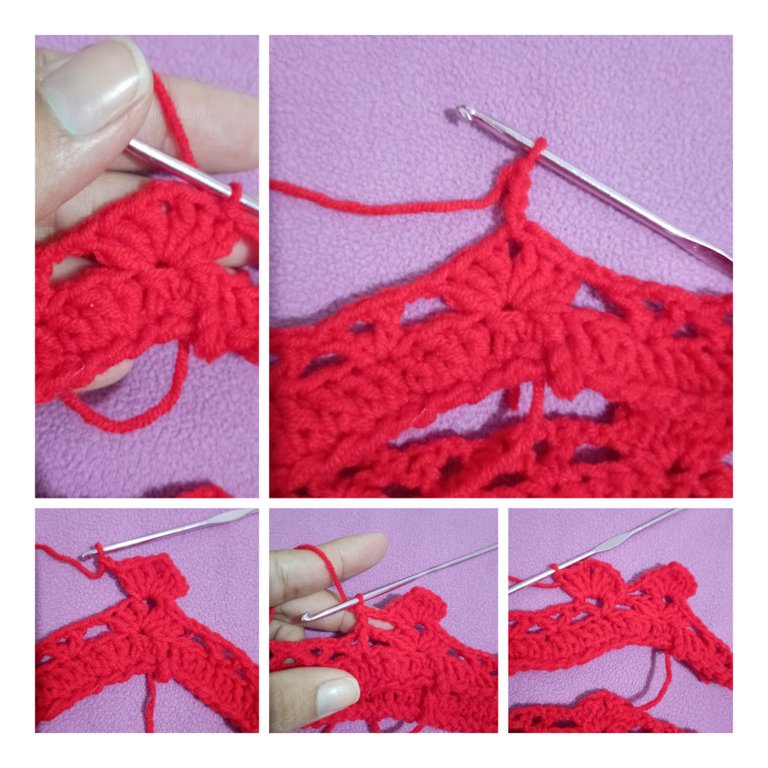
We knit 3 chains and then two rods. Remember that these three chains replace the first rod. Then two chains and in the same stitch three more rods, we continue with two chains, we leave three stitches in the middle and in the next stitch we knit one rod plus two chains and another vareta, I skip 4 stitches and knit one vareta plus two chains and in the same stitch another vareta. We will have a sequence of triangles up and down interspersed. Just before we get there we make two chains and we make the three rods with two chains and three rods in the same stitch. This is where the shoulders of the poncho will be. We start with two chains and continue the series of triangles. When we reach the end of the round we make two chain stitches and close over the previously made rods with slipped stitches until we reach the peak. | Tejemos 3 cadenas y luego dos varetas. Recordemos que estas tres cadenas sustituyen la primera vareta. Luego dos cadenas y en el mismo punto tres varetas mas, seguimos con dos cadenas, dejamos tres punto por el medio y en el siguiente hacemos una varetas más dos cadena y otra vareta, salto 4 puntos y hago una vareta más dos cadenas y en el mismo punto otra vareta. Nos quedará una secuencia de triángulos unos hacia arriba y hacia abajo intercalados. Así hacemos hasta donde hemos colocado la marca en el punto cadena número 40. Justo antes de llegar hacemos dos cadenas y hacemos las tres varetas con dos cadenas y tres varetas en el mismo punto. Es allí donde estarán los hombros del poncho. Empezamos con dos cadenas y seguimos la serie de triángulos. Al llegar al final de la vuelta hacemos dos puntos cadenas y cerramos sobre las varetas hechas anteriormente con puntos deslizados hasta llegar al pico. |

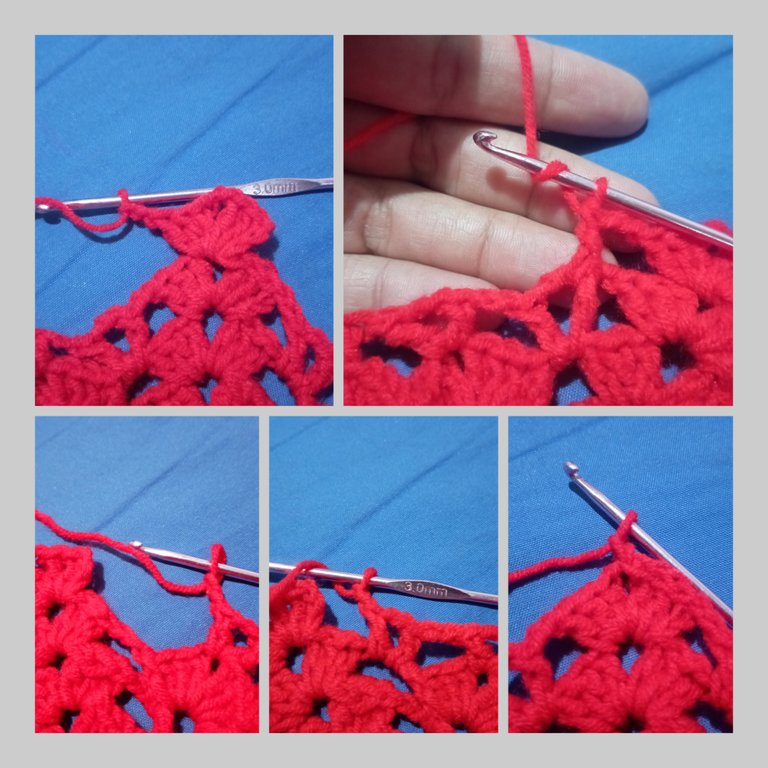
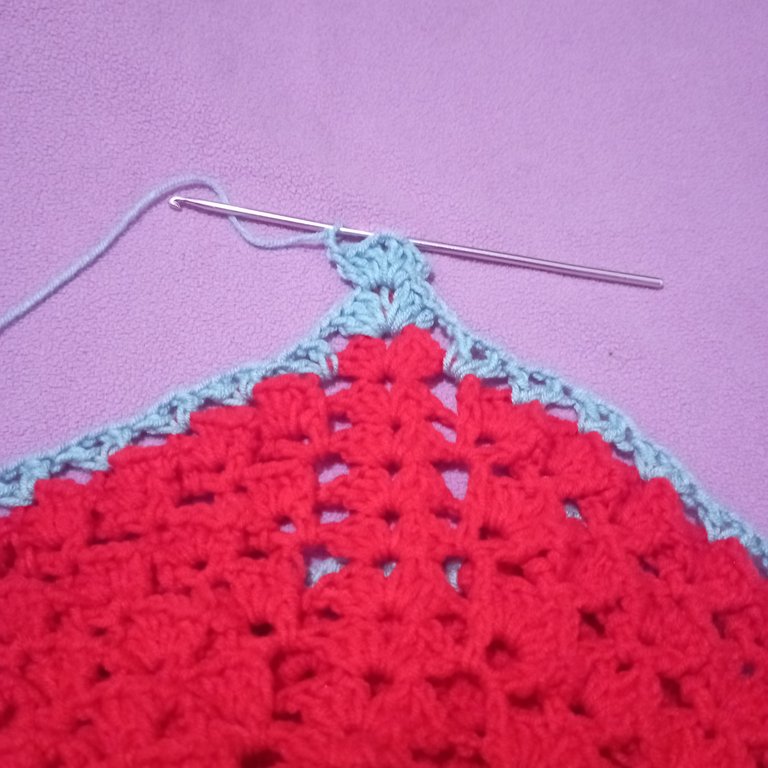
We start three chains followed by two rods and two chains plus three rods in the same stitch forming a fan. And we continue with the round with two chains and make a relief stitch in the first vareta stitch of the previous round and then three normal rods with two chain stitches plus three rods in the stitch and close this part with another relief stitch, we will have a fan made in relief stitches. We start in the next triangle with a relief stitch and repeat three rods plus two chains and three rods closed with relief stitch. In this way we continue to the point where we have marked the shoulders. When we reach that point two chains and again we continue with three rods followed by two stitches forming a fan. | Empezamos tres cadenas seguidas de dos varetas y dos cadenas más tres varetas en el mismo punto que forma un abanico. Y continuamos con la vuelta realizando con dos cadenas y hacemos un punto vareta en relieve en el primer punto vareta de la vuelta anterior y luego tres varetas normales con dos puntos de cadena más tres varetas en el punto y cerramos esta parte con otro punto en relieve, nos quedará un abanico realizado en puntos relieve. Iniciamos en el siguiente triángulo con un punto en relieve y repetimos tres varetas más dos cadenas y tres varetas cerradas con punto en relieve. De esta manera seguimos hasta el punto dónde tenemos marcado los hombros. Cuando lleguemos a ese punto dos cadenas y nuevamente seguimos con tres varetas seguidas de dos puntos formando un abanico. |
We move forward by interspersing a round of inverted triangles and then a round of fans. Let's remember something important. The fans that give the poncho the shape of a beak are made in the middle where we have marked and we did it in the stitch 40 where each row begins and ends, on the other hand at the beginning and end of each row we must do it with two chain stitches because there the increases are made. | Avanzamos intercalando una vuelta de triángulos invertidos y luego una vuelta de abanicos. Recordemos algo importante. Los abanicos que dan al poncho la forma de pico se realizan en la mitad donde hemos marcado y lo hicimos en el punto 40 donde empieza y termina cada vuelta, por otro lado al empezar y terminar cada.vuelta debemos hacerlo con dos puntos cadena ya que allí se realizan los aumentos. |
When we have reached the length we want we change the color of the yarn and perform the same procedure until the length we want. | Cuando hemos llegado al largo que deseamos cambiamos el color del hilo y realizamos el mismo procedimiento hasta el largo que deseemos. |
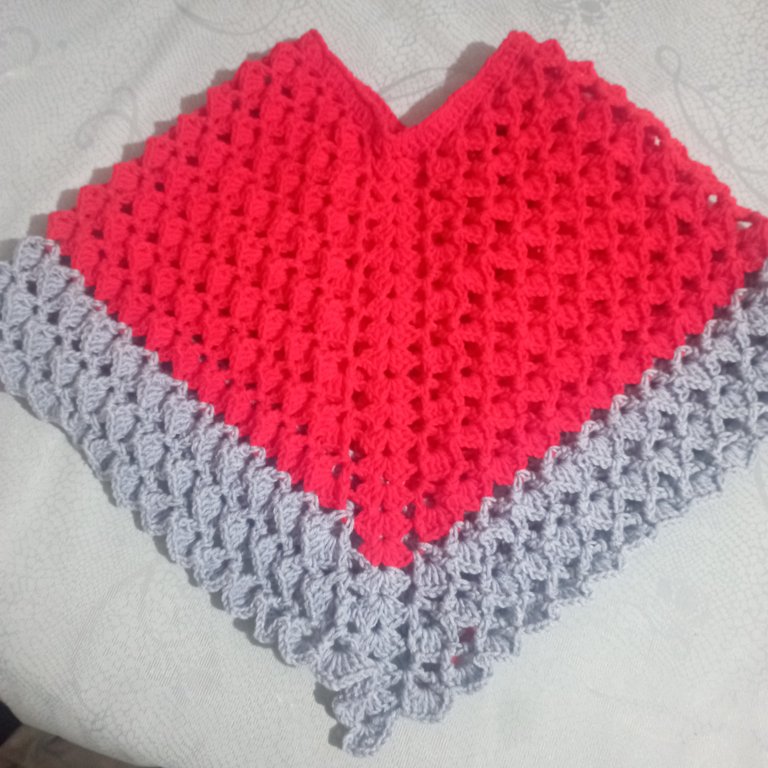
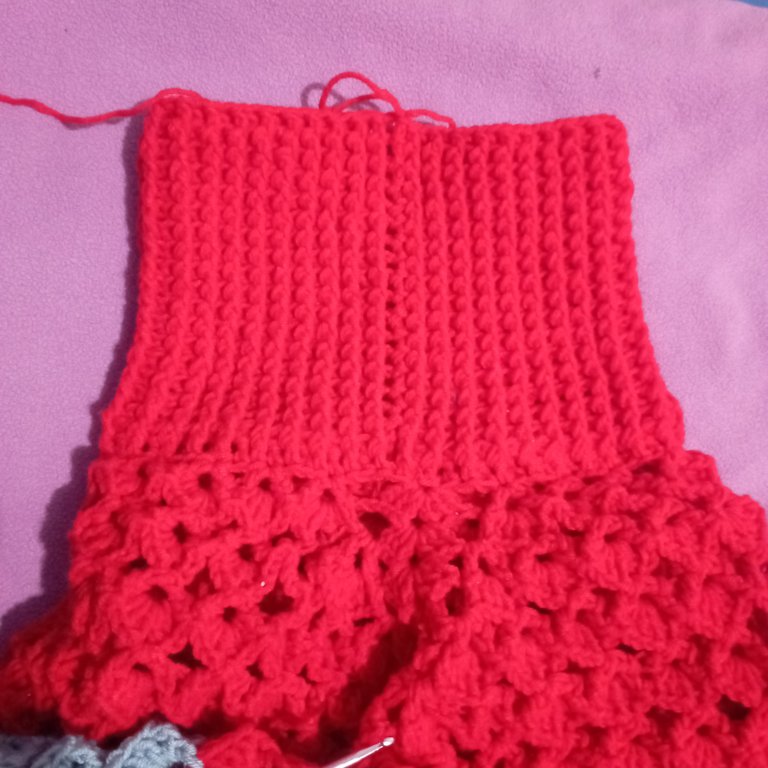
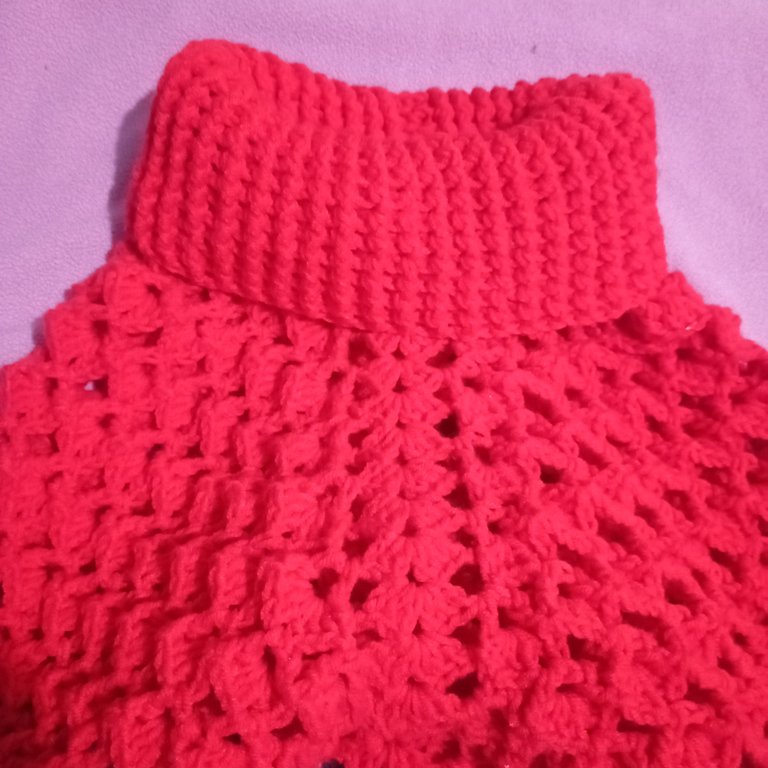
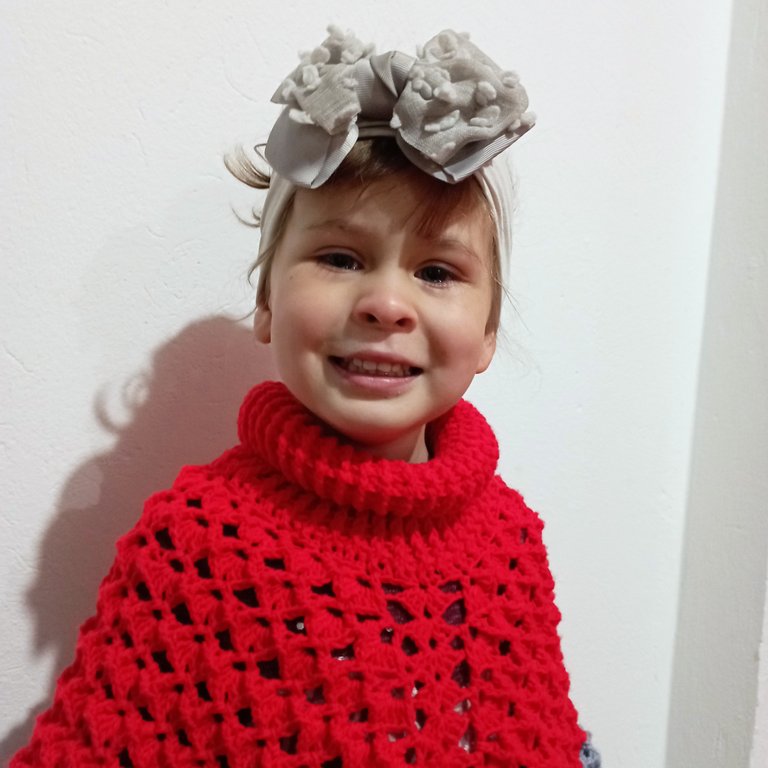
To make the collar we make an elastic stitch that consists of making several rounds with raised rods interspersed with one in relief at the front and the next one at the back. This step is very simple, but the one I enjoyed the most because the result is beautiful. | Para hacer el cuello realizamos un punto elástico que consiste en realizar varias vueltas con varetas en relieve intercaladas una en relieve por delante y la siguiente por detrás. Este paso es muy sencillo, pero el que más disfruté porque el resultado es precioso. |
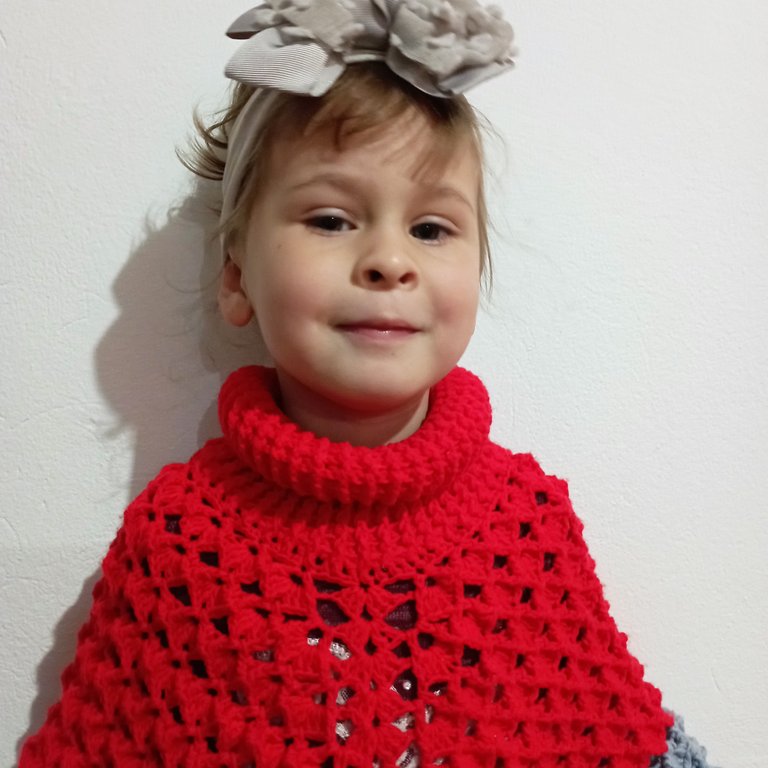
As an anecdote, I was very anxious to finish it because I wanted my daughter to wear it on Sunday at church and I got up early in the morning to finish the collar, which was what was missing. I got to finish it and I was excited to put it on my baby, but that day it was never very hot in the city and I had to take it off so she almost didn't wear it, I am now waiting for our next outing and I hope this time it will be a little cold so together we can show off my beautiful red poncho. I hope you like it too. Thanks to #needleworkmonday for the space allowed to share with you my first post in the community. Bye Bye | Les comento a modo de anécdota, que estaba muy ansiosa por terminarlo porque quería que mi hija lo usara el domingo en la iglesia y me levanté de madrugada a terminar el cuello que era lo que faltaba. Con las justas llegué a terminar y emocionada se lo coloque a mi nena, pero ese día como nunca hizo mucho calor en la ciudad y se lo tuve que quitar así que casi no lo lució, estoy esperando ahora nuestra próxima salida y espero que está vez si haga algo de frío para juntas podamos presumir mi bonito poncho rojo. Espero que a ustedes también les guste. Gracias a #needleworkmonday por el espacio permitido para compartirles mi primera publicación en la comunidad . Chao Chao. |

Imágenes editadas en: itshot
Fotos tomadas con Redmi 10
Images edited in: itshot
Photos taken with Redmi 10

Que hermoso tu proyecto amiga!! De verdad te mereces el mejor premio y mas aún tu bella princesa!! Bendiciones y éxitos 🙌 🤗
Améeeeen. Gracias amiga por tus bendiciones.
Abrazos.
Tu hijita es igual que vos ❣️. Vi su foto y antes de leer tu usuario ya te reconocí 😅.
Que bueno que pudiste tejerle este poncho, se ve hermosa con él. Bienvenida a la comunidad Needle Work Monday ❤️.
Jajajajaja...eres la primera persona que me dice que se parece a mi. Y yo feliz... Siempre le buscan parecidos con otros familares, pero nunca conmigo. Graciasssss...
Gracias también por la bienvenida a la comunidad. Es un privilegio compartir con todos.
Bendiciones y éxitos.
Que precioso le ha quedado su trabajo! Es muy talentosa amiga! Un abrazo . Saludos!
Muchas gracias amiga. Tu comentario es bien recibido.
Abrazos y bendiciones.
Hey! Que bella tu niña, toda una modelo ☺️ Te quedó hermoso ese poncho, no sabía que también tejes 😱 Definitivamente tienes el don de hacer arte en todas sus formas ✨
Jajajajaja...pues amiga, ella disfruta mucho que la fotografíen..aunque en la última foto está llorosa por el gato del vecino.
Hace un tiempito que aprendí a realizar lo mas básico.
Gracias por pasar por tu comentario. Es muy apretado.
Abrazos.
I totally disagree with you, you are not a beginner because this work doesn't look like a beginner work. You are really master on this, it looks so beautiful and I love it
It's actually my first full job. I never finished anything but some decorative tablecloths. And I was not advancing because I did not know how to make the increases until watching tutorials I knew where and how and I dared with this piece that is quite simple to do. I was also surprised by the result. I said to myself wow!...yes I could. hahahaha. It was quite a challenge.
Thank you for your comment and visit.
Best wishes.
Muy hermoso, el color rojo mi favorito, le quedo super genial a tu niña, se ve muy hermosa con ese regalo y colores. Tejer es muy trabajoso y tedioso, pero después de terminar da satisfacción, sobre todo si es para quien amas. Bendiciones
Ay amiga..para mí fue tan gratificante terminarlo. Pero si es un trabajo yo no lo llamaría tedioso sino laborioso, pero cuando empiezas a ver cómo va quedando no puedes parar...quieres avanzar y avanzar para ya ver alcanzado el logro. Es como un reto.
Yo me lo pasé bien con ello.
Mi hija está contenta con su poncho. Aunque se ve llorosa en las fotos, pero era por el gato del vecino. Lo ama y ya era hora de que se fuera. Jajajaja.
Abrazos y gracias por el comentario.
Me gustó ése poncho y muy bueno para estos tiempos de frío 😁 y muy linda tu modelo me hizo recordar a mi nieta 💕
Ayyy... gracias...que bueno que te haya recordado a tu tesorito. Gracias por tu comentario y pasar por mi blog.
Abrazos
Amiga la felicito ese poncho le quedó demasiado hermoso, pero más hermosa es la modelo le luce muchísimo el color rojo, Dios las bendiga enormemente 🤗
Ameeeen. Gracias por tus bendiciones y por pasar por mi blog. Que alegría que te guste.
Bendiciones 🙏
Quedo muy hermoso tuu creación. Te felicito
Gracias!!! ☺️☺️☺️
Te quedo precioso y tu niña toda una modelo orgullosa del bello tejido que le realizó su mamá ❤️
Siii...aunque no lo entendía mucho y me decía que para qué era eso?. Que si era su capa de superhéroe. Jajajajaja.
Que hermosura!! 😍😍 Y su hija no se queda atrás, toda una princesa. Bendiciones para esas manos ♥️
Ameeeennn...gracias bella Blue.
Bendiciones.
@artsugar hermoso trabajo y el color le queda muy lindo a la niña , espero seguir disfrutando de tus proyectos, gracias por compartir, Un Abrazote 🤗
Amiga...muchas gracias. Si espero poder compartir otros proyectos que tengo en mente. Es un verdadero honor.
Gracias por pasar por mi blog.
Muchas bendiciones.
Mi sincera feliciatción para ti, quedó muy hermoso y el color le luce a tu niña, ecitos y saludos
Gracias 😊 por tomarte el tiempo para dejarme tan lindo comentario.
Bendiciones.
Es un placer, saludos
Que bien se le ve su poncho a tu hija y con esa sonrisa le luce aun mejor. Para no ser tejedora profesional y tener mucho tiempo sin hacerlo te ha quedado muy bien.
PARA SER EL PRIMERO TE QUEDO MUY BONITO. Y LE QUEDA HERMOSO A LA PRINCESA.
Siiii...con varios detalles que mejorar. Por ejemplo, me quedó corto de brazos pero si le hubiera agregado otras vueltas, el pico le habría llegado muy abajo.
Gracias amiga por tu comentario.
Bendiciones