
Español:
¡Un saludo a todos! Sean bienvenidos otra vez a mi blog
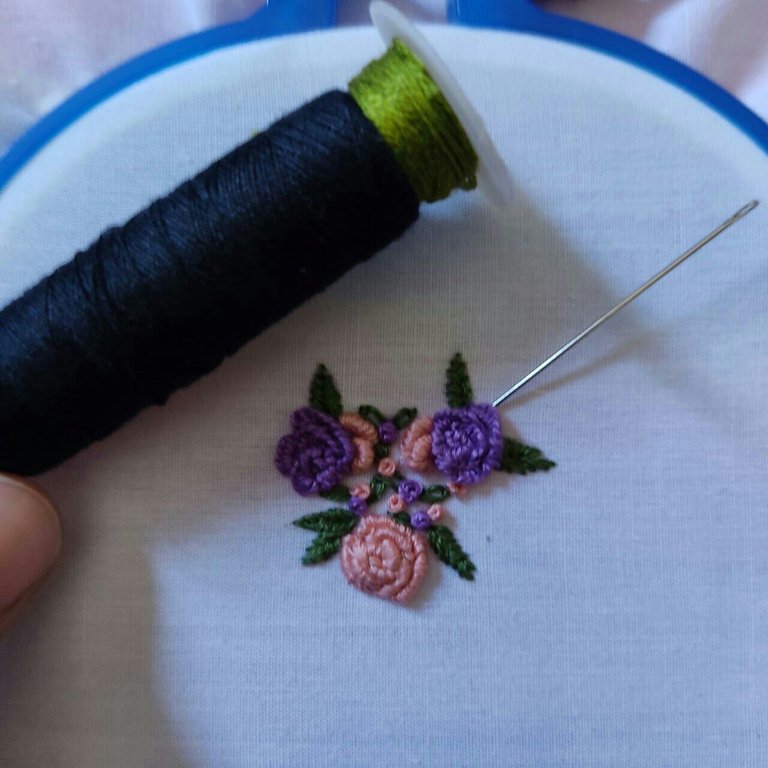
El día de hoy les traigo un tutorial para hacer rosas con relieve, en donde veremos 2 puntadas sencillas con las que puedes crear hermosas flores para decorar manteles, ropa, cuadros decorativos, etc. Estaré aplicando estas puntadas para crear un bouquet de rosas en miniatura.
¡Empecemos!
English:
Greetings to all! Welcome back to my channel.
Today I bring you a tutorial for making embossed roses, where we will see 2 simple stitches with which you can create beautiful flowers to decorate tablecloths, clothes, decorative pictures, etc. I will be applying these stitches to create a miniature rose bouquet.
Let's get started!
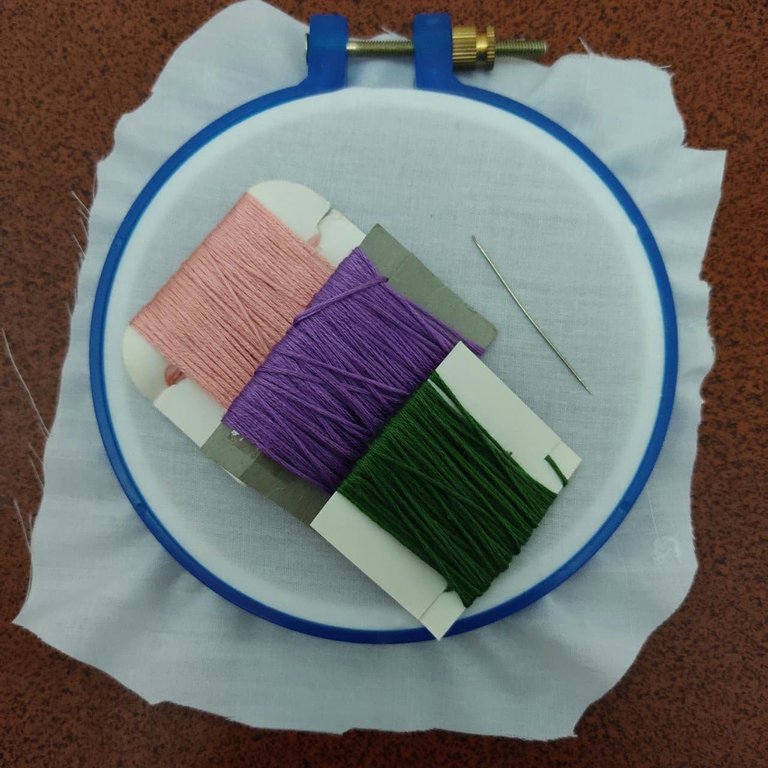
Los hilos que he usado son:
Tono morado Anchor código 110.
Tono Salmón DMC 761.
Tono verde Anchor 861.
The yarns I used are:
Anchor purple shade code 110.
Salmon shade DMC 761.
Green shade Anchor 861.
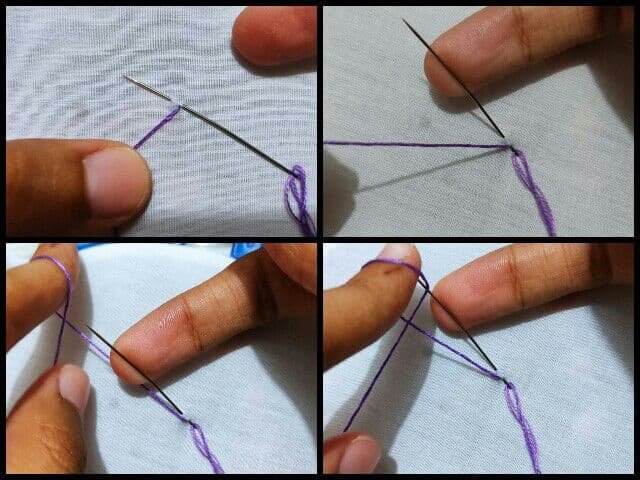
~Puntada Cast-On~
¡Esta es mi puntada favorita! Siempre que la hago quedo satisfecha con la flor que he bordado ❤️ esta vez estaré usando 3 hebras de hilo morado.
Para realizar la puntada Cast-on, sigue los siguientes pasos:
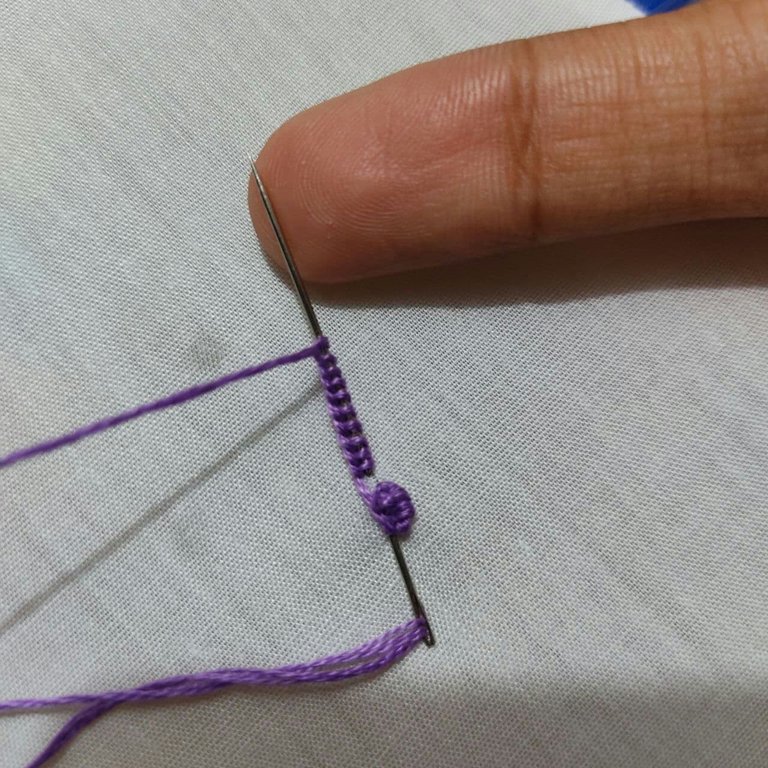
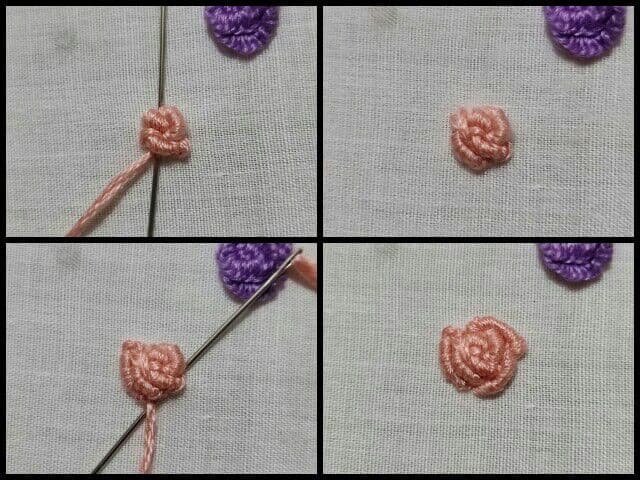
1- Saca la aguja y vuélvela a introducir, pero cuando lo hagas, hazlo en forma de pellizco (1ra foto), el lugar donde vuelvas a sacar la aguja determinará el espacio de el pétalo. Este que yo estoy bordando es pequeño, ya que es para mostrar la puntada.
2- Con uno de tus dedos, levanta la aguja como se muestra en la foto 2.
3- Usando uno de los dedos de la mano sobrante, enróllate el hilo una vez como se muestra en la foto 3.
4- Pasa el hilo por la aguja sin perder el bucle que haz formado en tu dedo.
~Cast-On Stitch~
This is my favorite stitch! Whenever I do it I am always satisfied with the flower I embroidered ❤️ this time I will be using 3 strands.
To make the Cast-on stitch, follow these steps:
1- Take the needle out and put it back in, but when you do so, do it in a pinch shape (1st photo), the place where you take the needle back out will determine the spacing of the petal. This one I am embroidering is small, as it is to show the stitch.
2- With one of your fingers, lift the needle as shown in photo 2.
3- Using one of the fingers of the remaining hand, wind the thread once as shown in photo 3.
4- Pass the thread through the needle without losing the loop you have formed on your finger.
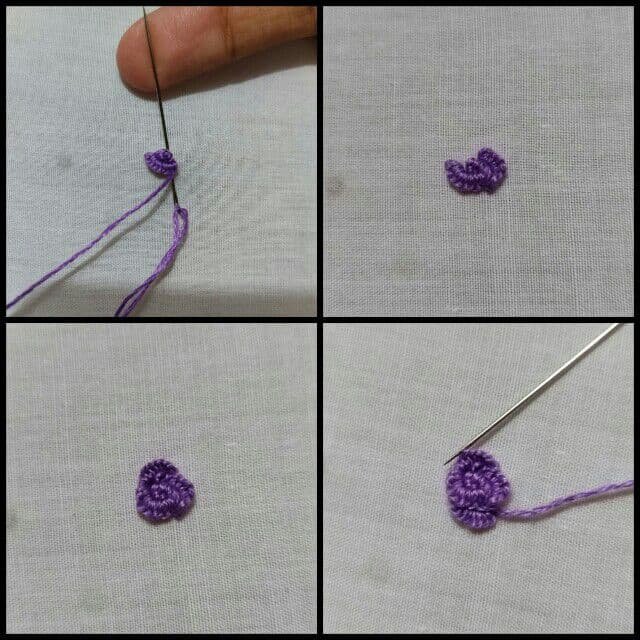
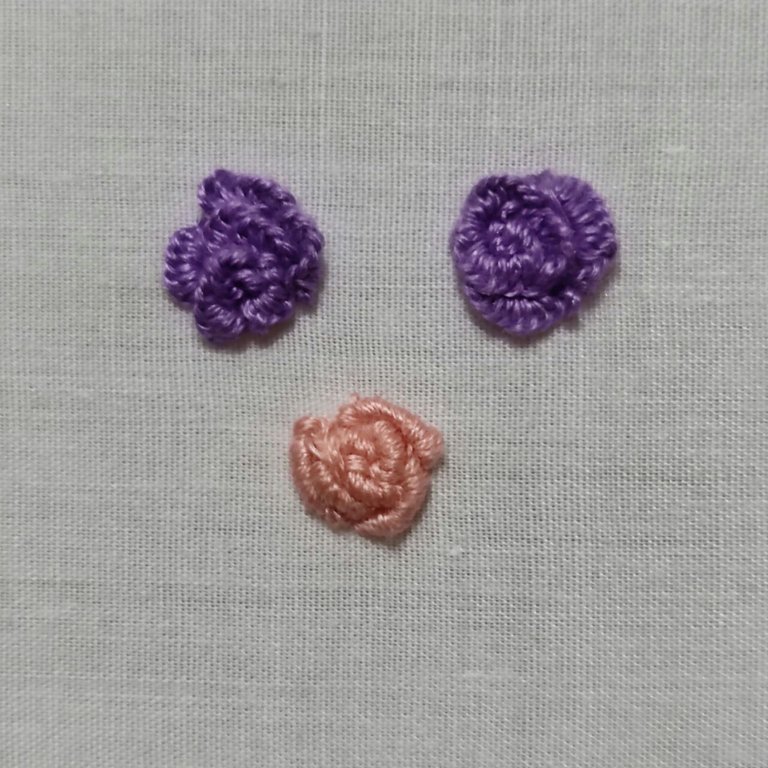
6- Repite este proceso hasta donde desees. Mientras más bucles hagas, más grande será tu pétalo, pero yo no recomendaría hacer más de 12, ya que se volvería un poco complicado (al menos que uses un hilo grueso). En este caso yo hice sólo 6 bucles.
6- Repeat this process as far as you want. The more loops you make, the bigger your petal will be, but I wouldn't recommend making more than 12, as it will get a bit complicated (unless you use a thick yarn). In this case I made only 6 loops.
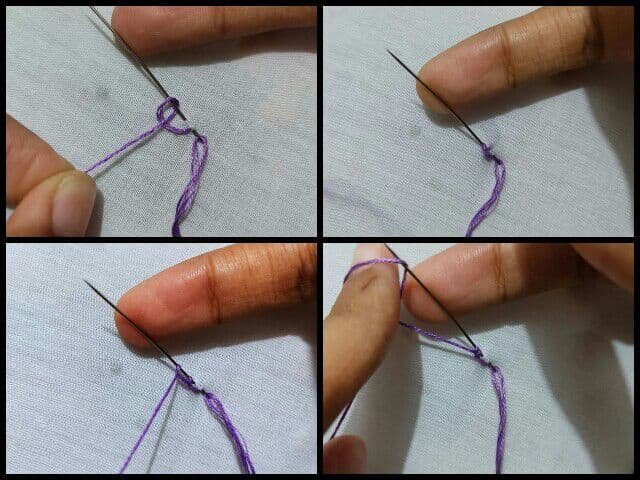
8- Para finalizar, al haber jalado el hilo, los bules que haz formado se irán hacia atrás y se acostarán en la tela (Tienen mucho sueño, igual que yo en este momento 😴).
Luego, sólo queda fijar metiendo la aguja por la tela, debe quedarte como un pequeño gusano ) este se ve muy pequeño y raro, pero es porque lo hice así para empezar el centro de la rosa, más adelante verás mejores).
8- To finish, having pulled the thread, the loops you have formed will go backwards and lie on the fabric (They are very sleepy, just like me at the moment 😴).
Then, it only remains to fix by sticking the needle through the fabric, you should be left with a small worm ) this one looks very small and weird, but that's because I did it this way to start the center of the rose, later you will see better ones).
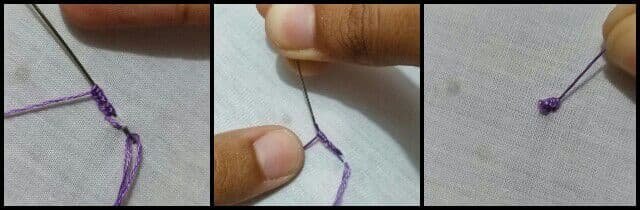
~Puntada Rococó~
Una vez que te hayas familiarizado con la puntada Cast-on, verás que la puntada Rococó (que nombre tan divertido) no es muy diferente. Para realizar esta puntada estaré usando las 6 hebras de hilo.
Para realizar la puntada Rococó sigue los siguientes pasos:
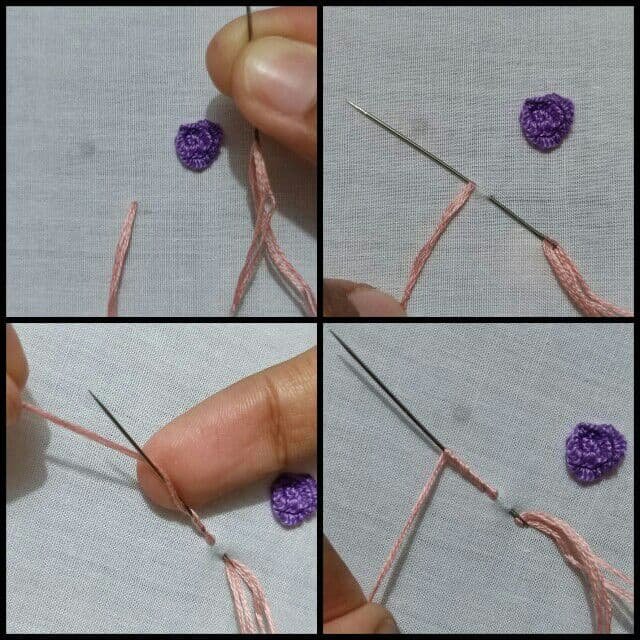
1- Saca la aguja y vuélvela a introducir en forma de pellizco pero unos milímetros (o centímetros) lejos de donde saliste, volviendo a entrar y salir por donde sacaste la aguja inicialmente (Foto 2). La distancia que dejes determinará el tamaño de el pétalo.
2 - Al igual que la puntada Cast-on, levanta la aguja con el dedo.
3 - Enrolla el hilo en la aguja (No tiene ningún truco como la Cast-on, sólo enróllala normal). Las veces que enrrolles el hilo en la aguja determinarán el grosor de el pétalo, te recomiendo no hacerlo más de 12 veces (al menos que uses un hilo grueso).
~Bullion Stitch~
Once you've familiarized yourself with the Cast-on stitch, you'll see that the Bullion stitch is not much different. To create this stitch I will be using 6 strands of yarn.
To make the Bullion stitch follow these steps:
1- Pull the needle out and reinsert it pinchwise but a few millimeters (or centimeters) away from where you came out, re-entering and exiting where you initially pulled the needle out (Photo 2). The distance you leave will determine the size of the petal.
2 - As with the Cast-on stitch, lift the needle with your finger.
3 - Wrap the thread around the needle (There is no trick to it like the Cast-on, just wind it normally). The number of times you wind the thread on the needle will determine the thickness of the petal, I recommend not to do it more than 12 times (unless you use a thick thread).
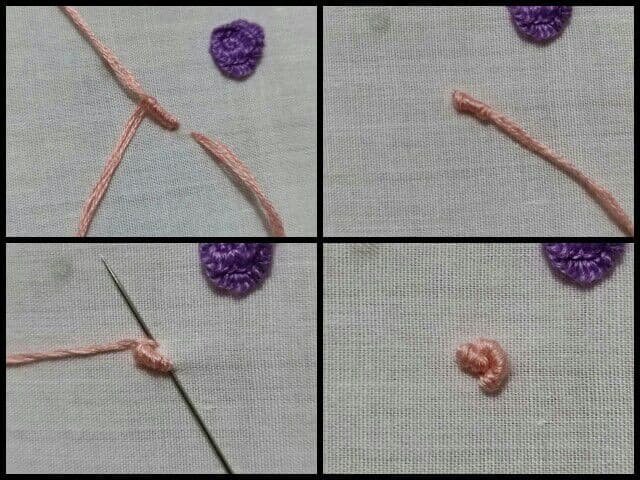
Then, go playing with the petals you make, making one after another around the center of the rose. They should look like little worms 🐛.
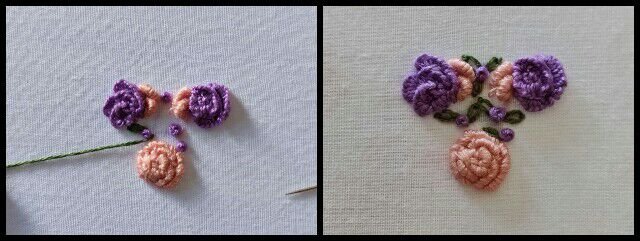
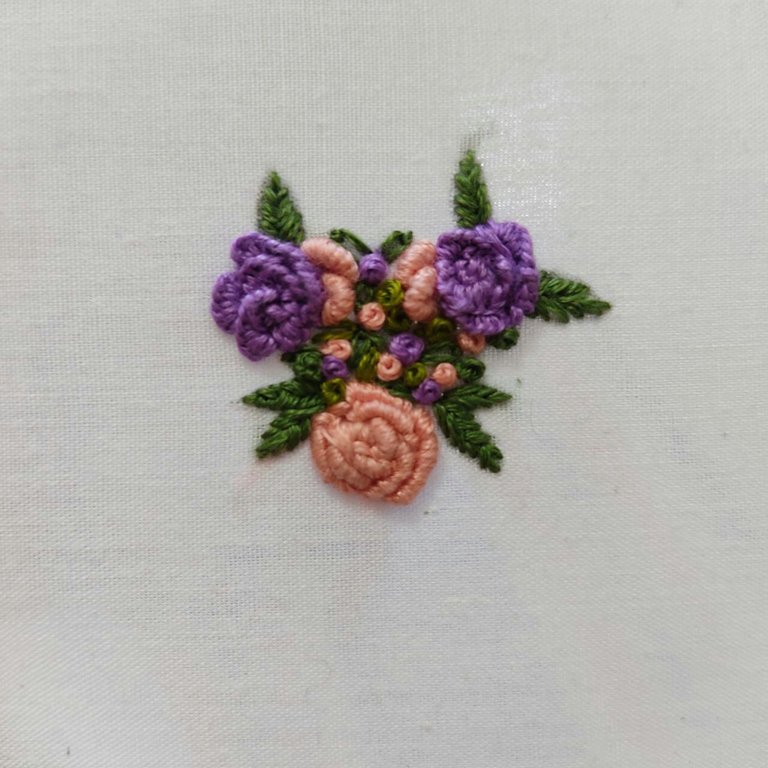
Para añadirle más vida al bouquet, hice con tres hebras puntos franceses variando entre el morado y el color salmón, además, fui añadiendo puntos margaritas con el color verde para simular pequeñas hojas.
To add more life to the bouquet, I made three strands of French stitches varying between purple and salmon, and I also added daisy stitches with green to simulate small leaves.
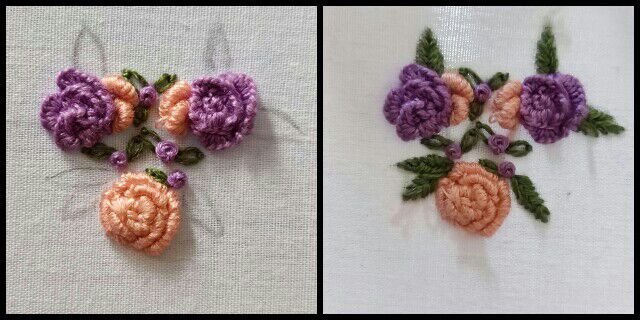
Since there weren't enough leaves, I marked spaces to make larger ones. It looks like I used herringbone stitch, but no, I just made straight stitches to fill in these leaves.
Si haz visto mis publicaciones por un tiempo, y eres una persona detallista, capaz habrás notado que en mi hilo negro de coser siempre tengo un poco de hilo de bordar verde claro. No sé que código es o que marca, sólo sé que un día lo conseguí y lo puse allí. Hoy por fin lo usaré para hacer más puntos franceses a estas rosas.
If you've seen my posts for a while, and you're a detail person, you may have noticed that in my black sewing thread I always have some light green embroidery floss. I don't know what code it is or what brand, I just know that one day I got it and put it in there. Today I will finally use it to make more French stitches on these roses.
Una vez agregados los detalles, ¡el bouquet está listo!
Aún no sé bien qué hacer con él, mide poco menos de 3 centímetros, así que quizás lo agregue a un parche.
¿Cuál fue tu rosa favorita? ¿Cast-on o Rococó?
Once the details are added, the bouquet is ready!
I'm not quite sure what to do with it yet, it's just under 3 centimeters, so maybe I'll add it to a patch.
Which one was your favrite rose? Cast- on or Bullion?
Muchas gracias por leer, espero haya sido de tu agrado.
Todas las fotografías fueron tomadas por mi y me pertenecen.El texto fue traducido del español al inglés con el traductor de Deepl.
¡Nos vemos la próxima!
Thank you very much for reading, I hope you enjoyed it.
All the pictures were taken by me and belong to me.
The text was translated from Spanish to English with Deepl's translator
Que hermosa rosa, viendo aprendí uno, el otro ya lo sabía hacer. Gracias por compartir
Muchas gracias, ¿Cuál aprendió a hacer? 😊
Congratulations @bunnysneedle! You have completed the following achievement on the Hive blockchain and have been rewarded with new badge(s) :
Your next target is to reach 3000 upvotes.
You can view your badges on your board and compare yourself to others in the Ranking
If you no longer want to receive notifications, reply to this comment with the word
STOPWow very simple but so attractive ☺ 😮 😮
Yes ♥ thank you
Te agradezco muchísimo el haberte tomado el tiempo de hacer este tutorial, porque hace años quiero personalizar el cuello y los puños de una camisa pero no termino de entender las instrucciones de las infografías en Pinterest 😭 y el hilo DMC esta muy caro -me da turbo pánico malgastarlo- si mesale bien publicare el resultado y te etiqueto para redirigir a este tuto peziozoh ❤️ ❤️ ❤️
Omg ¡Sería un honor! ♥♥♥suerteee
Sí, está carísimo. Quizás más adelante publique mis consejos para ahorrar hilo que me han servido mucho 😂
The rewards earned on this comment will go directly to the person sharing the post on Twitter as long as they are registered with @poshtoken. Sign up at https://hiveposh.com.