A rose for my t-shirt
Hello my dear creative friends, continuing with a series of tutorials that I want to do showing a little bit of the techniques of ribbon embroidery and the beautiful things that can be done with it, today I want to show you a beautiful rose that I did some time ago to embroider on the flannels. For those of you who didn't visit my first tape embroidery post I leave you the following link where you can see the threading of the needle and Star roses Embroidery in ribbon or satin ribbon

Materials we are going to use:
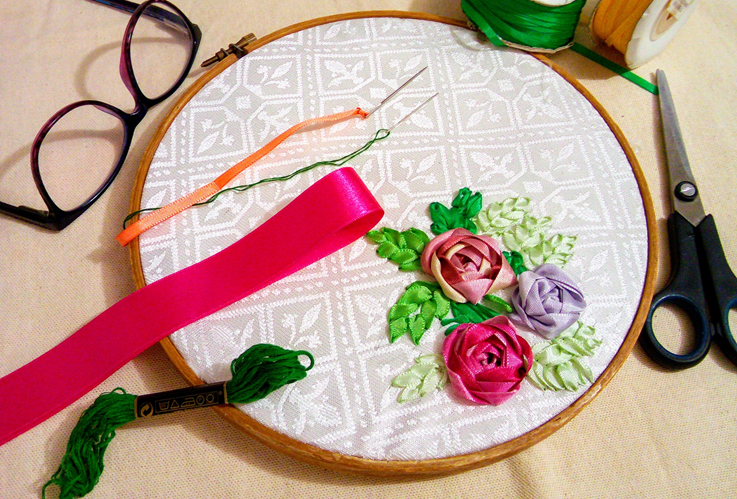
Etamina fabric or any other you wish to decorate.
Embroidery needle in ribbon #18
Satin ribbons # 2
Embroidery strips or ribbons #5 #7
Sedalinas
Embroidery frame, ring or drum
Needle and thread.
I remember that I did this course in 2013 when, by chance, I saw a program on TV about a girl named Rosangela who was giving a workshop on tape embroidery. I immediately fell in love with her and I didn't miss the program for anything, and if they repeated it in the afternoon, I watched it again because I really wanted to learn.
She always repeated that we could do the course in a sector of Caracas called Macaracuay, so one day I got ready and called her and immediately we agreed to attend her classes. Well, I can tell you that in that course I learned what was mine and what the others were doing too. I absorbed everything like a sponge and thanks to that I can now make many clothes.
Design and elaboration
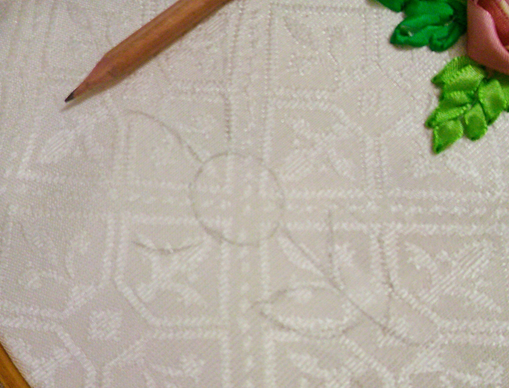
The first thing we are going to do is to prepare the area where we are going to work, according to that space we design our flower. As I told you before, I made this flower in flannels and I always placed it towards the heart. It also looks very beautiful on a ribbon, but I couldn't get it from the market to show it to you.
So we drew with a pencil and began to embroider.
Embroidering with ribbons is a very original way to enhance a garment or decorate a fabric to make cushions, bags, rugs, towels or tablecloths.
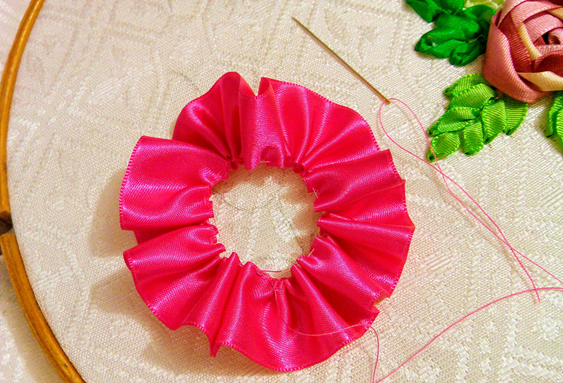
To make this flower we used half a meter of satin ribbon #5, we joined the ends with needle and thread, but it should be a small stitch that is almost not seen, but at the same time it is well fastened because remember that if it is for a flannel or something you wash at every moment it will fray. You can also burn the stitches with a tinder before sewing, that helps much more to make your embroidery safe. Then we put it back in place and do a few stitches with a needle and thread so that it doesn't move.
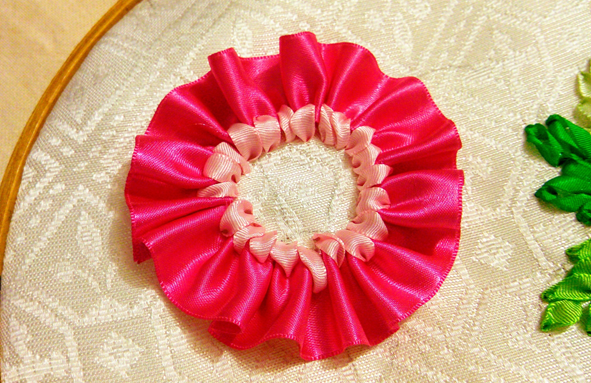
We take embroidery ribbon #5 of a color that matches the satin ribbon and do a basting stitch or straight stitch by taking the fabric and the edge of the satin ribbon.
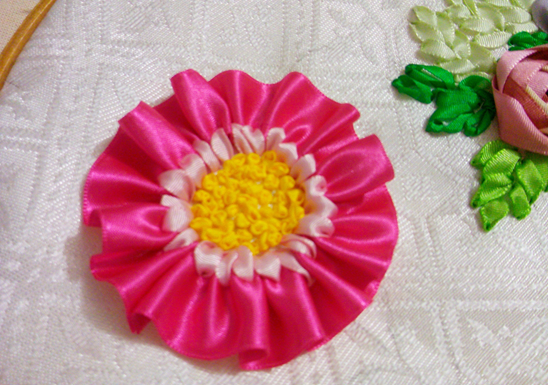
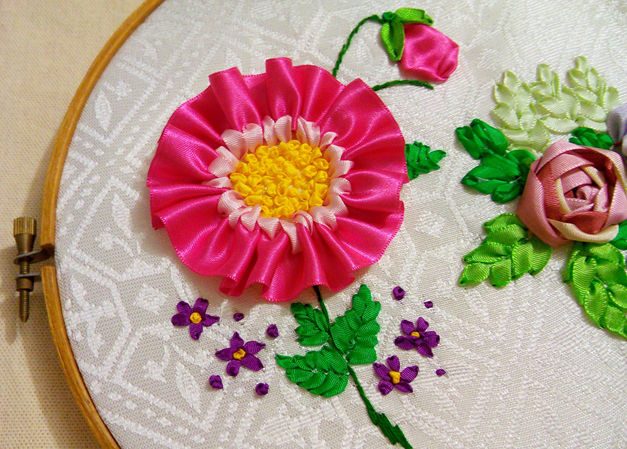
We make yellow French knit that resembles the center of a flower.
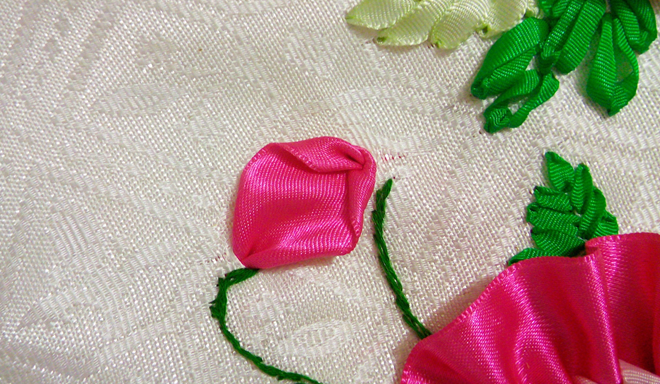
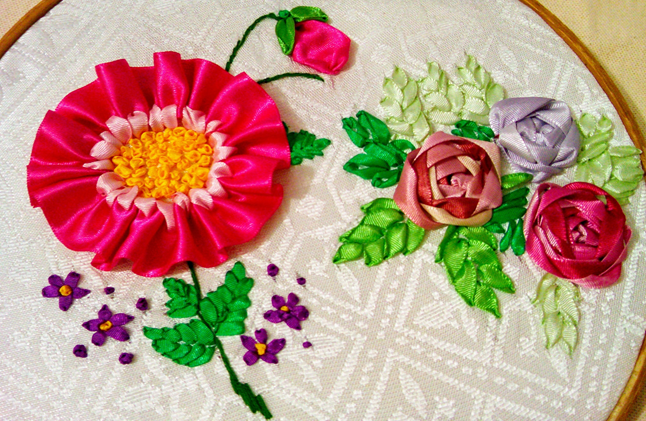
With green sedalines we can form the stems, for that we knit back and to embroider the rose petal we do Japanese knitting. This same stitch is used on the leaves. Once the main flower is made, you can decorate the contour as you like. I remember that my teacher used to paint the space with different colors to give it a different background and make it stand out a little more.
I tell you that on the internet you can get many videos and tutorials where you can learn this technique much better and with that make beautiful clothes for you, your family or give to your friends. I hope you liked it and I say bye bye, until the next "Made with LOVE".

Una rosa para mi franela
Hola mis queridos amigos creativos, continuando con una serie de tutoriales que quiero hacer mostrando un poco las técnicas del bordado en cinta y las cosas bellas que se pueden realizar con ella, hoy les quiero mostrar una rosa hermosa que hice hace una tiempo para bordar en las franelas. Para los que no visitaron mi primer post de bordado en cinta les dejo el siguiente enlace donde puedes observar el enhebrado de la aguja y Rosas en forma de estrella Bordado en listón o cinta de raso.
Materiales que vamos a utilizar:
Tela Etamina o cualquier otra que desees decorar.
Aguja de bordar en cinta #18
Cintas de raso # 2
Listones o cintas de bordar #5 #7
Sedalinas
Bastidor, aro o tambor para bordar
Aguja e hilo.
Recuerdo que hice este curso en el año 2013 cuando por suerte del destino vi un programa en la televisión son de una chica llamada Rósangela daba un taller sobre Bordado en cinta; de inmediato quedé enamorada y no me perdía el programa por nada del mundo y si lo repetían en la tarde lo volvía a ver porque de verdad quería aprender.
Ella siempre repetía que podíamos hacer el curso en un sector de Caracas llamado Macaracuay, así que un día me dispuse y la llamé y de inmediato nos pusimos de acuerdo para asistir a sus clases. Pues les cuento que en ese curso aprendí lo mío y lo que hacían los demás también, absorbí todo como una esponja y gracias a eso hoy puedo elaborar muchísimas prendas.
Diseño y elaboración
Lo primero que vamos hacer es preparar ella rea que vamos a trabajar, de acuerdo a ese espacio diseñamos nuestra flor. Como les dije antes esta flor la hice mucho en franelas y siempre la colocaba hacia la parte del corazón. En cinta de organiza también queda muy hermosa, pero no conseguí en el mercado para mostrársela.
Entonces dibujamos con un lápiz y comenzamos a bordar.
Bordar con cintas es una forma muy original de realzar una prenda o decorar una tela para realizar almohadones, bolsos, tapetes, toallas o manteles.
Para hacer esta flor usamos medio metro de cinta de raso #5, unimos los extremos con aguja e hilo, pero que sea una puntada pequeña, que casi ni se vea, pero que a la vez quede bien sujeta porque recuerda que si es para una franela o algo que laves a cada instante se va a deshilachar. También puedes quemar las puntas con un yesquero antes de coser, eso ayuda mucho más para que tu bordado sea seguro. Luego lo acomodamos bien en el sitio y hacemos unas puntadas con aguja e hilo para que no se mueva.
Tomamos listón #5 de bordar de un color que haga tono con la cinta de raso y hacemos puntada hilván o puntada recta tomando la tela y el borde de la cinta de raso.
Hacemos punto francés color amarillo que asemeje el centro de una flor.
Con sedalinas verdes podemos formar los tallos, para eso hacemos punto atrás y para bordar el pétalo de la rosa hacemos punto japonés. Este mismo punto es el utilizado en las hojas. Ya realizada la flor principal puedes decorar el contorno como mejor te guste. Yo recuerdo que mi profesora pintaba un poco el espacio con distintos colores para darle un fondo distinto y que resaltara un poco más.
Les digo que en internet puedes conseguir muchos videos y tutoriales donde puedes aprender mucho mejor esta técnica y con eso realizar prendas hermosas para ti, tu familia o regalar a tus amistades. Espero que les haya gustado y les digo bye bye, hasta el próximo "Hecho con AMOR".
Put love in everything you do. 💞 Ponle amor a cada cosa que hagas


Que belleza amiga. Felicitaciones!
muchas gracias, yo encantada de que disfrutes del trabajo que realizo con mucho cariño para ustedes.
Excelente trabajo
Gracias amart, es tan bonito ver que a los hombres le gusten estas labores, eso demuestra el amor y el respeto que siente por la mujer.
Hola Caro, precioso trabajo, una gala hermosa de colores en complicidad con los acabados que es el sello que distingue la labor. Saludos.
Gracias mi jicrochet, que bueno que te gustó, a mi también me encantan los colores.
Que bonita, antes bordaba en cintas pero deje de hacerlo y tengo muchas cintas abollada en casa. Que bellas todas tus labores
hay que sacarles provecho, hay flores muy sencillas de hacer y con ellas puedes bordar toallas, caminos de mesa y muchas cosas mas.
Asi es, a mi me encanta esa labor, es hermosa lo que pasa es que ya mis dedos no dan para tanto.
Enhorabuena, su "post" ha sido "up-voted" por @dsc-r2cornell, que es la "cuenta curating" de la Comunidad de la Discordia de @R2cornell.
Muchas gracias mis queridos amigos. Dios los bendiga
Hello @carolinacardoza! Your post was selected by our staff on behalf of the OCD Community Incubation Program and has received an OCD upvote! Congratulations!!! Thank you for sharing your quality posts :)
Written by @crosheille for the NeedleWorkMonday Community ~
Thank you all very much for your help. God bless you and keep helping you to consolidate your project and keep growing with all the projects you propose
The roses are so beautiful and the detailed work you did is amazing. I am really happy to see you got the earnings you deserved <3
Thank you very much to you and aneedleworkmonday for always supporting us, God bless you and keep helping you in your work, you are a beautiful family. It was a beautiful surprise that I found today. I am very happy.