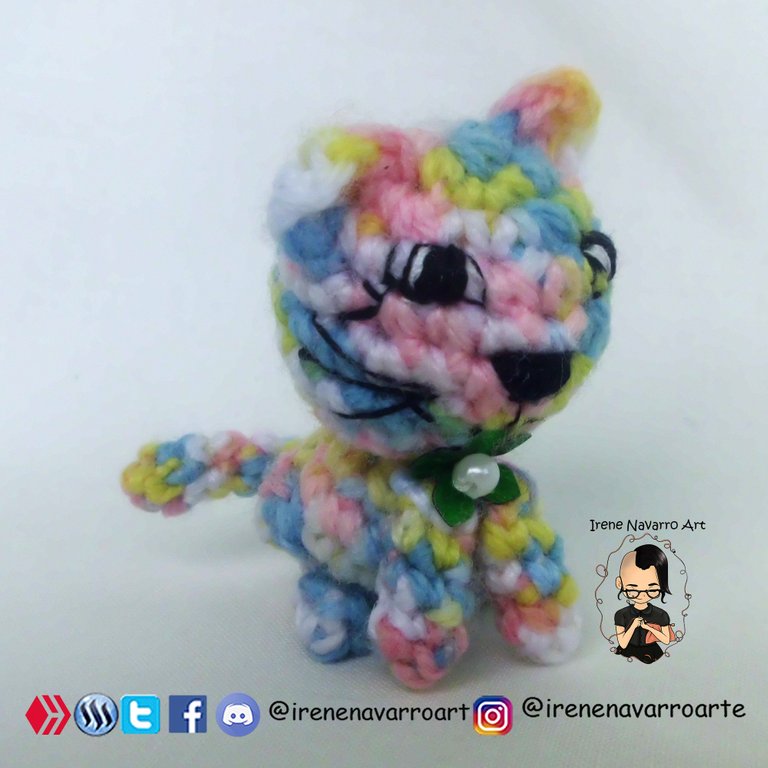
¡Saludos!, hace uno días le enseñé a mi sobrina a tejer su primer amigurumi, entonces se me ocurrió la idea de compartir este #tutorial sencillo ideal para principiantes, se trata de un amigurumi con forma de gato de apenas 5 centímetros de alto. Tanto los materiales como las instrucciones son bastaste sencillas.
Greetings! A few days ago I taught my niece to weave her first amigurumi, so I came up with the idea of sharing this simple tutorial ideal for beginners, it is an amigurumi in the shape of a cat just 5 centimeters high Both the materials and the instructions are quite simple.

Materiales / Materials
- Ganchillo #0
- Estambre escolar
- Relleno sintético
- Tijeras
- Aguja de ojo grande
- Aguja e hilo de coser.
- Crochet # 0
- Scissors
- Needle
- Synthetic filling
- Yarn
- Needle and sewing thread
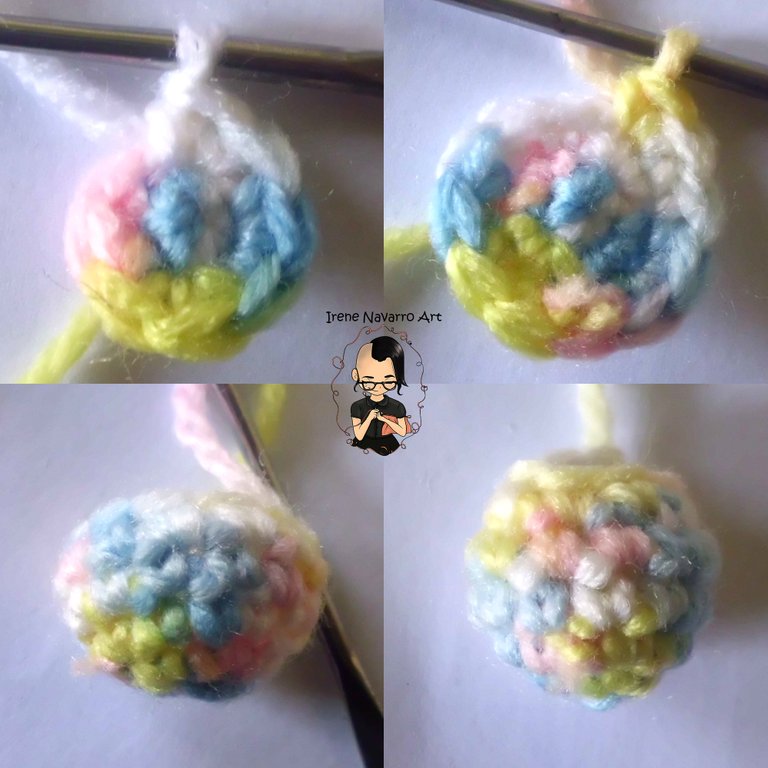
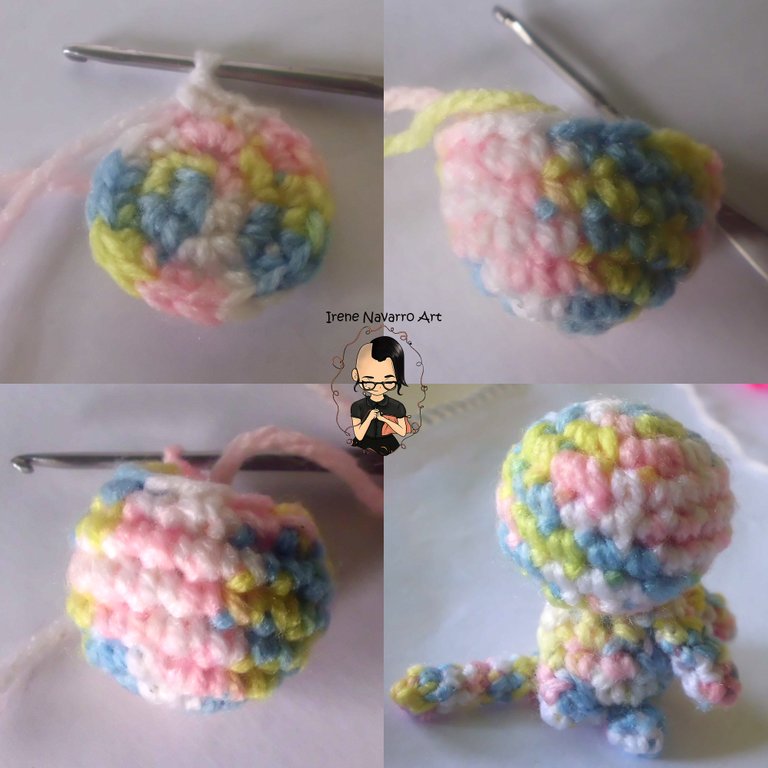
Cuerpo / Body
Tejer 4 puntos bajos en un anillo, en la primera vuelta tejer 4 aumentos para obtener 8 puntos.
En la segunda vuelta tejer 1 punto bajo y 1 aumento repetidamente hasta obtener 12 puntos.
Tejer la tercera y cuarta vuelta sin aumentos.
En la quinta vuelta tejer 2 puntos bajos y 1 disminución repetidamente hasta obtener 8 puntos. Cerrar con 1 punto deslizado y dejar una hebra larga para coser.
Knit 4 single crochets in a ring, on the first round knit 4 increases to get 8 stitches. On the second round knit 1 single crochet and 1 increase repeatedly until you get 12 stitches. Work the third and fourth rounds without increases. On the fifth round knit 2 single crochets and 1 decrease repeatedly until you get 8 stitches. Close with 1 slip stitch and leave a long strand to sew.
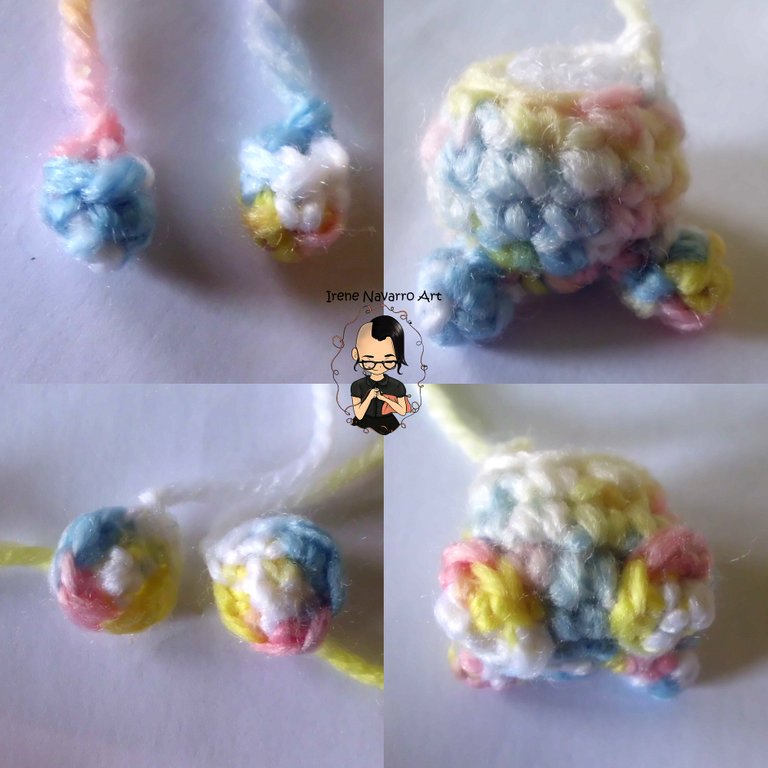
Patas traseras / Back Legs
Tejer 4 puntos bajos en un anillo y tejer una vuelta de 4 puntos bajos. Cerrar con 1 punto deslizado y dejar una hebra larga para coser. Hacer dos iguales. Rellenar y coser al cuerpo.
Work 4 single crochets in a ring and work a round of 4 single crochets. Close with 1 slip stitch and leave a long strand to sew. Make two the same. Fill and sew to the body.
Tejer 4 puntos bajos en un anillo, en la primera vuelta tejer 4 aumentos para obtener 8 puntos. Cerrar con 1 punto deslizado y dejar una hebra larga para coser a los costados de las patas. Hacer dos iguales
Knit 4 single crochets in a ring, on the first round knit 4 increases to get 8 stitches. Close with 1 slip stitch and leave a long strand to sew on the sides of the legs. Make two the same
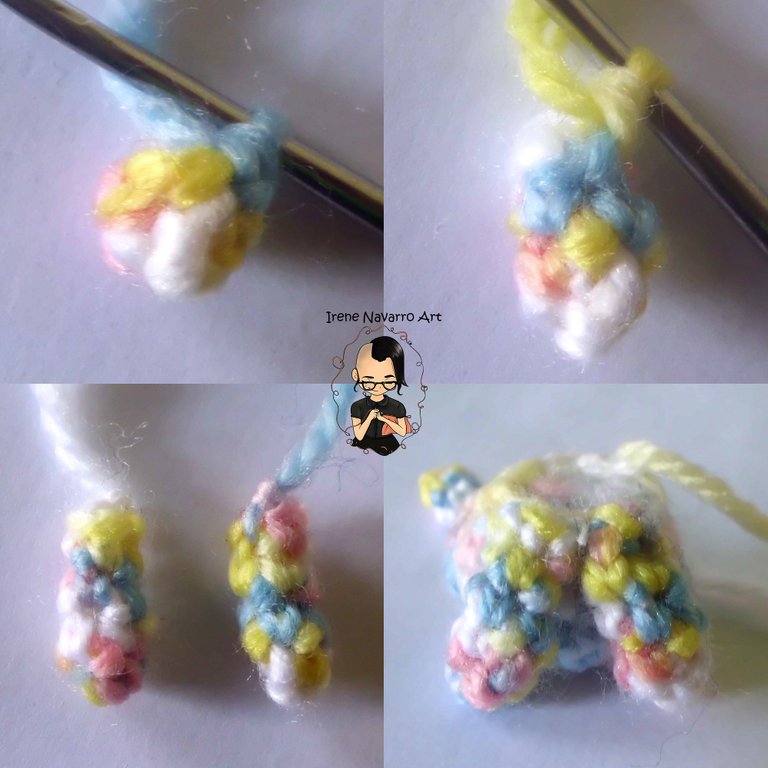
Cola / Tail
Tejer 4 puntos bajos en un anillo y tejer seis vueltas de 4 puntos bajos. Cerrar con 1 punto deslizado y dejar una hebra larga para coser, sin rellenar coser al cuerpo.
Work 4 single crochets in a ring and work six rounds of 4 single crochets. Close with 1 slip stitch and leave a long strand to sew, without filling sew to the body.
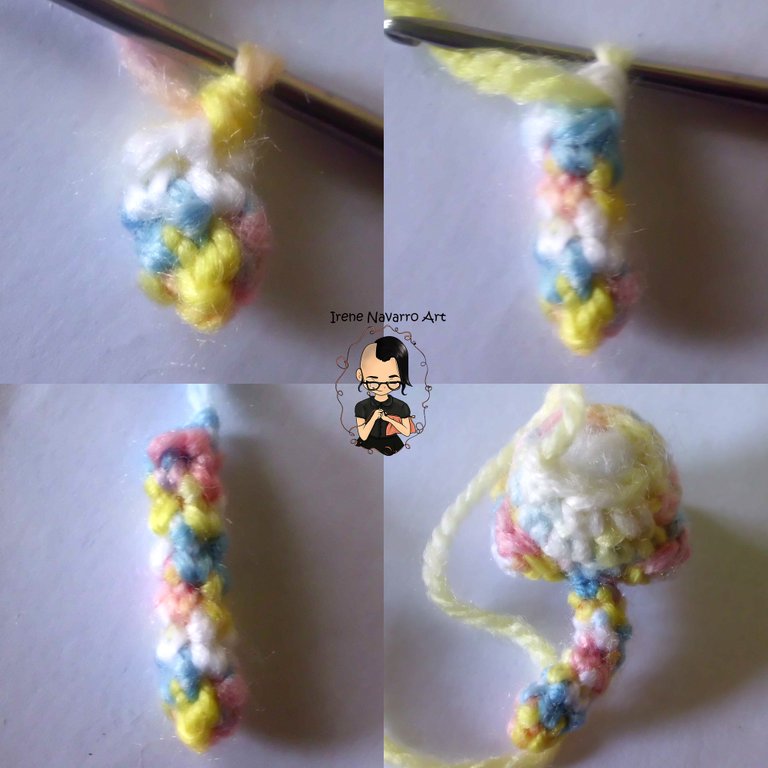
Patas delanteras / Front Legs
Tejer 4 puntos bajos en un anillo y tejer tres vueltas de 4 puntos bajos. Cerrar con 1 punto deslizado y dejar una hebra larga para coser, rellenar coser al cuerpo.
Work 4 single crochets in a ring and work three rounds of 4 single crochets. Close with 1 slip stitch and leave a long strand to sew, fill sew to the body.
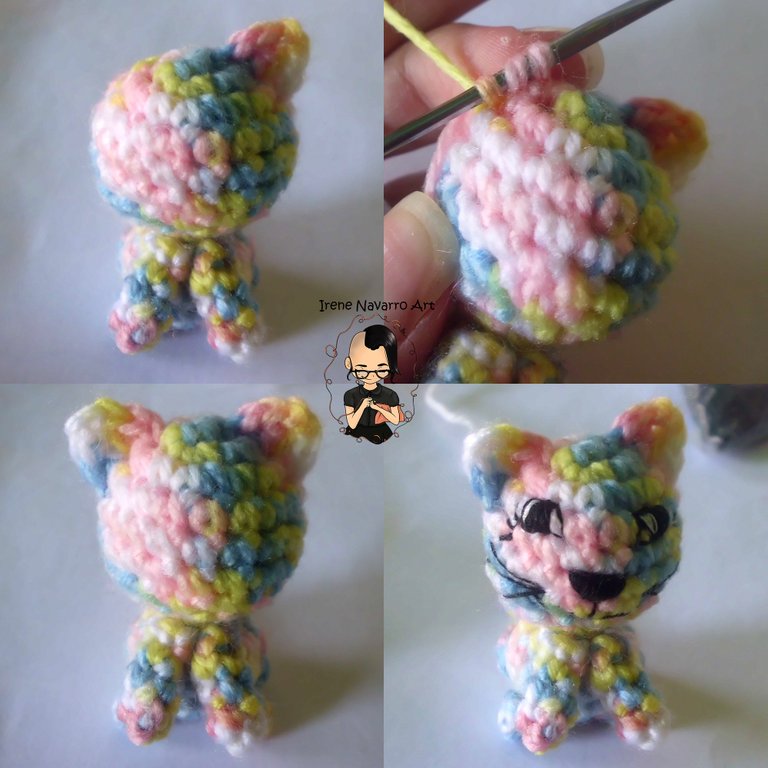
Cabeza / Head
Tejer 6 puntos bajos en un anillo, en la primera vuelta tejer 6 aumentos para obtener 12 puntos.
En la segunda vuelta tejer 1 punto bajo y 1 aumento repetidamente hasta obtener 18 puntos.
Tejer sin aumentos desde la tercera hasta la quinta vuelta.
En la sexta vuelta tejer 1 punto bajo y 1 disminución repetidamente hasta obtener 12 puntos.
En la séptima vuelta tejer 2 puntos bajos y 1 disminución repetidamente hasta obtener 8 puntos. Cerrar con 1 punto deslizado y dejar una hebra larga para coser. Rellenar y coser la cabeza al cuerpo.
Work 6 single crochets in a ring, on the first round work 6 increases to get 12 stitches. On the second round work 1 single crochet and 1 increase repeatedly until you get 18 stitches. Work without increases from the third to the fifth round. On the sixth round, knit 1 single crochet and 1 decrease repeatedly until you get 12 stitches. On the seventh round, knit 2 single crochets and 1 decrease repeatedly until you get 8 stitches. Close with 1 slip stitch and leave a long strand to sew. Fill and sew the head to the body.
Orejas /Ears
Levantar un punto bajo a un lado de la cabeza, en el punto siguiente tejer 1 punto medio alto, 1 punto alto, 2 cadenas, 1 punto alto y punto medio alto, en el siguiente punto tejer un 1 punto deslizado, cortar y esconder la hebra por dentro del tejido. Hacer el mismo procedimiento para la otra oreja. Bordar la nariz, los ojos y detalles del rostro con hilo y aguja de coser. Los demás detalles con opcionales.
Pick up a single crochet on one side of the head, in the next stitch work 1 half double crochet, 1 double crochet, 2 chains, 1 double crochet and half double crochet, in the next stitch work 1 slip stitch, cut and hide the thread inside the fabric. Do the same procedure for the other ear. Embroider the nose, eyes and details of the face with thread and a sewing needle. The other details with optional.
Resultado/ Result
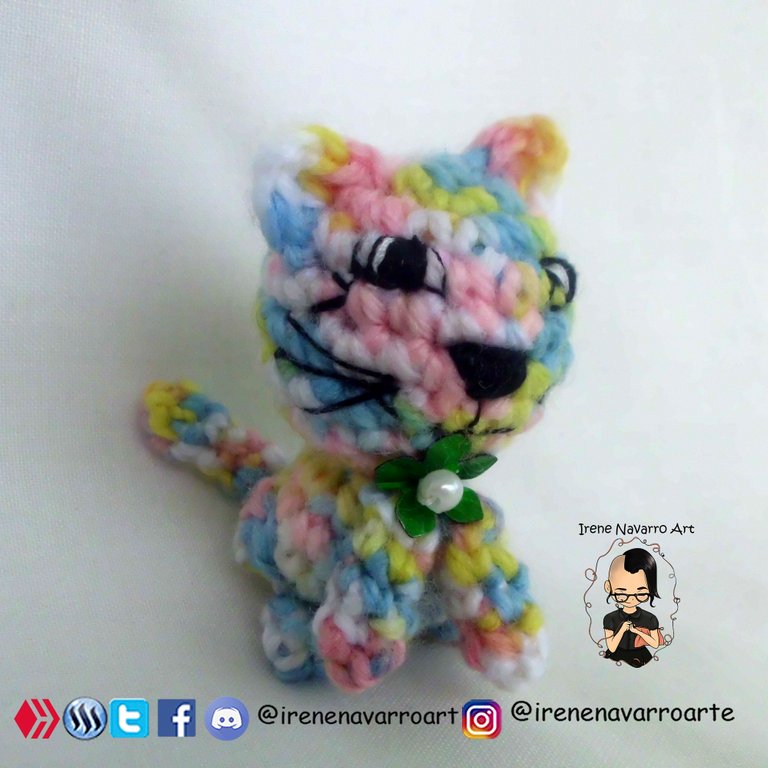
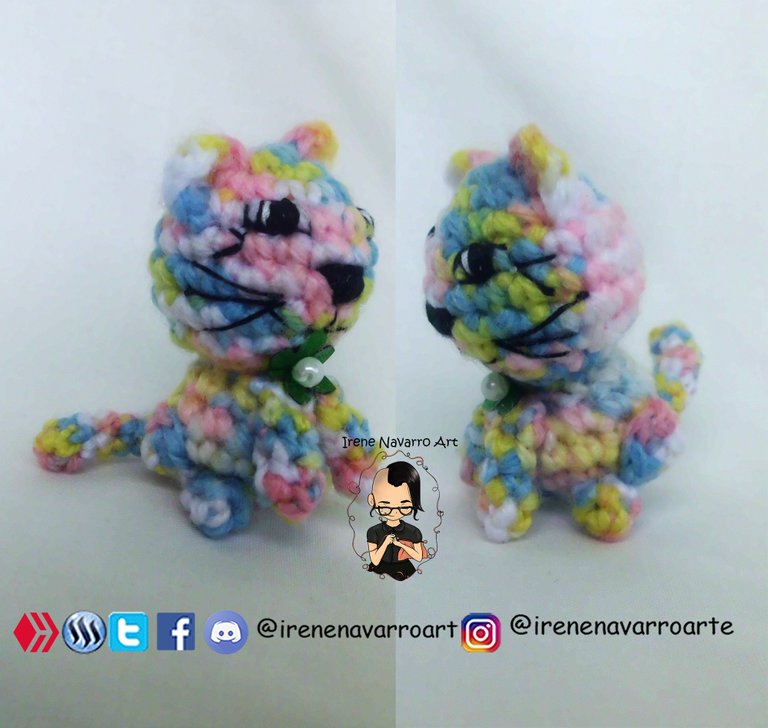


Imágenes tomadas con cámara Casio QV-R100 y editadas en Adobe Photoshop Cs6
Images taken with Casio QV-R100 camera and edited in Adobe Photoshop Cs6
Invítenme un Café/Support Me on Ko-Fi
Si te gusta mi contenido y quieres apoyarme a seguir dibujando, pintando, escribiendo y tejiendo puedes invitarme un Ko-fi en el enlace que les dejo aquí abajo, les recuerdo que es fácil, se usa Paypal y Tarjeta. ¡Muchas gracias a todos!
If you want to support my art you can also make donations for the value of a coffee (Ko-Fi) this uses Paypal, it is simple and with it I will be able to continue knitting and buying materials to create and share my publications

https://ko-fi.com/irenenavarroart
Espero les haya gustado. Les invito a leer mis próximas publicaciones y siempre estaré dispuesta a responder sus preguntas y comentarios, también pueden seguirme y contactarme en cualquiera de mis redes sociales. ¡Muchas gracias!
I hope you liked it. I invite you to read my next publications and I will always be willing to answer your questions and comments, you can also follow me and contact me on any of my social networks. Thank you!
Thanks for the support :)
Cute so so! I made my a rabbit on my first amigurumi hmm long long time ago. I will try again by copying this tutorial of yours. Clear tutorial easy to follow.
I hope you have a good result and share it :) I am glad that you feel motivated to follow my tutorial :)
Lovely. I should show it to my wife so she make such for my baby. Thanks for sharing.
I hope your wife has a good result following the instructions. Thank you very much for your comment ❤️
Te quedo espectacular, los colores lo hacen ver genial me ha encantado
Mucha gracias, los estambres matizados hacen que los tejidos se vean muy bien :) Saludos ❤️
Hola!! que cosita tan tierna. muy bonito.Saludos
Muchas gracias :) Saludos!
Congratulations, your post has been upvoted by @dsc-r2cornell, which is the curating account for @R2cornell's Discord Community.
Enhorabuena, su "post" ha sido "up-voted" por @dsc-r2cornell, que es la "cuenta curating" de la Comunidad de la Discordia de @R2cornell.
Thanks for the support :)
Hello @irenenavarroart! Your post was selected by our staff on behalf of the OCD Community Incubation Program and has received an OCD upvote! Congratulations!!! Please keep sharing these quality posts :)
Written by @crosheille for the NeedleWorkMonday Community ~
Thank you very much for the support :D