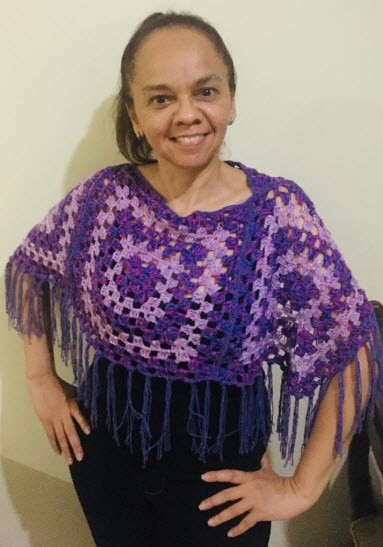
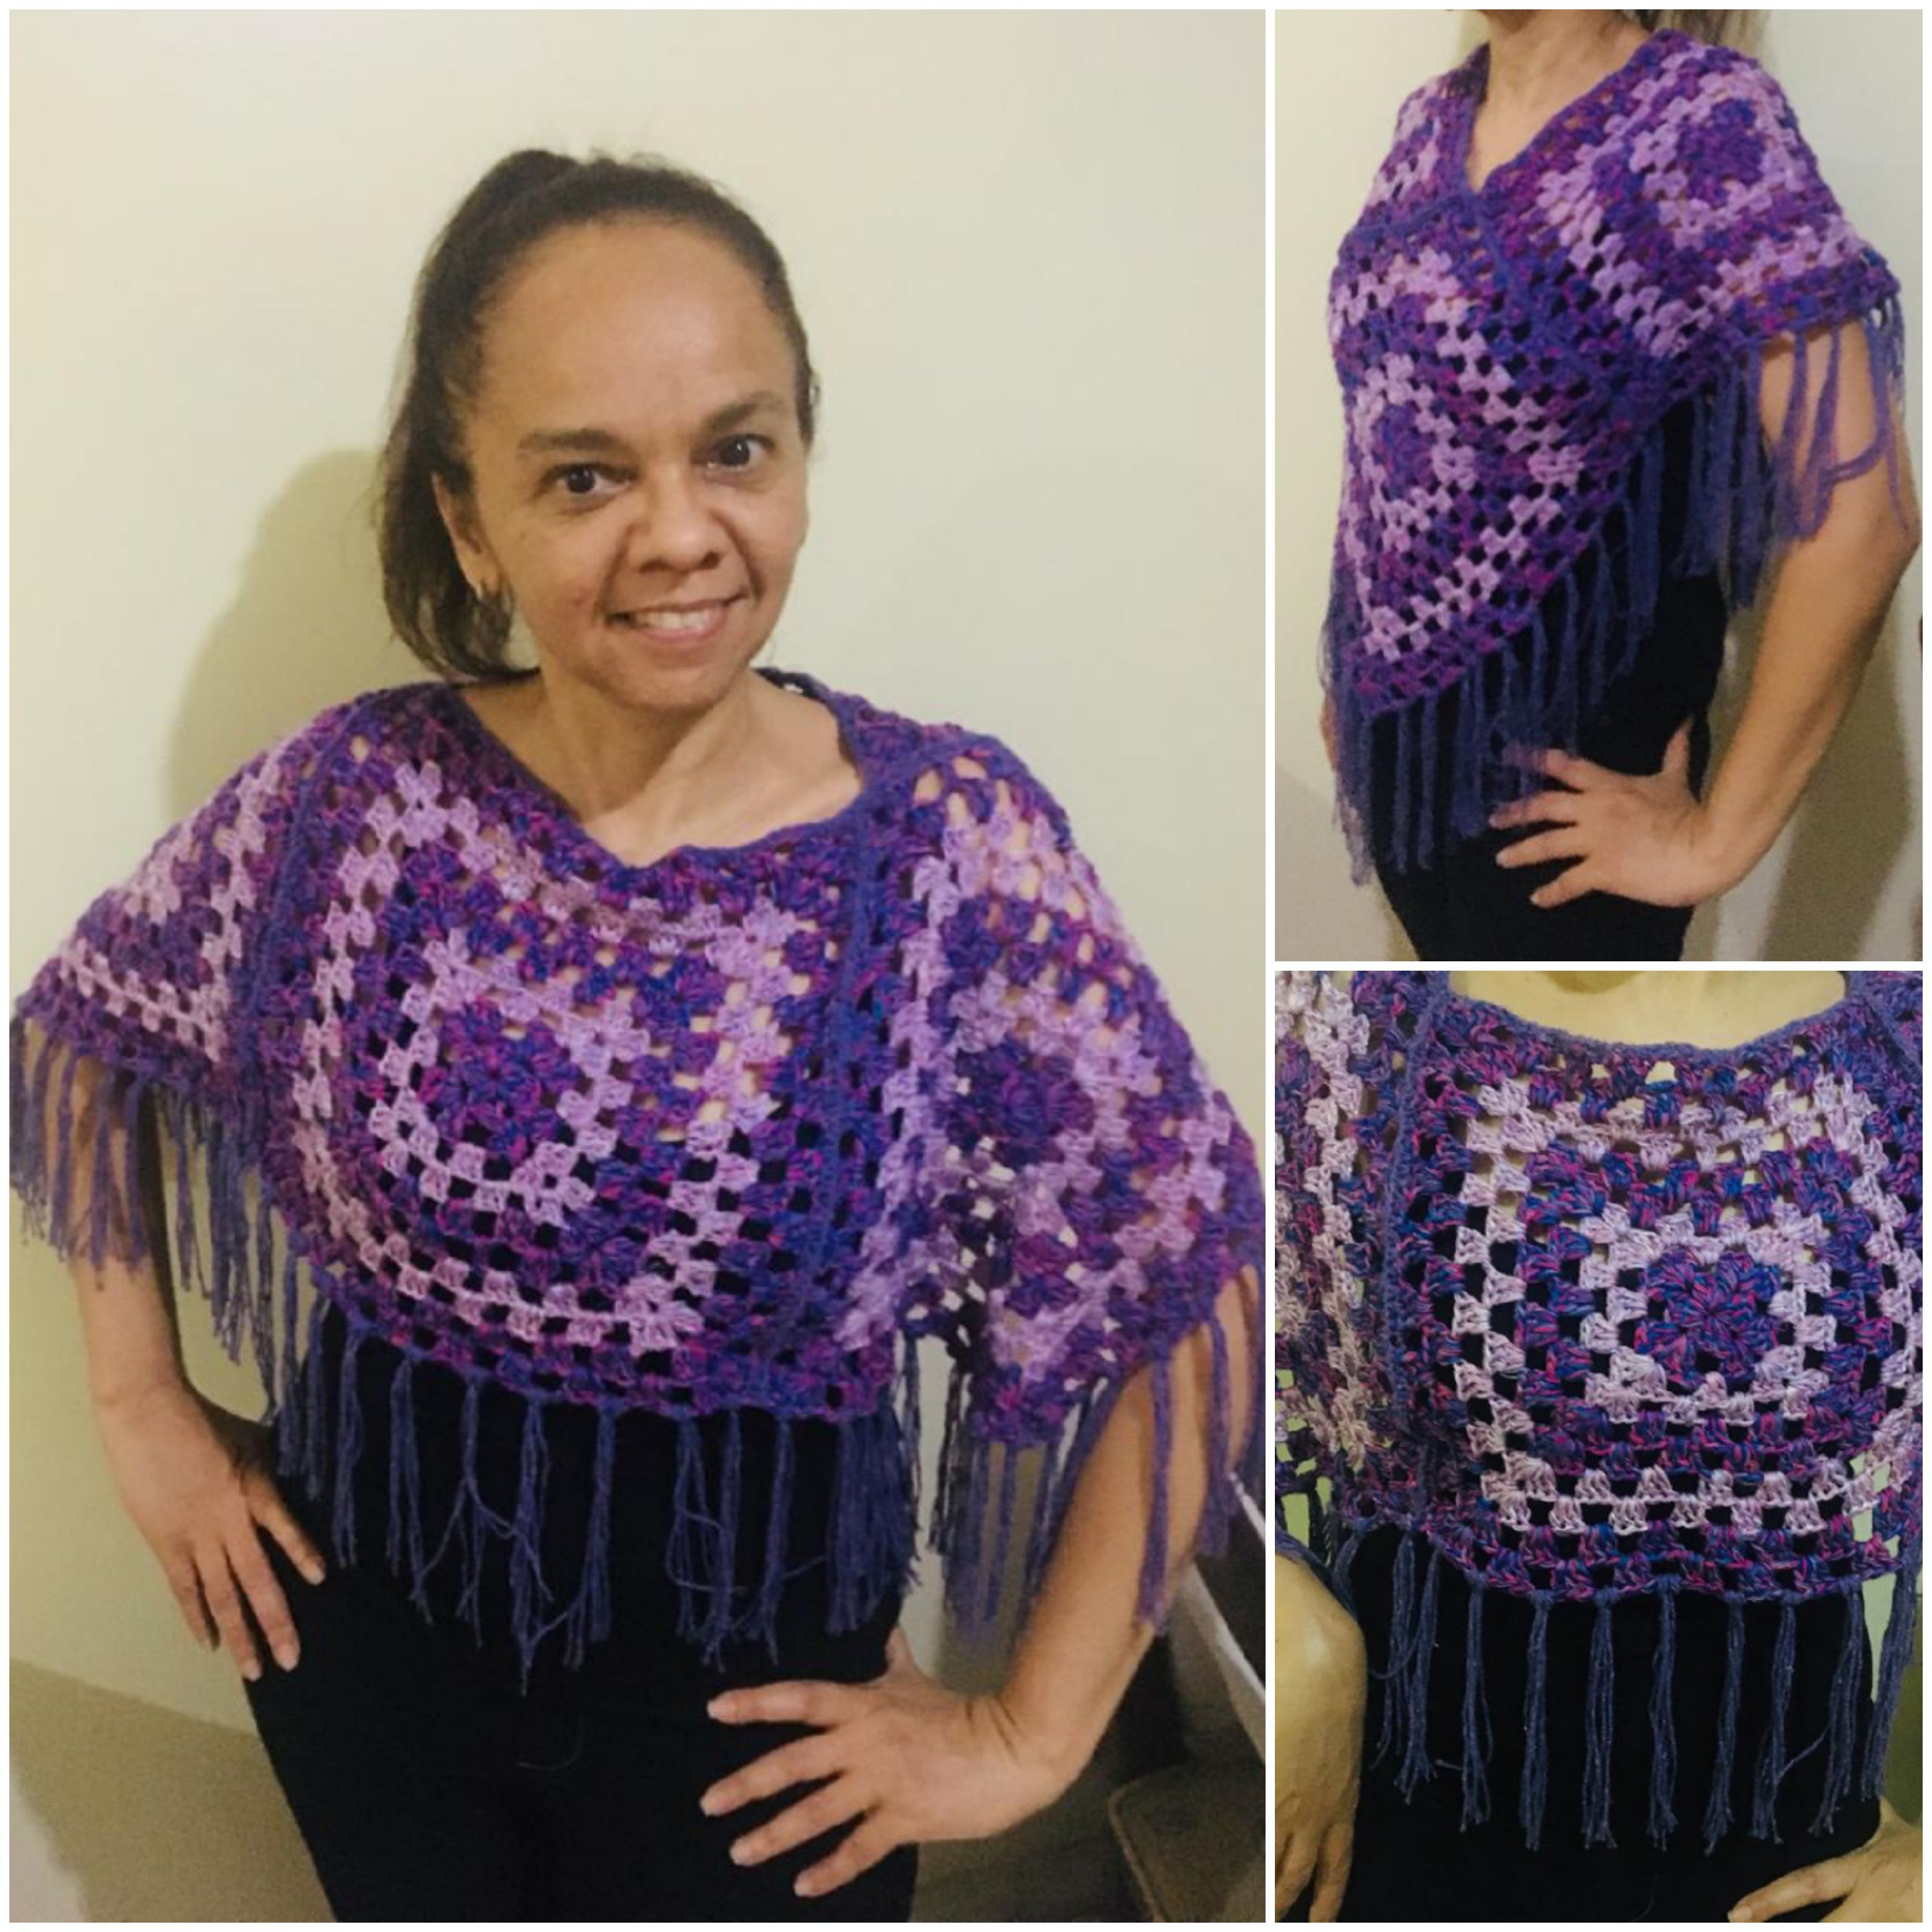
A poncho is a piece that will make you look beautiful on any occasion. A pocho looks good with a jean and sport shoes on a cold day. It will make you look attractive in a business meeting where you will wear a shirt with a skirt. They can also be worn when it's cold. Today I want to share with you a poncho that I made two days ago for the birthday of a very dear cousin.
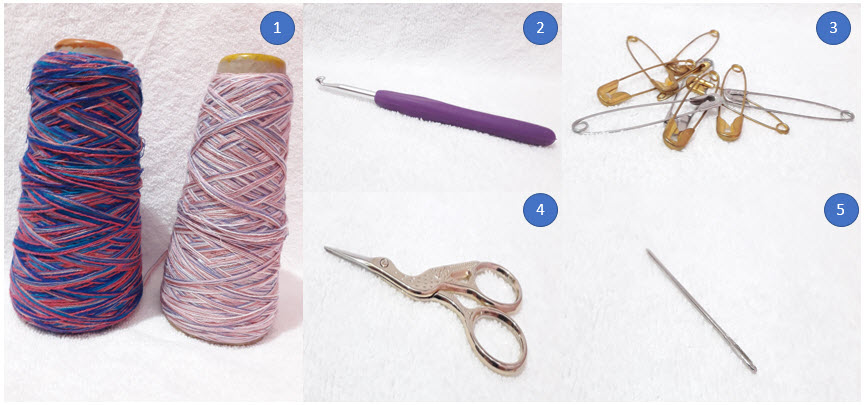
What materials do we need to knit the poncho?
- Thread of the color of your preference, I used multithread in two shades, approximately 200 grs
- Crochet 6 mm
- Safety pins
- Scissors
- Blunt yarn needle
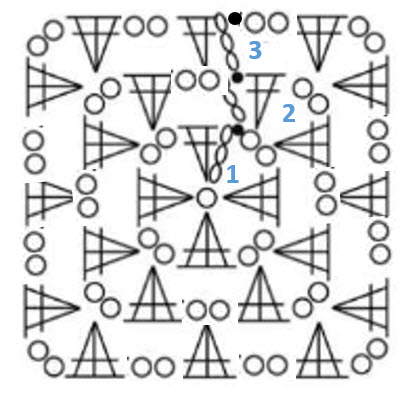
which are the crochet stitches that we are going to use?
- Slip stich
- Double crochet
- Chain
What are the steps to follow to knit the poncho?
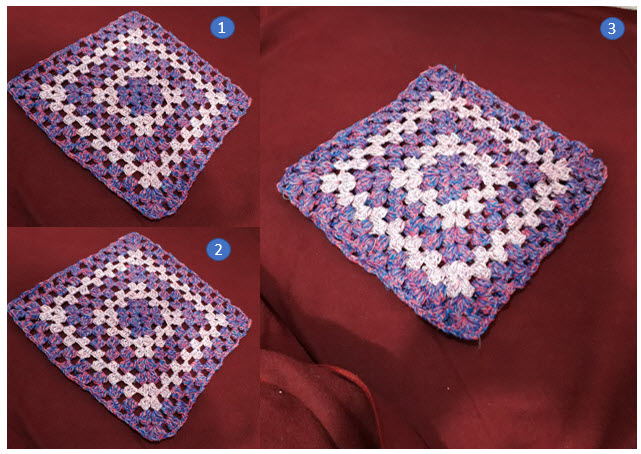
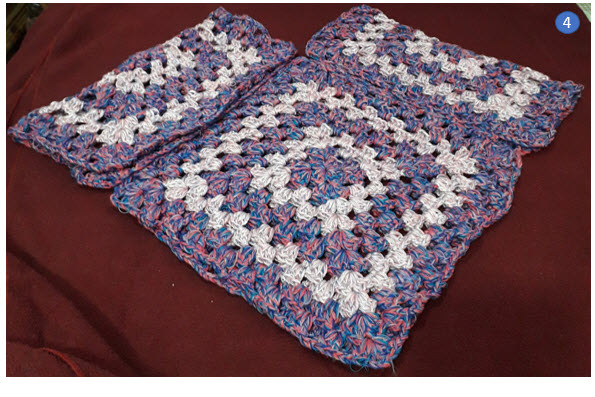
The poncho is composed of four squares, which will be obtained after completing nine rounds, these rounds are very simple.
Start with a magic ring. See the diagram below for a guide to completing all nine rounds. If you want the biggest poncho, you can make more rounds by following the sequence in the diagram.
How to assemble the poncho?
This is my favorite part, since you can see the result. Here are the steps:
- Place one of the squares as you can see in the image
- Locate another of the squares as you can see in the image
- Place one square on top of the other
4.Fold in half the other two squares and place them as shown in the image below:
5.Before sewing, join the pieces with safety pins, to ensure that everything looks good
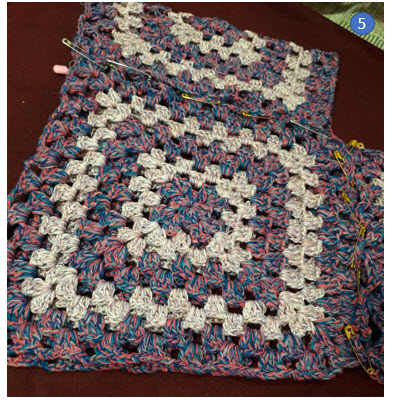
After joining with safety pins it is advisable to put it on and start enjoying what will be the result or if it is required to make any adjustments.
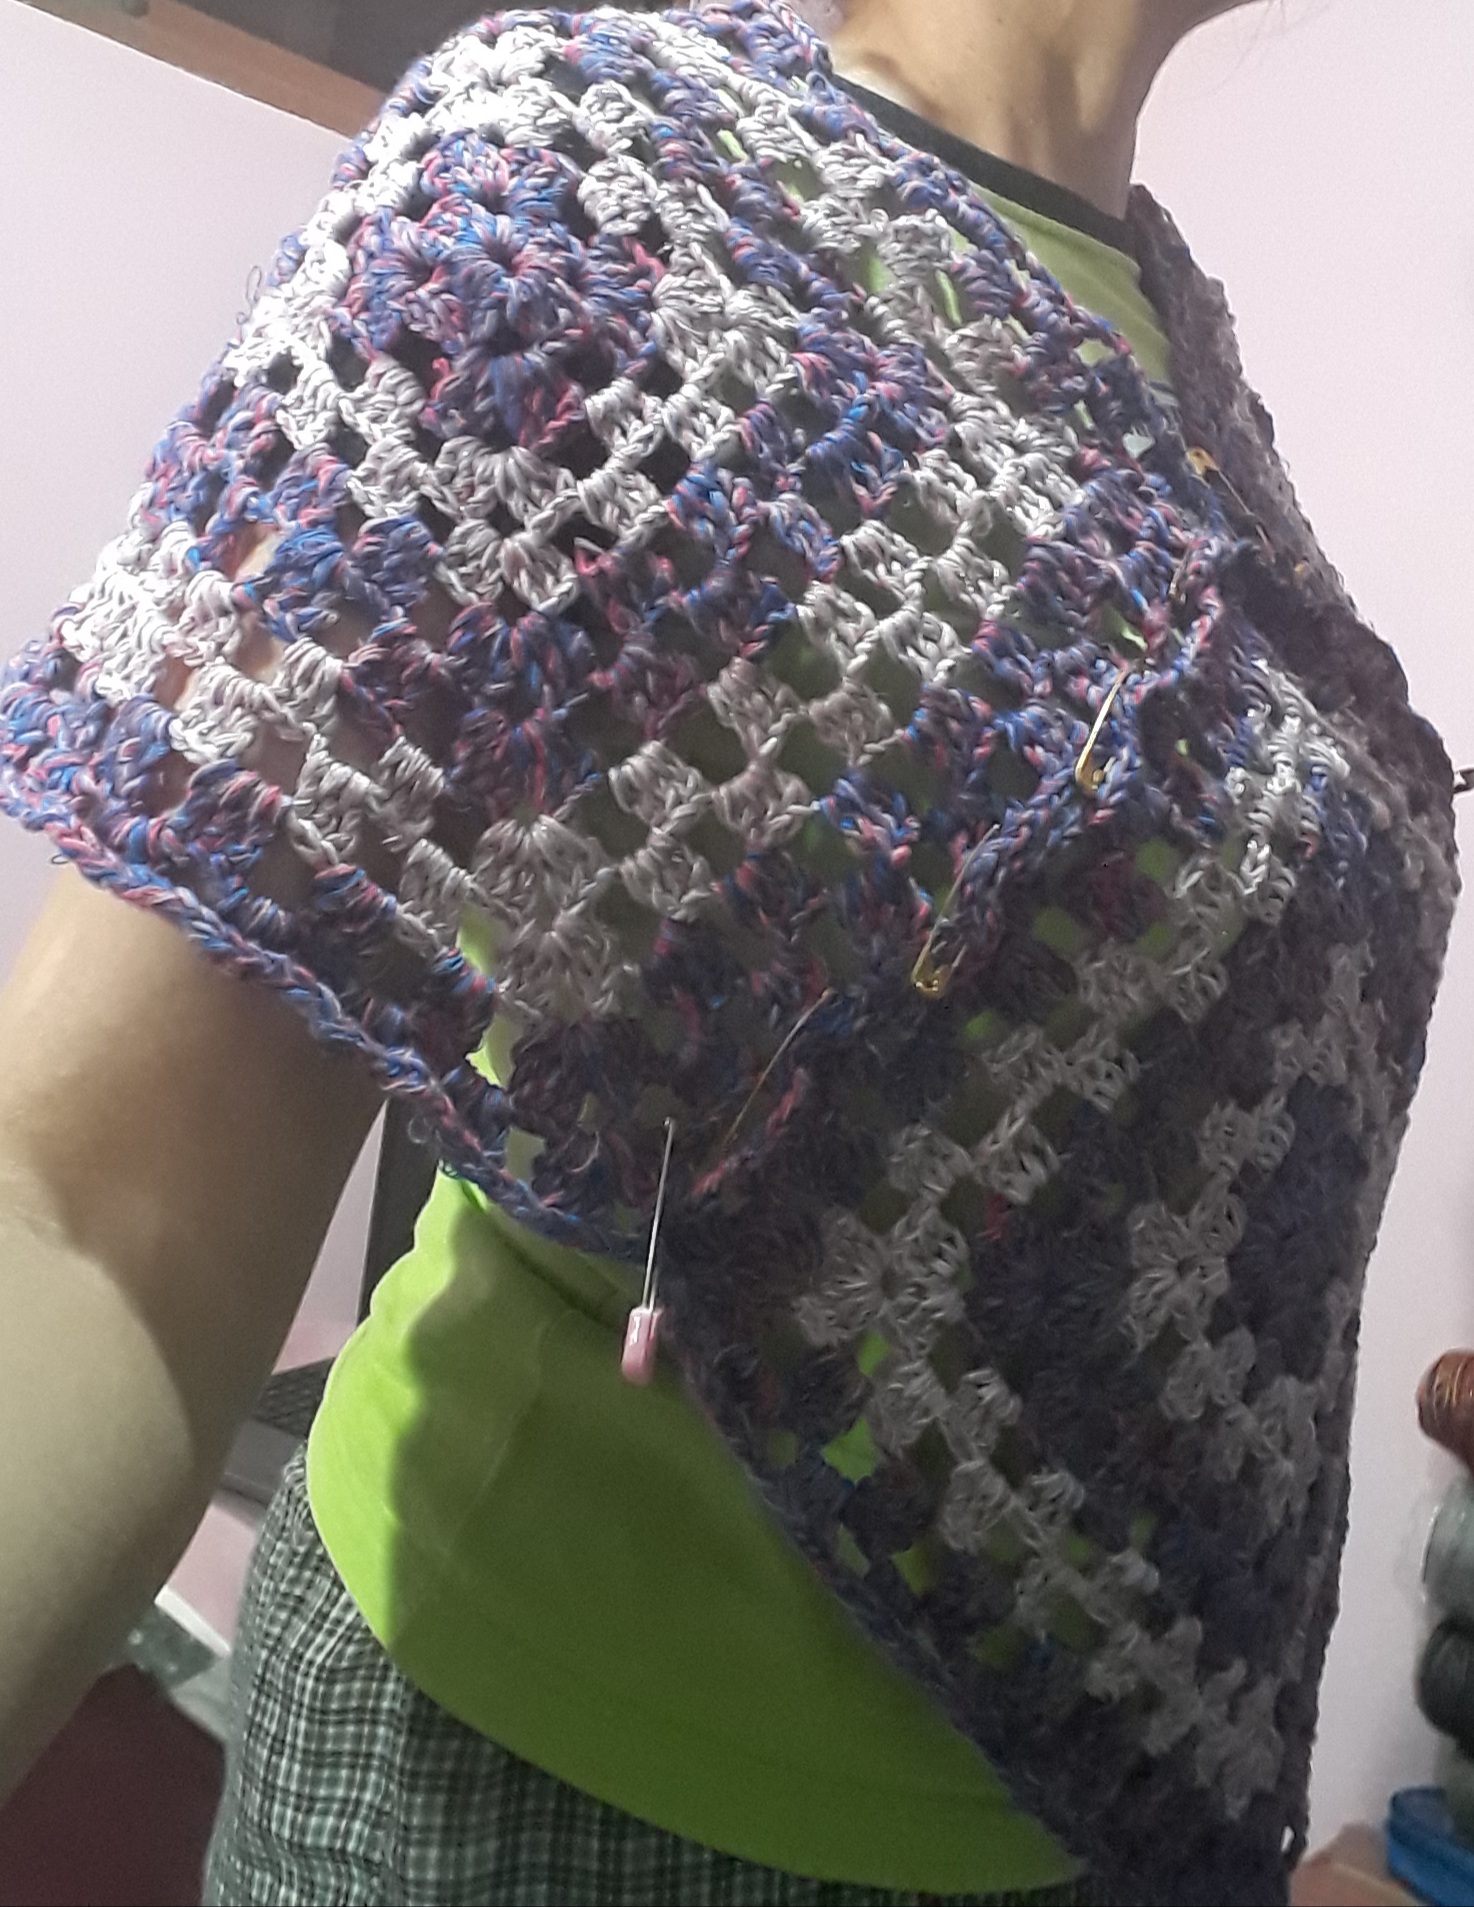
6.Sewing the pieces and removing the safety pins
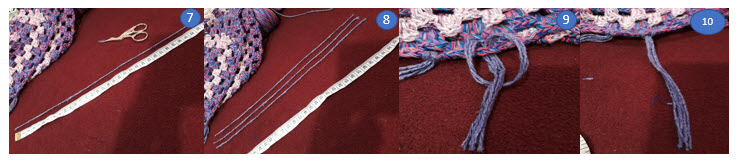
What are the steps to follow to make the fringe?
7.Measure 32 centimeter thread
8.Cut three strands for each fringe
9.Pass the three strands through the spaces of two chains
10.Make a loop
Repeat the procedure in each space of two chains
Ready!!! We are finished
The wonderful thing is that the poncho can be used in two ways
Thank you for taking the time to read this publication. If there are any questions, please ask me in the comments section below.
Text and images: Por @jicrochet

¿Conoces lo atractiva que puedes lucir usando un poncho tejido? Hoy les comparto los pasos para que puedas tejer uno en Crochet.
Un poncho es una pieza que te hará lucir hermosa en cualquier ocasión. Un pocho luce bien con un jean con zapatos deportivos en un día frío. Te hará lucir atractiva en una reunión de negocios donde llevarás una camisa con falda. También se pueden usar cuando hace frío. Hoy quiero compartir con ustedes un poncho que hice hace dos días para el cumpleaños de un primo muy querido.
¿Qué materiales necesitamos para tejer el poncho?
- Hilo del color de tu preferencia, usé hilo multihebras en dos matices, aproximadamente 200 grs
- Ganchillo 6 mm
- Alfileres
- Tijera
- Aguja lanera
¿Cuáles son los puntos a utilizar?
- Punto bajo
- Punto deslizado
- Punto alto
- Cadeneta
¿Cuáles son los pasos a seguir para tejer el poncho?
El poncho está compuesto de cuatro cuadrados, que serán obtenidos luego de completar nueve rondas, dichas rondas son muy sencillas.
Iniciar con un anillo mágico. Ver el diagrama a continuación para la guía para completar las nueve rondas. Si deseas el poncho más grande, puedes realizar más ronda siguiendo la secuencia del diagrama.
¿Cómo armar el poncho?
Esta es mi parte favorita, ya que se puede ver el resultado. A continuación los pasos:
- Ubica uno de los cuadrados tal como se puede observar en la imagen
- Ubica otro de los cuadrados tal como se puede observar en la imagen
- Colocar un cuadrado encima del otro
4.Doblar por la mitad los otros dos cuadrados y ubicar como se puede observar en la imagen a continuación:
5.Antes de coser unir las piezas con alfileres, y así asegurar que todo luzca bien
Luego de unir con alfileres es recomendable te lo coloques y así comenzar a disfrutar de cual será el resultado o si es requerido realizar algún ajuste.
6.Coser las piezas e ir retirando los alfileres
¿Cuáles son los pasos a seguir para hacer los flecos?
7.Medir hebras de hilo de 32 centímetros
8.Cortar tres hebras por cada fleco
9.Pasar las tres hebras por los espacios de dos cadenetas
10.Hacer una lazada
Repetir el procedimiento en cada espacio de dos cadenetas
Listo!!! Hemos terminado
Lo maravilloso es que el poncho se puede usar de dos formas
Gracias por dedicar un espacio de su tiempo para leer la publicación. Si hay alguna pregunta, por favor pregúntame en la sección de comentarios a continuación.
Texto e imágenes: Por @jicrochet
Qué hermoso, el morado es un color relajante y muy elegante. felicitaciones.
Gracias por tu apoyo...Saludos cargados de mi cariño😍
¡Te quedó muy lindo! Yo tengo un poncho verde que lo uso todo el tiempo en de mi casa, es muy calentito jaja. ¿Cuánto tiempo tardas en hacerlo todo?
Feliz día. Gracias por pasar a visitarme. Que bueno te gustó. Me tomó en tejer aproximadamente unas 30 hrs, Tú tejes? Seguimos en contacto. Saludos.
Woww 30 horas! Mucha dedicación, te felicito de nuevo!
Yo no tejo nada... solo sé hacer el punto básico de dos agujas... pero nunca hice más nada que una pequeña bufandita para mi muñeca 😆
Buen día...Creo que puedes aprender. Estaré publicando unos videos para aprender a tejer en crochet, a un aguja. Incorporar tejido a lo que coses, sería espectacular.
Genial! Voy a verlos y si lo intento te muestro :) gracias!
Te admiro!! que paciencia! quedó espectaclar!
Gracias cariño...cuando haces lo que te gusta todo fluye. Abrazos.
Congratulations @jicrochet! You have completed the following achievement on the Hive blockchain and have been rewarded with new badge(s) :
You can view your badges on your board and compare yourself to others in the Ranking
If you no longer want to receive notifications, reply to this comment with the word
STOPDo not miss the last post from @hivebuzz:
Que bueno que ya estes de regreso y presentando cosas tan lindas como las que siempre nos presentas. un abrazo
Hola Caro...Sip, esto feliz de compartir lo que me gusta hacer. Estuve viendo tus p.ublicaciones, haz hecho cosas espectaculares. Seguimos en contacto Saludos
Hello @jicrochet! Your post was selected by our staff on behalf of the OCD Community Incubation Program and has received an OCD upvote! Congratulations!!! Please keep sharing these quality posts :)
I invite you to share anything needlework related directly to the NeedleWorkMonday Community. On Monday’s we use the #needleworkmonday tag and on all other days the #needlework tag.
Written by @crosheille for the NeedleWorkMonday Community ~
Thank you for your support😍
Absolutely! 😘