.jpeg)

Como ya les he comentado antes, me gusta obsequiar detalles hechos a mano, así que buscando que podía regalarles a mis sobrinos para navidad, me encontré con este patrón y me pareció perfecto ya que el no tengo mucho tiempo como para realizar algo tan complejo y elaborado.
A continuación les muestro el paso a paso, espero que les guste y se animen a elaborarlos, pero les advierto que son adictivos, no querrán hacer solo uno.
Hello my dear needleworkers, I am happy to share with you another Needle Monday. For today I bring you the process to make some cute and tender crochet bunnies. Best of all, they are super easy to do and very fast. They can be made in different sizes and colors.
As I have already mentioned before, I like to give away handmade details, so looking for what I could give my nephews for Christmas, I found this pattern and it seemed perfect since I don't have much time to do something so complex and Elaborated.
Below I show you the step by step, I hope you like it and are encouraged to make them, but I warn you that they are addictive, you will not want to make just one.
| Materiales | Materials |
|---|---|
| Hilo de algodón | Cotton thread |
| Tijeras | Scissors |
| Agujas para crochet | Crochet hooks |
| Aguja Lanera | Wool needle |
| Ojitos de seguridad | Safety eyes |
| Cinta de raso | Satin ribbon |
| Relleno antialérgico | Anti-allergy filler |
| Cinta metrica | Measuring tape |
| Marcadores de tejido | Tissue markers |
| Proceso | Process |
|---|---|
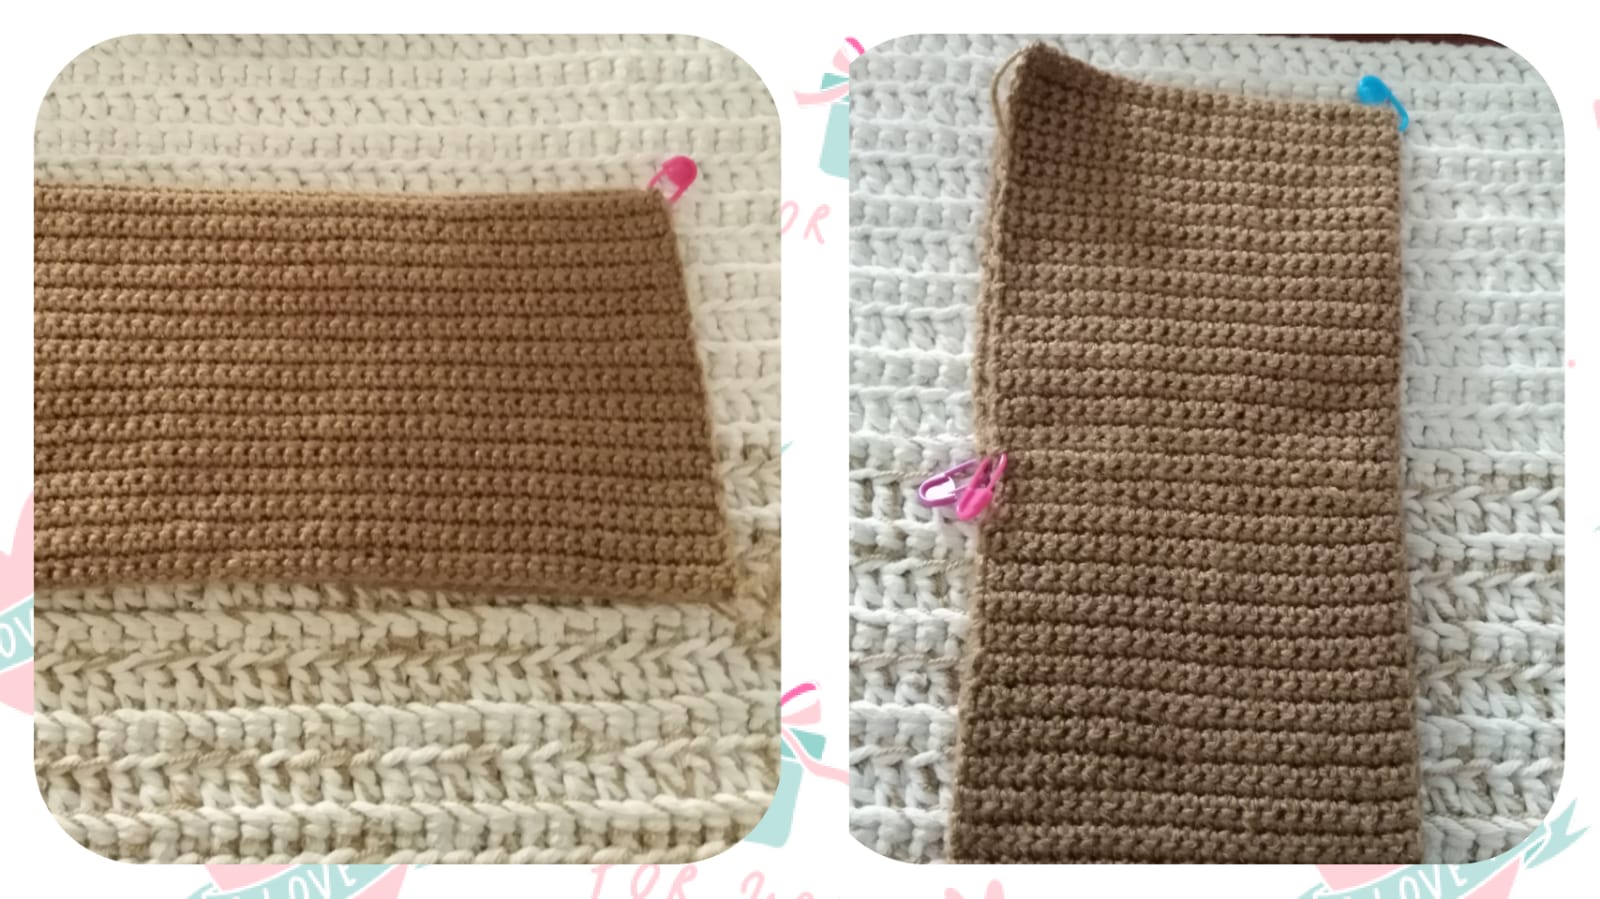
| Lo primero será elaborar un cuadrado tejido en puntos bajos. Debemos tejer hasta tener la misma medida de alto y de ancho. El cuadrado de la imagen mide 30cm x30cm | The first thing to do is to make a square knitted in single crochets. We must knit until we have the same height and width. The square in the image measures 30cm x30cm |
.jpeg)
| Luego tomamos el cuadrado, doblamos a la mitad y marcamos cada uno de los extremos, (derecha, izquierda, superior, inferior) | Then we take the square, fold in half and mark each of the ends, (right, left, top, bottom) |
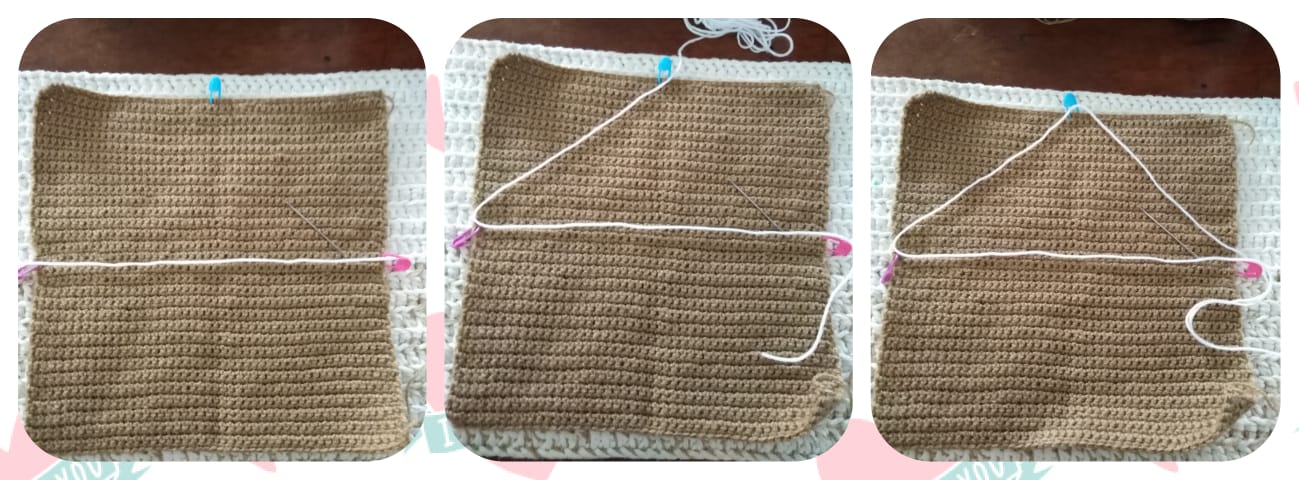
| Con la aguja lanera, vamos a coser pequeñas puntadas hasta formar un triángulo. (Se cose con la lana del mismo color del cuadrado, para la foto use una lana más clara) | With the wool needle, we are going to sew small stitches to form a triangle. (It is sewn with the wool of the same color of the square, for the photo use a lighter wool) |
| Se comienza a coser las puntadas de derecha a izquierda en linea recta. | The stitches start to be sewn from right to left in a straight line. |
| Luego seguimos desde el extremo izquierdo hasta la marca de la parte superior. | Then we continue from the extreme left to the mark at the top. |
| Continuamos con las puntadas desde la parte superior hasta volver al extremo derecho. Allí se encontraran las dos hebras de lana. | We continue with the stitches from the top until we return to the extreme right. There you will find the two strands of wool. |
| Tomar las dos hebras de lana del lado derecho y halar suavemente para fruncir el cuadrado como se muestra en la imagen. | Take the two strands of wool from the right side and pull gently to gather the square as shown in the image. |
| Comenzar a rellenar y continuar halando las hebras hasta obtener la cabecita de nuestro conejo. | Start filling and continue pulling the strands until you get the head of our rabbit. |
| Obs: Es muy importante al momento de coser, que las líneas del tejido queden de manera vertical, esto le dará una mejor apariencia al conejo y no se notara la costura. | Note: It is very important at the time of sewing that the lines of the fabric are vertical, this will give a better appearance to the rabbit and the seam will not be noticed. |
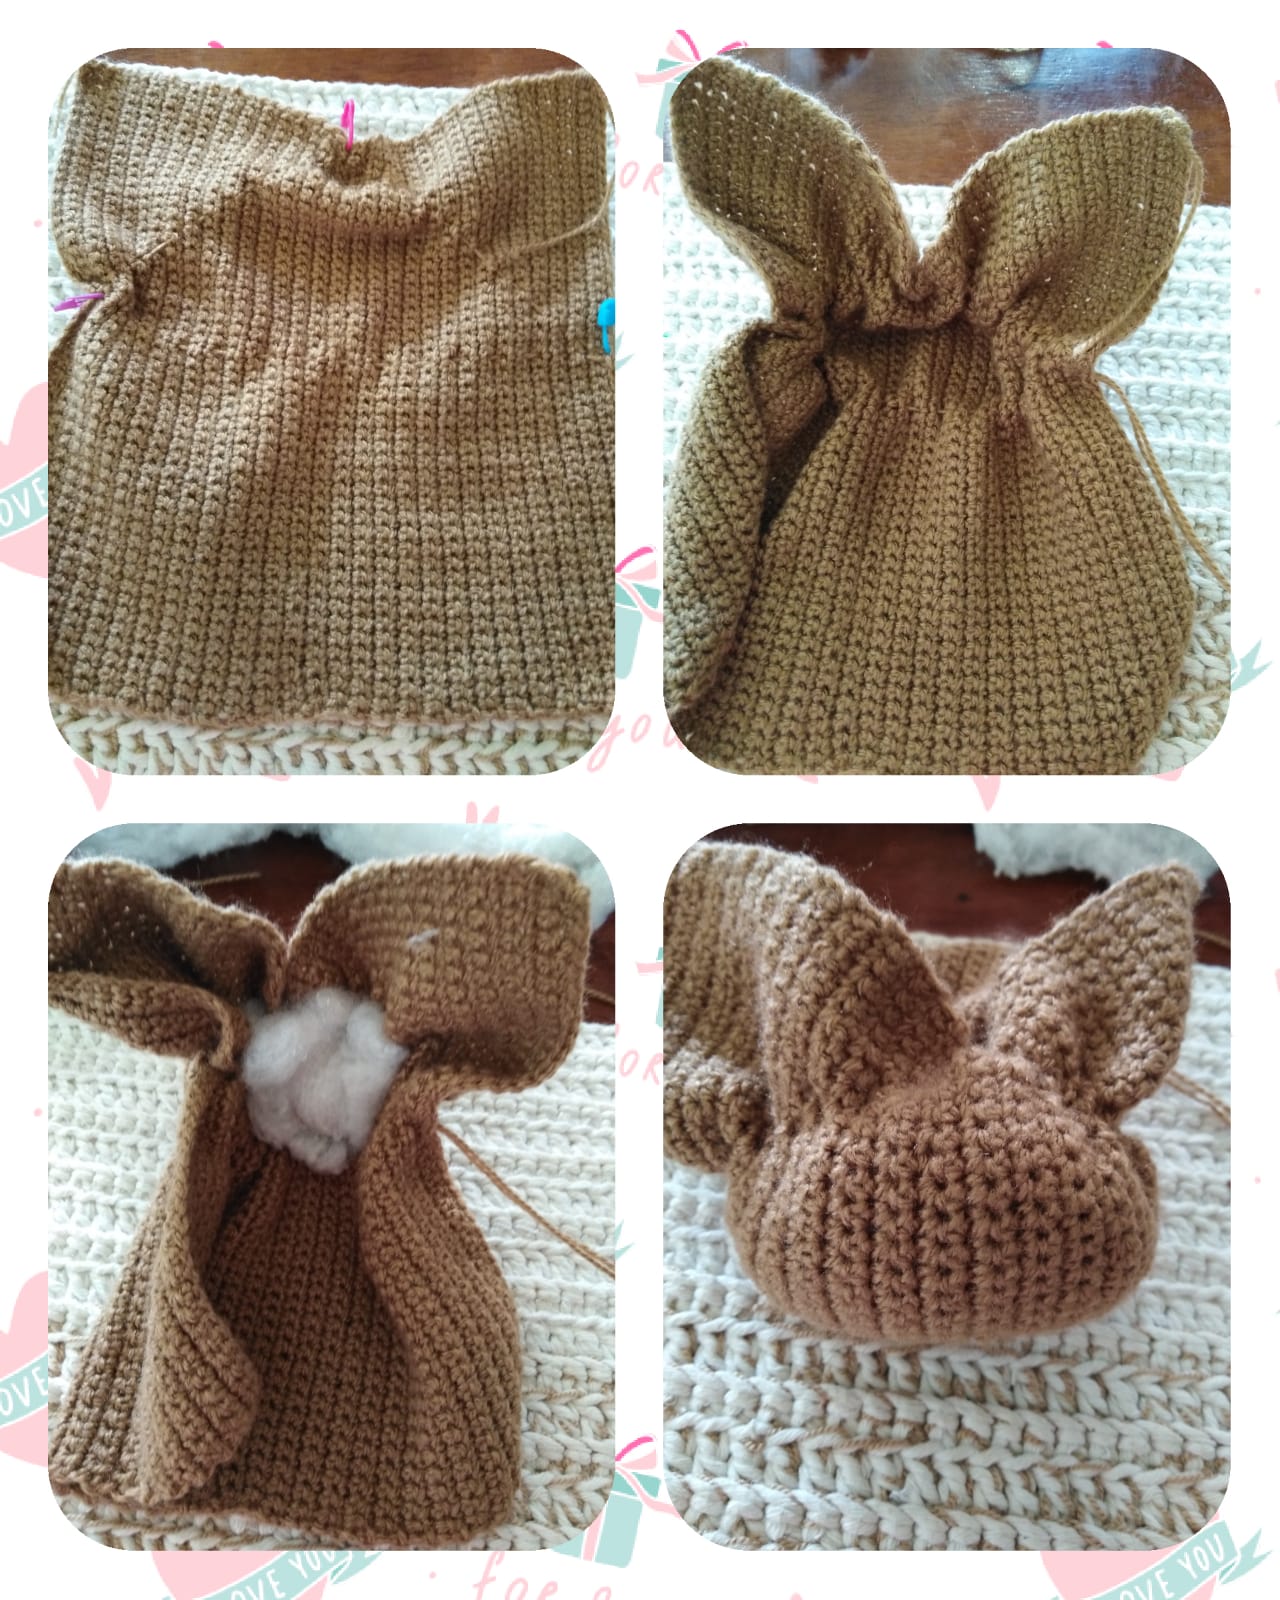
| Con la misma hebra de lana y con la aguja lanera, cosemos para terminar de cerrar la cabeza y darle forma a las orejas | With the same thread of wool and with the needle, we sew to finish closing the head and shaping the ears. |
| Luego continuamos cosiendo hasta cerrar lo que formar'a el cuerpo del conejo. | Then we continue sewing until we close what will form the rabbit's body. |
| Después, vamos a dar puntadas suaves al rededor de la parte inferior , de manera que luego se puedan halar para cerrar el cuerpo. | Next, we are going to give soft stitches around the bottom, so that later they can be pulled to close the body. |
| Rellenar el cuerpo, luego cerrar y asegurar cosiendo con la aguja lanera. | Fill the body, then close and secure by sewing with the wool needle. |
.jpeg)
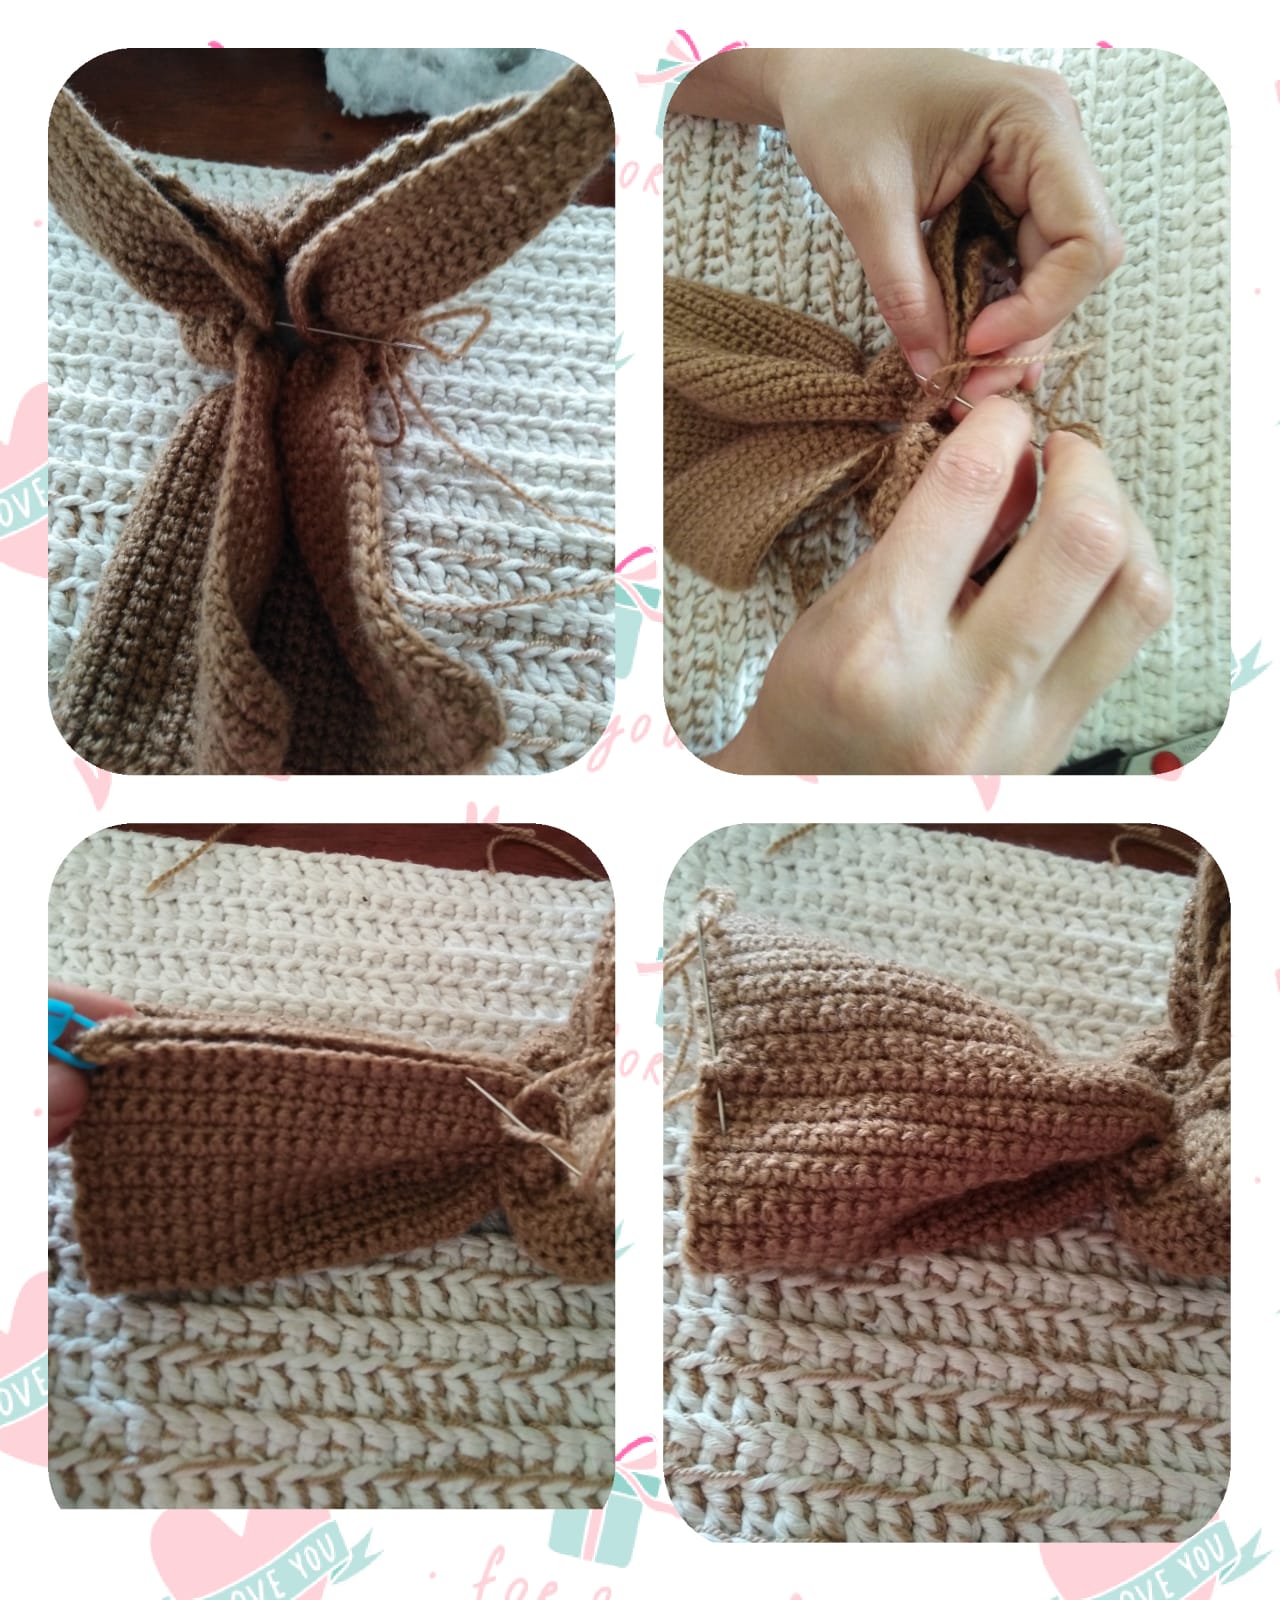
| Ahora nos dedicamos a darle forma a la carita. Para ello tomamos un poco de lana y con la aguja lanera atravesamos la carita de un lado a otro para darle el efecto hundido donde posteriormente colocaremos los ojitos. | Now we are dedicated to shaping the face. To do this we take a little wool and with the wool needle we cross the face from one side to the other to give it the sunken effect where we will later place the eyes. |
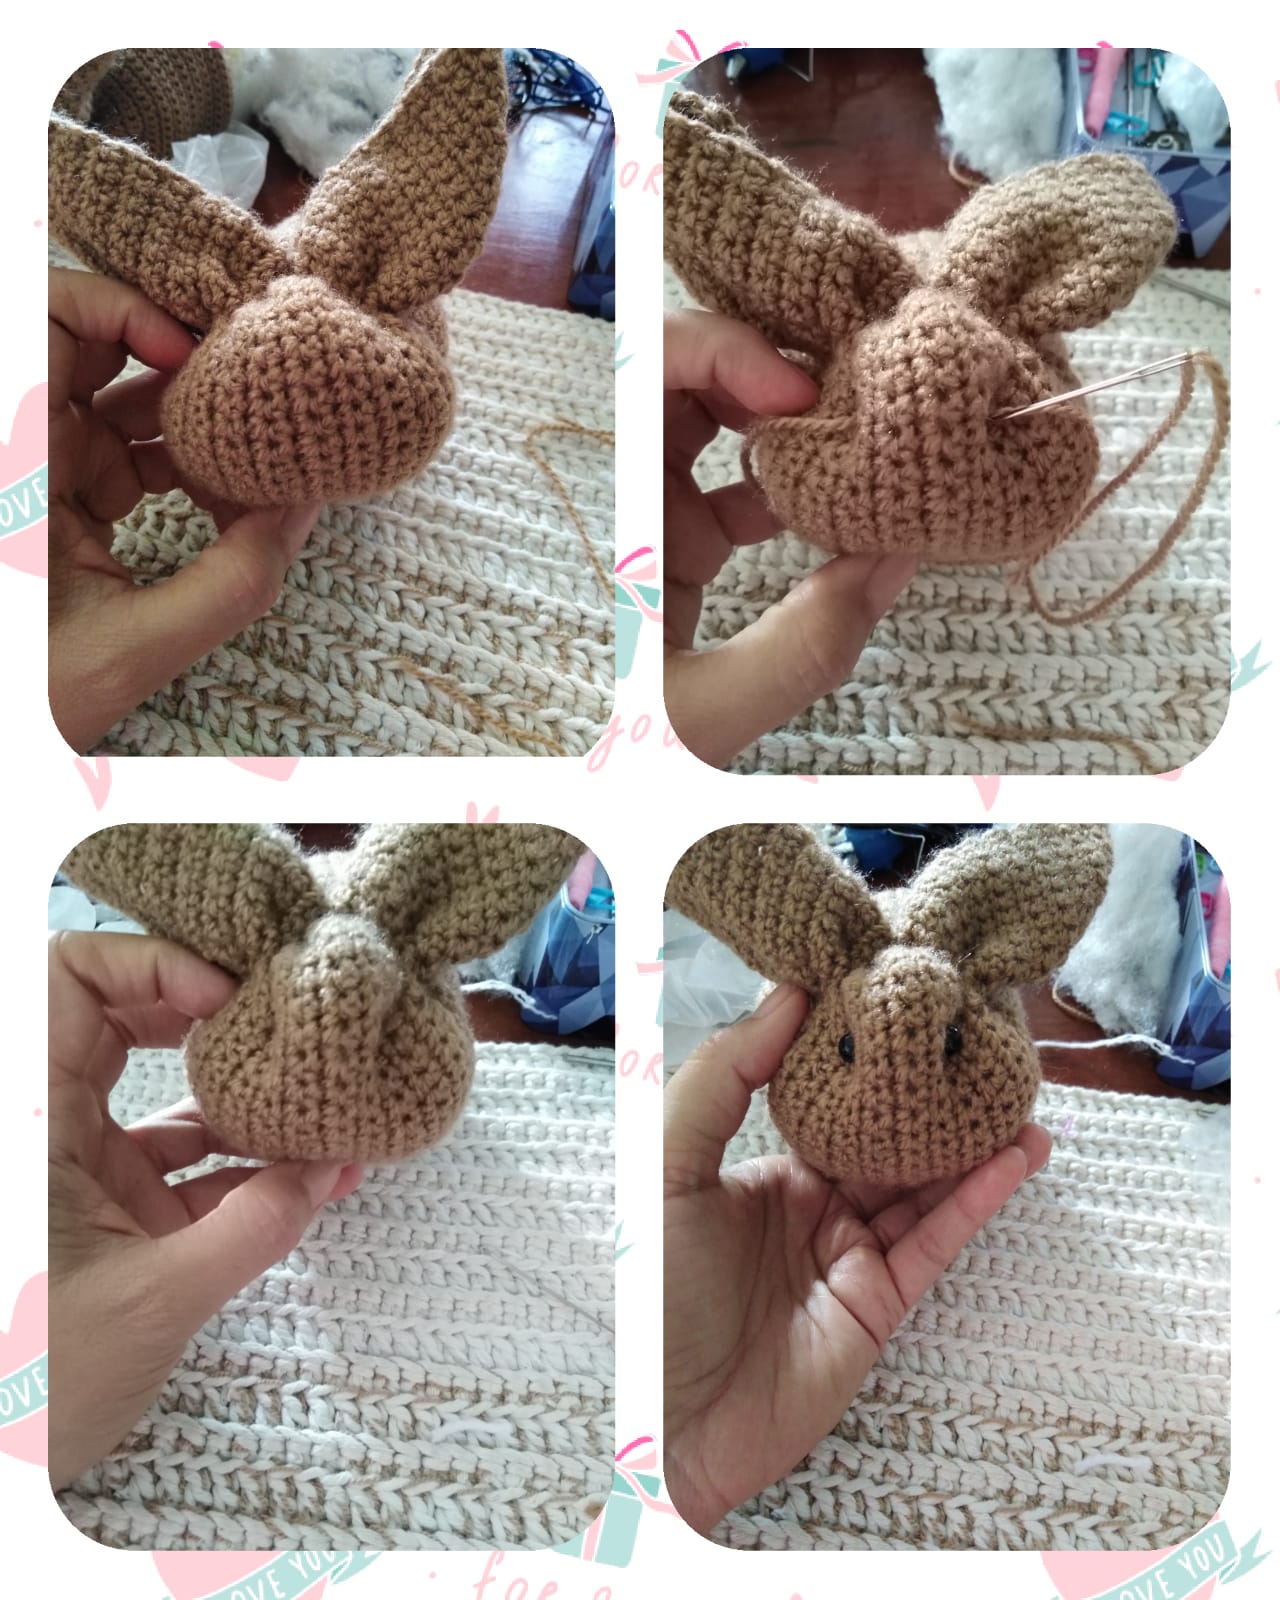
| Con hilo rosado, bordamos una pequeña nariz en medio de los ojitos. (también le puedes añadir unos bigotes) | With pink thread, we embroider a small nose in the middle of the eyes. (you can also add some mustaches) |
.jpeg)
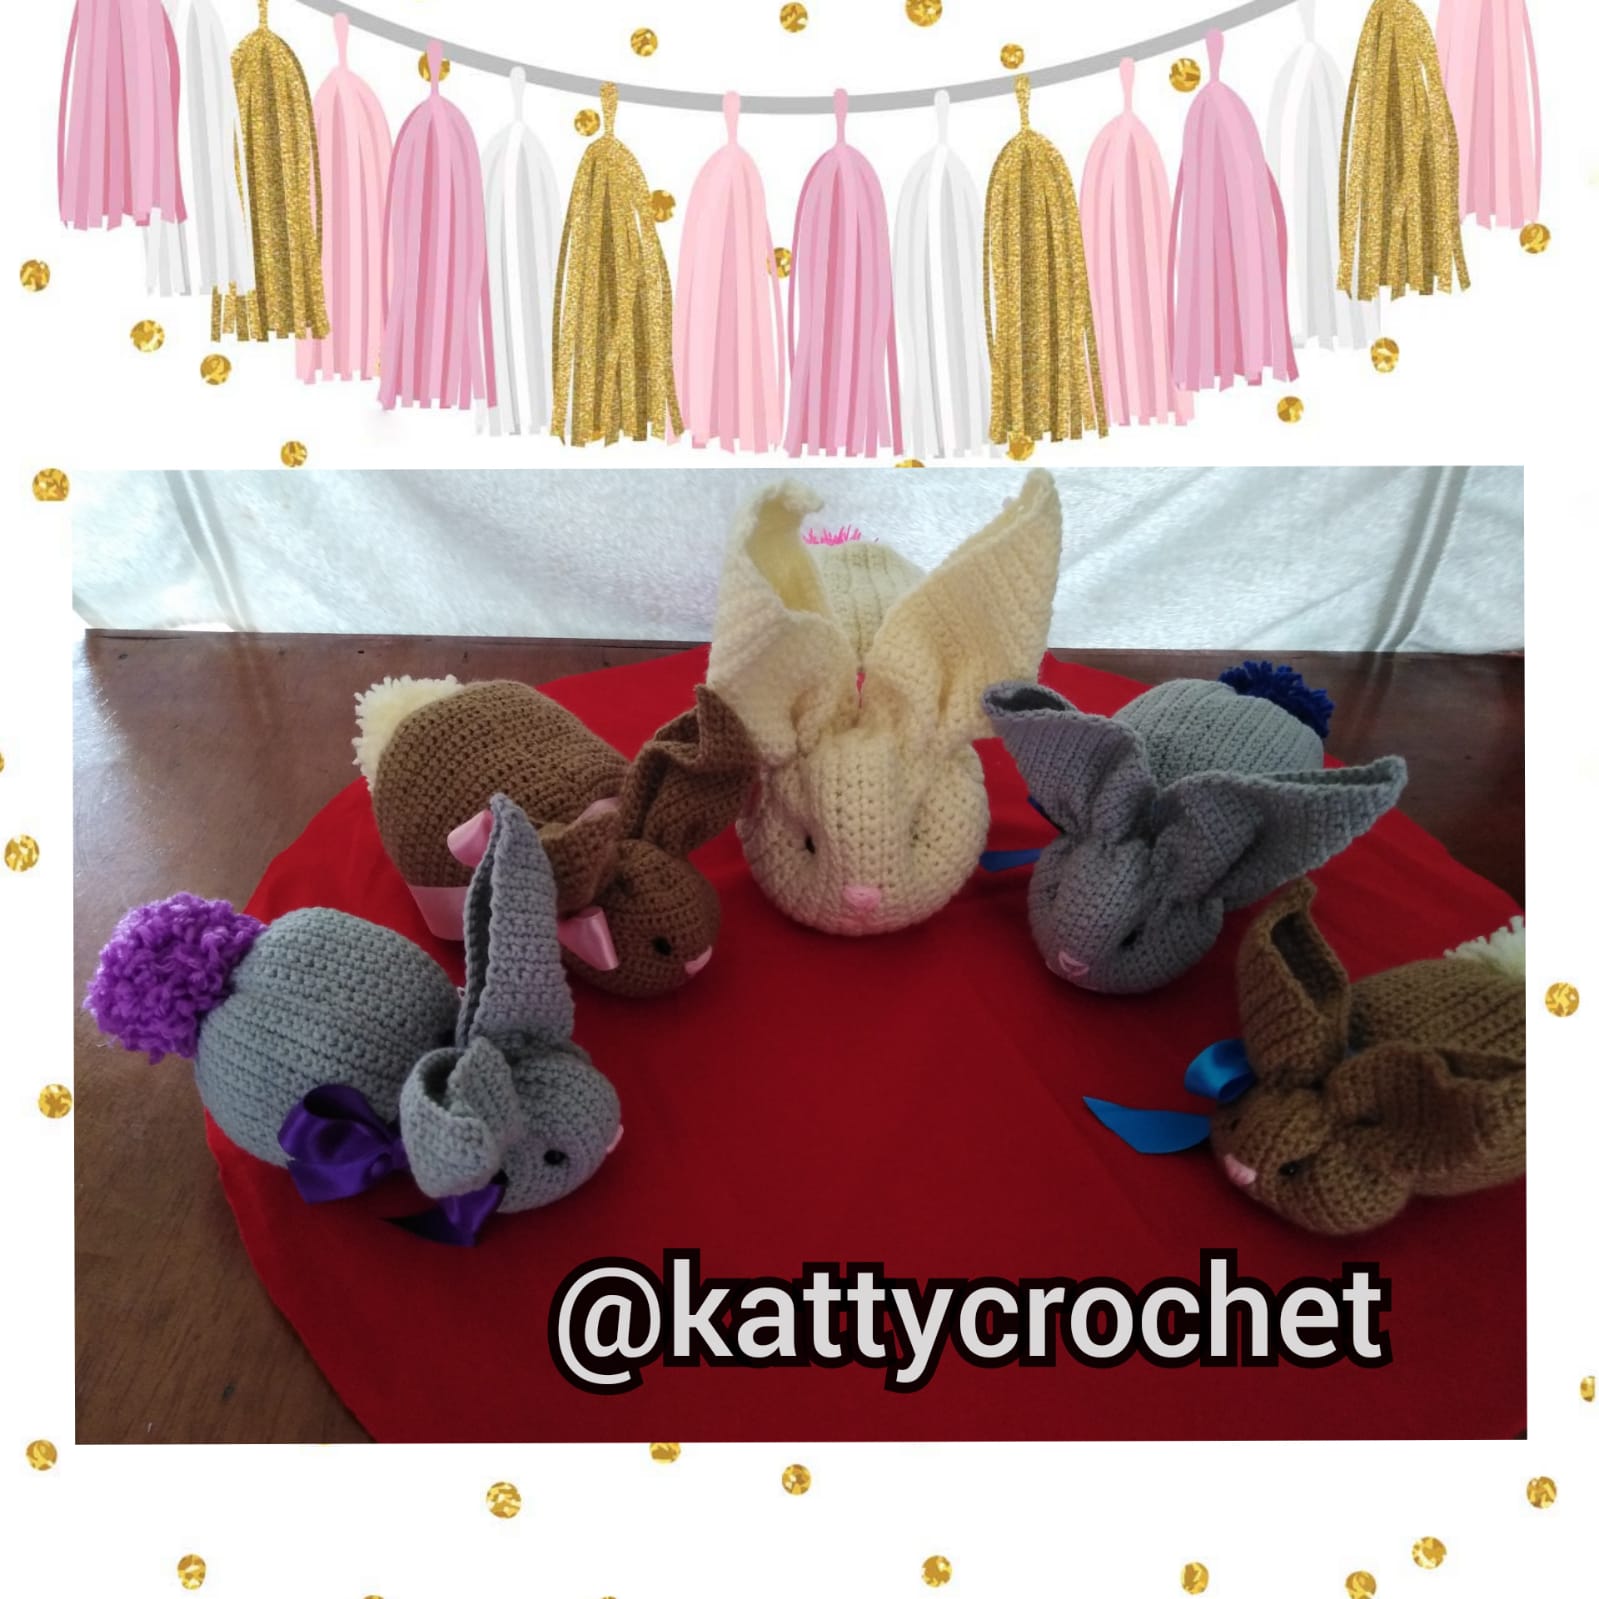
| Y por supuesto, no podía faltar una tierna y simpática colita, para lo cual haremos un pompón en un color diferente al cuerpo para que sea más llamativo. | And of course, a cute and cute little tail could not be missing, for which we will make a pompom in a different color to the body to make it more striking. |
| El proceso para elaborar el pompón lo pueden encontrar en una de mis publicaciones anteriores que les dejo por AQUI | The process to make the pompom can be found in one of my previous posts that I leave you by HERE |
.jpeg)
| Finalmente decoramos con un lazo de cinta de raso. | Finally we decorate with a satin ribbon bow. |
| Como podrán ver en la imagen, luego se me ocurrió combinar el lazo con el color del pompón, pero lo pueden hacer del color que prefieran. | As you can see in the image, then it occurred to me to combine the bow with the color of the pompom, but you can do it in the color you prefer. |
.jpeg)
And as I warned you at the beginning, knitting these bunnies is a bit addictive, so I didn't just make one, I made several and I'm still knitting them since it's an excellent option to give this Christmas.
From my blog I wish you have a nice Christmas, that you can enjoy and share as a family and that the Child God fill you with many Blessings. Thanks for reading, for your support and for being part of my 2020.🤗💕

Todas las fotos fueron tomadas con mi teléfono celular, editadas con Photo Collage. / All potos were taken with my cellular phone and edited with Photo Collage.
Credits to: @eve66 to create the text dividers
Oh my goodness so much adorable in this post! I can definitely see why making these would be so addictive! They are sooo cute and cuddly!!
Thank you so much for sharing this. Quite amazing you made these from a knitted square. I love the fuzzy tails and ribbon!! 😍
Hello, yes is so addictive, I am still making some others for children in my neighborhood.
Thanks to read and comment. Have a Merry Christmas!
Hermoso Katty, estos conejitos se ven muy tiernos y fáciles de hacer. Son una buena opción para regalo 😃❤️ Si es a partir de un cuadrado quizás se pueda hacer con tela también 🙂
Hola Laura, me alegra que te gusten. Realmente me faltó acotar que también se pueden elaborar con tela, especialmente con tela de felpa o peluche talvez, pero como ya sabes lo mío es lo tejido je je. Saludos.🤗
So cute!!! Especially the face of the bunny is so lovely. I love how you made the eyes lay a bit inside the face, this looks like a real bunny. If you ever stumble upon these furry yarns you must buy it and make a whole bunny with it, like a fluffy angora bunny, I think this old be über-sweet <3
Thank you for this lovely tutorial
Hello, I am glad you like the bunny. That is a great idea to do a fluffy angora bunny. Thanks a lot for yous comment.
Thank you very much!
Congratulations @kattycrochet! You have completed the following achievement on the Hive blockchain and have been rewarded with new badge(s) :
You can view your badges on your board and compare yourself to others in the Ranking
If you no longer want to receive notifications, reply to this comment with the word
STOPLovely bunnies!
Thanks a lot
So clever! Gracias for your tutorial.
Thank you very much!
Hola @kattycrochet 🤗 me sorprendiste con estas bellezas. Las veo muy bonitas y de lujo. ¡Están preciosos! Te felicito. Deseo tener más tiempo y material para poner en práctica varios proyectos que he visto por aquí. Pronto así será. Saludos. ¿Cómo te preparas para el concurso? Yo crudita. Con la idea en mente. Nos veremos pronto por needleworkmonday y el reto.
Hola, me alegra que te hayan gustado, ojalá los puedas elaborar, en miniatura se verían hermosos.
Aun no he pensado en la idea para el concurso, he estado muy ocupada pero espero poder participar. Saludos.
Bellísimos... Yo quiero muchos. Gracias por compartir la técnica de elaboración
Hola Tibaire que bueno que te gustaron los conejitos. Espero ver pronto los tuyos.
OHHHHHH, that is soooooo cute. My sister will loves. If I try to make one.
Thanks, I am happy you like them. I hope you try to do it.
Congratulations! Your post has been placed in the spotlight for this week's NeedleWorkMonday Community Featured Posts #119!
Thank you for your quality post and for being a part of the needlework community!