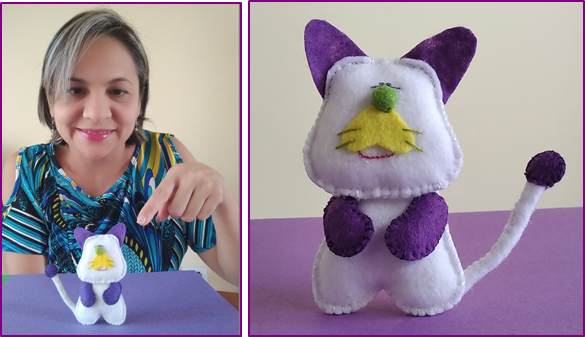
Saludos apreciada comunidad de #needleworkmonday. Esta es mi primera publicación en esta comunidad, me encantan las manualidades y me alegro encontrar un lugar donde la aguja es la protagonista. Hoy les traigo una proyecto muy lindo se trata de cómo hacer un gato con fieltro. Espero que les guste, es muy fácil, sencillo y rápido de hacer.
Greetings, appreciated #needleworkmonday community. This is my first post in this community, I love crafts and I am glad to find a place where the needle is the protagonist. Today I bring you a very nice project about how to make a cat out of felt. I hope you like it, it is very easy, simple and fast to do.
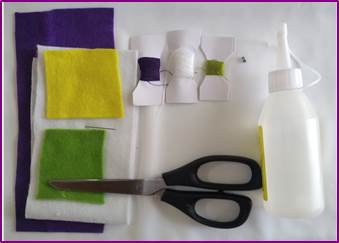
Materiales:
- Fieltro de colores: blanco, morado, amarillo, verde.
- Aguja e hilo de los colores del fieltro.
- Cuentas negras
- Algodón para relleno
- Tijeras
Materials:
- Felt colors: white, purple, yellow, green.
- Needle and thread in the colors of the felt.
- Black beads
- Cotton for filling
- Pair of scissors
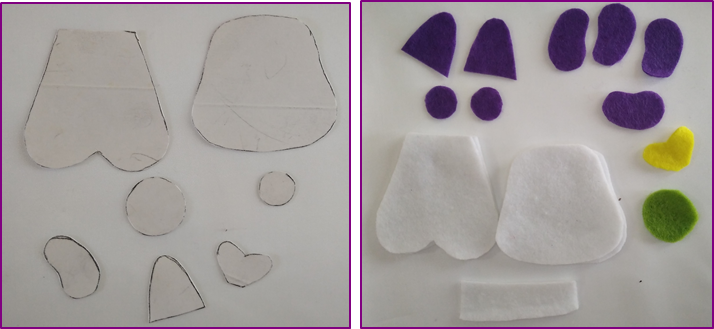
Paso a paso:
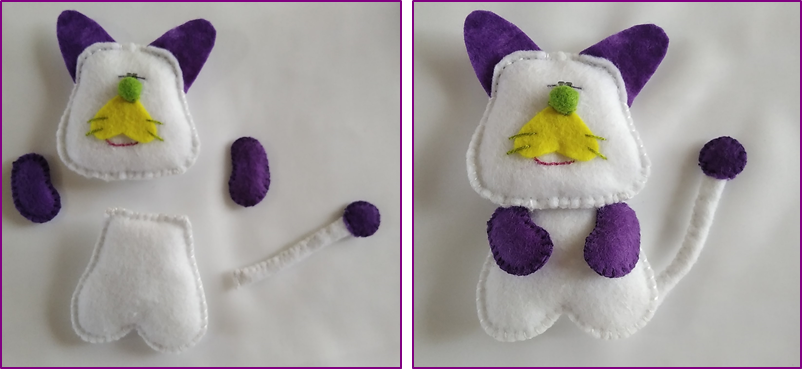
Lo primero que hacemos es dibujar y recortar los patrones para luego trasladarlos al fieltro: de las patas recortamos cuatro piezas, de las orejas, circulo de la cola, el cuerpo y la cabeza dos piezas, la nariz y el hocico una pieza.
Step by Step:
The first thing we do is draw and cut out the patterns and then transfer them to the felt: from the legs we cut four pieces, from the ears, the circle of the tail, the body and the head two pieces, the nose and the muzzle one piece.
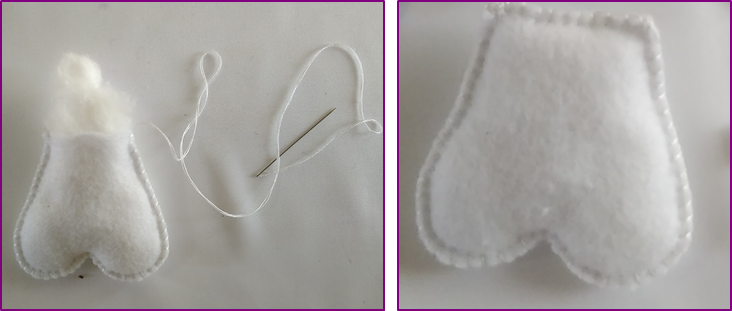
Cuerpo:
Unimos las partes del cuerpo revés contra revés y pasamos la costura por toda la orilla con punto de ojal, dejando una abertura para rellenar. Una vez colocado el relleno culminamos la costura. De igual manera se cosen las patas.
Body:
We join the parts of the body wrong side against wrong side and we pass the seam along the entire edge with buttonhole stitch, leaving an opening to fill. Once the filling is in place, we finish the seam.
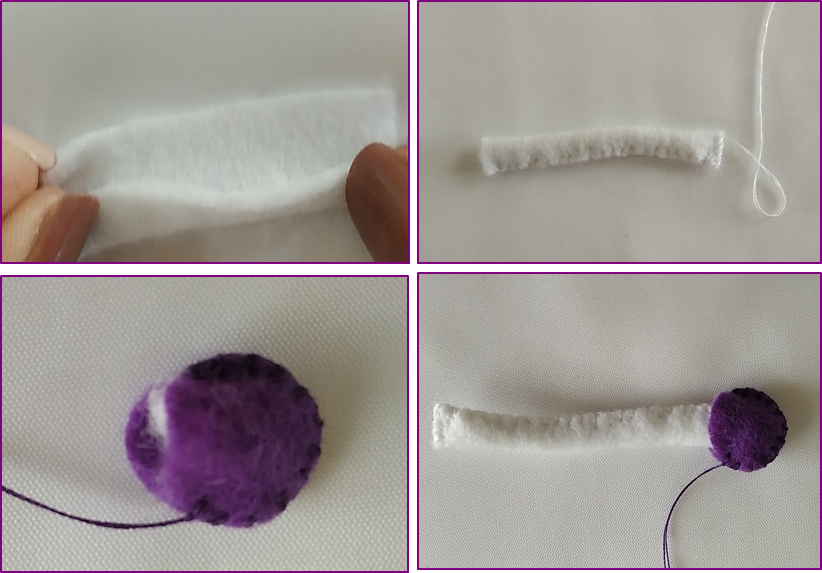
Cola del gato:
Para hacer la cola cortamos una tira de 5 cm x 2 cm, luego la enrollamos y pasamos la costura por la orilla. Insertamos un extremo en la costura al unir las dos piezas de la punta de la cola.
Cat's tail:
To make the tail we cut a 5 cm x 2 cm strip, then we rolled it up and passed the seam along the edge. We insert one end into the seam by joining the two pieces of the tip of the tail.
Nariz:
Para hacer la nariz pasamos una costura recta por la orilla y fruncimos. Colocamos el relleno y la cosemos.
Nose:
To make the nose we pass a straight seam along the edge and gather. We place the filling and we sew it.
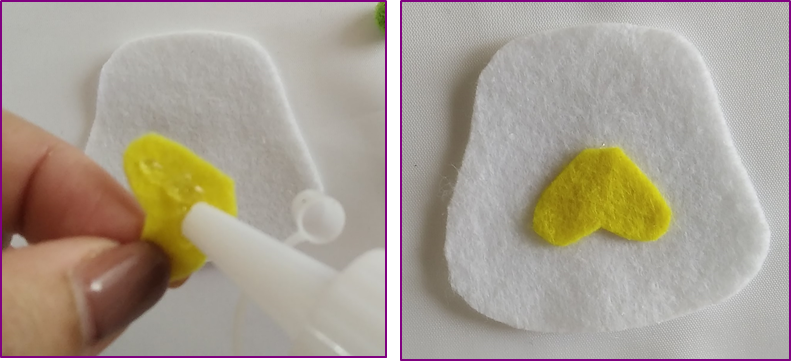
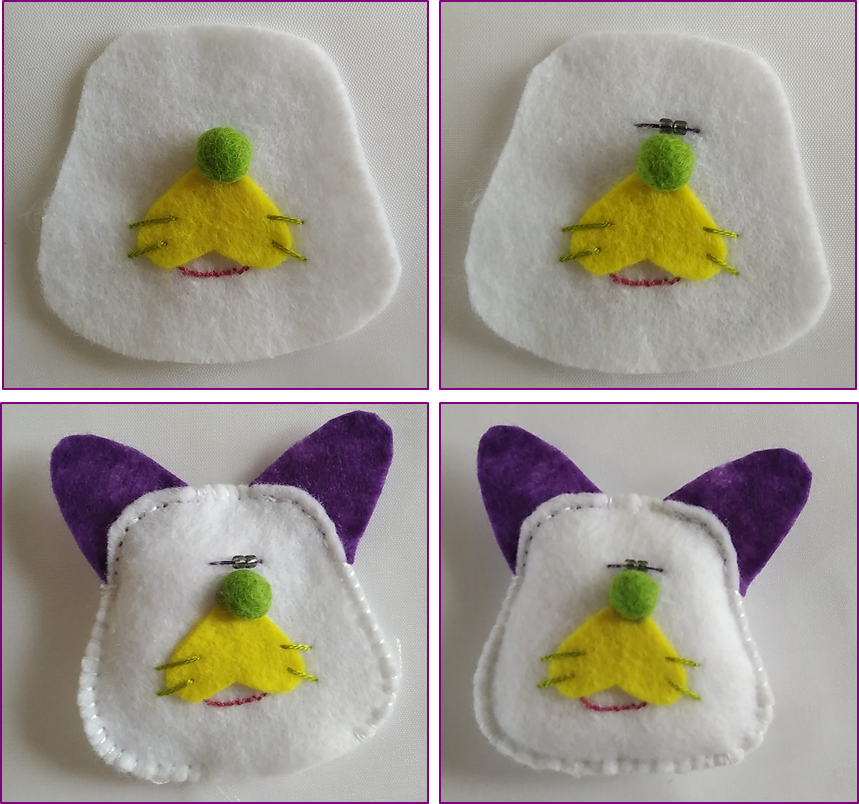
Facciones de la cara del gato:
Para hacer las facciones de la cara, pegamos con el silicón el hocico.
Cat face features:
To make the features of the face, we glue the muzzle with the silicone.
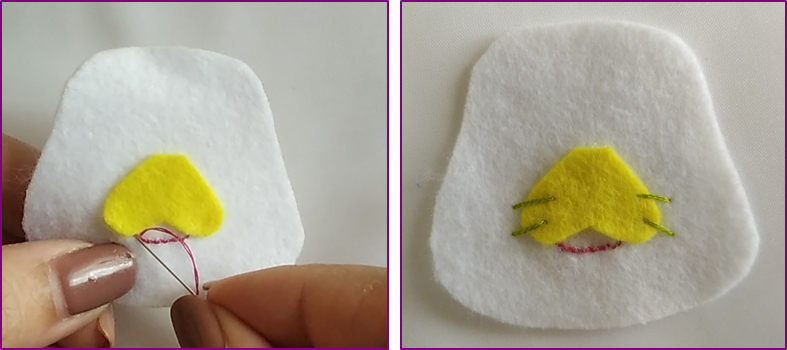
Con el hilo fucsia bordamos con punto de contorno la boca de color rosado. Los bigotes se bordan con hilo verde utilizando puntos rectos.
With the fuchsia thread we embroider the pink mouth with a contour stitch. The whiskers are embroidered with green thread using straight stitches.
Cosemos las nariz encima del hocico y le colocamos los ojos, para esto utilizamos dos cuentas negras las cual cosemos con una puntada recta. Luego unimos las dos piezas de la cabeza, colocamos las orejas y pasamos costura por la orilla dejando una abertura para rellenar.
We sew the nose over the muzzle and put the eyes, for this we use two black beads which we sew with a straight stitch. Then we join the two pieces of the head, we put the ears and we sew along the edge leaving an opening to fill.
Una vez que tenemos todas piezas listas unimos cada una de ella, cosiendo con puntadas las patas y la cola al cuerpo. Luego cosemos firmemente la cabeza con el cuerpo.
Once we have all the pieces ready, we join each one of them, sewing the legs and the tail to the body with stitches. Then we firmly sew the head with the body.
Como puedes ver queda muy lindo, es muy fácil de hacer y puedes hacerlo de diferentes colores.
As you can see it is very cute, it is very easy to do and you can do it in different colors.
Hola @marciabon,
Me complace darte la bienvenida a la comunidad @needleworkmonday, acá nos reunimos los amantes de la aguja en sus diferentes presentaciones, espero puedas disfrutar de esta comunidad, nos divertimos, aprendemos el uno del otro, acá se presenta la gala del arte en su máximo esplendor.
El gato de fieltro te ha quedado precioso, las terminaciones de costuras lucen delicadas y la vez prolijas, tiene una expresión muy bonita el gato.
Gracias por compartir.
Saludos
Gracias @jicrochet por la bienvenida, espero seguir compartiendo mis creaciones en esta comunidad.
This is beautiful sis, I may have to decorate my rooms with beautiful dolls as this
Hello @ monica-ene, they are very cute🥰 you can change the color of the ears and legs.
Hello @marciabon! Welcome to the NeedleWorkMonday Community!
What a darling felt cat you made :D
Every week needleworkers from around the globe get together to share our work, patterns, tips, ideas and shortcuts as we support one another. Our goal is to inspire the Hive blockchain to give crafting a try.
On Monday’s we use the #needleworkmonday tag and on all other days we use the #needlework tag without the word Monday attached. We share and post our work directly from the Community page.
We encourage our members to share the process of their work through photos (as you have done so here). This not only validates your work but it takes us along the creative journey with you ;)
For more information about what we do and for our posting guidelines please visit our FAQs.
Thank you ~
Hola! Que hermoso trabajo! felicitaciones!