Mi trabajo es mi pasión y cuando tu trabajo es tu pasión nada es imposible / My work is my passion and when your work is your passion nothing is impossible
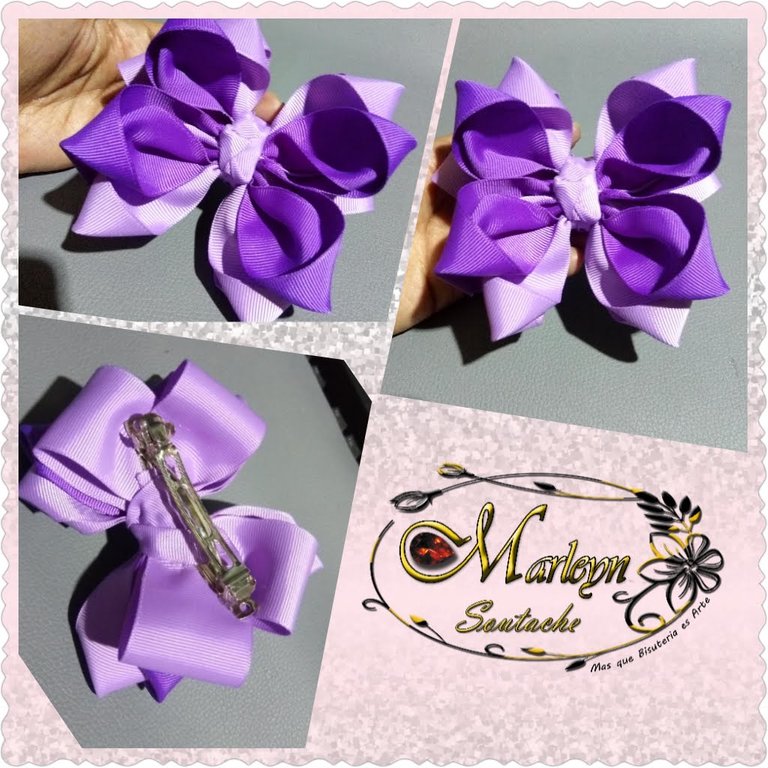
Feliz y Bendecido inicio de semana, llego el lunes estoy bien estoy sana agradecida con la vida espero todos se encuentren muy bien, para este lunes de aguja e realizado un gran lazo morado a mi hija le a encantado ya lo quiere para ella, :) es muy fácil, el tutorial es practico me ayudare con una secuencia de imágenes de manera que la explicación sea mas detallada y lo veas para comparar como te va quedando a ti a medida que lo vas fabricando de verdad espero les guste tanto como me gusta a mi realizarlo esto no solo es mi trabajo es mi pasión y cuando tu trabajo es tu pasión nada es imposible. Llena tu vida de paciencia y amor por lo que haces, Quédate en casa, disfruta el tiempo libre.
Happy and blessed start of the week, I arrive on Monday I am well I am healthy grateful with life I hope everyone is very well, for this Monday I made a big purple bow for my daughter She loved it and she wants it for her, :) It is very easy, the tutorial is practical, I will help me with a sequence of images so that the explanation is more detailed and you can see it to compare how it looks to you as you go manufacturing really I hope you like it as much as I like doing it this is not only my job it is my passion and when your job is your passion nothing is impossible. Fill your life with patience and love for what you do, stay home, enjoy your free time.

| MATERIALES | MATERIALS |
|---|
| 8 trozos de cinta de 4 centímetros de ancho por 13 de largo cada una | 8 strip of ribbon, 4 centimeters wide by 13 long each |
| 1 trozo de cinta de 4 centímetros de ancho por 10 centímetros de largo para el centro | 1 strip of tape 4 centimeters wide by 10 centimeters long for the center |
| 2 trozos de cinta razo de 4 centimetros de ancho por 27 centimetros de largo cada una | 2 pieces of satin ribbon, 4 centimeters wide by 27 centimeters long each |
| tijera | scissors |
| Encendedor | Lighter |
| Silicon en barra y su pistola | Silicon stick and his gun |
| Aguja e Hilo | Needle and thread |
| Gancho para lazos grande | Large loop hook |
| Animo, Paciencia y Amor por lo que hacemos | Courage, Patience and Love for what we do |
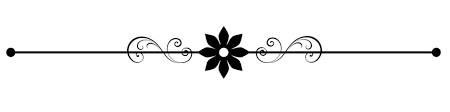
PASO 1: Selecciona las cintas que vas a utilizar deben ser como le indique en los materiales de 4 centímetros de grosor, vas a cortar 8 piezas de 13 centímetros cada una, y con el encendedor quemar las puntas con cuidado eso es solo para sellar las puntas y no se le salgan los hilos
STEP 1: Select the tapes that you are going to use, they must be as indicated in the materials of 4 centimeters thick, you are going to cut 8 pieces of 13 centimeters each, and with the lighter burn the tips carefully that is just to seal the tips and do not get the strands
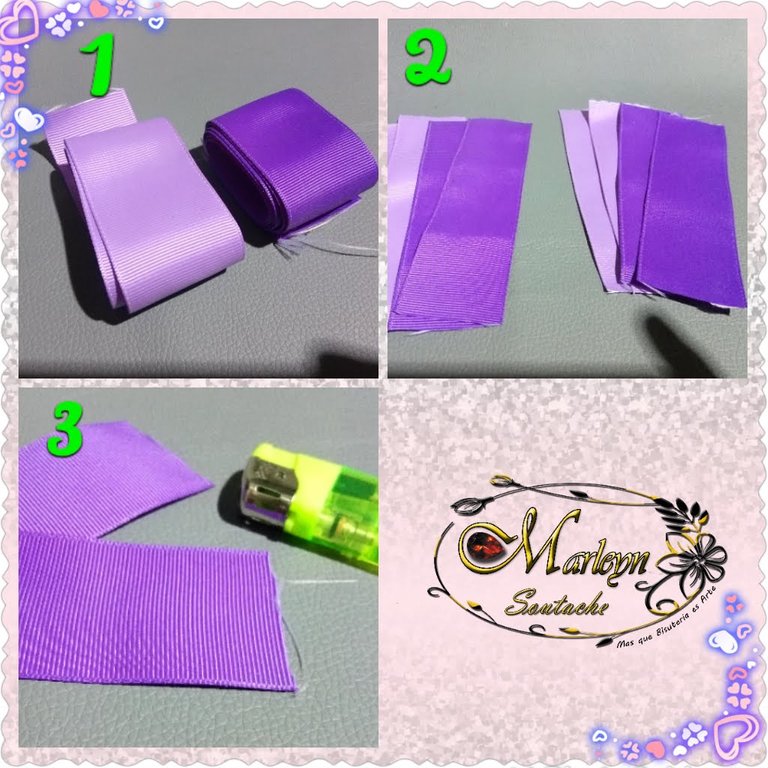
PASO 2: Vamos a realizar las piezas de nuestro lazo toma en cuenta las imagenes para un mayor entendimiento, primero dobla la cinta por la mitad hacia el lado derecho como ves la imagen 2, luego la doblaremos hacia adentro para que quede encima del otro pedazo de cinta, y le colocaras un alfiler para que se sostenga mientras realizamos las otras piezas.
STEP 2: We are going to make the pieces of our bow take into account the images for a better understanding, first fold the ribbon in half towards the right side as you see image 2, then We will fold it inward so that it is on top of the other piece of tape, and you will place a pin on it to hold it while we make the other pieces.
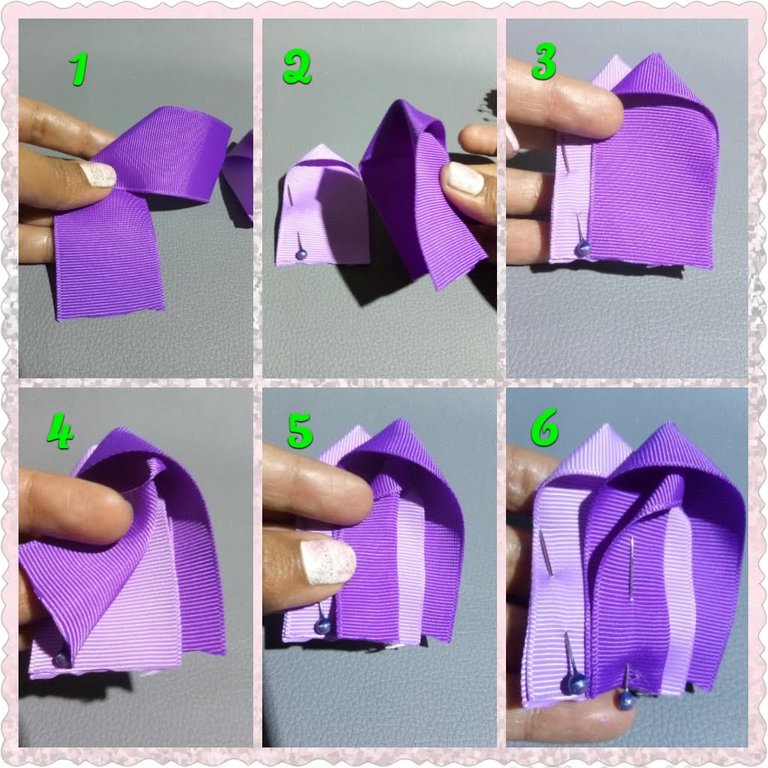
PASO 3: Realiza el mismo proceso que realizaste con la cinta anterior y esta vez en meteremos la cinta anterior dentro de esta que estas doblando como te muestro en la imgen numero 2, ahora la cinta que estamos doblando vas a doblarle la parte que queda encima por la mitad como veras en la imagen 4 y 5 ahora la sujetaremos con un alfiler y debe quedar como te muestro en la imagen 6
STEP 3: Perform the same process that you did with the previous tape and this time we will put the previous tape inside this one that you are doubling as I show you in image number 2, now the tape that we are folding you are going to fold the part that is on top in half as you will see in image 4 and 5 now we will hold it with a pin and it should be as I show you in image 6
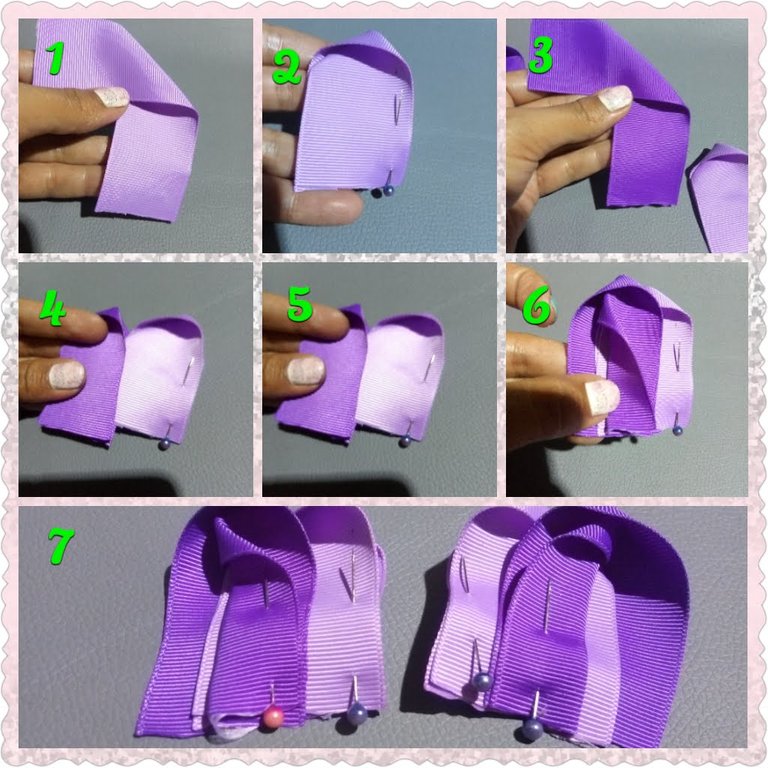
PASO 4: Vamos a realizar los mismos pasos 2 y 3 solo que esta vez vas a doblar la cinta hacia el lado izquierdo todo lo demás es el mismo proceso es facil :)
STEP 4: We are going to do the same steps 2 and 3, only this time we will fold the tape to the left side, everything else is the same process, it's easy :)
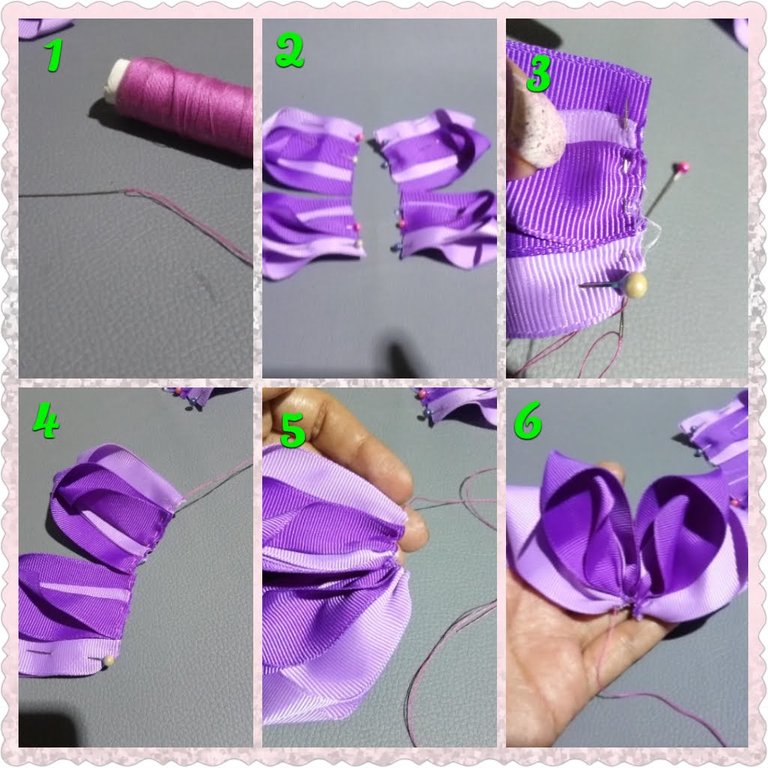
PASO 5: Ensarta el hilo en la aguja y vamos a empezar a unir las piezas, por la orilla vamos a coser poco a poco dos piezas puedes ver en la imagen 3 y 4 ambas piezas con el mismo hilo después de coser vas a halar el hilo y coser nuevamente luego le realizas un amarre y cortas el hilo sobrante, quedara como te muestro en la imagen 6
STEP 5: Thread the thread on the needle and we are going to start joining the pieces, along the edge we are going to sew two pieces little by little you can see in image 3 and 4 both pieces With the same thread after sewing you are going to pull the thread and sew again then you make a tie and cut the excess thread, it will be as I show you in image 6
PASO 6: Al tener listas ambas piezas del lazo calienta la pistola de silicon y coloca un poco de silicon en el centro como veras en la imagen 2, ahora pegaremos ambas partes para formar el lazo
STEP 6: When having both pieces of the loop ready, heat the glue gun and place a little bit of silicon in the center as you will see in image 2, now we will glue both parts to form the loop
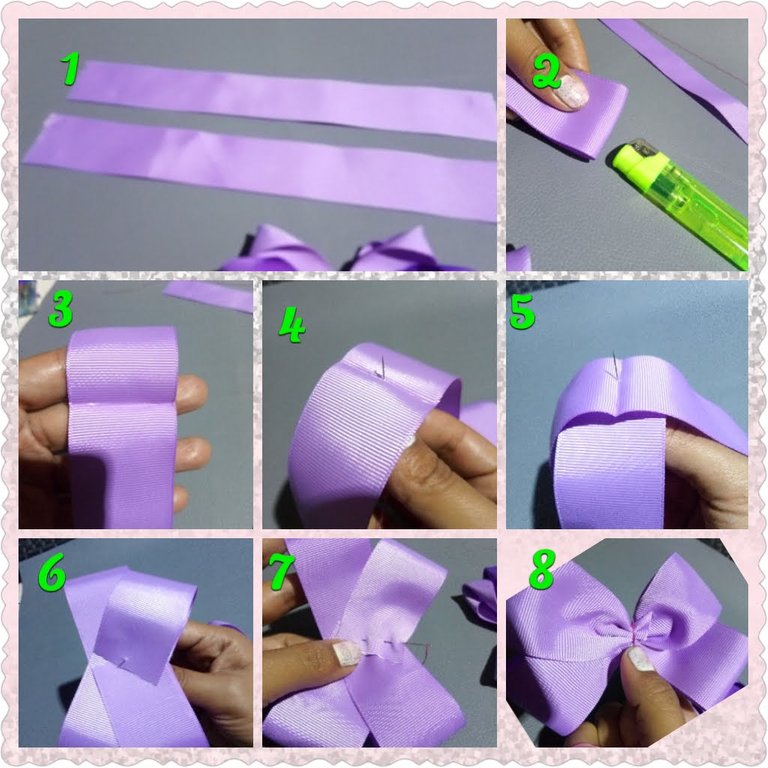
PASO 7: Las cintas largas de 27 centímetros van a formar un pequeño lazo sencillo que se va a colocar por la parte de atrás de la pieza anteriormente fabricada, dobla la cinta a la mitad y pasa el encendedor rápidamente por la mitad para marcarla realiza este proceso en ambas cintas, ahora coloca una sobre la otra e introduce la aguja ya con hilo por abajo solo un poquito como te muestro en la imagen 4 ahora solo vamos a introducir las puntas un poco ladeadas de cada tira se vera como en la imagen 6, sujeta las cintas saca la aguja y comienza a cocer como te muestro en la imagen 7, al terminar de cocer halar el hilo y envolver el medio del lazo con el mimo hilo realiza un nudo para que no se suelte y cortar el hilo sobrante
STEP 7: The 27-centimeter long ribbons will form a small simple loop that will be placed on the back of the previously manufactured piece, fold the ribbon in half and pass the lighter quickly in the middle to mark it, carry out this process on both tapes, now place one on top of the other and insert the needle with thread underneath just a little as I show you in image 4 now we are only going to insert the tips a little Sideways of each strip will look like in image 6, hold the ribbons, take out the needle and start to cook as I show you in image 7, when you finish cooking, pull the thread and wrap the middle of the loop with the same thread, make a knot so that it does not come loose and cut the excess thread
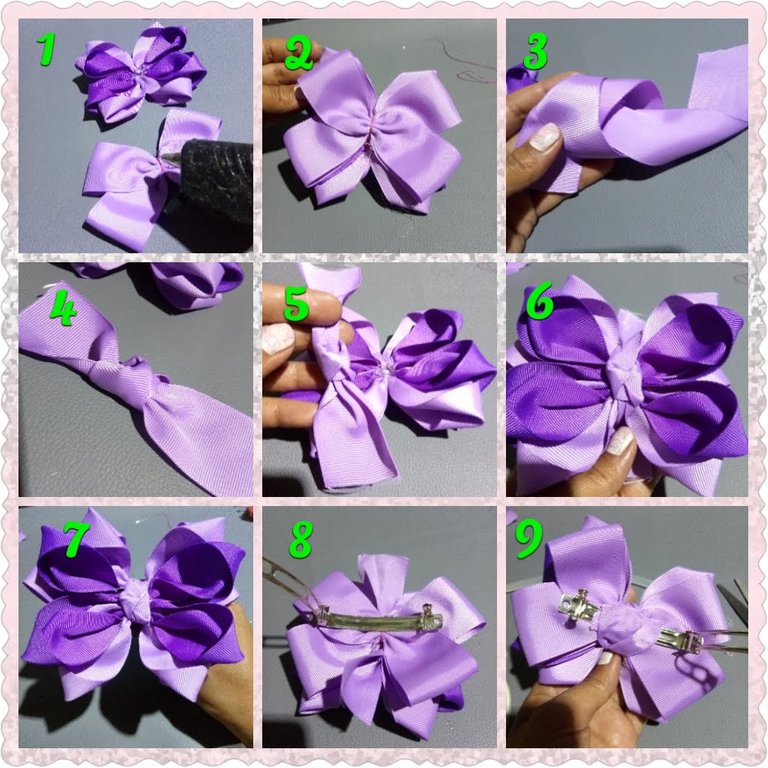
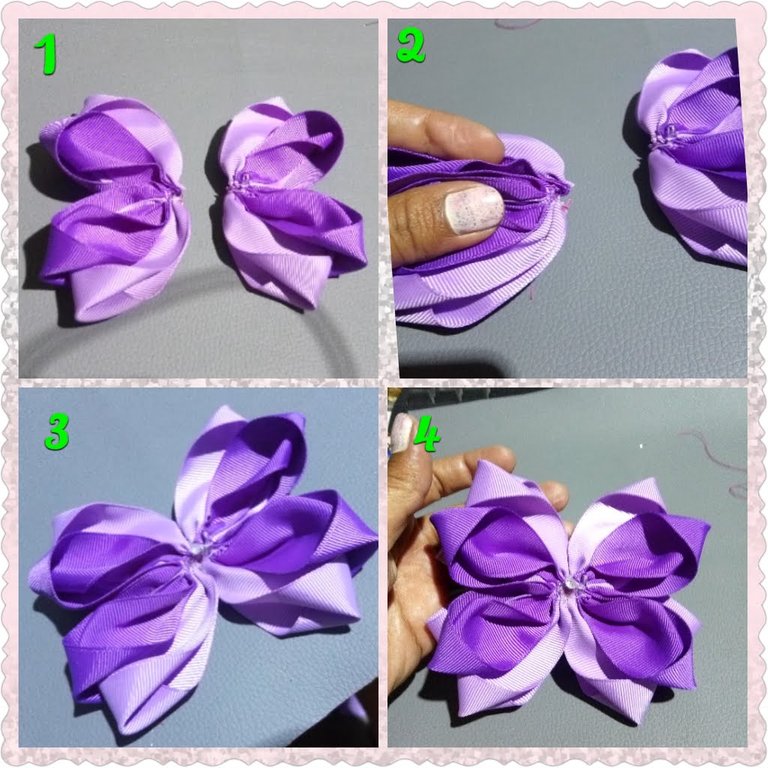
PASO 8: Este es el ultimo paso, en la parte de atras del lazo coloca un poco de silicon caliente y pega ambos lazos, ahora con la tira que queda realiza un amarre simple, en la parte superior del lazo coloca un poco de silicon caliente y pega el amarre que quede centrado, ahora en la parte de atras con silicon caliente vamos a pegar el gancho, lo vas a desarmar con cuidado y pegaras el sobrante de la cinta q pegaste en el medio vuelve a armar el gancho y listo hemos terminado tenemos ahora un hermoso lazo y un nuevo conocimiento :)
STEP 8: This is the last step, on the back of the loop, place a little hot silicone and glue both loops, now with the remaining strip, make a simple tie, in The upper part of the loop, place a little hot silicone and glue the tie that is centered, now on the back with hot silicone we are going to glue the hook, you are going to disassemble it carefully and you will stick the excess of the tape that you glued on the middle reassembles the hook and voila we're done now we have a beautiful loop and new knowledge :)
Si tienes una duda escríbeme un comentario, estaré feliz de ayudarte con cualquier detalle, Espero que mis diseños les gusten tanto como a mí me gusta, aprendan con placer ...!

Nunca olvides que el Poder es Querer y si quieres Puedes...
Eres Luz eres Energía, TU PUEDES ... Que el universo infinito Conspire para que todo siempre sea mejor ... Se les quiere ...
Venezuela FE
Somos Seres Abundantes! Qué las energías del universo vibren en sintonía con las de cada uno de nosotros en armonía! Cuidemos nuestras palabras, acciones y pensamientos!
If you have a question, write me a comment, I will be happy to help you with any details, I hope you like my designs as much as I like, learn with pleasure ...!
Never forget that Power is Wanting and if you want you can ...
You are Light, you are Energy, YOU CAN ... May the infinite universe Conspire so that everything is always better ... They are loved ...
Venezuela FAITH
We are Abundant Beings! May the energies of the universe vibrate in tune with those of each of us in harmony! Let's take care of our words, actions and thoughts!
Autoría del texto y todas las imágenes: @Marleyn , La edición de las imágenes las realicé yo misma, Por favor no Utilices mis fotos sin mi autorización, edites ni re-publiques mi material ¿Deseas ponerte en contacto conmigo? Escríbeme:
Correo electronico: [email protected]
Discord Marleyn#7821
Twitter: @marleynleal1
Imstagran: @MarleynSoutache
Authorship of the text and all the images: @Marleyn, Editing of the images was done by myself, >Please do not use my photos without my authorization, edit or re-publish my material Do you want to >contact me? Write me:
Email: [email protected]
Discord Marleyn #7821
Twitter: @marleynleal1
Imstagran: @MarleynSoutache
Mi trabajo es mi pasión y cuando tu trabajo es tu pasión nada es imposible / My work is my passion and when your work is your passion nothing is impossible
How much I love ribbons!! I have two girls (7 and 5 years old) and I make them all the time accessories for their hair ! Nice work!
Thank you, I'm glad to know that you liked it.
Thank you for sharing this amazing post on HIVE!
Your content got selected by our fellow curator @stevenson7 & you just received a little thank you via an upvote from our non-profit curation initiative!
You will be featured in one of our recurring curation compilations and on our pinterest boards! Both are aiming to offer you a stage to widen your audience within and outside of the DIY scene of hive.
Join the official DIYHub community on HIVE and show us more of your amazing work and feel free to connect with us and other DIYers via our discord server!
If you want to support our goal to motivate other DIY/art/music/homesteading/... creators just delegate to us and earn 100% of your curation rewards!
Stay creative & hive on!
Hello @marleyn! Your post was selected by our staff on behalf of the OCD Community Incubation Program and has received an OCD upvote! Congratulations!!! Please keep sharing these quality posts :)
I invite you to continue sharing anything needlework related directly to the NeedleWorkMonday Community. On Monday’s we use the #needleworkmonday tag and on all other days the #needlework tag.
Written by @crosheille for the NeedleWorkMonday Community ~
Congratulations @marleyn! You have completed the following achievement on the Hive blockchain and have been rewarded with new badge(s) :
You can view your badges on your board and compare yourself to others in the Ranking
If you no longer want to receive notifications, reply to this comment with the word
STOPDo not miss the last post from @hivebuzz: