¿A quién no le gusta la Pizza?
La pizza fue creada en 1738 en la ciudad italiana de Nápoles, con su versiones más tradicionales la marinara y la napolitana. Consiste en un pan circular que se cubre con salsa de tomate y queso, para posteriormente colocarla en el horno, existe gran variedad de pizzas, la puedes encontrar cubierta con pimentón, aceitunas, jamón, orégano, cebolla, anchoas, entre otros. También consigues pizzas cuadrada, masas finas o gruesas. La cual se puede comer en cualquier día de la semana, cualquier hora y en cualquier lugar.
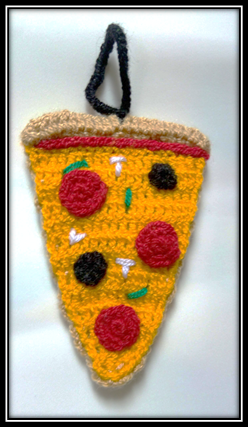
Hoy les quiero mostrar un llavero con temática de pizza súper linda y fácil de hacer, ¡Es perfecto para los amantes de la pizza!
Estos llaveros de pizzas son especiales para adaptarse a un tema de fiesta, evento, regalar a los empleados o clientes de una pizzería. Le doy inicio a los pasos de como la realice:
Who doesn't like Pizza?
Pizza was created in 1738 in the Italian city of Naples, with its more traditional versions the marinara and the Neapolitan. It consists of a circular bread that is covered with tomato sauce and cheese, to later place it in the oven, there is a great variety of pizzas, you can find it covered with paprika, olives, ham, oregano, onion, anchovies, among others. You also get square pizzas, thin or thick doughs. Which can be eaten any day of the week, any time and anywhere.
Today I want to show you a super cute and easy to make pizza themed keychain, it's perfect for pizza lovers!
These pizza keychains are special to fit a party theme, event, gift to employees or customers of a pizzeria. I start the steps of how to do it:
Materiales:
- Aguja de crochet de 3 mm
- Hilo crochet
- Aguja de lana
- Tijeras
Materials:
- 3mm crochet hook
- Crochet thread
- Wool needle
- Pair of scissors
Proceso
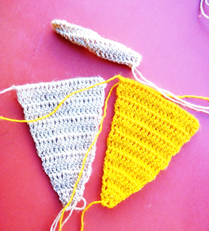
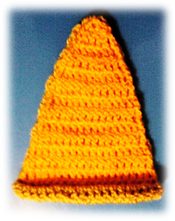
Iniciamos realizando dos triángulos uno en color amarillo y el otro en color marrón claro.
- Inicie con 20 cadenetas
- Tejemos 3 cadenetas para luego tejer 20 puntos altos en total 21 puntos.
- Tres cadenetas, giro y realizo punto alto en el segundo punto (allí vamos haciendo las disminuciones), haciendo 20 puntos altos
- Para la siguiente vuelta realizo nuevamente 3 cadenetas, giro y realizo punto alto en el segundo punto, realizando 19 puntos altos, repetir hasta llegar a la vuelta 9 (sin contar la vuelta de la cadeneta, solo la que se hizo en puntos altos).
- Para la vuelta 10, realizamos las 3 cadenetas, giramos, punto alto y más o menos en el medio realizamos una disminución y seguimos con puntos altos, obteniendo 11 puntos. Repetimos realizando dos disminuciones por vueltas, hasta terminar en punta.
Realizamos un rectángulo en color marrón:
- realizamos 20 cadenetas
- Hacemos 3 cadenetas y en el tercer punto hacemos puntos altos, obteniendo 20 puntos. En la siguiente vuelta 3 cadenetas, giro y puntos altos obteniendo 20 puntos, realizo una vuelta más, corto y dejo hilo para tejer. Esto lo enrollo y lo uno con el triángulo amarillo. Como se observa en la imagen
Process
- We start by making two triangles, one in yellow and the other in light brown. *
- Start with 20 chains
- We knit 3 chains and then we knit 20 treble crochets in total 21 stitches.
- Three chains, I turn and double crochet in the second stitch (there we are doing the decreases), making 20 double crochets
- For the next round I chain 3 again, turn and double crochet in the second stitch, making 19 double crochets, repeat until I reach round 9 (not counting the chain round, only the one made in high crochets) .
- For round 10, we make the 3 chains, we turn, high point and more or less in the middle we make a decrease and we continue with high points, obtaining 11 points. We repeat making two decreases per round, until we finish in a point.
- We make a rectangle in brown: *
- we make 20 chains
- We make 3 chains and in the third point we make double crochets, obtaining 20 points. On the next round I chain 3, turn and double crochets obtaining 20 stitches, I make one more round, short and leave yarn to knit. This I roll up and attach it to the yellow triangle. As seen in the picture

Source: Photo taken by the author @xeliram on a cell phone.
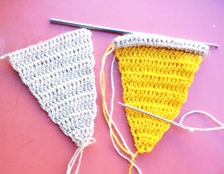
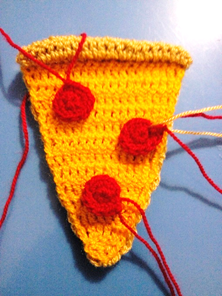
Posteriormente uno los dos triángulos
Then join the two triangles
Source: Photo taken by the author @xeliram on a cell phone.
Realizo tres círculos rojos:
V-1 Anillo mágico con 6pb
V-2 1 aumento por cada punto, obteniendo 12 puntos bajos,
V-3 1 punto bajo y aumento repetir hasta terminar la vuelta, obteniendo 18 puntos, cerrar con punto deslizado, dejar hilo para coser.
Coserlo al triángulo.
I make three red circles:
V-1 Magic ring with 6sp
T-2 1 increase for each point, obtaining 12 low points,
R-3 1 single crochet and increase repeat until the round is finished, obtaining 18 stitches, close with slip stitch, leave thread to sew.
Sew it to the triangle.
Source: Photo taken by the author @xeliram on a cell phone.
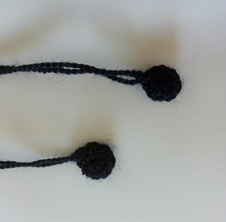
Ahora realiza dos círculos negros:
V-1 Anillo mágico con 6pb
V-2 1 aumento por cada punto, obteniendo 12 puntos bajos, cerrar con punto deslizado, dejar hilo para coser.
Coserlo al triángulo.
Now make two black circles:
V-1 Magic ring with 6sp
R-2 1 increase for each stitch, obtaining 12 single crochets, close with slip stitch, leave thread to sew.
Sew it to the triangle.
Source: Photo taken by the author @xeliram on a cell phone.
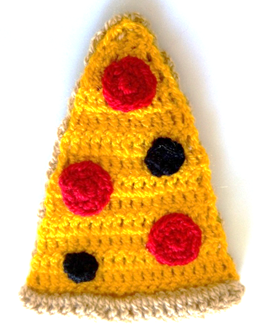
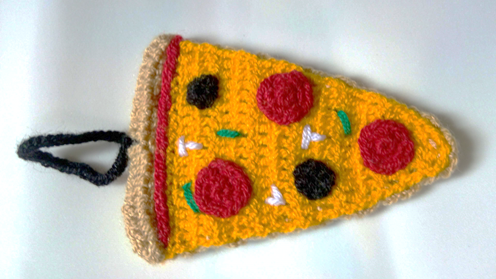
Para finalizar realice unos detalles en color verde y blanco.
Finally, make some details in green and white.
Source: Photo taken by the author @xeliram on a cell phone.

Soy Marilex Porteles profesora de Matemática, investigadora, soñadora, me gusta tejer, nadar y soy madre de una hermosa niña.
Dale UPVOTE si te gusto, COMENTA y RESTEEM para que otros se enteren GRACIAS

Dale UPVOTE si te gusto, COMENTA y RESTEEM para que otros se enteren GRACIAS
I like this idea! I'll have a go.
Nos manda las fótico, cualquier duda puedes preguntarme.
Send us the photos, any questions you can ask me.
I made a smaller one than your pattern.It is not as neat as yours but a good idea. Thanks . I have send a virtual one to PizzaBot on Hive !
que bien, gracias por compartir. Igual se ve lindo.
Congratulations @xeliram! You have completed the following achievement on the Hive blockchain and have been rewarded with new badge(s) :
Your next target is to reach 150 posts.
You can view your badges on your board and compare yourself to others in the Ranking
If you no longer want to receive notifications, reply to this comment with the word
STOPCheck out the last post from @hivebuzz:
So cool! I just finished a crochet pizza project as well. Mine started at the pointy end, then increased as I went along. My project is used as a toy. The keychain idea is brilliant! Nicely done!
Hi! yes .. how cool I stay. Well they already have two models for others to dare to do it.
Excelente te felicito ☺️👌
Hola! Gracias por leer mi post.
Hi @xeliram! It’s so nice to see you here!!
Cute keychain idea!!! I love the rolled crust you added to the edge. Now I’m ready to make homemade pizza to eat lol.
Thanks for sharing ~
Thanks, at first I thought to make it flat but I liked the idea of rolling it more.
Que lindura de llavero amiga, se ve muy hermoso y llamativo!! Muy bien explicado el proceso, no se mucho de eso pero me gusto que lo hayas explicado.
Gracias, solo debes aprender los puntos y de allí puedes hacer maravillas.
I love the concept, it's a brilliant project
Gracias!
Gracias por el apoyo