¡Saludos queridos amigos y amigas de esta hermosa comunidad de Hive! Sean cordialmente bienvenidos a este nuevo espacio, cargado de innovadoras e ingeniosas ideas para todos, el día de hoy les voy a compartir una nueva manera de decorar nuestros hogares en este mes de Halloween 🎃 utilizando unos cuantos materiales reciclables, como por ejemplo una maracuyá seca y un rollo de cartón, que junto a los distintos matices, crean la estructura de la cabeza de un zombi asomándose a la superficie, con su cuerpo completamente sepultado en la tierra.
Greetings dear friends from this beautiful Hive community! You are cordially welcome to this new space, loaded with innovative and ingenious ideas for everyone, today I am going to share a new way to decorate our homes this Halloween month 🎃 using a few recyclable materials, such as a dried passion fruit and a roll of cardboard, which together with the different shades, create the structure of a zombie's head emerging from the surface, with its body completely buried in the ground.

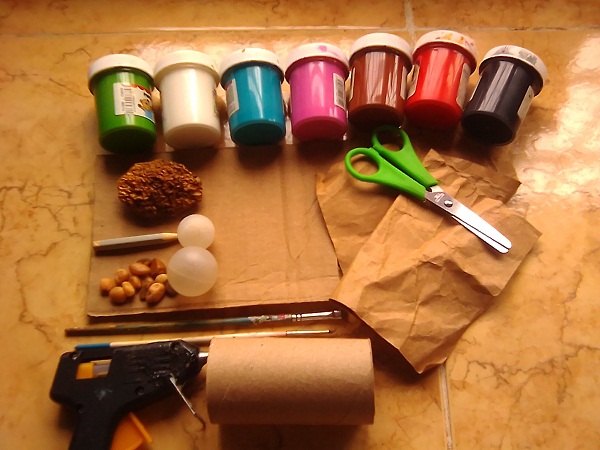
Materiales:
- Pinturas al frio, verde, blanco, azul, rosa, marrón, rojo y negro.
- Maracuyá seco.
- Trozo de cartón.
- Lápiz.
- Esferas plásticas.
- Piedritas.
- Pinceles.
- Pistola de silicón.
- Rollo de cartón.
- Bolsa de papel.
- Tijera.
Materials:
- Cold paints, green, white, blue, pink, brown, red and black.
- Dried passion fruit.
- Piece of cardboard.
- Pencil.
- Plastic spheres.
- Pebbles.
- Brushes.
- Silicone gun.
- Cardboard roll.
- Paper bag.
- Scissors.
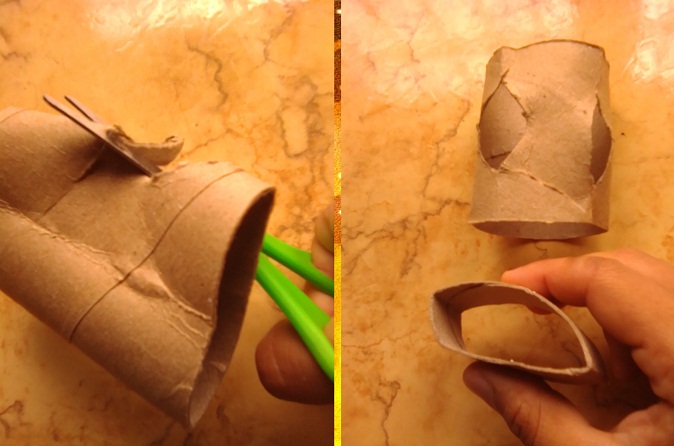
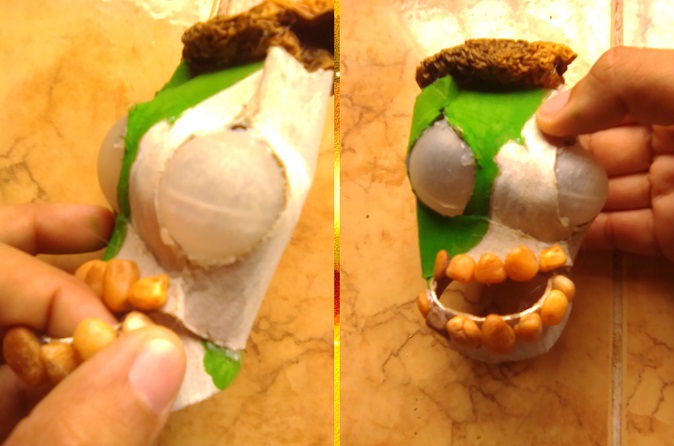
Comenzamos cortando a la mitad el royo de catón, después le abrimos dos orificios con la tijera, en donde insertaremos las esferas como los ojos del zombi y con el sobrante armamos la mandíbula.
We start by cutting the royo of caton in half, then we open two holes with the scissors, where we will insert the spheres as the eyes of the zombie and with the remainder we will build the jaw.
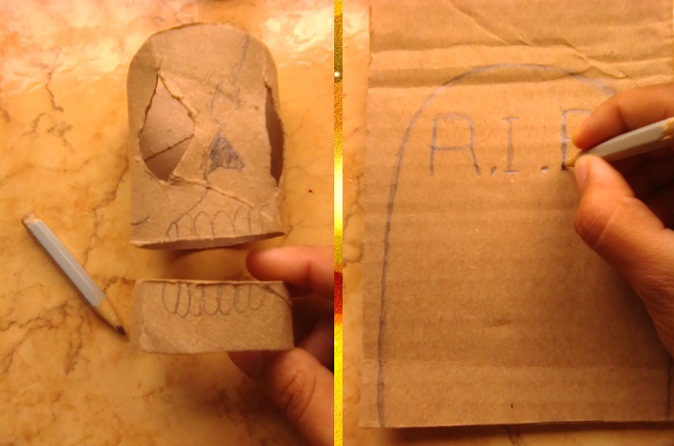
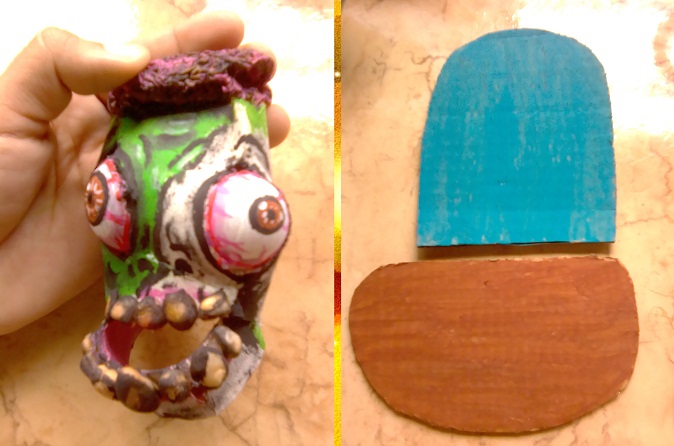
Ahora marcamos el boceto del rostro del zombi en el royo de cartón, guiándonos por los orificios, para ir dibujando las zonas de la nariz y dientes, luego dibujamos en el trozo de cartón la forma de la lapida y la plataforma en donde irán situados cuya forma será ovalada.
Now we mark the sketch of the zombie's face on the cardboard, guiding us through the holes, to draw the areas of the nose and teeth, then we draw on the piece of cardboard the shape of the tombstone and the platform where they will be located whose shape will be oval.
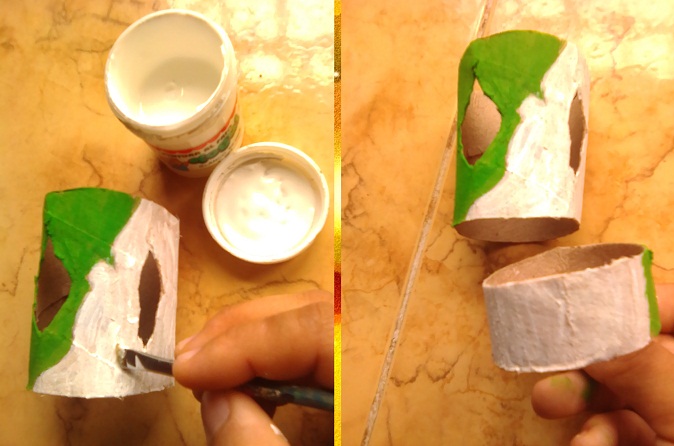
Pintamos la mitad del rostro del zombi en verde y la otra en blanco para detallar el cráneo, lo mismo ira para la mandíbula.
We paint half of the zombie's face in green and the other in white to detail the skull, the same goes for the jaw.
Ahora le situamos las esferas plásticas como ojos y en la parte superior del cráneo el maracuyá seco como cerebro, seguidamente unimos la parte posterior de la mandíbula a la superior y por último le pegamos las piedritas como dientes.
Now we place the plastic spheres as eyes and in the upper part of the skull the dried passion fruit as the brain, then we join the back of the jaw to the upper one and finally we glue the pebbles as teeth.
Pintamos el cerebro en rosa, los ojos saltones en blanco, rosa, rojo, marrón y negro, la mandíbula en rosa, rojo y negro, dejando las piedras en su color original para que sea una dentadura manchada y amarillenta, distinta al color del hueso, el resto irá detallado con sombras en negro y blanco. Bien, ahora pintamos la lapida en azul y la base en marrón.
We painted the brain in pink, the googly eyes in white, pink, red, brown and black, the jaw in pink, red and black, leaving the stones in their original color so that it is a stained and yellowish teeth, different from the color of the bone , the rest will be detailed with shadows in black and white. Ok, now we paint the tombstone in blue and the base in brown.
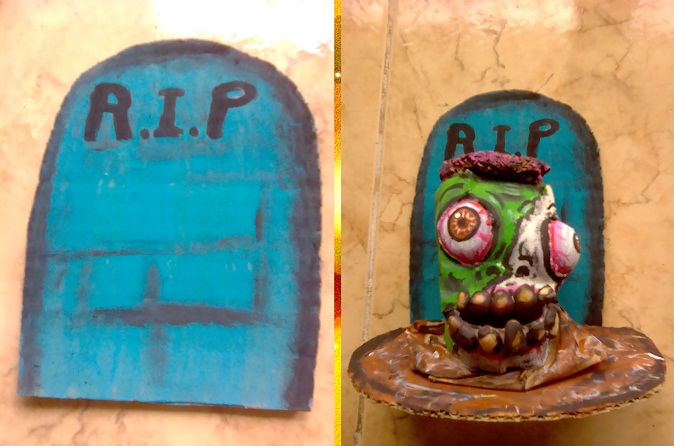
Marcamos las siguientes siglas en la lapida "R.I.P" usando la pintura negra, nuevamente la tomamos para delinear la sombra alrededor de la lapida al igual que las marcas de ladrillo, pegamos un trozo de la bolsa de papel en el centro de la base, en forma de circulo, encima de ella situamos el cráneo del zombi, pintamos los alrededores de la bolsa y base en blanco y negro, para que se parezca un poco al cráter de tierra formado alrededor de la cabeza.
We mark the following acronyms on the "R.I.P" tombstone using the black paint, again we take it to outline the shadow around the tombstone as well as the brick marks, we glue a piece of the paper bag in the center of the base, in the shape of circle, on top of it we place the skull of the zombie, we paint the surroundings of the bag and base in black and white, so that it looks a bit like the crater of earth formed around the head.
Finalmente, concluimos con la elaboración de esta terrorífica manualidad decorativa, una aterradora manera de recrear aquellas figuras conocidas en el día de brujas utilizando nuestra imaginación como conducto a la creación de dichas estructuras elaboradas mediante la combinación de objetos reciclables con el fin de compartirles a todas aquellas maravillosas personas que piensan de igual forma.
Finally, we conclude with the elaboration of this terrifying decorative craft, a terrifying way to recreate those figures known on Halloween using our imagination as a conduit to the creation of these elaborate structures by combining recyclable objects in order to share them all. those wonderful people who think alike.
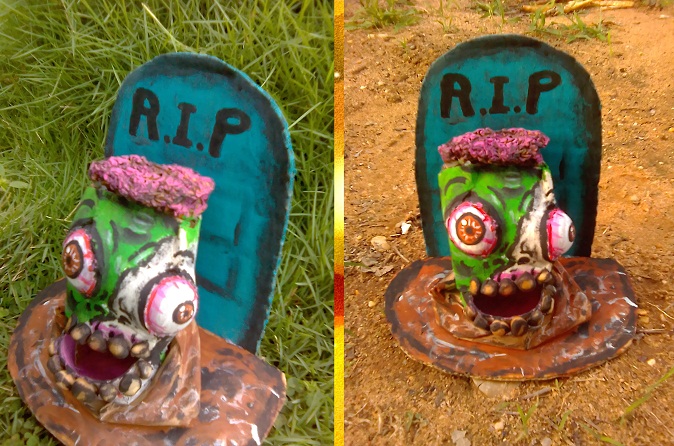
Con ello llegamos al final por este día, espero que les guste esta manualidad, y si es así los invito a que nos visiten nuevamente en mas de estas próximas y artísticas ideas, ¡Nos vemos pronto! ¡Y que pasen un Feliz Halloween!
With this we come to the end for this day, I hope you like this craft, and if so, I invite you to visit us again in more of these next and artistic ideas, see you soon! And have a Happy Halloween!

🎃 Las fotografías 📷 son de nuestra autoria y fueron tomadas con un teléfono inteligente (ZTE Blade L130) y editadas en Paint y Paint Tool SAI por @albakriz.
🎃 The photographs 📷 are of our authorship and were taken with a smartphone (ZTE Blade L130) and edited in Paint and Paint Tool SAI by @albakriz.
🎃 Traducción: traductor de Google.
🎃 Translation: translate Google.
Thank you for sharing this amazing post on HIVE!
Your content got selected by our fellow curator tibfox & you just received a little thank you upvote from our non-profit curation initiative!
You will be featured in one of our recurring curation compilations which is aiming to offer you a stage to widen your audience within the DIY scene of Hive.
Make sure to always post / cross-post your creations within the DIYHub community on HIVE so we never miss your content. We also have a discord server where you can connect with us and other DIYers. If you want to support our goal to motivate other DIY/art/music/gardening/... creators just delegate to us and earn 100% of your curation rewards!
Stay creative & hive on!