¡Hello my beautiful diy people!
¡Feliz noche para toda esta hermosa comunidad de hive diy! ¡Es un gran placer saludarles nuevamente! ¡siempre será un regocijo para mi, poder compartir mis proyectos con tanta gente talentosa como lo son ustede😄.
¡Happy night to all this beautiful hive diy community! It is a great pleasure to greet you again! It will always be a joy for me to be able to share my projects with so many talented people like you😄.
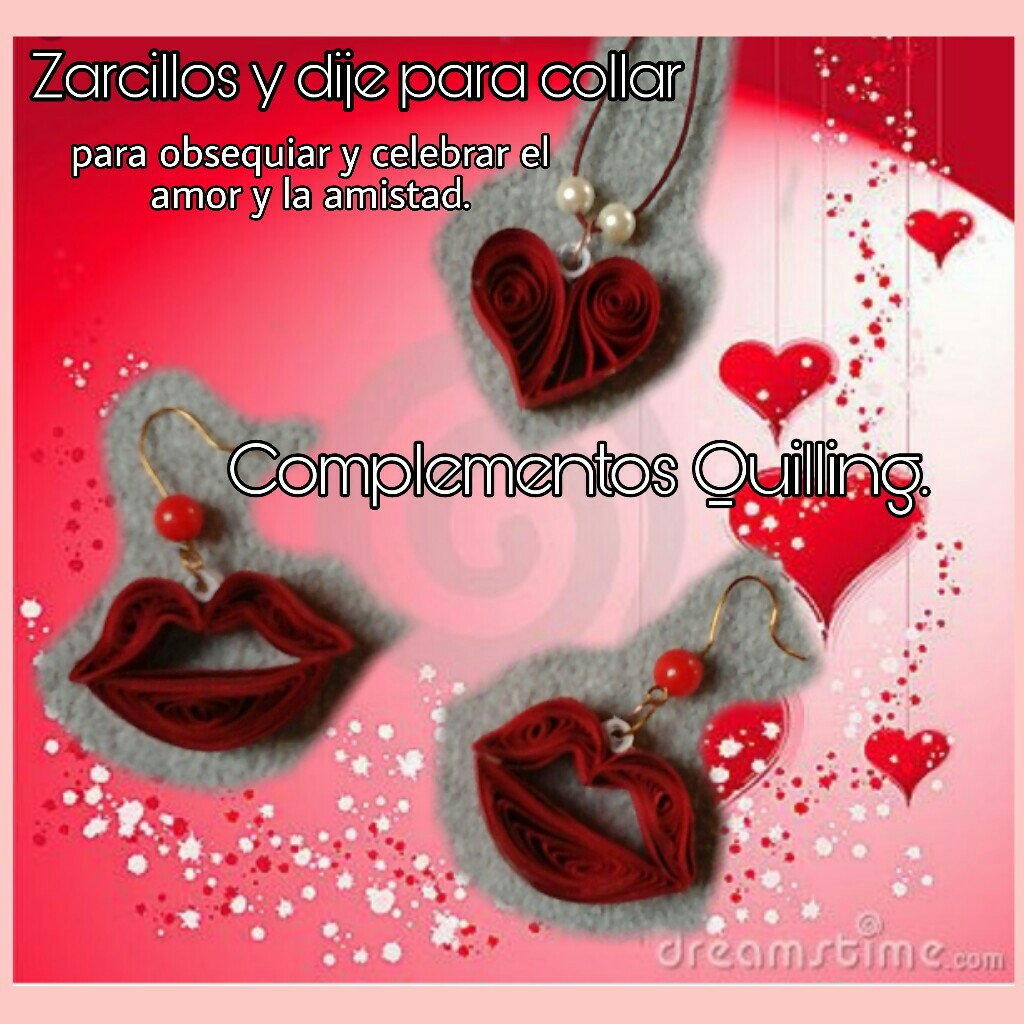
Hoy quiero compartir con ustedes un hermoso contenido, donde les mostraré la elaboración de unos lindos complementos Quilling, pues se trata de unos lindos zarcillos en forma de labios y un corazón que servirá como un dije para collares. Se que algunos conocen esta técnica, y la han practicado muy bien, de hecho reconozco el trabajo de algunas amigas de esta plataforma que han venido haciendo un excelente trabajo en cada presentación. Como ya estamos en víspera de una de las fechas importates que todos esperamos con mucho entusiasmo para obsequiar, como lo es el día del amor y la amistad. Por esta razón quiero mostrarles esta excelente propuesta, para obsequiar en esa fecha importante. Así que desde ya comencemos la elaboración de nuestro obsequio, !siganme hasta el final!!
Today I want to share with you a beautiful content, where I will show you how to make some beautiful Quilling accessories, because it is about beautiful tendrils in the shape of lips and a heart that served as a pendant for necklaces. I know that some of you know this technique, and have practiced it very well. In fact, I recognize the work of some friends on this platform who have been doing an excellent job in each presentation. As we are already on the eve of one of the important dates that we all look forward to giving gifts, such as the day of love and friendship. For this reason I want to show you this excellent proposal, to give away on that important date. So from now on we begin the elaboration of our gift,! Follow me until the end!
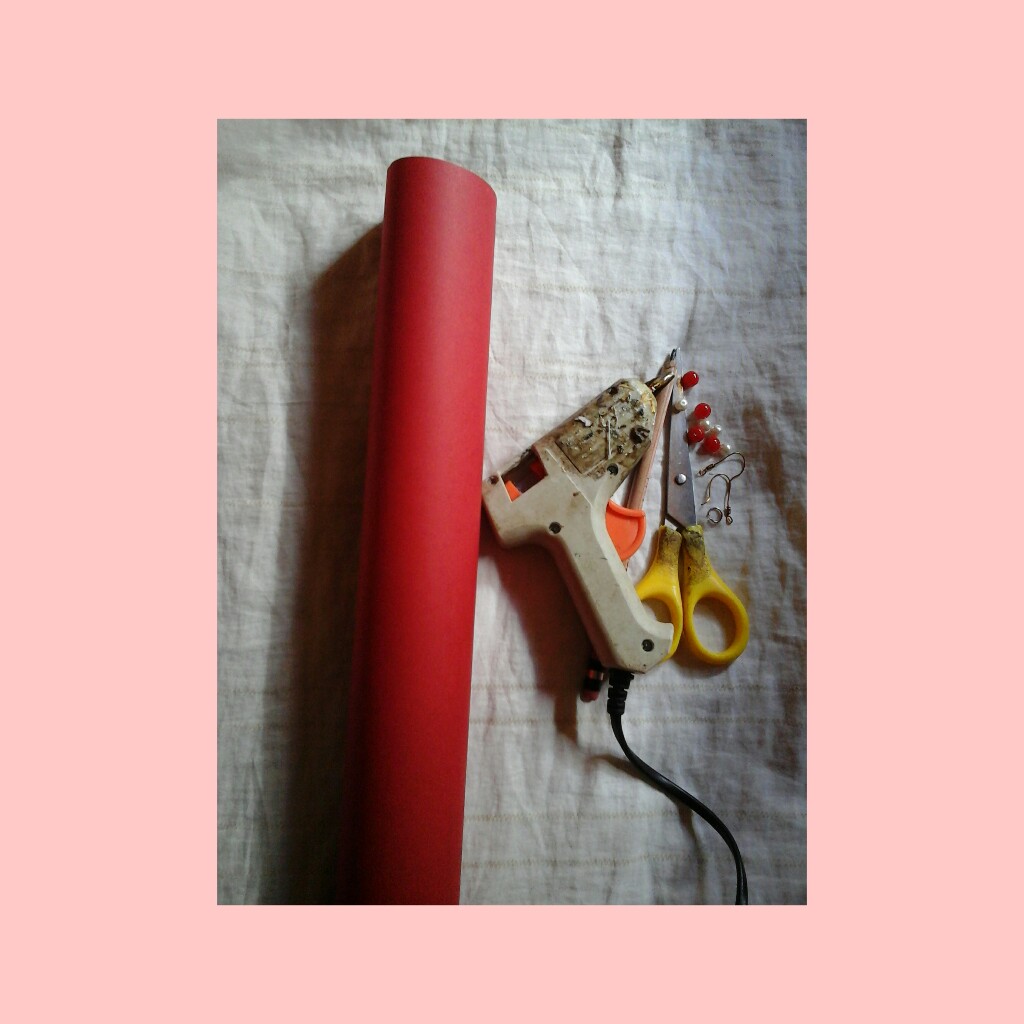
- Papel tipo cartulina.
- Pistola para silicona, puedes usar pega blanca o silicona fría.
- Anzuelos y aritos.
- Pedrería
- Lápiz.
- Tijera.
- Una regla.
- Cardboard type paper.
- Silicone gun, you can use white glue or cold silicone.
- Hooks and rings.
- rhinestones
- Pencil.
- Scissors.
- A rule.
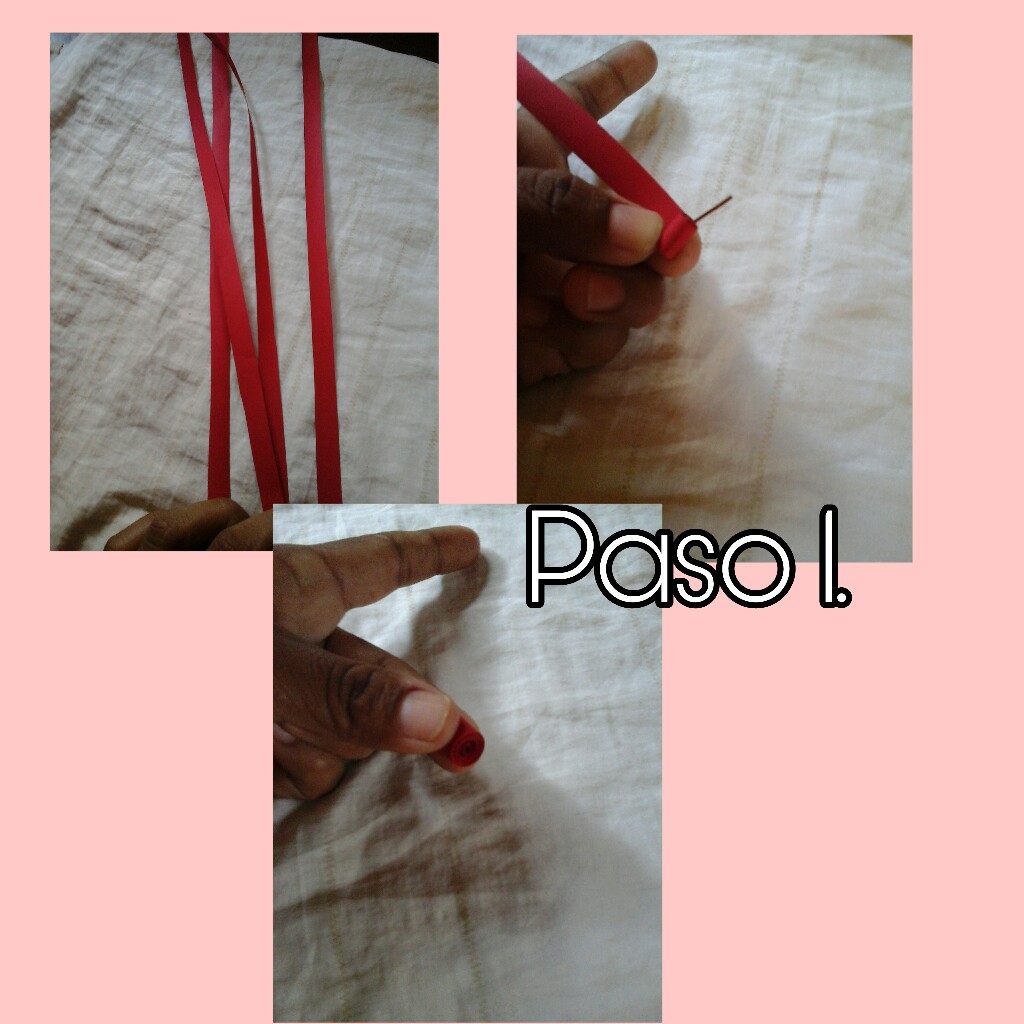
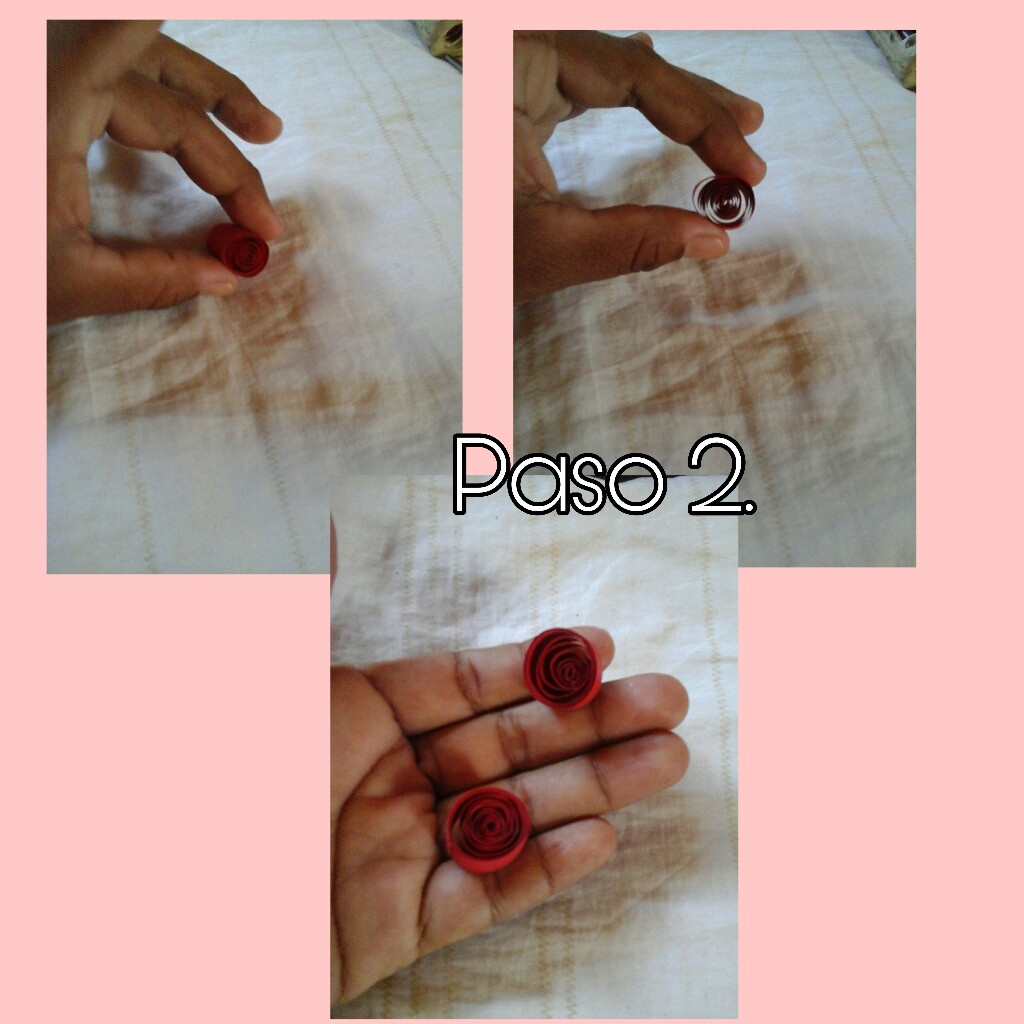
Amigos, para iniciar estos accesorios debemos cortar cuatro tiras de cartulina, estas miden (40cmx2cm) aproximadamente, estas servirán para hacer la parte superior de los labios. También debemos recortar dos tiras del mismo grosor pero un poco más largas, una buena opción será pegar dos por los extremos, así quedará super largas. Seguimos con el próximo procedimiento el cual será enrollar estas tiras, yo utilicé un trocito de alambre ya que aun no tengo la herramienta adecuada para este tipo de trabajos.
Friends, to start these accessories we must cut four strips of cardboard, they measure (40cmx2cm) approximately, they will begin to make the upper part of the lips. We must also cut two strips of the same thickness but a little longer, a good option would be to glue two at the ends, so it will be super long. We continue with the following procedure, which will be to wind these strips, I used a piece of wire since I still don't have the right tool for this type of work.
En este paso vamos a tomar nuestro rollito con los dedos y poco a poco vamos abriendo o soltando, para que suavemente este rollito vaya ampliando solo un poco, en ese momento es cuando debemos agregar la silicona caliente, más yo les recomiendo usar pega blanca o silicona fría.
In this step we are going to take our roll with our fingers and little by little we are opening or releasing it so that this roll gently expands just a little, at that moment is when we must add the hot silicone but I recommend using white glue or cold silicone.
Seguimos el procedimiento para crear los labios, tomamos estos rollitos y hacemos pellizcos en ambos lados. Observen como deben quedar, creo que tiene forma como de un pajarito😁 pero esta es la forma que buscamos.
We follow the procedure to create the lips, we take these little rolls and we pinch both sides. Notice how they should look, I think it has the shape of a little bird😁 but this is the shape we are looking for.
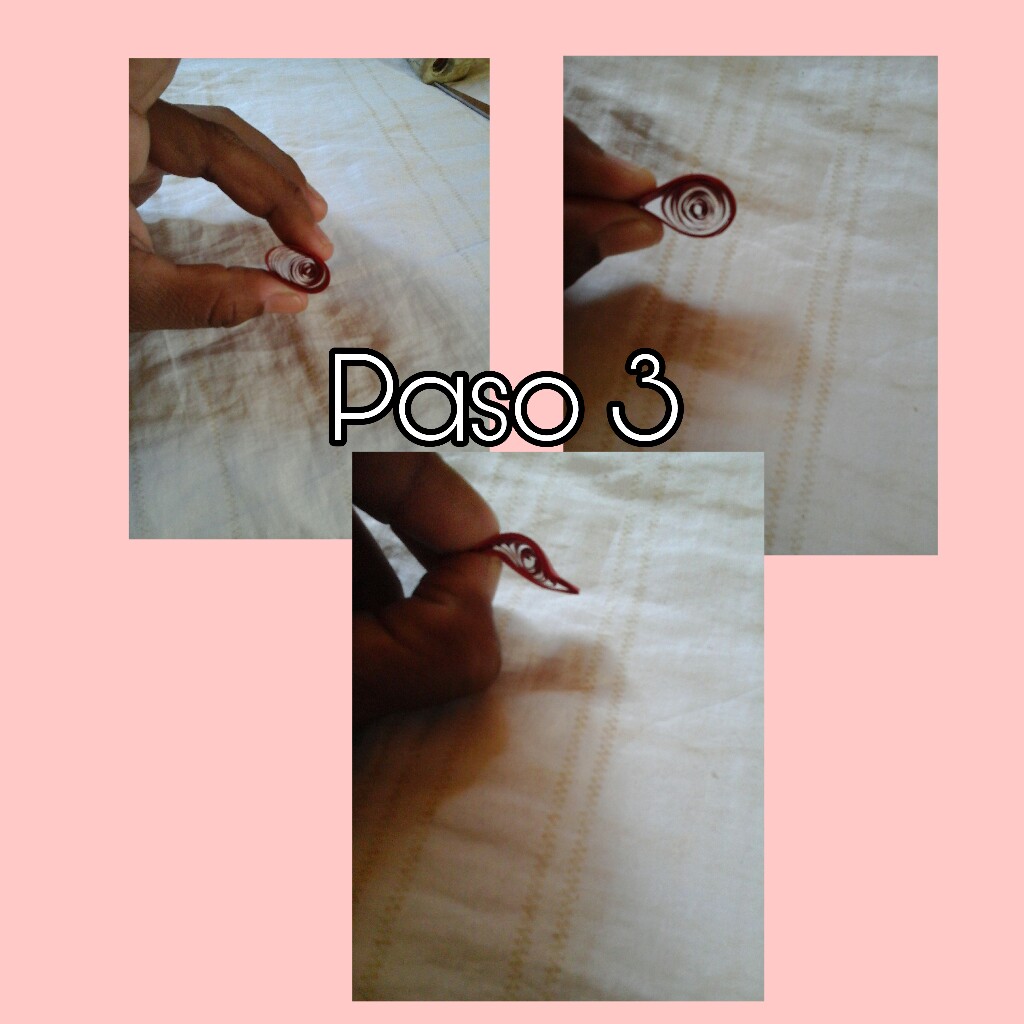
Para hacer el labio inferior, debemos enrollar la cinta más larga e ir soltando poco a poco como hicimos en el procedimiento antetior, esta vez damos pellizcos en ambos lados pero damos forma de media luna. Recordemos que la forma la vamos a dar con nuestros dedos.
To make the bottom lip, we need to roll up the longest ribbon and loosen it little by little as we did in the previous procedure, this time we pinch it on both sides but give it a crescent shape. Remember that we are going to give the shape with our fingers.
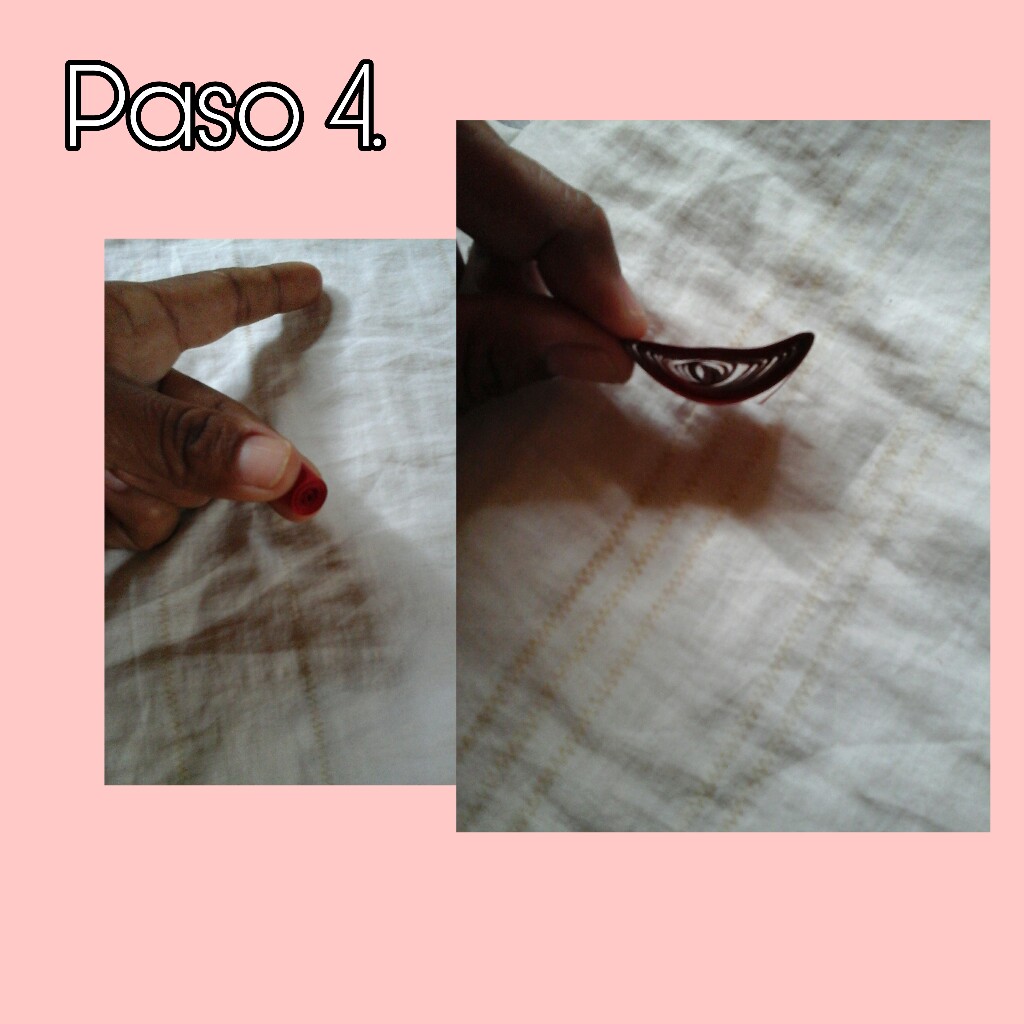
Una vez que ya hemos terminado las piezas, comenzaremos a unir y dar forma a nuestros labios, agregamos el pegamento.
Once we have finished the pieces, we will begin to join and shape our lips, we add the glue.

Para hacer el corazón, haremos dos rollitos y damos forma de gota con cierta cuerva como pueden apreciar en las imágenes. Pegamos estas piezas una con otra, también aproveche para hacer dos pequeños rollitos con cinta de papel blanco, estas cintas miden (3cmx0,5cm) puedes hacerlas del mismo color del corazón.
To make the heart, we will make two rolls and shape a drop with some rope as can be seen in the images. We glue these pieces together, also take the opportunity to make two small rolls with white paper tape, these tapes measure (3cmx0.5cm) you can make them the same color as the heart.
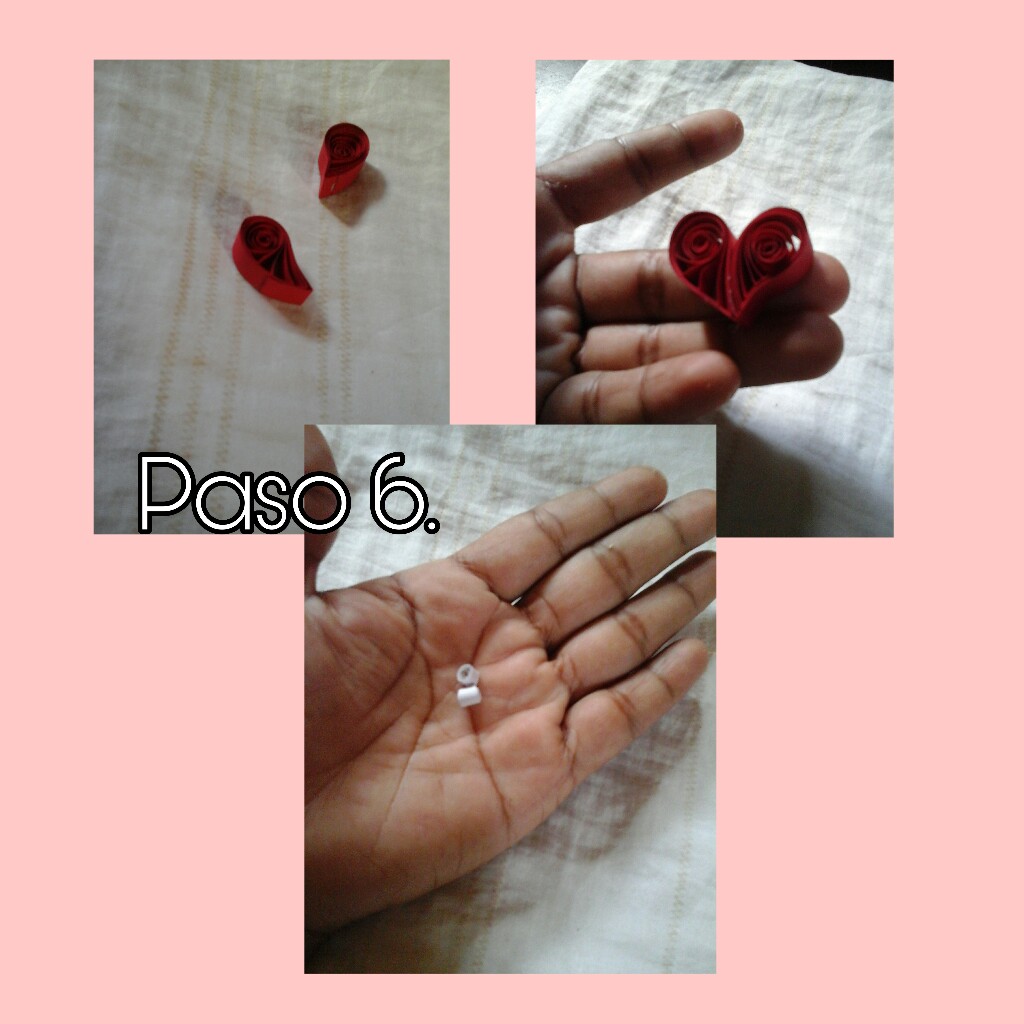
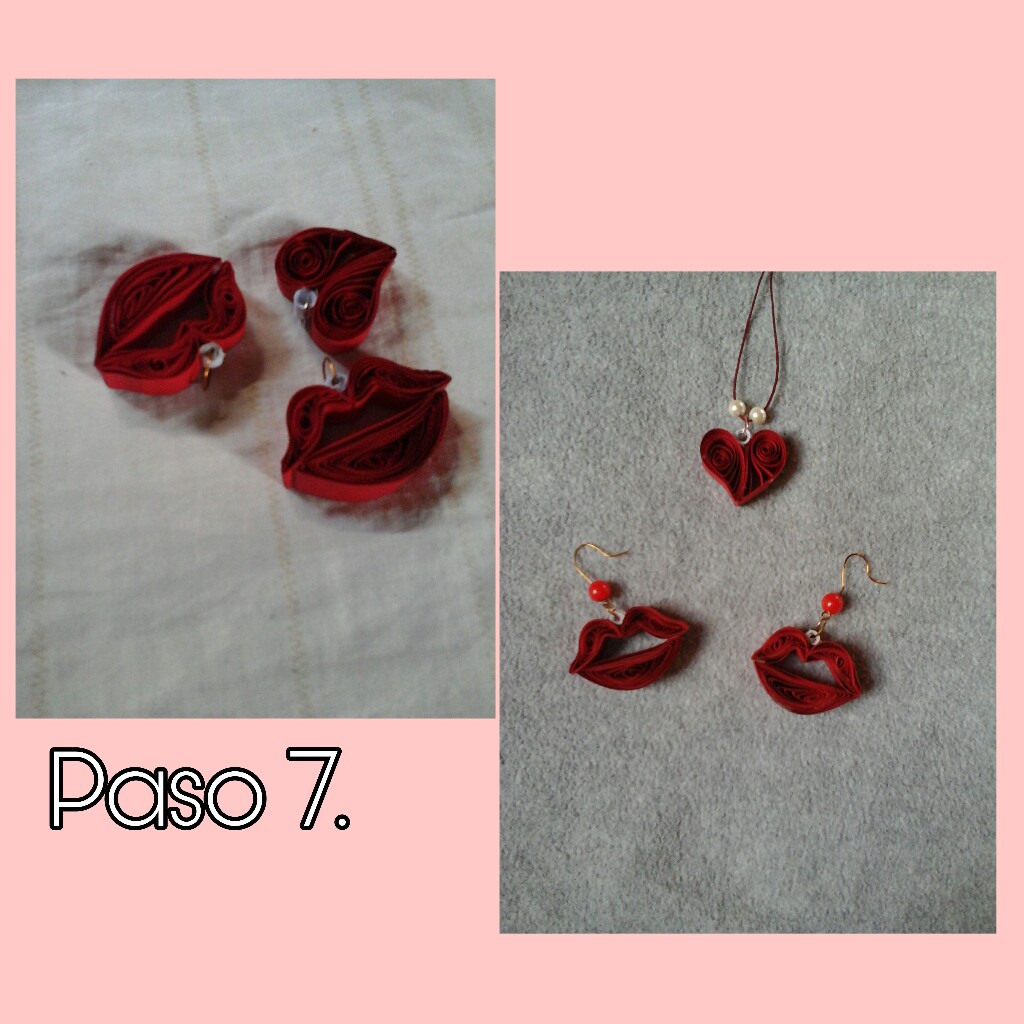
Como pueden ver, he pegado estos mini rollitos en la parte superior de cada pieza, finalmente coloqué los aritos y los anzuelos decorados con unas pelotitas rojas.
As you can see, I glued these mini rolls on top of each piece, finally I placed the earrings and the hooks decorated with little red balls.
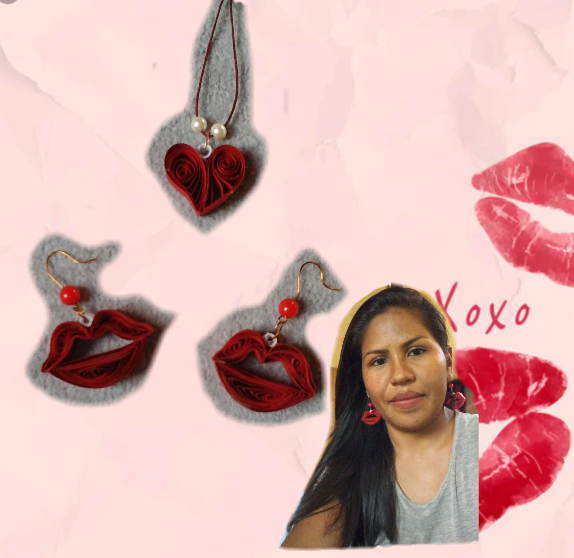
Amigos este es el resultado de este procedimiento un poco complicado pero con mucha práctica y paciencia podemos terminarlo con un manigfico resultado. Me encanta esta técnica por que el trabajo queda espectacular dejando cada pieza con una textura increíble. Espero que también puedan elaborar unos en casa para obsequiar o simplemente lucirlos en ese día.
Friends, this is the result of this somewhat complicated procedure, but with a lot of practice and patience we can finish it with a magnificent result. I love this technique because the work is spectacular, leaving each piece with an incredible texture. I hope you can also make some at home to give as gifts or just show them off that day.
Hemos llegado al final de este post, esperando que haya sido de su agrado, quiero agradecerles por leer cada paso y dejar ese hermoso comentario el cual tengo el honor de leer ya que me han motivado para seguir dando lo mejor en cada contenido. Sin más, me despido deseándoles ¡mil bendiciones! ¡Hasta la próxima!
We have reached the end of this post, hoping that it has been to your liking, I want to thank you for reading each step and leaving that beautiful comment which I have the honor of reading since it has motivated me to keep giving your best in each content. Without further ado, I say goodbye wishing you a thousand blessings! Until next time!
Todo el contenido es de mi autoria.
Fotos capturadas por mi tablet Samsung galaxy, editadas por Picsart.
Algunos fondos fueron tomados de Internet.
fuente
Traductor utilizado ESP/ING google.com
Credits.
All content is my own.
Photos captured by my Samsung galaxy tablet, edited by Picsart.
Some funds were taken from the Internet.
fuente
Translator used SPA/ENG google.com
Buenas noches @anaarevalo01 que hermoso a quedado los accesorios, felicitaciones gracias por enseñarnos el paso a paso, esta genial también para decorar una tarjeta de amor.
¡Hola amiguita! gracias por tu comentario💗💖😄 ¡bendiciones!
Wow!! no sabía que se podía hacer cosas tan lindas con carulina😍 me gusta mucho el dije de corazón❤ te felicito por tu creatividad!!🌼🌼
¡Hola querida! si, es un trabajo muy lindo. Gracias por comentar.
Están bellísimos, mucho éxito. Saludos 👍
¡Muchas gracias linda!💖😊
Hola @anaarevalo01, un gusto saludarte, me encanta como quedo estos bellos accesorios, sus color y forman, son hermosos, buen dia.
¡Hola amiga! que bueno saber de ti, gracias por comentar ¡saludos y bendiciones!
Amiga @anaarevalo01, me gustó mucho tu paso a paso muy sencillo se ve de la manera en la que lo explicas.
Quedaron preciosos y si lucen espectaculares. Quede enamorada de estos accesorios.
Gracias por compartinos. Tengo tiempo queriendo aprender, pero tampoco tengo las herramientas.
He visto que le echan una capa transparente para que duren más.
Pero creo que me voy a aventurar a practicar así como tu los haces.
Si, puedes echarles pega blanca o también esmalte de uñas y quedan super lindos y no parecen de cartulina. Bueno suerte con los tuyos😃😄 ¡Saludos y un fuerte abrazo!