Mi versión Español.
¡Bienvenido a mi blog!
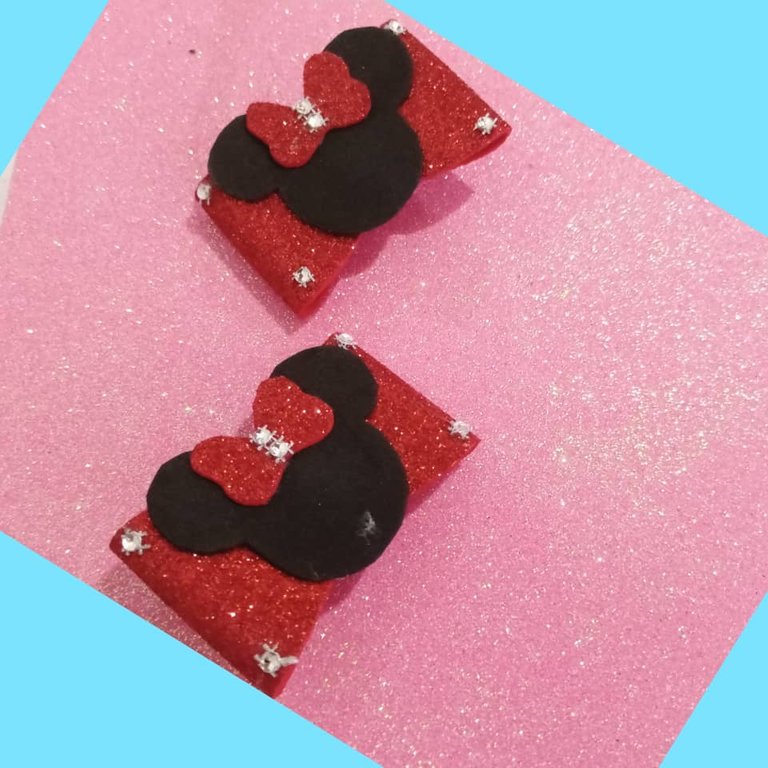
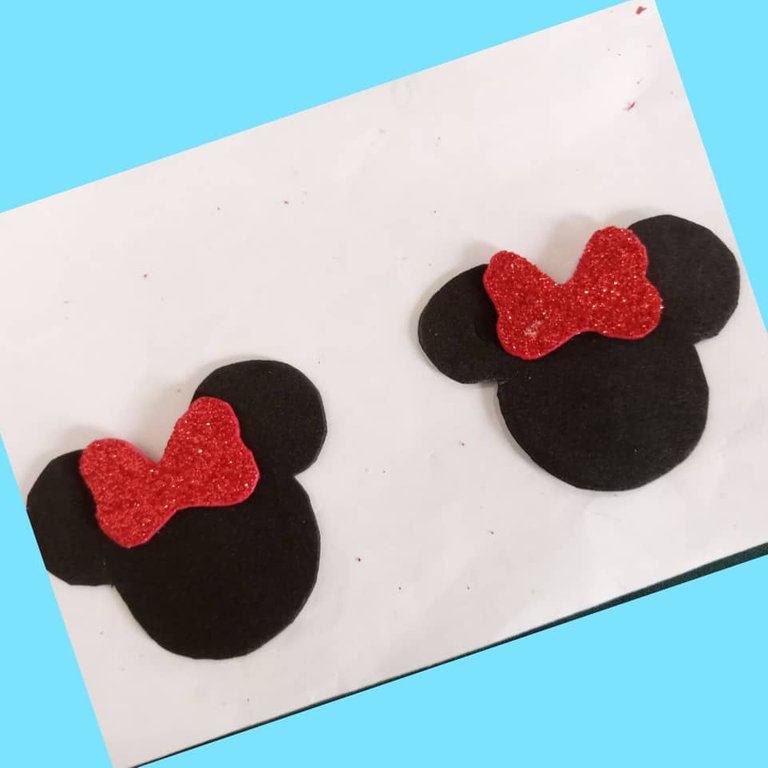
Hola a toda mi gente de esta comunidad, @HIVEDIY. Hoy me uno a esta comunidad para mostrar mi creatividad y compartirla en este grupo, en esta ocasión hoy le traigo, un par de preciosa pinza de foami con diseño de minnie mouse para un regalo, la pinza está diseñada con foami de color rojo y negro con dos pinza pequeña y pegada con silicón,el set de pinza es para un regalo de una vecinita que estudia en el preescolar ella tiene dos años y quise hacerle este lindo detalle para que lo llevara para su escuela, lo puede usar para salir a una fiesta o al parque en la tarde espero que lo disfrute mucho, me encanta hacer muchos detalles para las niñas y más cuando tiene una princesa en la casa. Además los materiales a utilizar son fácil de encontrar y sencilla de hacer. Aquí le dejo el tutorial de la dos pinza preciosa con diseño de minnie mouse.
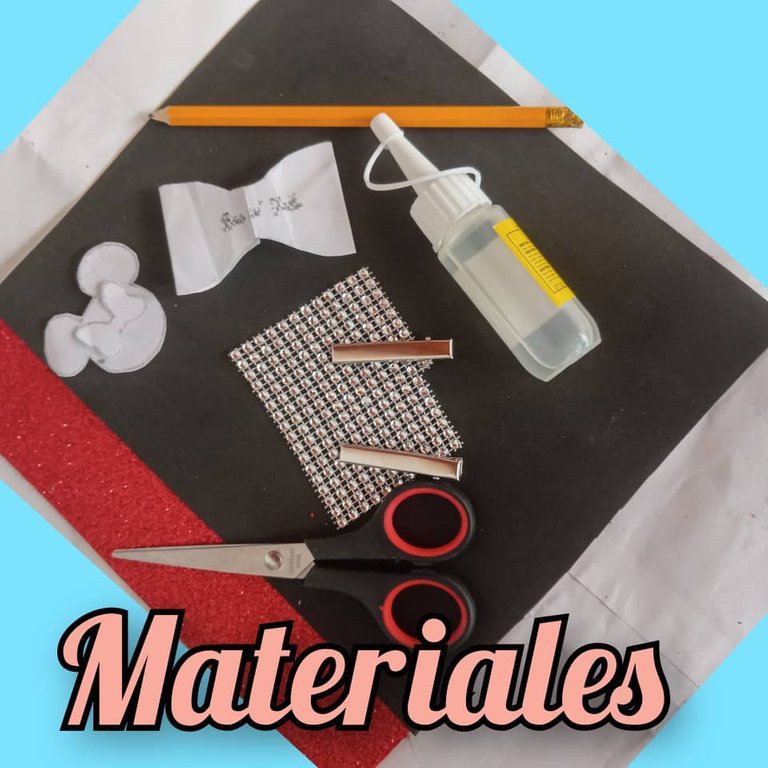
Materiales.
- 1 horma de Minnie Mouse.
- 1 horma de lazo.
- 2 pinza pequeña.
- 1 silicón líquido.
- 1 tijera.
- 1 lápiz.
- Para decorar una lámina plateada.
Paso.
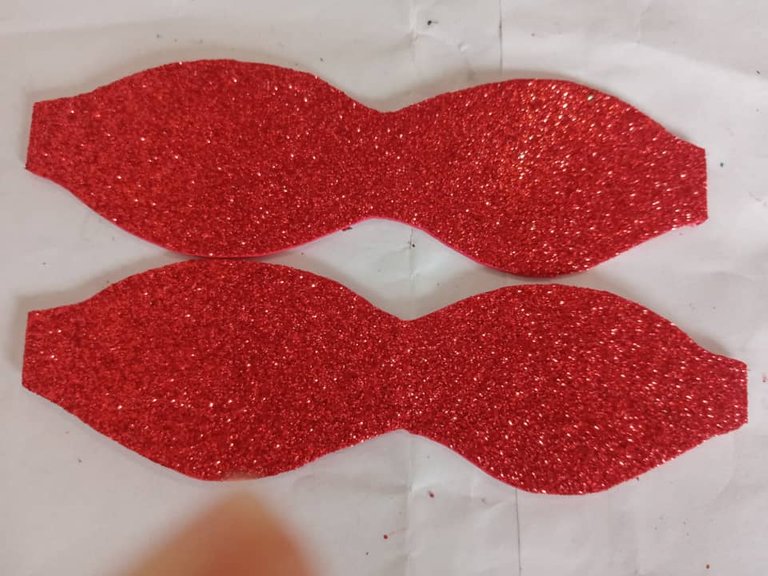
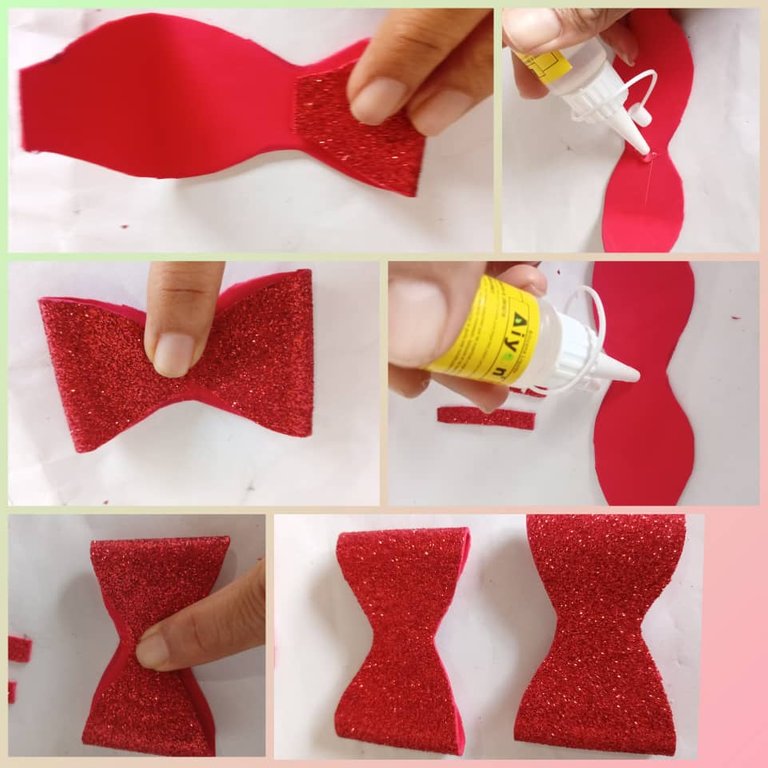
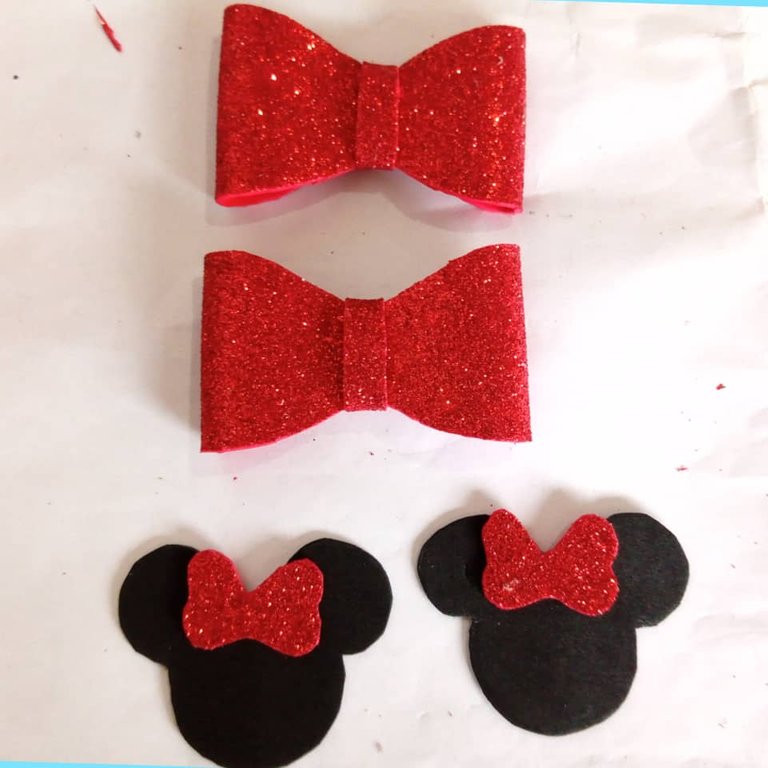
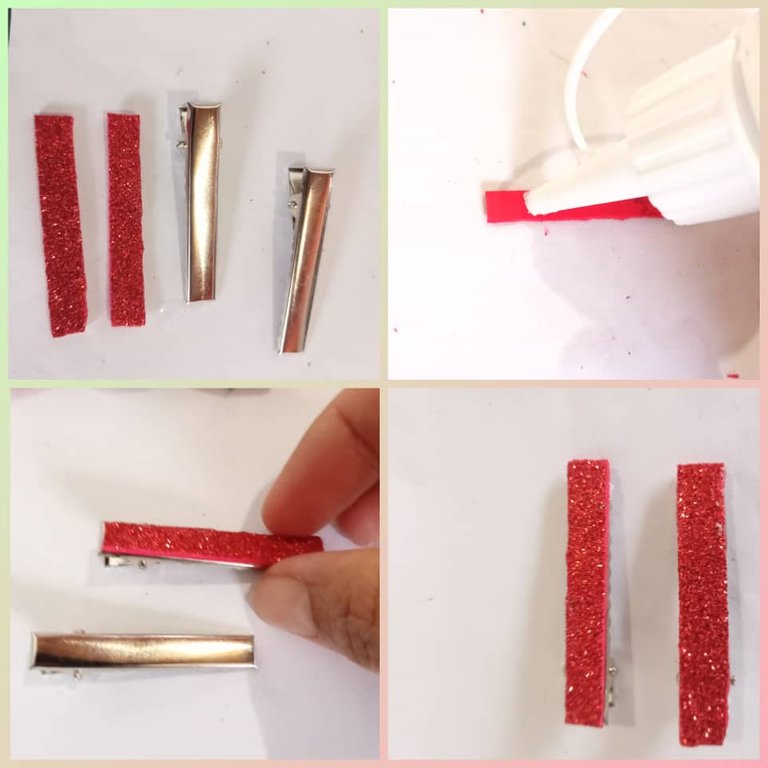
Tomo el foami de color rojo y trazamos la horma de lazo, ya teniendo las dos horma de lazo trazada procedemos a recortalas.
Ya tenemos los dos lazos recortados.
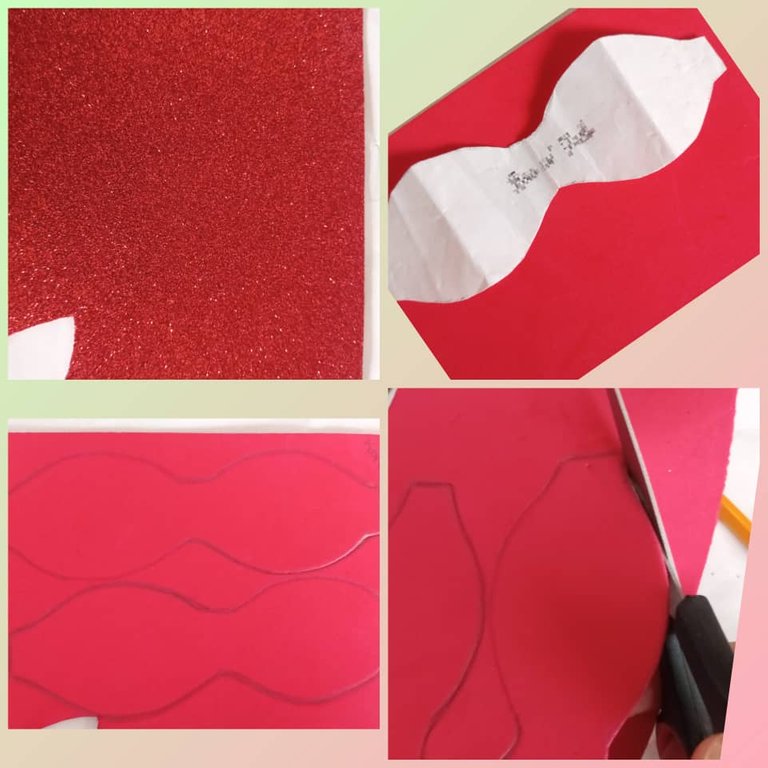
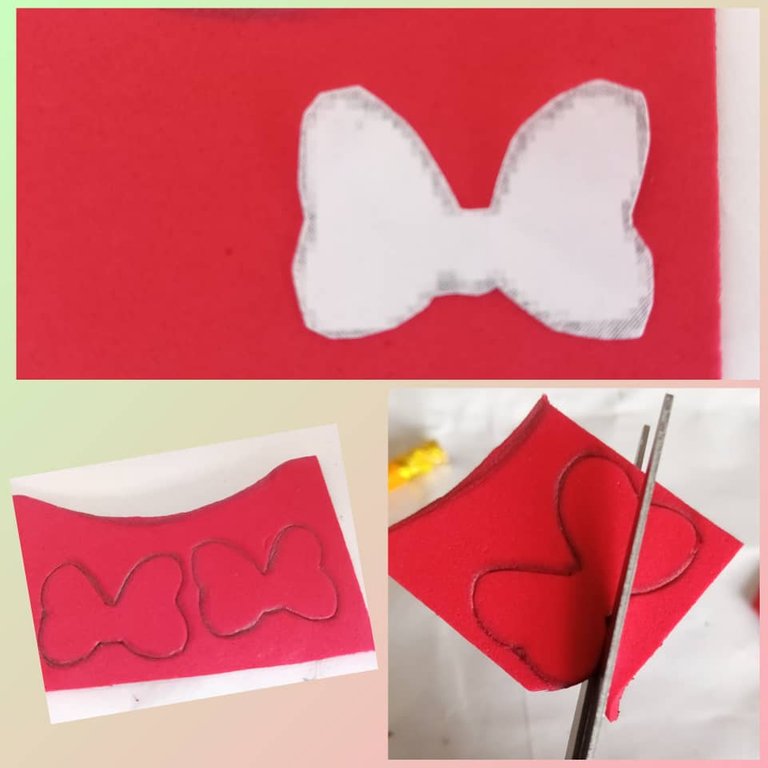
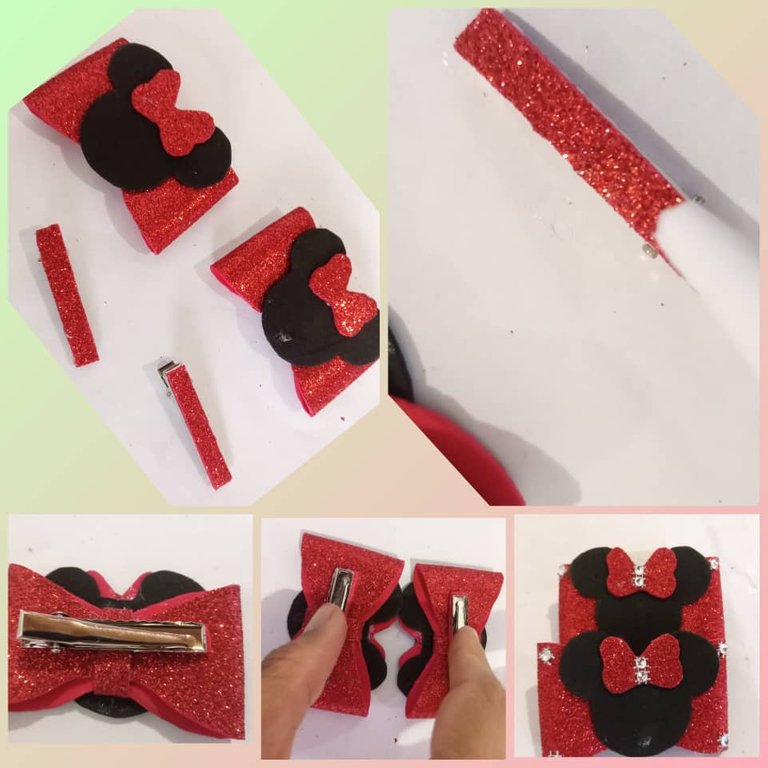
Tomo la horma de los lazos de minnie mouse y lo trazamos en el foami de color rojo y la recortamos.
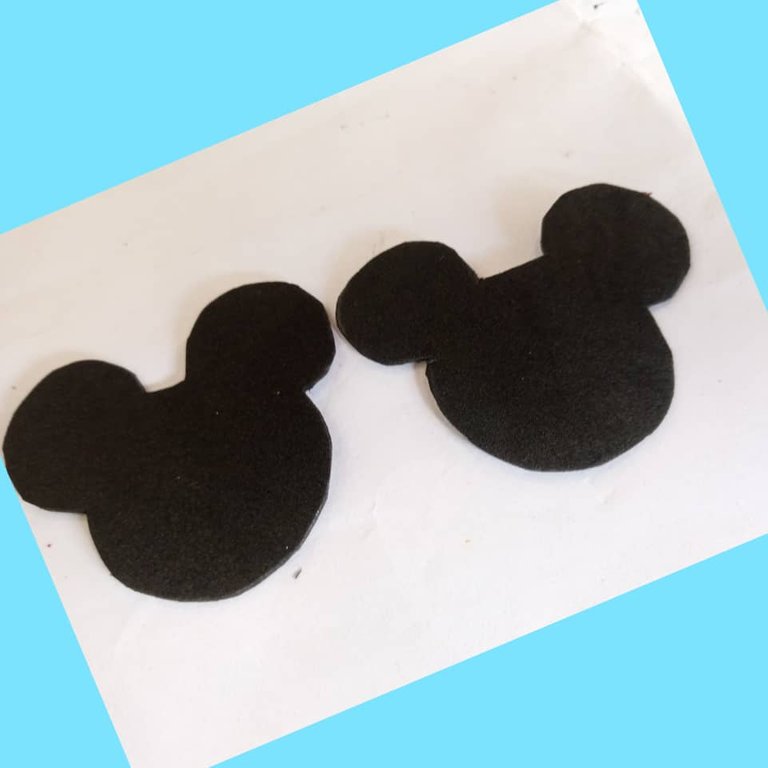
Trazamos las hormas de minnie mouse en el foami de color negro y también procedemos a córtalas.
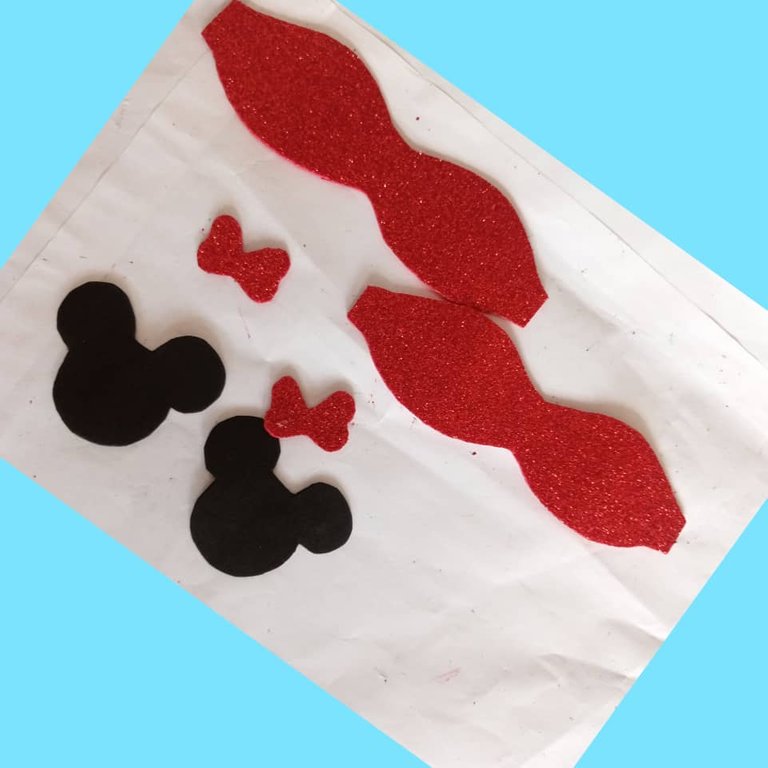
Ya tenemos todas las hormas recortada empezamos a proceder hacer el par de pinza.

Ya tenemos todas las hormas recortada empezamos a proceder diseñar el par de pinza.
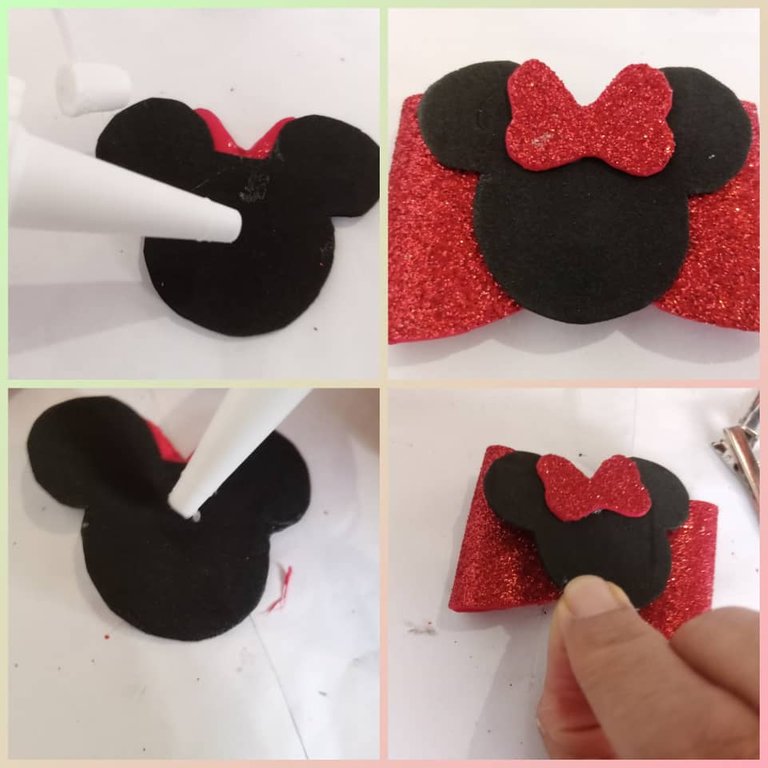
Luego tomamos la puntas del lazo por la parte de atrás y la juntamos le agregamos silicón y lo presionamos con los dedos hasta que se pegue, así hacemos el mismo procedimientos con el otro lazo.
Ya tenemos ambos lazo armado.
Cortamos dos tiras de foami de aproximadamente de 5 centímetros de largo x 2 centímetros de ancho, tomo el lazo le coloco la tira en el medio le agregamos silicón en la parte de atrás para que se pegue. Y así hacemos con el otro lazo el mismo procedimiento.
Vea que ya tenemos ambos lazos armado.
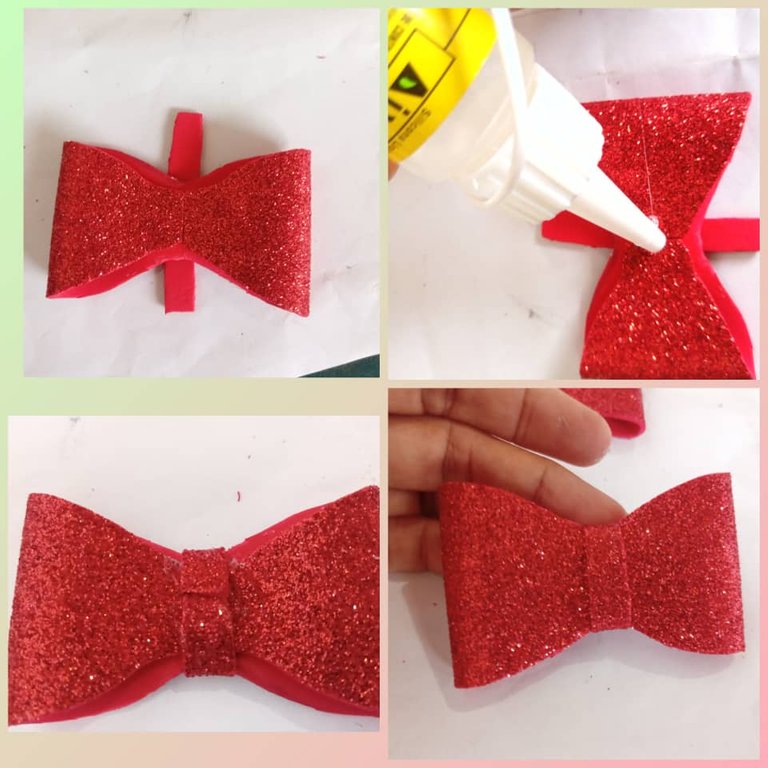
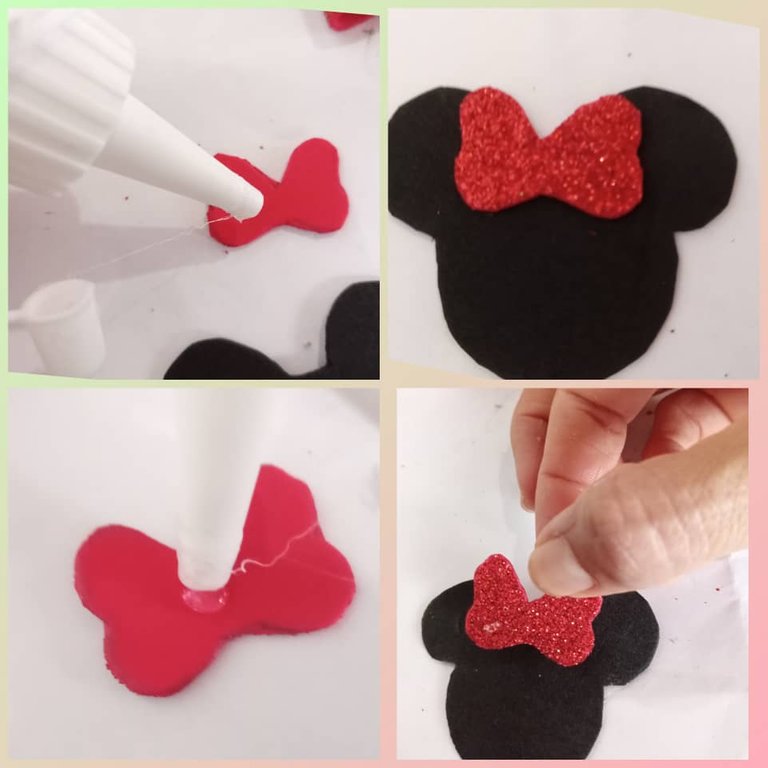
Luego tomo los lacitos y le agrego silicón y los pegamos en la horma de minnie mouse lo presiono con los dedos hasta que se pegue.
Vea que ya está lista la minnie.
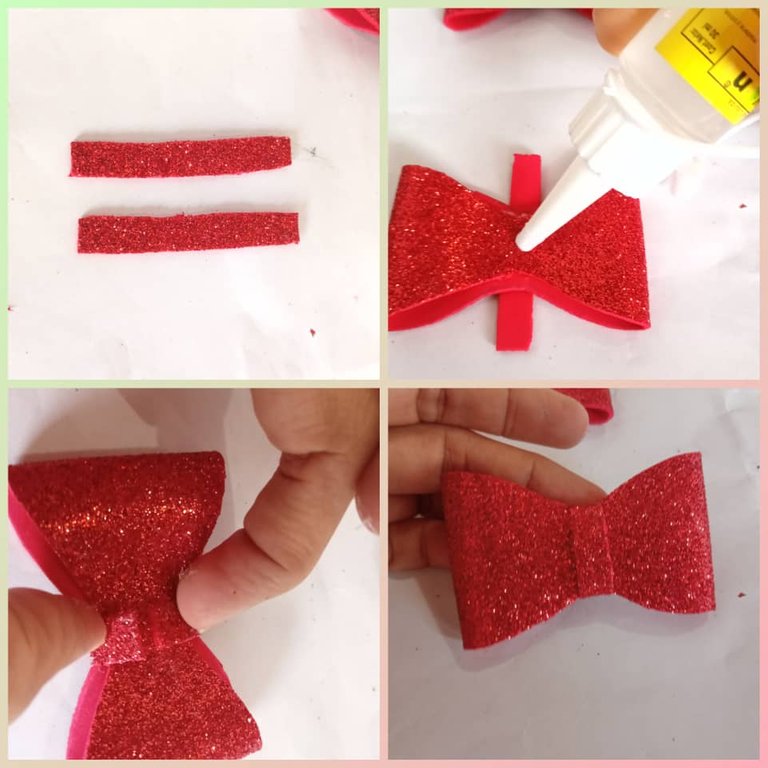
Ya teniendo todo listo comenzamos a proceder arma la pinza.
Agarro la horma de minnie mouse le agrego silicón en la parte de atrás y lo pegamos en el lazo. Comienzo a decorar el lazo con la lámina plateada coloco unas en el centro del lazo de la minnie mouse y las otras en las esquina del lazo.
Vea como esta agarrando forma y se muy linda.
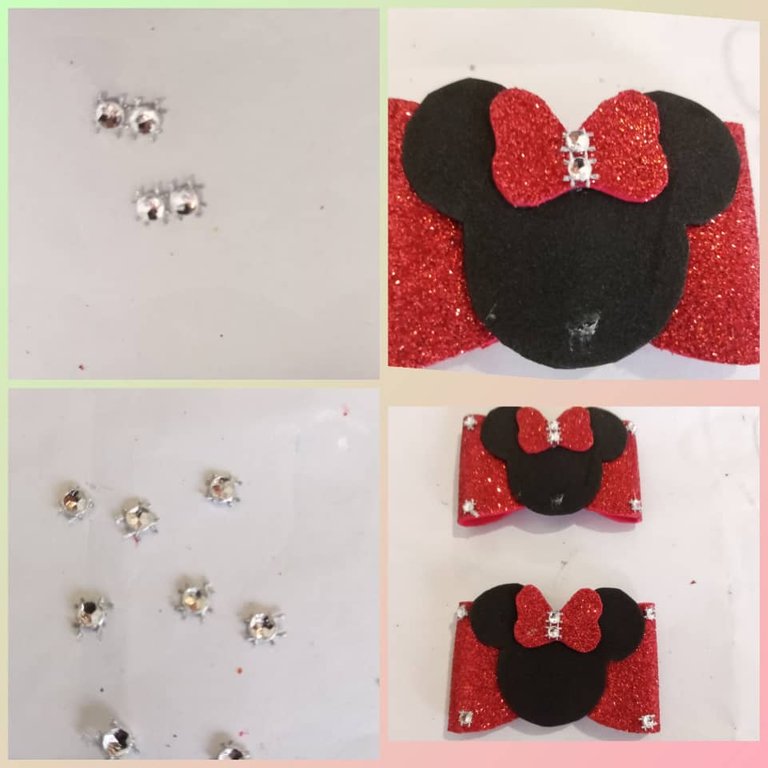
Luego procedo corta unas tiras de 4 centímetro de largo por 1,5 de ancho le añadimos silicón lo pegamos en la pinza hasta que se pegue. Agarro el lazo y pegamos las pinza de atrás del lazo lo dejo presionado hasta que se pegue. Y tenemos lista la pinza.
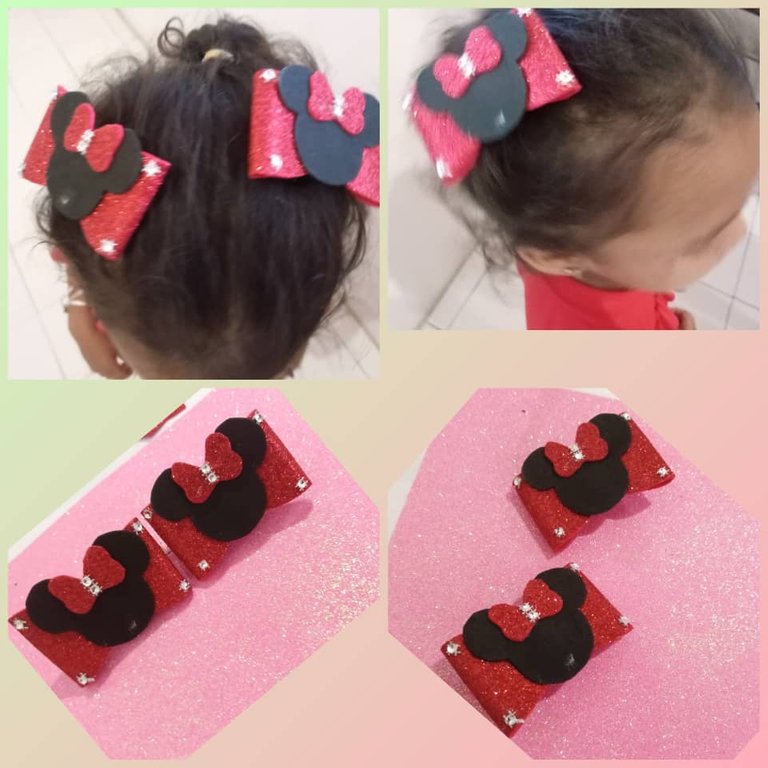
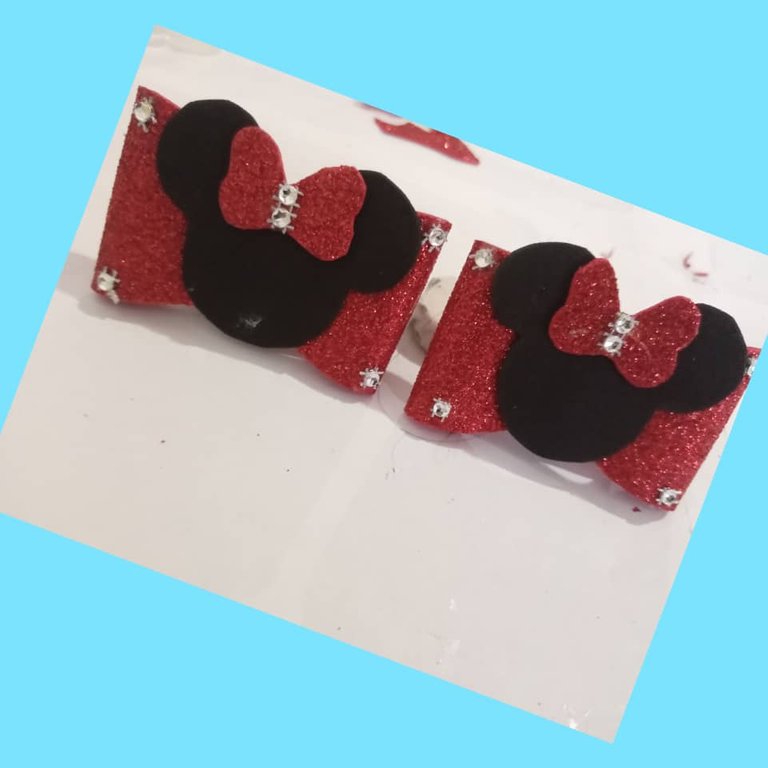
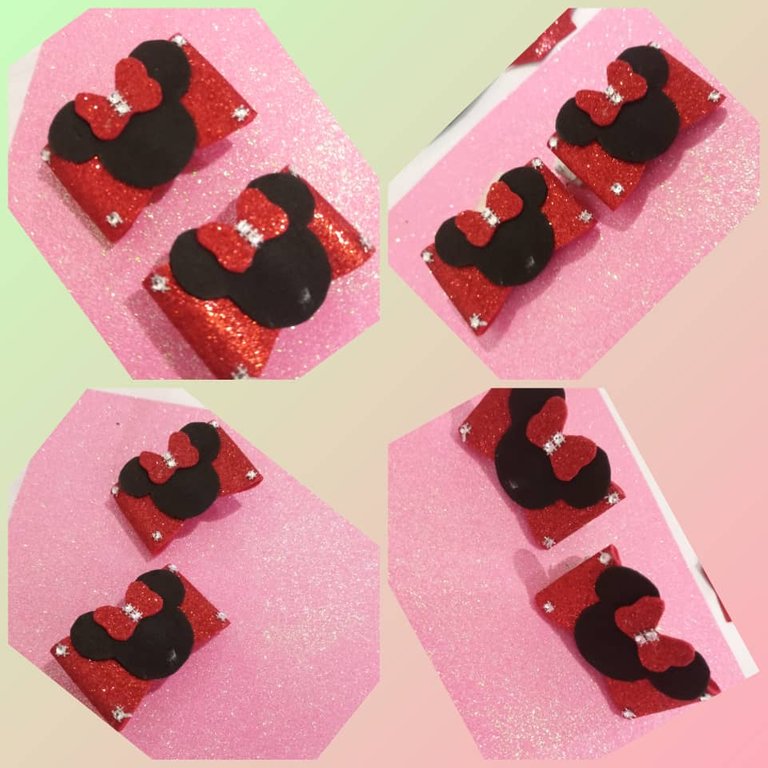
Vea lo linda que quedaron mi vecinita la va a disfrutar muchos.
Espero que les haya gustado esta publicación que tenga un feliz días y bendecidos para todos muchas gracias por leer mi post.

Las fotos son mías, tomadas con teléfono alcatel , editadas con incollage y traducidas con Deepl.
My English version.
Welcome to my blog!
Hello to all my people in this community, @HIVEDIY. Today I join this community to show my creativity and share it in this group, in this occasion today I bring you, a pair of beautiful foami clamp with minnie mouse design for a gift, the clamp is designed with red and black color foami with two small clamp and glued with silicone, the clamp set is for a gift for a little neighbor who studies in preschool she is two years old and I wanted to make this nice detail for her to take it to school, she can use it to go to a party or to the park in the afternoon I hope she enjoys it very much, I love to make many details for girls and more when she has a princess at home. Besides the materials to use are easy to find and simple to make. Here I leave you the tutorial of the two precious pin with minnie mouse design.
Materials.
- 1 last of Minnie Mouse.
- 1 loop last.
- 2 small tweezers.
- 1 liquid silicone.
- 1 scissors.
- 1 pencil.
- To decorate a silver foil.
Step.
I take the red foami and we trace the loop shape, and having the two loop shape traced we proceed to cut them out.
We already have the two loops cut out.
I take the last of the minnie mouse bows and we trace it on the red foami and cut it out.
We trace the lasts of minnie mouse on the black foami and also proceed to cut them out.
Now we have all the lasts cut out we start proceeding to make the pair of clothespin.
Now we have all the lasts trimmed we start proceeding to design the pair of clamp.
Then we take the ends of the loop from the back and join them together, we add silicone and press it with our fingers until it sticks, and we do the same procedure with the other loop.
Now we have both ribbons assembled.
We cut two strips of foami of approximately 5 centimeters long x 2 centimeters wide, I take the bow I place the strip in the middle we add silicone on the back so that it sticks. And so we do the same procedure with the other loop.
See that we already have both loops assembled.
Then I take the ribbons and add silicone and glue them on the minnie mouse last and press it with my fingers until it sticks.
See that the minnie is ready.
Already having everything ready we begin to proceed to assemble the clamp.
I take the minnie mouse last I add silicone on the back and glue it on the bow. I begin to decorate the bow with the silver foil I place some in the center of the minnie mouse bow and the others in the corner of the bow.
See how it is taking shape and looks very cute.
Then proceed to cut strips of 4 centimeters long by 1.5 wide, add silicone and glue it on the clip until it sticks. I grab the ribbon and glue the clamp on the back of the ribbon and leave it pressed until it sticks. And we have the clip ready.
See how cute my little neighbor girl is going to enjoy it a lot.
I hope you liked this post have a happy day and blessed to all thank you very much for reading my post.
the photos are mine, taken with alcatel phone , edited with incollage and translated with Deepl.
Que lindas te quedaron las pinzas de Minnie Mouse amiga @anacarolina2022 . Saludos
Gracias, si me quedaron preciosa
No me canso de decirlo el foami es un material muy noble que nos da la oportunidad de realizar cosas maravillosas
!discovery 30
gracias por su comentario, si con el foami se crea muchas cosas marvillosa. feliz dias
This post was shared and voted inside the discord by the curators team of discovery-it
Join our community! hive-193212
Discovery-it is also a Witness, vote for us here
Delegate to us for passive income. Check our 80% fee-back Program