Hello friends, today I share a collage I made from magazines and recycled cardboard.
Que tal amigos, hoy comparto un collage que realice a partir de revistas y cartón reciclado.
A few days ago I was cleaning my home and I came across some old magazines, I started to look through them and I was inspired to make a collage from them.
Remembering in my childhood I used to make a lot of collages, when I was bored I would cut out images and form scenes from comic books and NBA basketball magazines. Of course at that time I didn't know that this art of making compositions with different materials and images is called collage.
Hace unos días estuve realizando tareas de limpieza en mi hogar y me tope con unas viejas revistas, me puse a ojearlas y me inspire a elaborar un collage a partir de las mismas.
Recordando en mi infancia que solía hacer muchos collages, cuando estaba aburrido recortaba imágenes y formaba escenas a partir de historietas y revistas de basket de la NBA. Claro en esa época no sabia que este arte de realizar composiciones con diferentes materiales e imágenes se denomina collage.

It is worth mentioning that making a manual or analog collage for the first time after you are used to making digital compositions is a total challenge, you feel a bit like a fish out of water in my case without being able to manipulate the images, resize, change hue, adapt them to the work you want to represent.
But it was fun to do it this way, I need to improve my technique a little to get a better finish in the final result.
Vale mencionar que elaborar un collage manual o análogo por primera vez luego que ya estas habituado a hacer composiciones de manera digital resulta un reto total , te sientes un poco como pez fuera del agua en mi caso sin poder manipular las imágenes, redimensionar, cambiar tonos, adecuarlas a la obra que buscas representar.
Pero fue entretenido hacerlo de esta manera, me falta mejorar un poco la técnica para obtener un mejor acabado en el resultado final.

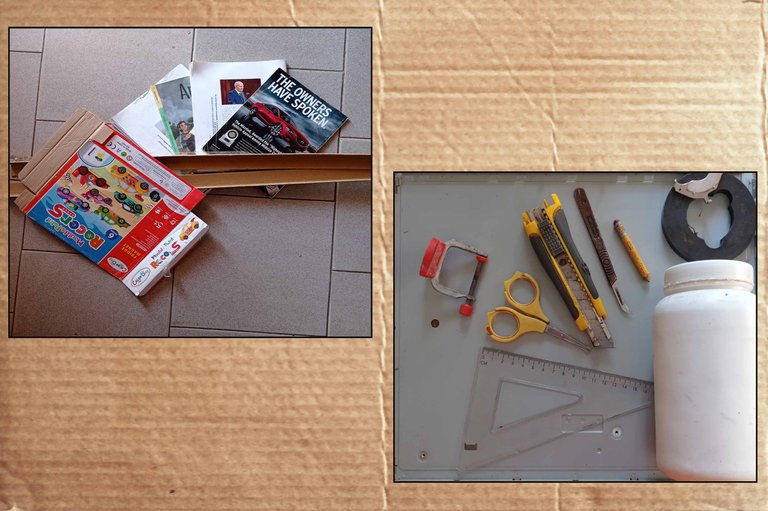
- Recycled magazines
- Cardboard
- Cardboard bar
- Scissors
- Blades
- Cutter
- Pencil
- White glue
- Paintbrush
- Adhesive tape
- Revistas recicladas
- Cartón
- Barra de cartón
- Tijeras
- Cuchillas
- Escuadra
- Lápiz
- Pegamento blanco
- Pincel
- Cinta adhesiva


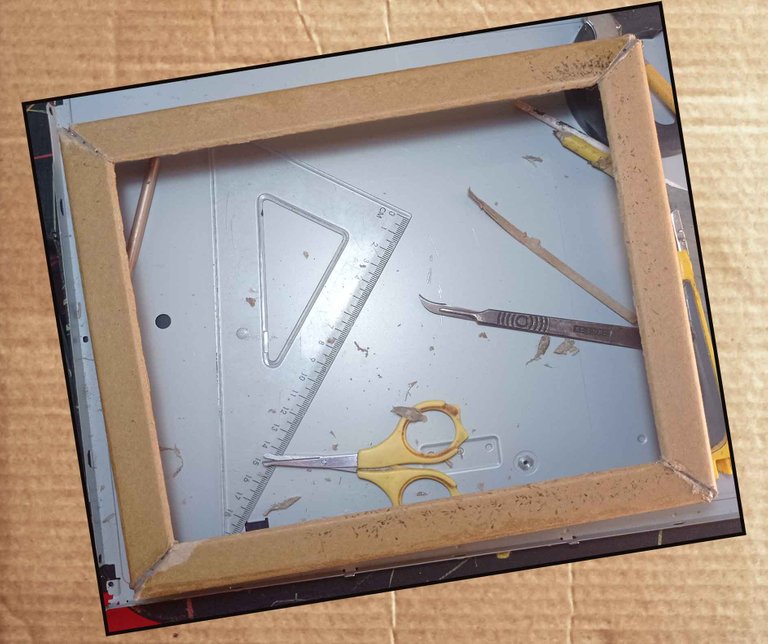
Para comenzar esta obra me dispuse a armar el marco o cuadro, corte dos trozos de 29cm y dos trozos de 25cm del tubo de cartón y los uní para formar un rectángulo, apoyándome con la escuadra y pegando los bordes entre si con pegamento blanco sujetando con cinta adhesiva hasta que el pegamento secara.

While the glue was drying on the frame I was cutting out pages with letters from magazines and selecting some phrases to cut out to cover the frame.
Mientras se secaba el pegamento del marco fui recortando paginas con letras de las revistas y seleccionando algunas frases para recortarlas para forrar el marco.
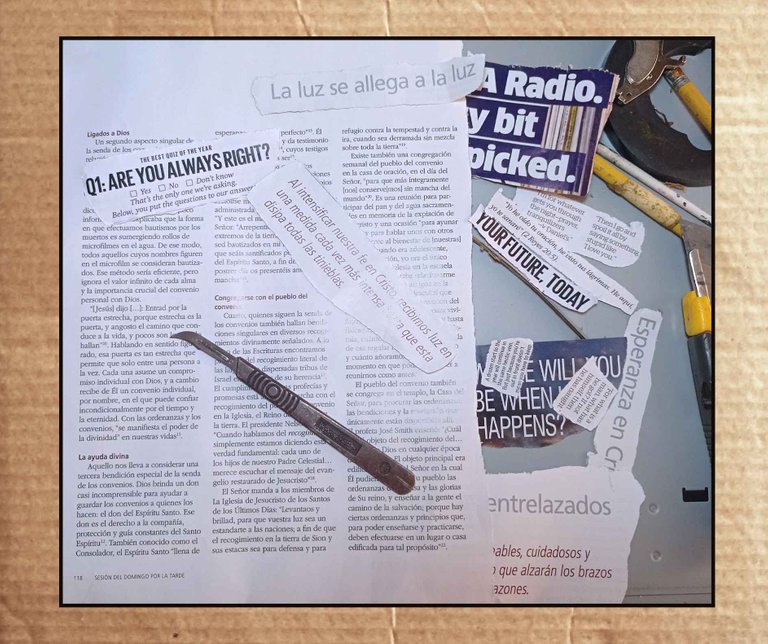

Using the brush, apply glue all over the surface of the frame to cover it with the pages with letters from the magazine and glue the cut-outs with phrases on top.
Empleando el pincel aplique pegamento por toda la superficie del marco para ir forrando el mismo con las paginas con letras de la revista y encima pegue los recortes con frases.
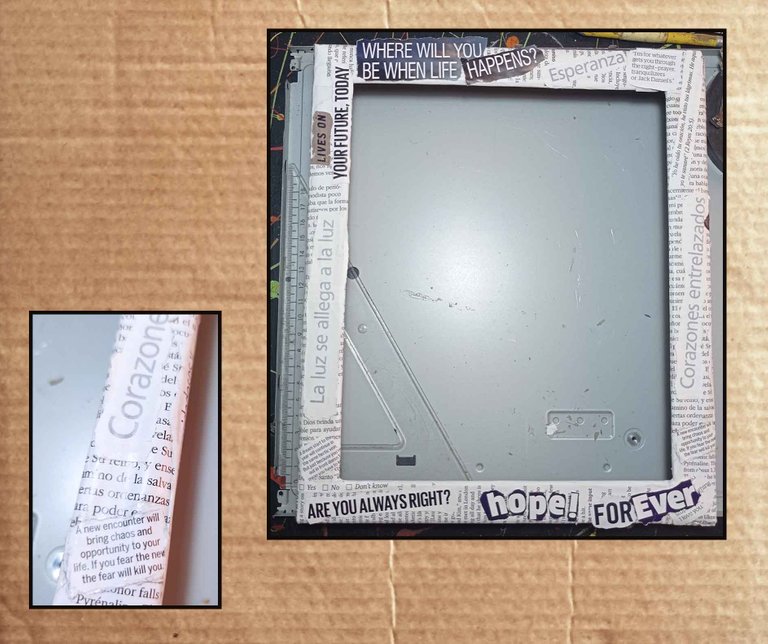
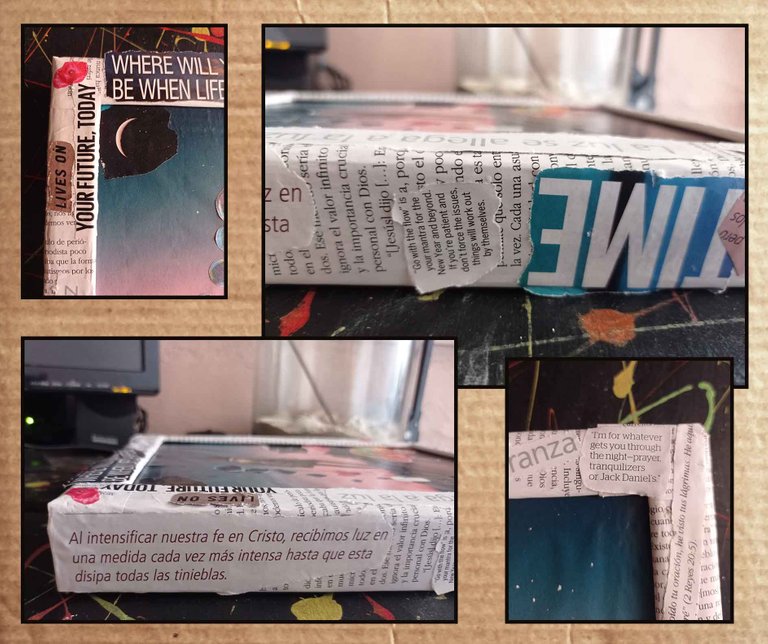
Here you can see the finished frame with its details, for this one I chose and cut out some motivational phrases in English and Spanish language.
Aquí se puede apreciar el marco culminado con sus detalles, para este escogí y recorte algunas frases de motivación en idioma ingles y español.

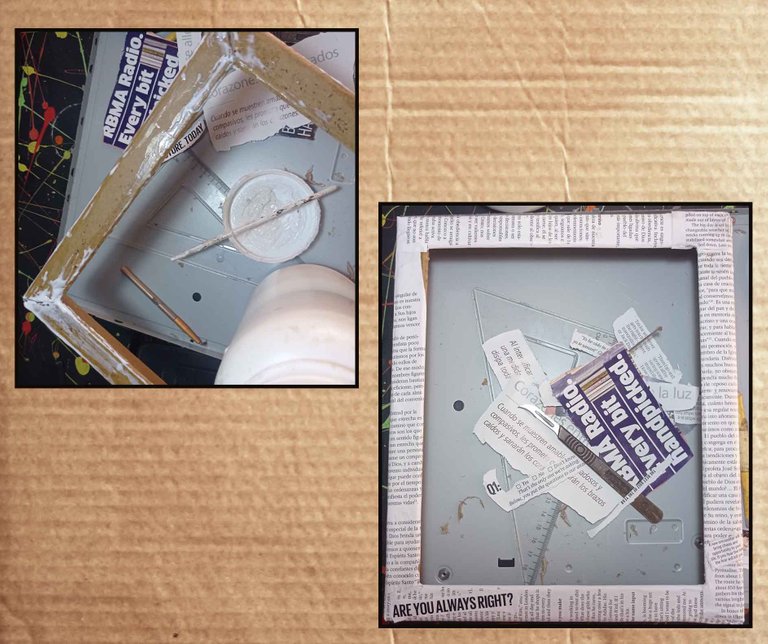
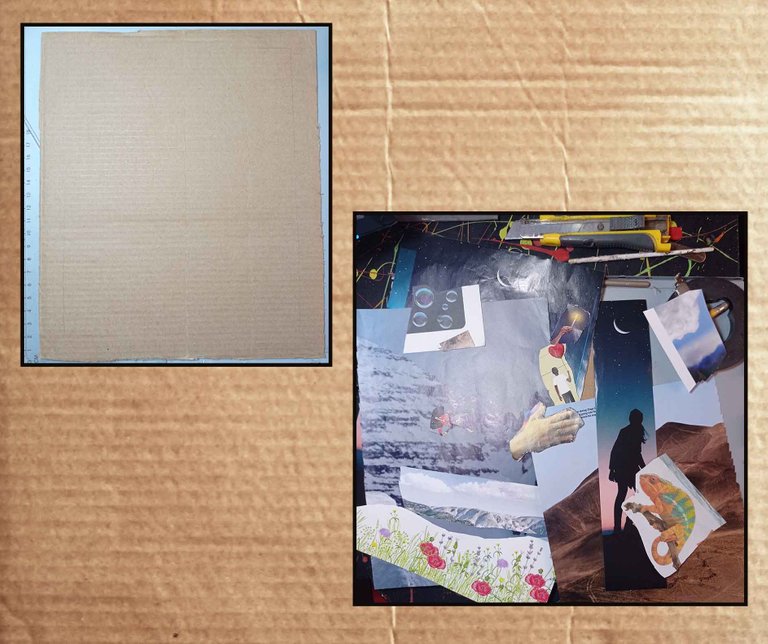
At this stage I cut a rectangular piece of cardboard to fit the frame I made, this piece of cardboard would be a kind of canvas where I will start to paste the images I was choosing to start making the collage.
Then I was looking through the magazines and selecting all the images that caught my attention and then I was cutting each one of them.
En esta etapa corte un trozo de cartón de forma rectangular que encaje en el marco que realice, este trozo de cartón seria una especie de lienzo donde comenzare a pegar la imágenes que iba escogiendo para comenzar a elaborar el collage.
Luego fui buscando entre las revistas la imágenes y seleccionando todas las que me iban llamando la atención para después ir recortando cada una de ellas.

Ya con todas las posibles imágenes seleccionadas fui recortando cada una de ellas para ir presentándolas en el trozo de cartón o lienzo y realizando combinaciones entre las imágenes para lograr visualizar como quedaría la composición de las imágenes para elaborar el collage.
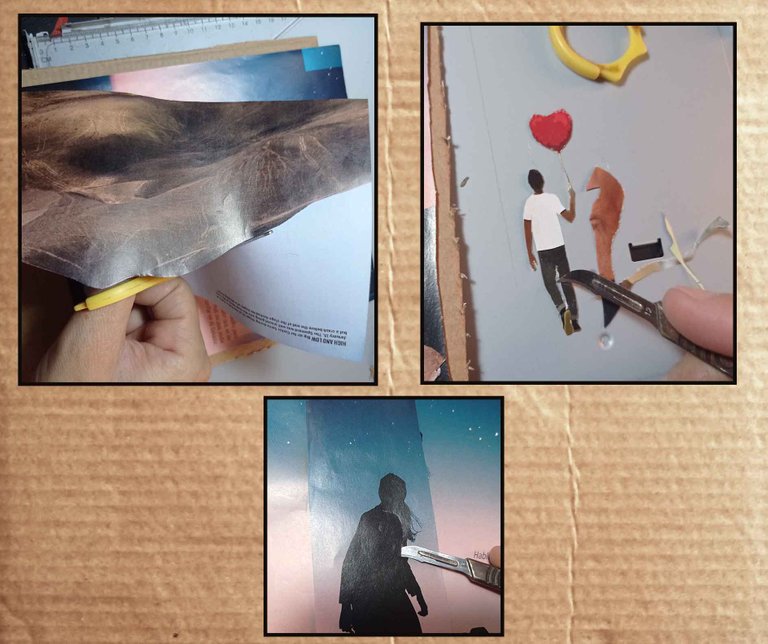
Once I had established how I was going to assemble the collage I applied the final cutout to each of the images. I also thought of adding some small details, like making a cut or incision in the silhouette of the girl to incorporate the cutout of the hand holding a candle so that it would look like it was illuminating from inside the girl, I also made two cuts in the sky in the background to incorporate a moon in the background.
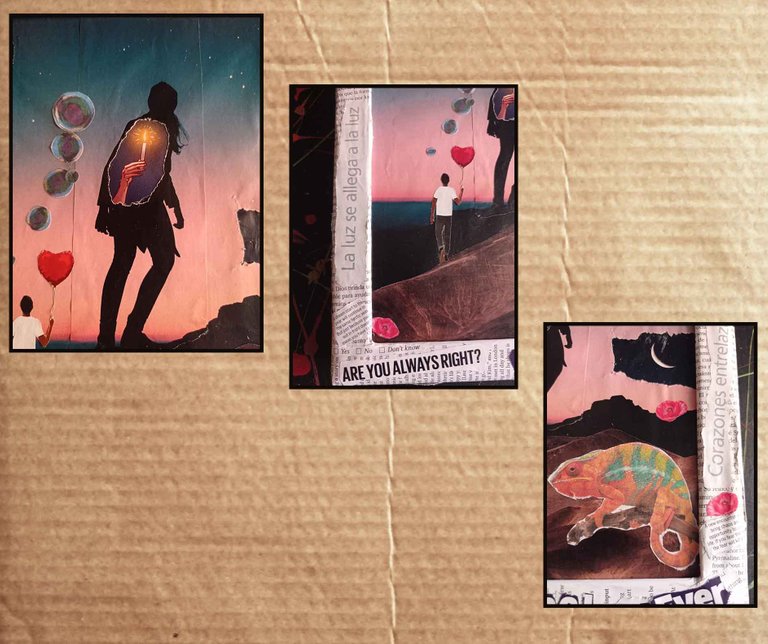
To finish I glued all the images to the cardboard to make the collage and once the glue was dry I joined the collage with the frame.
Al tener establecido como iba a armar el collage fui aplicando el recorte final a cada una de las imágenes. Ademas se me ocurrió agregar unos pequeños detalles, como hacer un corte o incisión en la silueta de la chica para incorporar el recorte de la mano sosteniendo una vela para que tuviera la apariencia de que esta iluminando desde el interior de la chica, también realice dos cortes en el cielo de fondo para incorporar una luna que quedara intercalado en cada uno de ellos.
Para culminar fui pegando todas las imágenes al cartón para armar el collage y una vez secado el pegamento uní el collage con el marco.

Well friends this was the process of this little project, I hope you like it and serve as inspiration for many.
Bueno amigos este fue el proceso de este pequeño proyecto, espero sea de su agrado y sirva de inspiración para muchos.
All photos are my own. / Todas las fotos son de mi autoria.
The editions were made in Photoshop. / Las ediciones las realice en Photoshop.
I translated it using DeepL Translator. / La traduccion empleando DeepL Traductor.
Thank you for sharing this post on HIVE!
Your content got selected by our fellow curator desro & you just received a little thank you upvote from us for your great work! Your post will be featured in one of our recurring compilations which are aiming to offer you a stage to widen your audience within the DIY scene of Hive. Stay creative & HIVE ON!
Please vote for our hive witness <3
Thanks for the support 👍
Has sido votado por
PROYECTO ENLACE
'Conectando Ideas y Comunidades'
PROYECTO ENLACE es un proyecto de curación de habla hispana enfocado en recompensar contenido de calidad y apoyar autores en su proceso de crecimiento en HIVE.
Creemos y apostamos por el futuro de esta gran plataforma, y estamos muy emocionados de poder hacerla crecer junto a esta comunidad. Así que te invitamos a publicar en nuestra COMUNIDAD y estar atento a todas las actividades que tenemos preparadas y que estaremos publicando en breve.
¿QUIERES AUTOMATIZAR TUS GANANCIAS DE CURACIÓN? SE PARTE DEL PROYECTO ENLACE APOYANDO A NUESTRO TRAIL EN HIVE.VOTE INGRESA AQUÍ PARA CONOCER LOS DETALLES.
¿QUIERES INVERTIR ENLACE? DESCUBRE COMO HACERLO Y GENERAR INGRESOS DE FORMA SEMANAL MEDIANTE TU DELEGACIÓN DE HP AQUÍ TE EXPLICAMOS COMO.
Te invitamos a participar en nuestro servidor de Discord: https://discord.gg/3S9y7BbWfS
Atentamente
EQUIPO ENLACE 2023
Muchas gracias por el apoyo
The rewards earned on this comment will go directly to the people sharing the post on Twitter as long as they are registered with @poshtoken. Sign up at https://hiveposh.com.
Un trabajo muy laborioso e imaginativo que hace honor a la mejor tradición del collage, en Picasso, Braque y los surrealistas. Saludos, @anibal-aa.
Gracias, si mi inspiración viene de aquellos grandes artistas del surrealismo.
Gracias, aprecio su apoyo 👍
¡Está muy bueno!
Gracias 👍
Es, cuando menos interesante este collage, me gusta para adornar un área creativa, ya sabe, donde uno tiene el taller para hacer las manualidades y esas cosas.
Tienes razón. Precisamente es el uso que le daré.
Gracias por visitar mi post.
Saludos.
Un trabajo de manualidades me parece lindo gracias por tus ideas
Hola! Aprecio que te haya gustado.
Gracias por pasar por mi publicación.
No tomes en cuenta está señal , es que mis dedos son tan grandes que voy a tocar uno y sale el que no es te pido disculpas pero si claro todo lo que se pueda reciclar es bueno Dios siga dando sabiduría
De verdad que quedó muy hermoso, convertiste un montón de cosas simples en algo maravilloso ✨❤🌟
Hola! Gracias.
Me gusta crear cosas a partir de objetos que no tienen utilidad.
Gracias por pasar por mi post 👍