
Hello everyone...🐱🐾💕
Hello to my dear Hivers, and especially to my dear community of great artists and talents of #HiveDIY. I wish you many, many blessings in every step you take every day of your lives.
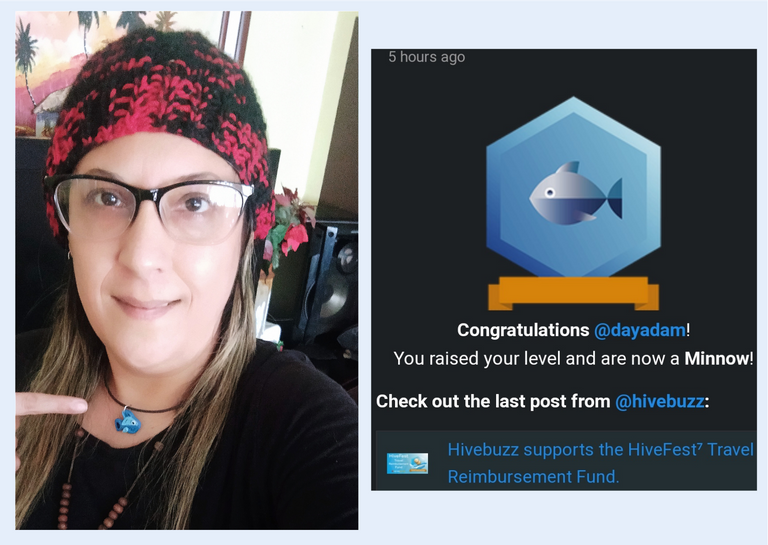
Today I am with you to share a great achievement for me, this morning I received the notification from hivebuzz congratulating me as I had managed to level up and become a Minnow, this is something wonderful as I see materialized the effort and dedication I have put to this beautiful Blockchain during these first 6 months.
And how not to celebrate in the way I love if not with a craft, and in the community that welcomed me warmly in my beginnings and to which I will always be grateful for such a beautiful reception, and in which I have met beautiful people who have supported me so much and I consider a big family.
There are many people who have reached out to me in this beginning, and really the list would be long if I name them one by one, whoever reads my publication knows that it is embodied in it with all my heart and gratitude.
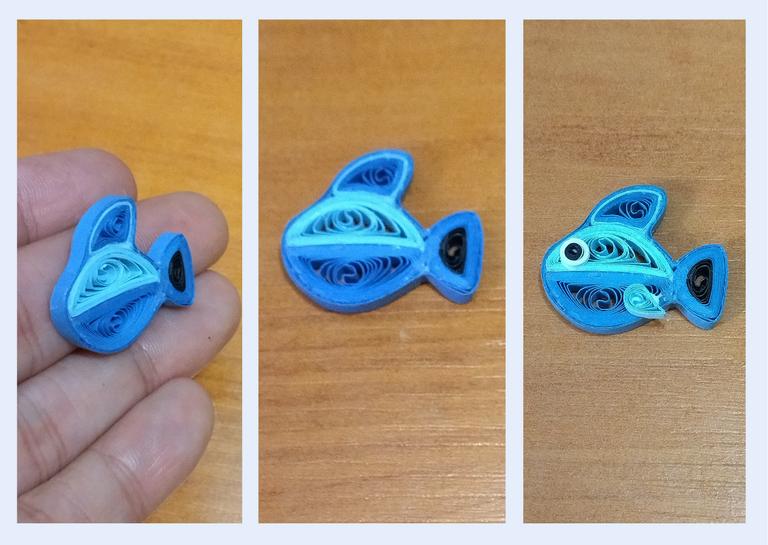
For today I bring you a pendant for necklace of a little fish in the quilling technique, to celebrate this my first great achievement, and to give it to you, I tried to make it as similar as possible to the one you sent me at least in its form, hoping it will be to your liking:
Let's get started: 😃

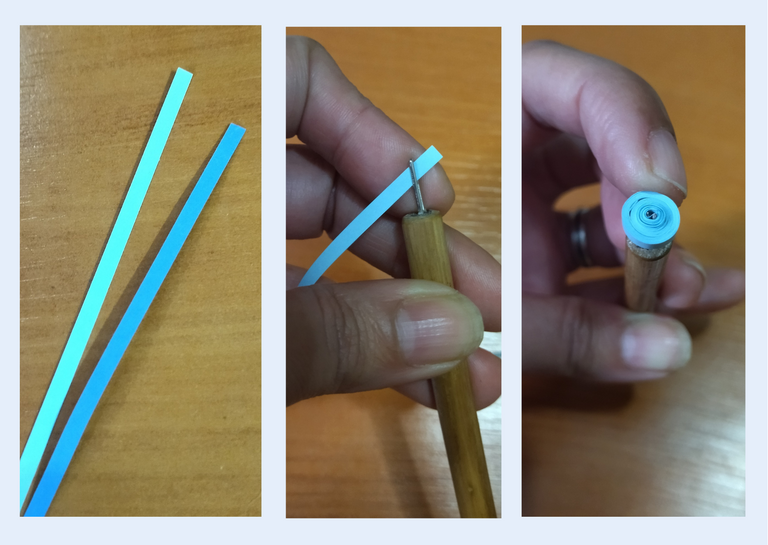
- 3mm wide quilling ribbons, light blue, dark blue, black, and 1mm wide white, black and light blue ribbons.
- Quilling needle.
- Scissors.
- White glue.
- Paintbrush.
- Medium size costume jewelry ring.
- Fine nose pliers.
- Necklace of your choice.
- Glass bottle.
- Solvent X.
- Artistic Resin.

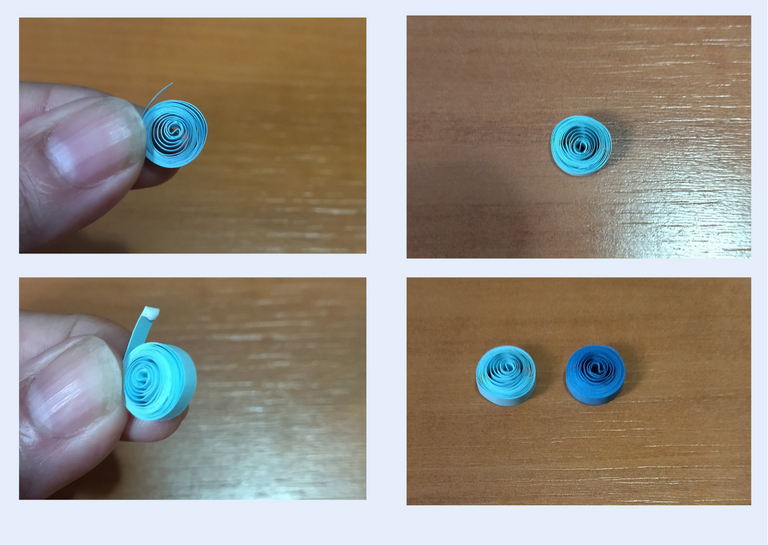
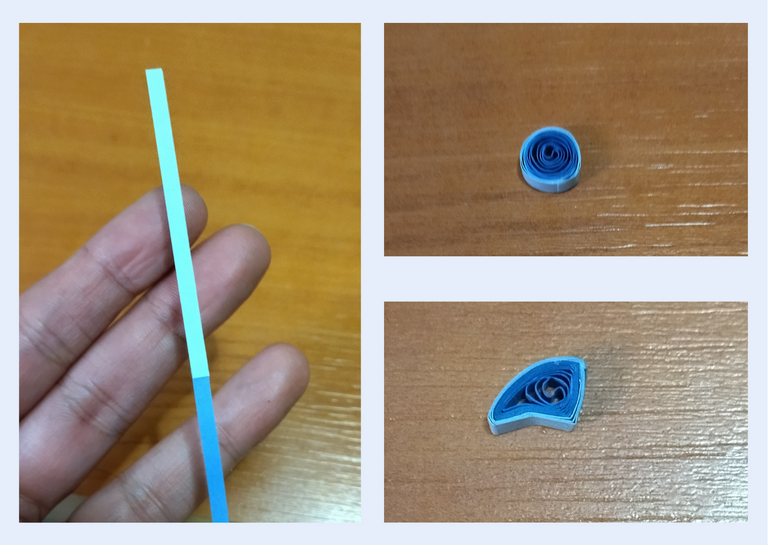
- Let's start by taking 3mm wide ribbons of dark blue and light blue color x 50cms long, we will take the quilling needle, roll it up, take it out of the needle and release it a little, seal it with glue. We must take into account that both the dark blue and light blue circles must be the same size.
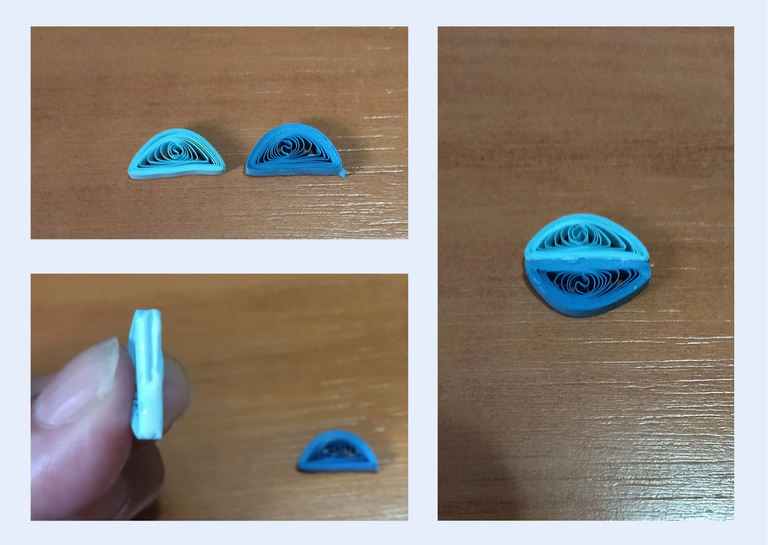
- We will mold both ribbons forming a kind of half moons, once molded we will add glue on the straight part of the ribbon and we will join both pieces, let dry and reserve.

Hola a todos... 🐱🐾💕
Hola a mis queridos Hivers, y en especial a mi querida comunidad de grandes artistas y talentos de #HiveDIY. Les deseo muchísimas bendiciones en cada paso que den cada día de sus vidas.Hoy me encuentro con ustedes para compartir un gran logro para mí, está mañana recibí la notificación de hivebuzz felicitándome ya que había logrado subir de nivel y ser un Minnow (pececillo), esto es algo maravilloso ya que veo materializado el esfuerzo y dedicación que le he puesto a esta hermosa Blockchain durante estos primeros 6 meses.
Y como no celebrar de la manera que me encanta si no es con una manualidad, y en la comunidad que me acogió cálidamente en mis inicios y a la cual siempre le estaré agradecida por tan bello recibimiento, y en la que he conocido a hermosas personas que me han apoyado tanto y considero una gran familia.
Son muchas las personas que me han tendido la mano en este comienzo, y realmente la lista se me haría larga si los nombrara uno a uno, el que lea mi publicación sabe que está plasmada en ella con todo mi corazón y gratitud.
Para hoy les traigo un dije para collar de un pececillo en la técnica de quilling, para celebrar este mi primer gran logro, y para regalárselos a ustedes, trate de hacerlo lo más parecido al que me enviaron por lo menos en su forma, esperando sea de su gusto:
Comencemos:😃

• Cintas de quilling de 3mm de ancho, azul claro, azul oscuro, negra, y cintas de 1mm de ancho blanca, negra y azul claro.
• Aguja para quilling.
• Tijera.
• Pega blanca.
• Pincel.
• Argolla mediana de bisutería.
• Alicate punta fina.
• Collar de tu preferencia.
• Frasco de vidrio.
• Solvente X.
• Resina Artistica.

• Vamos a comenzar tomando cintas de 3mm de ancho color azul oscuro y color azul claro x 50cms de largo, tomaremos la aguja para quilling enrollamos sacamos de la aguja y soltaremos un poco, sellamos con pega. Debemos tomar en cuenta que ambos círculos tanto el azul oscuro como el claro deben quedar del mismo tamaño.
• Vamos a moldear ambas cintas formando una especie de medias lunas, al estar moldeadas añadiremos pega por la parte recta de la cinta y uniremos ambas piezas, dejamos secar y reservamos.
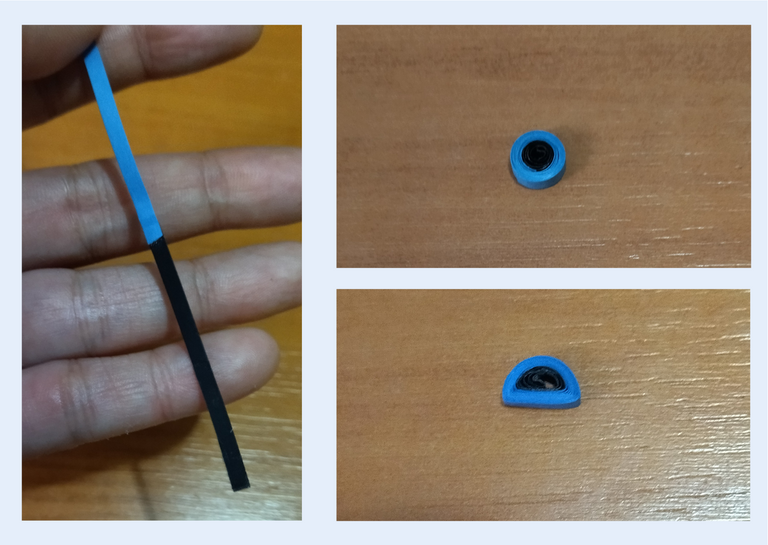
- We are going to make the tail of the little fish, we will take 3mm wide dark blue ribbon x 25cms long and 3mm wide black ribbon x 4cms long we join both to form a single ribbon, we roll it as we did before with the quilling needle starting with the black part, we will give it the size according to the piece we are making, we seal it with glue and we will mold it in a half moon shape as we did with the previous pieces. Set aside.
- Now we will make the fin of the upper part, we will take a piece of dark blue ribbon 3mm wide x 14cms long, and another piece of light blue ribbon 3mm wide 7cms x long, we will unite in a single ribbon we roll starting with the dark blue part, when we finish our circle we will shape our upper fin.
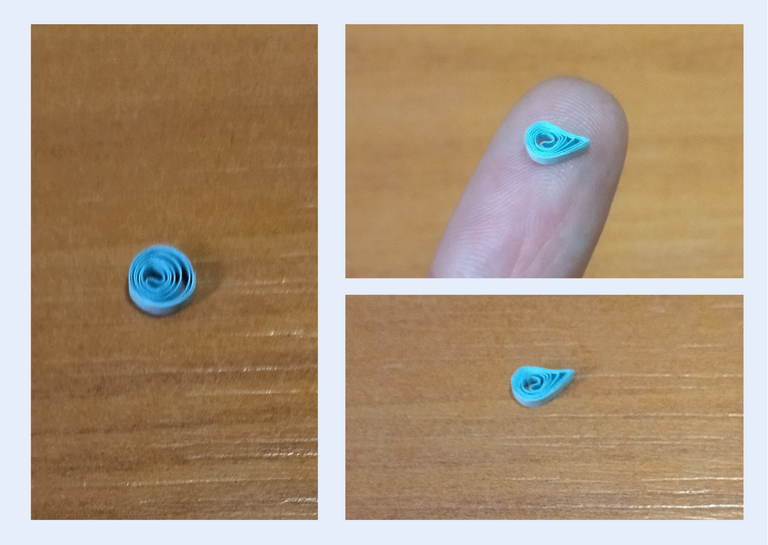
- Let's go with the lower fin, we take a piece of light blue quilling ribbon 1mm wide x 7cms long, we roll with the needle and when we get our circle as we have done in the previous processes, we shape the small fin, we reserve.
• Vamos a realizar la cola del pececillo, tomaremos cinta de 3mm de ancho color azul oscuro x 25cms de largo y cinta negra de 3mm de ancho x 4cms de largo unimos ambas para formar una sola cinta, enrollamos cómo lo hicimos anteriormente con la aguja para quilling comenzando por la parte negra, le daremos el tamaño según la pieza que estamos haciendo, sellamos con pega y moldearemos en forma de media luna como lo hicimos con las piezas anteriores. Reservamos.
• Ahora realizaremos la aleta de la parte superior, tomaremos un trozo de cinta azul oscuro de 3mm de ancho x 14cms de largo, y otro trozo de cinta azul claro de 3mm de ancho 7cms x de largo, uniremos en una sola cinta enrollamos comenzando por la parte azul oscura, al culminar nuestro círculo daremos forma a nuestra aleta superior.
• Vamos con la aleta inferior, tomamos un trozo de cinta de quilling azul claro de 1mm de ancho x 7cms de largo, enrollamos con la aguja y al obtener nuestro círculo como lo hemos realizado en los procesos anteriores, moldeamos la pequeña aleta, reservamos.
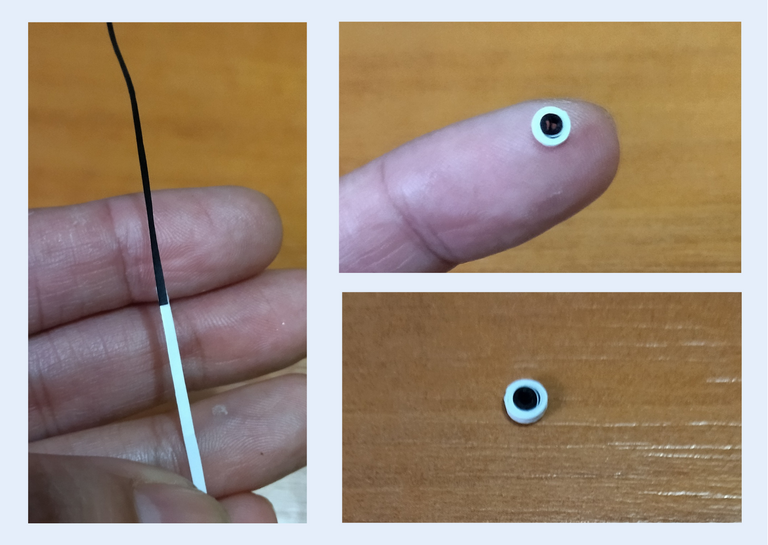
- To finish the pieces and then join them together, we will make the eye of our fish, we will take a piece of black ribbon 1mm wide x 5cms long and a piece of white ribbon 1mm wide x 6cms long, we join into one, we roll up starting with the black part forming a closed circle.
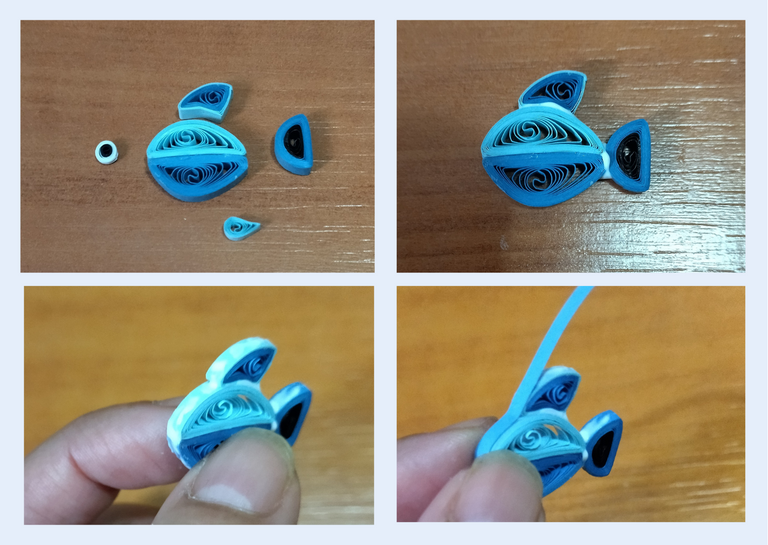
- Once our pieces are ready, we proceed to join them together. We will begin by gluing the upper fin and the tail of the fish, now we will take a piece of dark blue ribbon and glue around it, we will do this to give more firmness to the piece, finally, we glue the lower fin and the little eye.
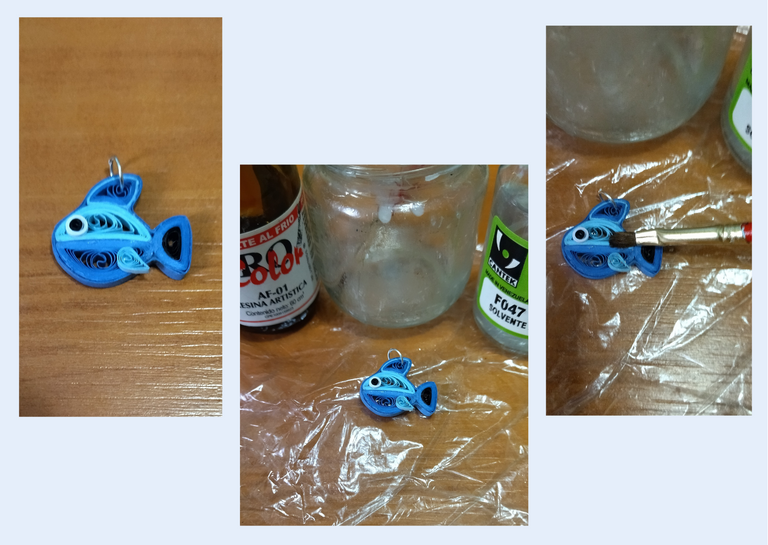
- As I am going to use my beautiful fish pendant in a necklace, I put a medium size jewelry ring in the upper fin, and I proceeded to give it its liquid protection, adding in a bottle a little bit of solvent x, artistic resin, and with a brush I put it to the whole piece and let it dry.
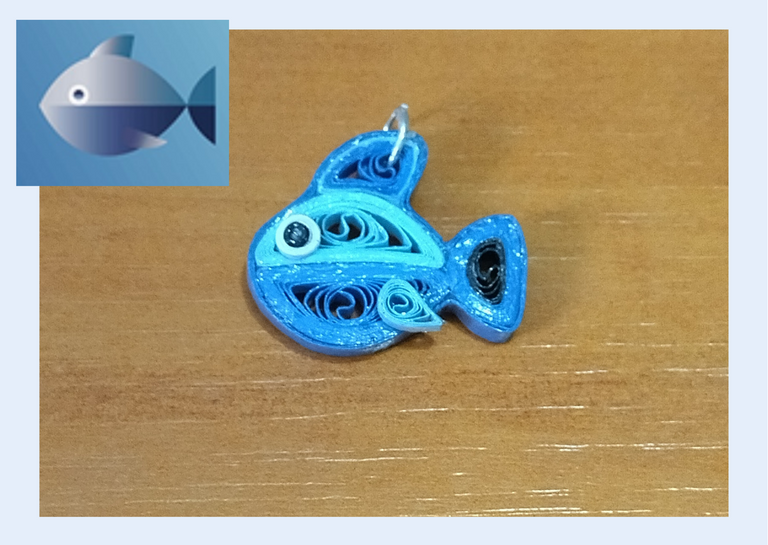
In this way I have my little Minnow pendant in celebration of my new achievement in Hive, I hope you liked it and that many of you are encouraged to make it.
• Para finalizar las piezas y luego unirlas, vamos a realizar el ojo de nuestro pez, tomaremos un trozo de cinta negra de 1mm de ancho x 5cms de largo y un trozo de blanca de 1mm de ancho x 6cms de largo, unimos en una sola, enrollamos empezando por la parte negra formando un círculo cerrado.
• Listas nuestras piezas procedemos a unir. Comenzaremos pegando la aleta superior y la cola del pez, ahora tomaremos un trozo de cinta azul oscuro y pegamos alrededor del mismo, esto lo haremos para dar más firmeza a la pieza, por último, pegamos, la aleta inferior, y el ojito.
• Cómo voy a utilizar mi bonito dije de pez en un collar, le coloque una argolla mediana de bisutería en la aleta superior, y procedí a darle su protección líquida, añadiendo en un frasco un poco de solvente x, resina artística, y con un pincel le coloque a toda la pieza dejando secar.
De esta manera tengo mi dije de Minnow (pececillo), en celebración a mi nuevo logro en Hive, esperando que le haya gustado y que muchos de ustedes se animen a realizarlo.

What did you think, did you like it?
I hope you did, I hope you liked my explanation, procedure and photos, I made them with love for you.
"Let out that muse that inspires you, and let your imagination fly".
Thank you all, see you next time. 🐾🐱💕
¿Que les pareció, les gustó?
Espero que sí, que les haya gustado mi explicación, procedimiento y fotos, los hice con mucho cariño por y para ustedes.
"Deja salir esa musa que te inspira, y deja volar tu imaginación".
Gracias a todos, nos vemos en la próxima. 🐾🐱💕
Todas las fotos usadas en este post son de mi autoría y han sido sacadas en mi celular personal un Redmi 9T y editadas Canva Banner y separador hecho por mí en Canva Traducido con la ayuda de DeepL

The rewards earned on this comment will go directly to the people( @dayadam ) sharing the post on Twitter as long as they are registered with @poshtoken. Sign up at https://hiveposh.com.
Wow! It looks so much like the Minnow HiveBuzz badge! Once again, my favorite colors!
I congratulate you on this accomplishment! Very happy always for you and I look at your work with great admiration! May your day be sunny and exciting!
A big hug! 🙌
!LUV 💜💛💚💙
@stdd(1/1) gave you LUV. tools | wallet | discord | community | <><
HiveBuzz.me NFT for Peace
Thank you dear friend @stdd . It is nice to see your words here. I love that you liked my fish and the colors. I tried to make it as similar as possible and it came out hahahahaha....
A big hug for you. It will always be nice to have you around.
Blessings today, and all the days of your life. 🌺🙂💐💕🎊🎉😍😻☺️❤️🌹🥰😘🤗✨🌈💗
Poco a poco cosechando éxitos, sabía cuando te vi por primera vez acá que te esperaba un gran futuro en la plataforma porque tu trabajo es increíble, además tienes una hermosa personalidad que se transmite en todas tus publicaciones. Muchos éxitos
Oye pero que bella amiga @irenenavarroart. Sabes que estoy muy agradecida contigo y siempre lo estaré, fuiste la primera en darme un empujón, me diste las primeras recomendaciones de los pasos que debía seguir, mucho de esto te lo debo a ti, ya que comencé a conocer más, explorar otras comunidades y todo por tus consejos. De verdad MIL GRACIAS❤️.
De verdad me gratifica verte por aquí, y creeme que ahora te entiendo, no tengo tantos seguidores como tú, y aún así estoy bien satisfecha con los que tengo y que me he dado a conocer mucho en la plataforma, y se que nos perdemos entre tantos post, comentarios, y nuestro propio trabajo y a veces no es querer, si no es que es duro querer hacer tanto y valorar tantas cosas y gente maravillosa que hay por aquí, pero es difícil abarcar tanto.
Aun lo más que he podido publicar en una semana son 4 veces, eso es un éxito para mí jajaja, algún día seré como tú.
Abrazos y mil bendiciones, te deseo lo mejor de la vida y que sigan los éxitos amiga. 🤗😘🥰✨🌈💕
!LADY 🌹
View or trade
LOHtokens.@dayadam, you successfully shared 0.1000 LOH with @irenenavarroart and you earned 0.1000 LOH as tips. (1/1 calls)
Use !LADY command to share LOH! More details available in this post.
Post votado por la Curación de la Comunidad de Mundo Virtual. Recibes algunos Huesos
Le invitamos a que conozca nuestra Comunidad de Hive
Gracia por el apoyo @mv-curacion ☺️
Congratulations, your post has been upvoted by @dsc-r2cornell, which is the curating account for @R2cornell's Discord Community.
Enhorabuena, su "post" ha sido "up-voted" por @dsc-r2cornell, que es la "cuenta curating" de la Comunidad de la Discordia de @R2cornell.
Thank you very much for your support. I feel very honored by it.
Success for your project @dsc-r2cornell ✨
Muy hermoso tu pez, mis felicitaciones por tu logro, todo esfuerzo siempre tiene su recompensa,saludos 🦋
Gracias por pasar por acá y por tu felicitación preciosa @anamariag. Éxitos y bendiciones 🙂💐☺️❤️🌹🥰😘🤗✨
Te quedó muy lindo este pecesito! Adoro está técnica y me gustaría probarla pronto. Ah y felicidades por ese primer gran logro 😊✨
Muchísimas gracias. Me alegra que te gustará. Gracias por tu felicitación. Intentando. Ante cualquier duda por aquí estoy a la orden. Saludos @estefania3 🙂💐☺️❤️🌹🥰😘🤗✨🌈💗🌺
Muchas felicidades amiga. Que sean muchos más logros los que alcancemos en esta estupenda blokchain.
También me lo gané hace como 4 días. Quería escribir sobre eso, pero aún no se en donde colocarlo.
Pero tú lo has hecho como mejor lo sabes hacer con tu hermoso trabajo manual, te ha quedado bello tu pez azul. Ese es tuyo y te luce muy bien.
Yo estoy que quiero hacer algo de esto, pero no he logrado comprar la herramientas y ese líquido que usas, aunque en este veo, que solo le echaste pega blanca.
Saludos y bendiciones amiga bella @dayadam
Gracias mi bella amiga @leidimarc. Hermosas como siempre tus palabras. En cuanto ví ese logro fue lo primero que se me ocurrió ya que así comencé por aquí, no quise dejarlo plasmado solo en palabras, cómo celebrarlo más que haciendo lo que se jajajaja.
No solo le puse pega blanca, pero puedes hacerlo con sumo cuidado. Es más olvide colocar en los materiales la resina, pero si la coloque en le proceso final en las fotos, si no me lo dices no me doy cuenta, tuve que editar y añadirlo a los comentarios jajaja.
Espero ver pronto tu escrito con respecto a tu logro. Mil felicidades también y que sigan los éxitos. Bendiciones ❤️🌹🥰😘🤗✨🌈💗💗🌺🙂💐☺️💕🎊🎉😍😻
Si amiga como siempre muy original, la forma de celebrarlo y comunicarlo.
Serán muchos los logros que tendremos de ahora en adelante, ya verás.
Felicidades amiga, te ha quedado muy lindo, siempre haces cosas hermosas 🐟🐟🐟
Gracias mi corazón por siempre visitarme y por tus lindos comentarios. Me alegro mucho que te guste mi trabajo. Bendiciones @sylregne 😘💗🌺💐💕😍✨🌈🤗
Sister it is really awesome. Can we use plastic ribbon for making minnow because I am taking tutorial from YouTube. They mostly recommend thread there.
Thanks for stopping by and for your comment.
I've never used plastic tapes, but it sounds interesting, it's all a matter of testing, try it and let me know.
I have always used paper tapes, and cardboard, or other materials such as fabrics, thread should also be useful.
I always do tests, and if everything goes well I make the tutorial to share it with you.
I'll be glad to help you.
I was delighted that you liked the work.
Good luck to you... @blueflipper123 🤗☺️🥰❤️🌹
Wow! this is great sis @dayadam. You are truly talented and skilled artist. Thanks for sharing.
Thank you for your beautiful comment.
Welcome here whenever you want, I am at your service.
Good luck to you. @jenthoughts 🤗☺️🥰❤️🌹
Excelente amiga 😊 felicitaciones seguimos nadando jajaja
Palante amigo. A seguir nadando en este océano hasta ser unas grandes ballenas, esa es la meta jajajaja.
Gracias por pasar, un gran abrazo mi estimado @edwing357 🤗🥰😘❤️
Siiii 🐳🐳🐳🐳🐳🐳🐋🐋
🐳
Una bien gigante ❤️
Jajajaja la más grande de todas eso será genial ☺️
Congratulations making a minnow, @dayadam !
I am very happy for you.
Keep it up, my friend!
Thank you very much, beautiful friend.
I am pleased to see you here and much more to receive your congratulations.
Hugs and a thousand blessings @silversaver888 🤗🥰😘❤️🌹
Te quedó hermoso... Un bonito homenaje a ese logro superado amiga. Brindemos porque sea el primero de muchos 🍾🥂...salud! Bendiciones para ti
🎆🎇🎉🎊🌧️💐✨🌾🌱🌹🌙🌿🍃🥀⚡🌺☘️🍀🌈🌷⭐🪴🌵🌸🌟💮🌴🌳💫☀️💮☔🌲🌳🌍🌌🌠☄️🏵️🐝🌻🌼🍄🐞🦋💙☕💜🍍🎆🎇🎉🎊
Gracias preciosa amiga @chacald.dcymt. Me alegra que te gustará. En cuanto ví la notificación y también tu mensaje, al colocarte que debía celebrarlo se me vino esta idea a la cabeza y lo logré en un día.
Salud, brindemos y amén. Que sigan los éxitos a seguir nadando hasta ser ballenas, Dios me escuche...
Tu también me has ayudado a lograr esto. Mil gracias.
Millones de bendiciones mi bella. 🌹❤️😘🥰🤗🌈✨😍💕🙂🎊🎉😻☺️💗🌺💐🐱❣️💋🐾🍕
!LADY
View or trade
LOHtokens.@dayadam, you successfully shared 0.1000 LOH with @chacald.dcymt and you earned 0.1000 LOH as tips. (1/1 calls)
Use !LADY command to share LOH! More details available in this post.
🐳💜
🎆🎇🎉🎊🌧️💐✨🌾🌱🌹🌙🌿🍃🥀⚡🌺☘️🍀🌈🌷⭐🪴🌵🌸🌟💮🌴🌳💫☀️💮☔🌲🌳🌍🌌🌠☄️🏵️🐝🌻🌼🍄🐞🦋💙☕💜🍍🎆🎇🎉🎊
Y las que te faltan.. Este es un gran comienzo. Todos nos alegramos por ti y nada mejor que celebrarlo con este hermoso detalle que te quedo muuuuuy adorable!! Adelante querida artista!
Gracias mi amor por tu hermoso comentario, y por tus grandes deseos para mí. Este es un comienzo para mí y por grandes como tú que me han apoyado es que estoy avanzando.
Que bueno que te gustó mi pececito, que mejor manera que celebrar haciendo lo que me gusta jajaja.
Éxitos para ti mi vida, seguiremos avanzando hasta ser si Dios quiere grandes ballenas.
Las más grandes 🐳
Para allá vamos, y ya verás que lo lograremos muuuuy pronto.. Feliz tarde <3 <3
Hermoso dije acuático amiga
con materiales faciles
saludos
Gracias amiga. Que bueno que te gustó 😘🥰🤗
Congratulations @dayadam! You have completed the following achievement on the Hive blockchain and have been rewarded with new badge(s):
Your next payout target is 2000 HP.
The unit is Hive Power equivalent because post and comment rewards can be split into HP and HBD
You can view your badges on your board and compare yourself to others in the Ranking
If you no longer want to receive notifications, reply to this comment with the word
STOPCheck out the last post from @hivebuzz:
Support the HiveBuzz project. Vote for our proposal!
Hermoso tu trabajo amiga!
Gracias por compartir.
Saludos.
Gracias amiga @elmundodebetty Saluditos ✨🤗💫
Felicitaciones amiga. 💐💐💐
Gracias bella @yusma21 😚❤️🌹