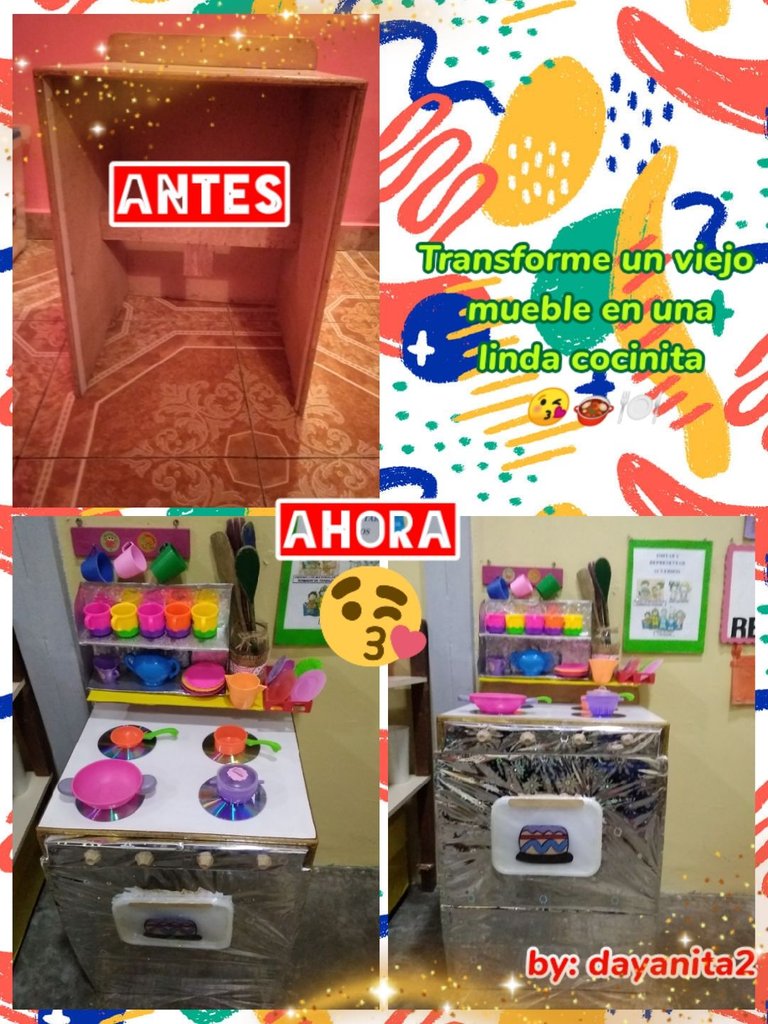
Hola, hola, a todos los integrantes de esta bella y creativa comunidad 🤗😘!!! espero se encuentren bien🙏
Hoy les traigo uno de mis más grandes proyectos, pues siempre he realizado pequeñas manualidades pero a todo hay que atreverse. El de hoy me impulso a realizarlo mi grupo de estudiantes, como ya lo he dicho anteriormente soy maestra de preescolar y como toda docente nos preocupamos por tener nuestra aula hermosa para que nuestros niños y niñas se sientan bien y lo disfruten. Este año tengo el honor de trabajar con los más pequeños ya que tienen entre 2 y 3 años de edad y a veces a ellos les resulta un tanto difícil su adaptación por esta razón es importante ambientar lo mejor posible.
Y bueno en este salón donde estoy no había cocinita solo un viejo mueble ya dañado por la humedad y el maltrato de los años que era anteriormente una lavadora, en vista de que ya no tenía ninguna función lo iban a desechar y nuestro salón quedaría aún más vacio, es allí donde se me ocurrió voy a llevarlo a casa para convertirlo en cocinita ya que aquí en este espacio no hay nada que llame la atención de nuestros pequeños.
Y ahora si les contaré como lo transforme en una bella cocinita, ustedes también la podrán realizar echando a volar su imaginación😊.
Qué materiales utilice son los siguientes?📝
✔️ Reutilice el viejo mueble que anteriormente era una lavadora
✔️ Una caja de cartón delgada y una tapa de cartón que sea resistente
✔️ 1 Cartón de huevos
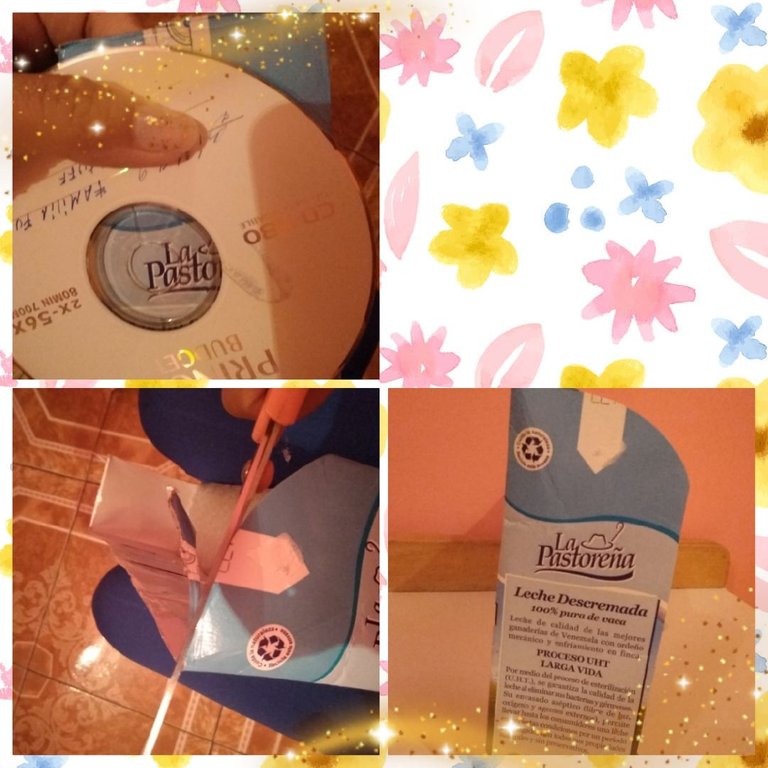
✔️ 4 Cd de música
✔️ Regla,cinta métrica, lápiz, tijera,cuchillo, cinta pegante transparente, pistola de silicón y silicón líquido
✔️ 2 pliegos de Papel de regalo metalizado y papel celofán transparente
✔️ 1/2 metro de papel contac amarillo
✔️ Foami metalizado
✔️ 1 tapa plástica
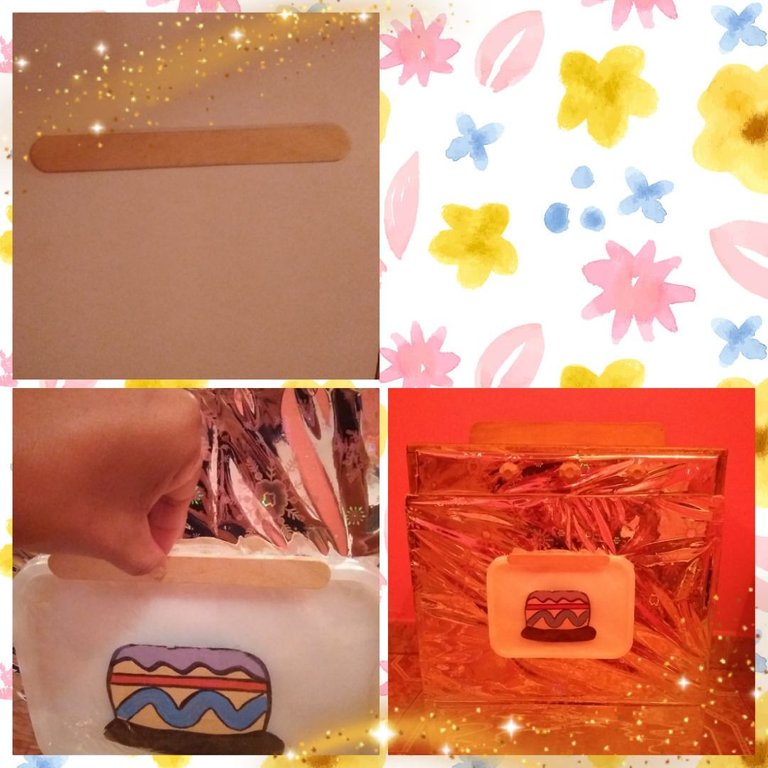
✔️ 1 imágen de una torta
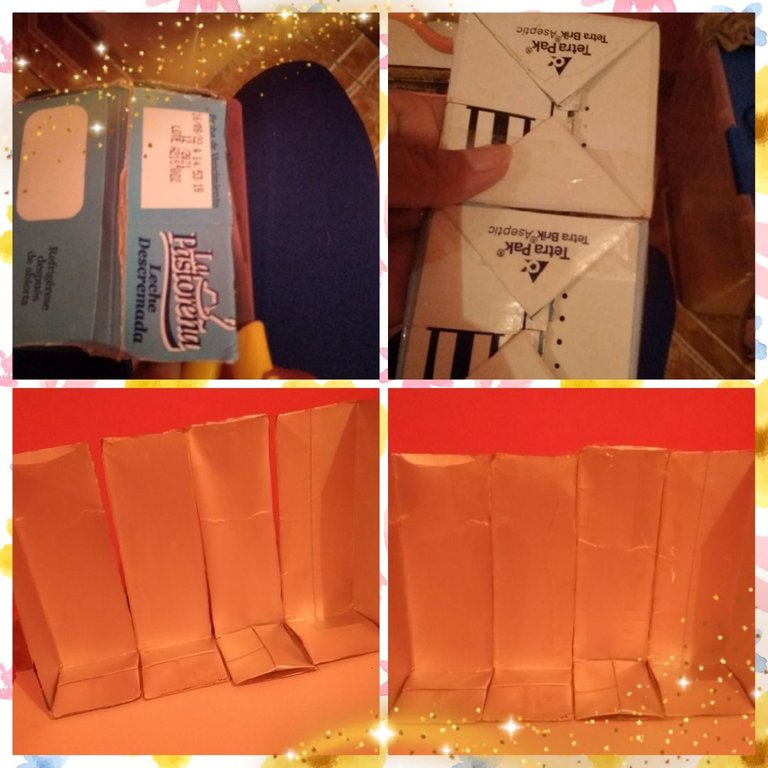
✔️ 3 potes de leche tetrapak
✔️ 1 paleta de madera gruesa
✔️ 1 Envase plástico de donde viene la mayonesa
✔️ Yute (especie de tela de saco)
Hello, hello, to all the members of this beautiful and creative community 🤗😘!!! I hope you are well 🙏
Today I bring you one of my biggest projects, because I have always made small crafts but you have to dare everything. Today my group of students encouraged me to do it. As I have said before, I am a preschool teacher and, like all teachers, we care about having our classroom beautiful so that our boys and girls feel good and enjoy it. This year I have the honor of working with the little ones since they are between 2 and 3 years old and sometimes it is a bit difficult for them to adapt, for this reason it is important to set the scene as well as possible.
And well, in this living room where I am, there was no kitchenette, just an old piece of furniture already damaged by humidity and the mistreatment of the years that was previously a washing machine, since it no longer had any function, they were going to throw it away and our living room would be even more empty, that is where it occurred to me that I am going to take it home to turn it into a kitchenette since here in this space there is nothing that attracts the attention of our little ones.
And now if I'm going to tell you how I turned it into a beautiful little kitchen, you can also do it by letting your imagination fly 😊.
What materials do you use are the following?📝
✔️ Reuse the old piece of furniture that was previously a washing machine
✔️ A thin cardboard box and a cardboard lid that is resistant
✔️ 1 Carton of eggs
✔️ 4 CDs of music
✔️ Ruler, tape measure, pencil, scissors, knife, transparent glue tape, silicone gun and liquid silicone
✔️ 2 sheets of metallic gift paper and transparent cellophane paper
✔️ 1/2 meter of yellow contact paper
✔️ Metallic foam
✔️ 1 plastic lid
✔️ 1 image of a cake
✔️ 3 pots of tetrapak milk
✔️ 1 thick wooden palette
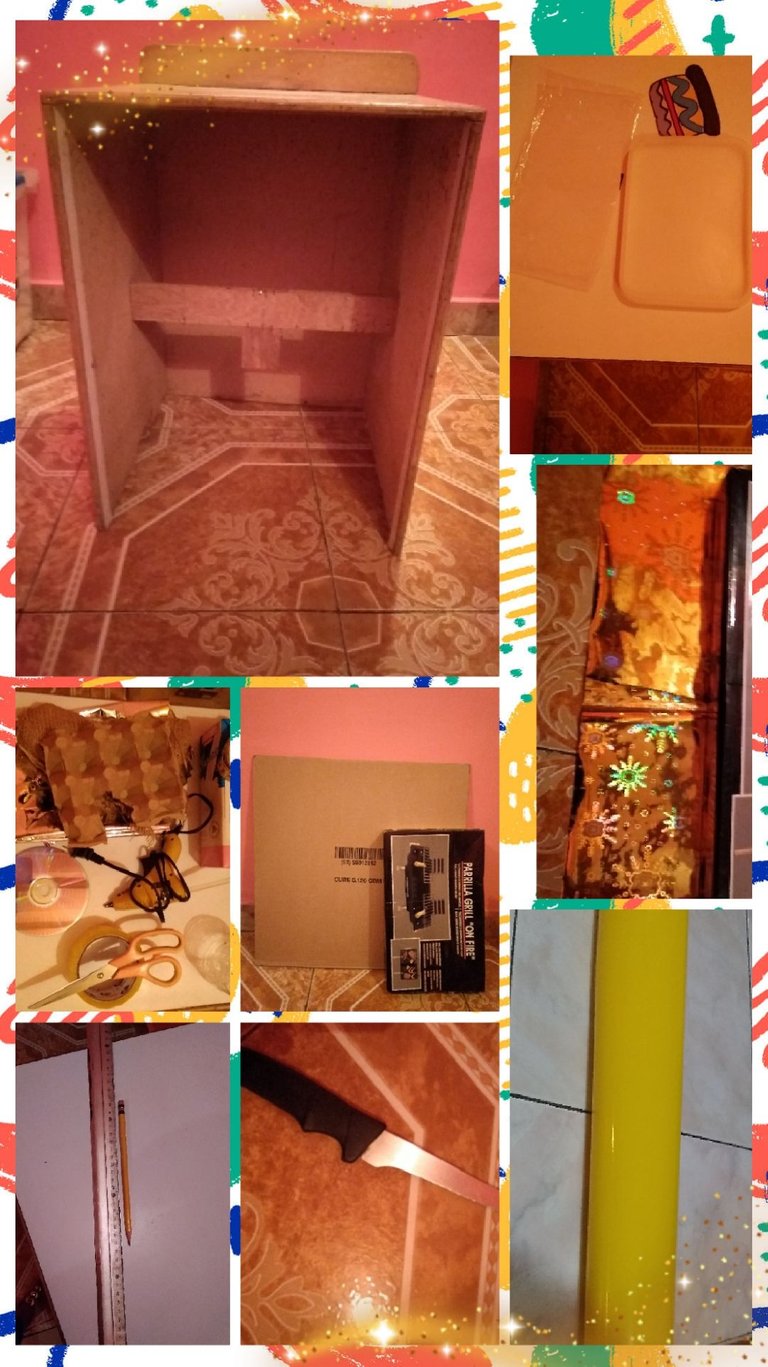
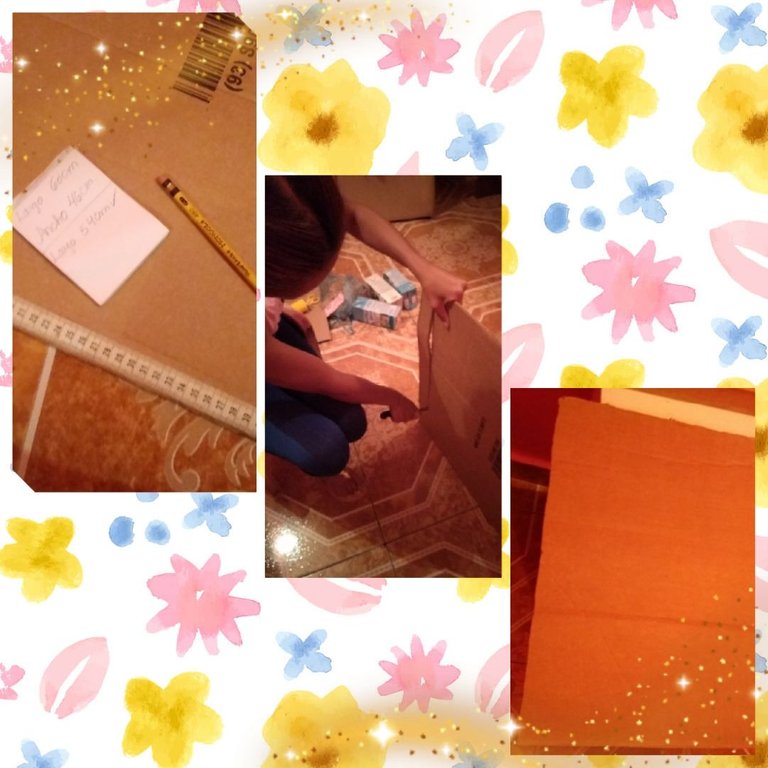
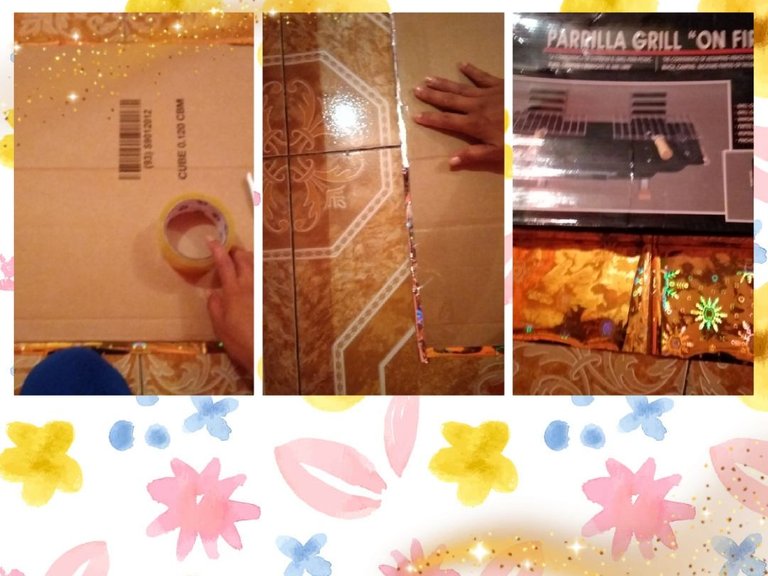
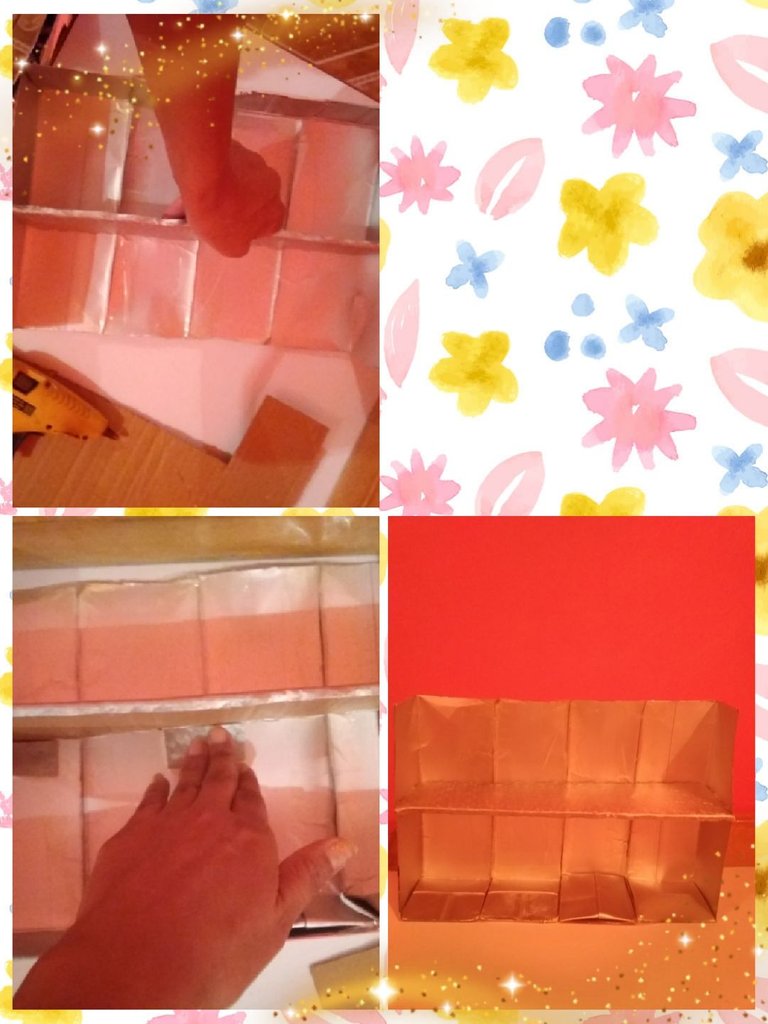
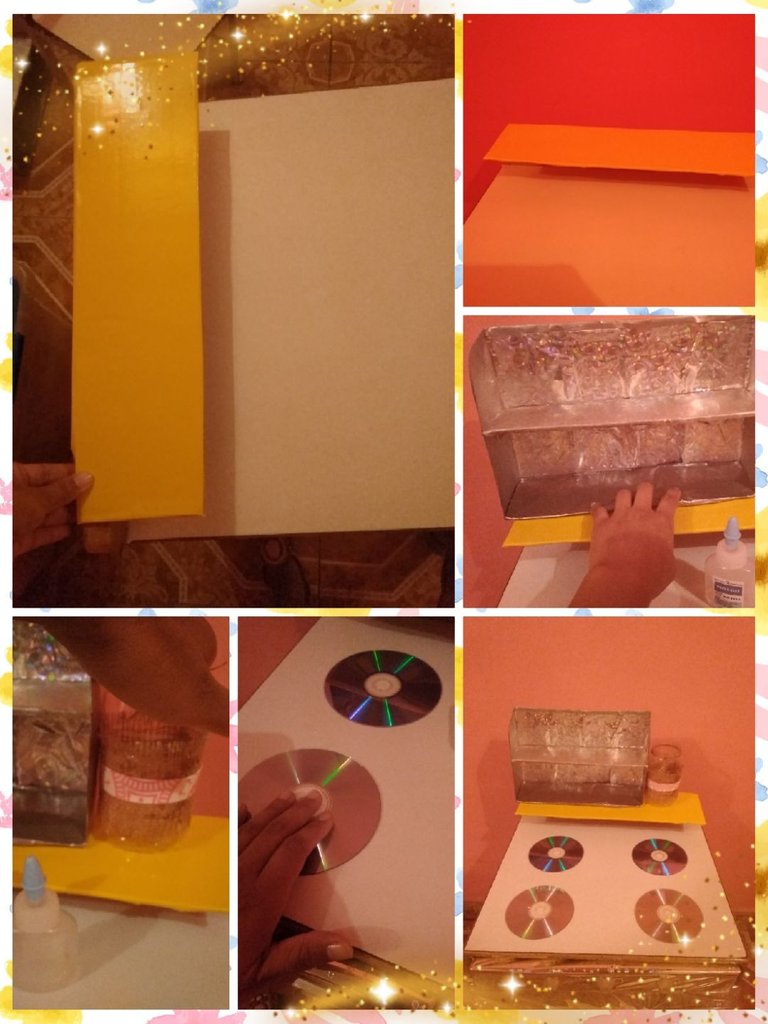
Lo primero que hice fue tomar las medidas con la cinta métrica, conseguí una caja delgada que inserte y quedo perfectamente para colocar las hornillas de la cocina, medí nuevamente para cortar la tapa de abajo que sería el horno sus medidas fueron de: 60cm de largo x 46cm de ancho, marque sobre el cartón y con el cuchillo con toda la precaución para no hacerme daño lo corte, lo medí y quedo perfecto.
The first thing I did was take the measurements with the tape measure, I got a thin box that I inserted and it fit perfectly to place the kitchen burners, I measured again to cut the bottom lid that would be the oven, its measurements were: 60cm long x 46cm wide, mark on the cardboard and with the knife with all the caution so as not to hurt myself, I cut it, measured it and it was perfect.
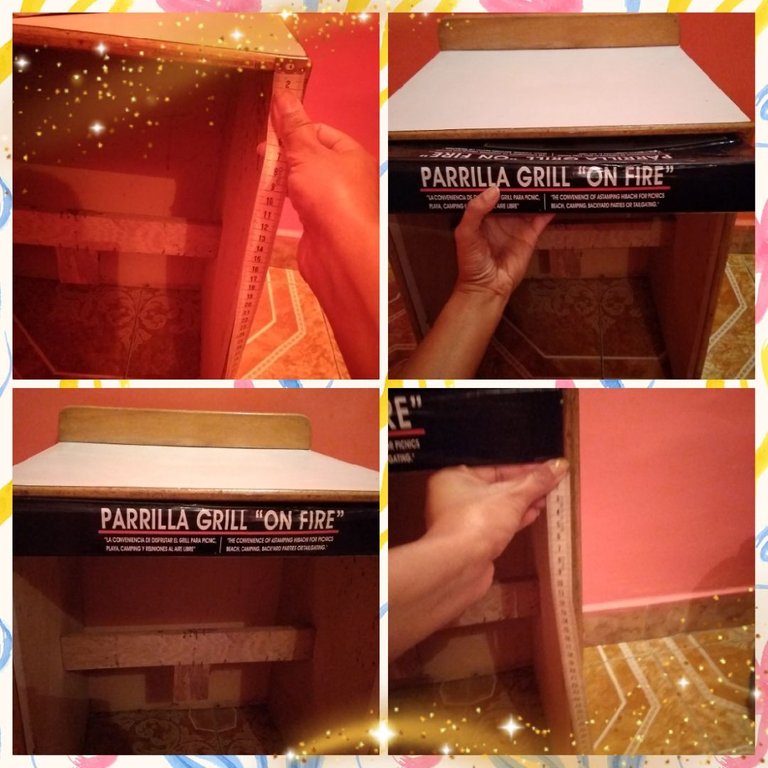
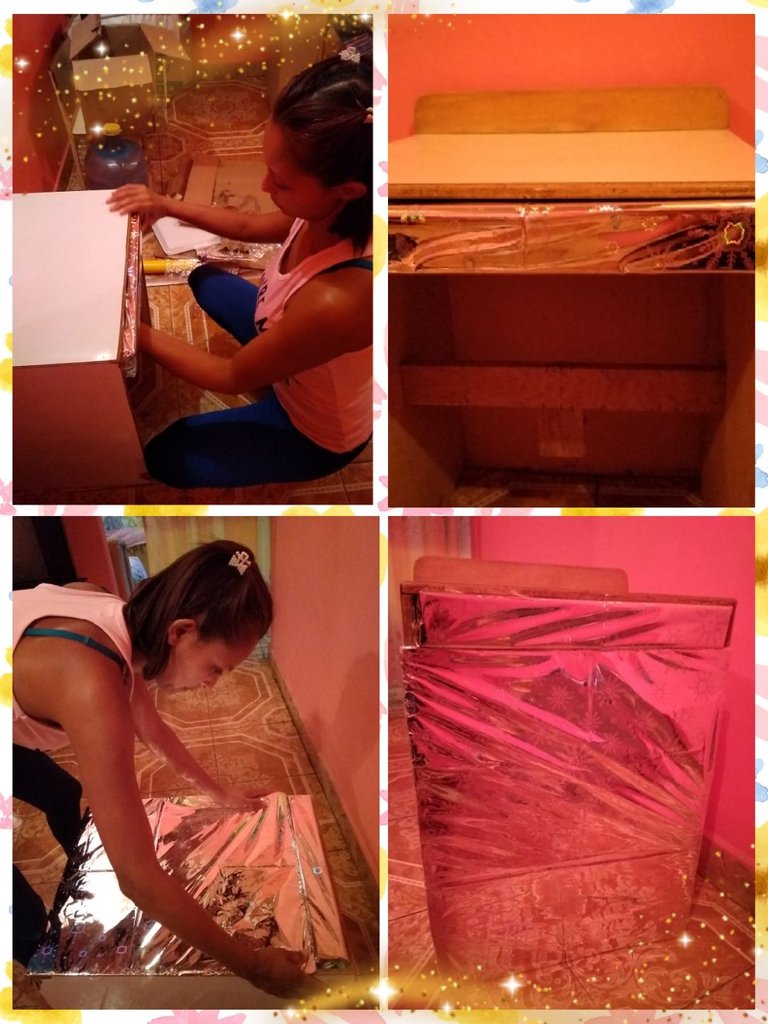
Tome el papel de regalo metalizado y mi cinta pegante y forre la tapa que será el horno y la caja delgada.
Ya forrados mis dos piezas primero encaje la caja delgada y luego coloque abundante silicón caliente sobre los bordes del cajón presione unos segundos y listo quedo sellado.
Once my two pieces are lined, first fit the thin box and then place plenty of hot silicone on the edges of the drawer, press for a few seconds and that's it, it's sealed.
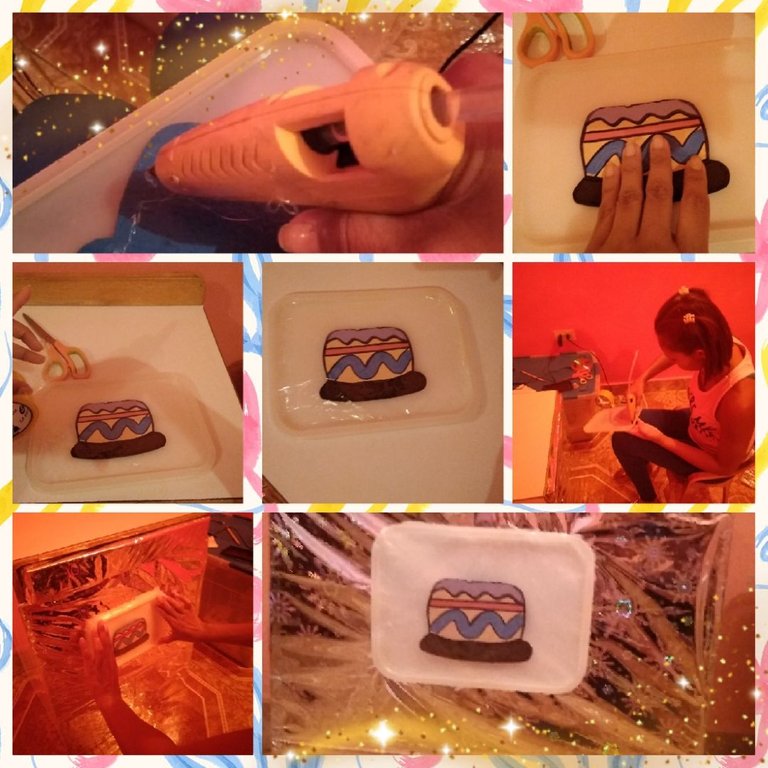
Tome la tapa plástica que era de un pote de helado que iba a desechar aquí le dí otra utilidad, la imágen de la torta la pegue en el centro de la misma usando la pistola de silicón luego forre la tapa con papel celofán transparente para dar la semejanza del vidrio del horno de la cocina, luego lo pegue centrandolo en la parte de abajo, use abudante silicón para evitar que se despegue.
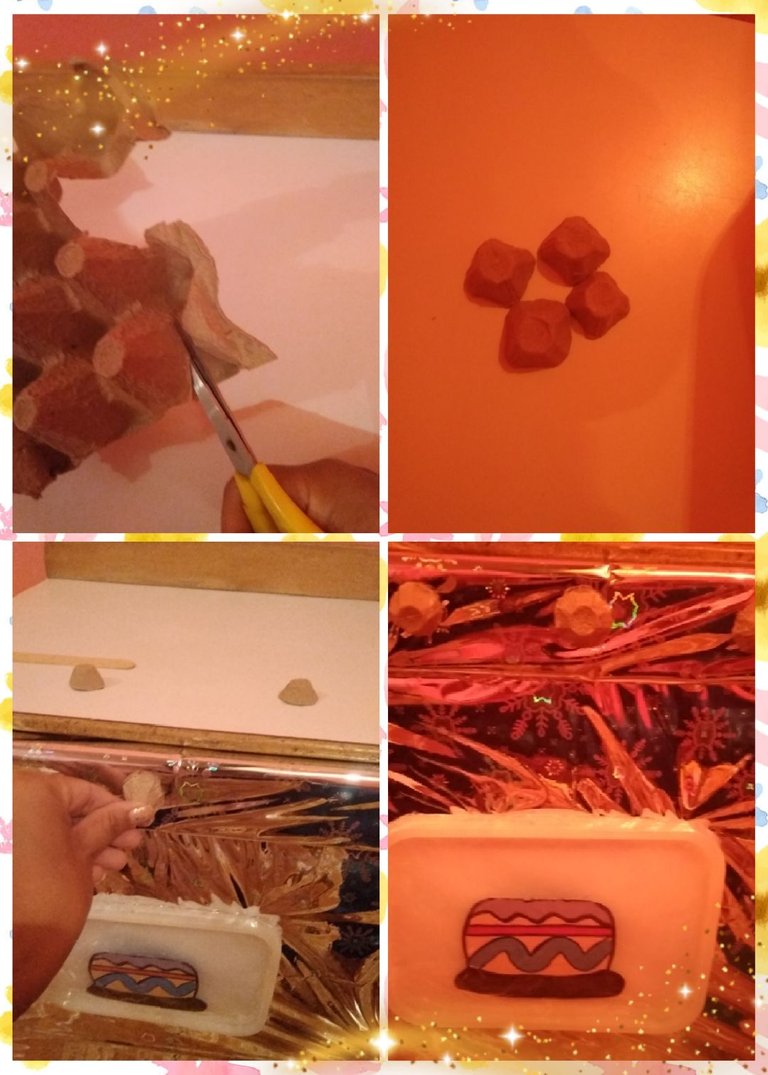
Las hornillas las realice usando el cartón de huevos, recorte dando forma circular para ello necesitamos 4, después los pegue dejando una distancia del otro.
Use una paleta de madera para la manilla del horno la pegue con la pistola de silicón.
I made the burners using the egg carton, cut out giving a circular shape for this we need 4, then glue them leaving a distance from the other.
Use a wooden palette for the oven handle and glue it on with the glue gun.
CÓMO REALICE EL ESTANTE?
✔️ Tome los potes de leche tetrapak les corte la tapa de arriba para abrirlos, le quite la tapa lateral y la del frente a cada uno y los que quedaron del lado derecho e izquierdo les deje la tapa una para que cierre del lado derecho y del lado izquierdo.
✔️ Luego con el cd marque y recorte su curvatura en las partes que quedarán en los laterales.
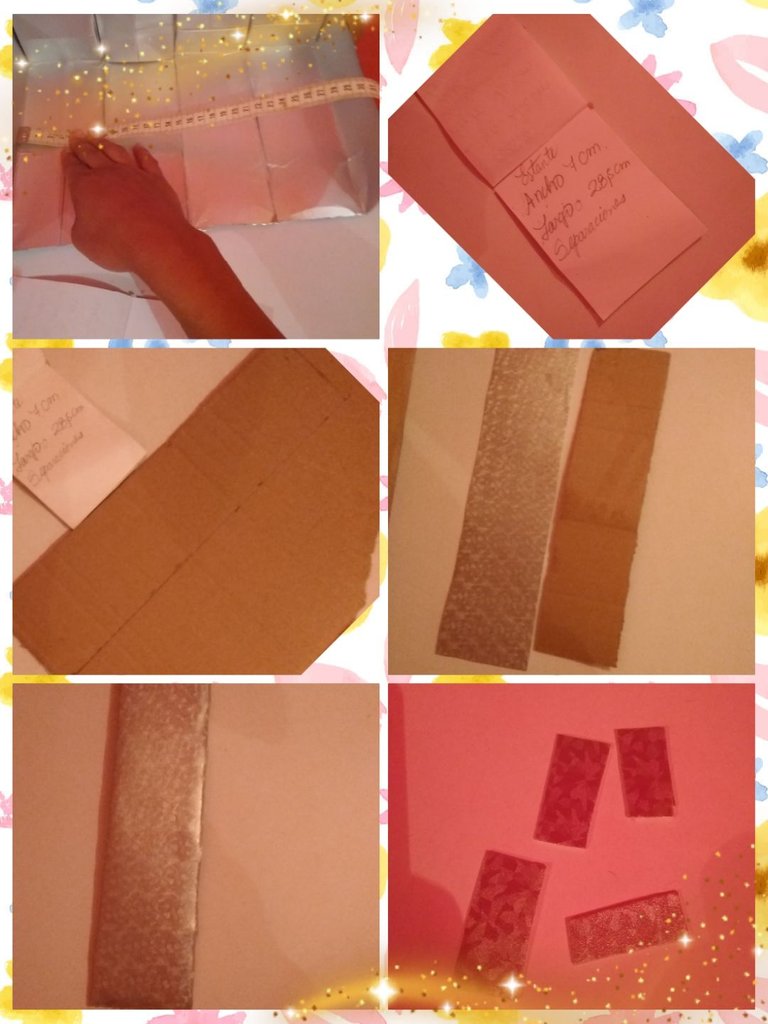
✔️ Con la cinta pegante uní cada una de las partes y ya el estante tomó forma, tome las medidas para sacar la división del estante para ello use un cartón de caja resistente. Sus medidas son:
Ancho 7cm x 28,5 cm de largo, luego lo forre con el foami metalizado
Saque 4 soportes de 2cm de ancho x 2cm de largo
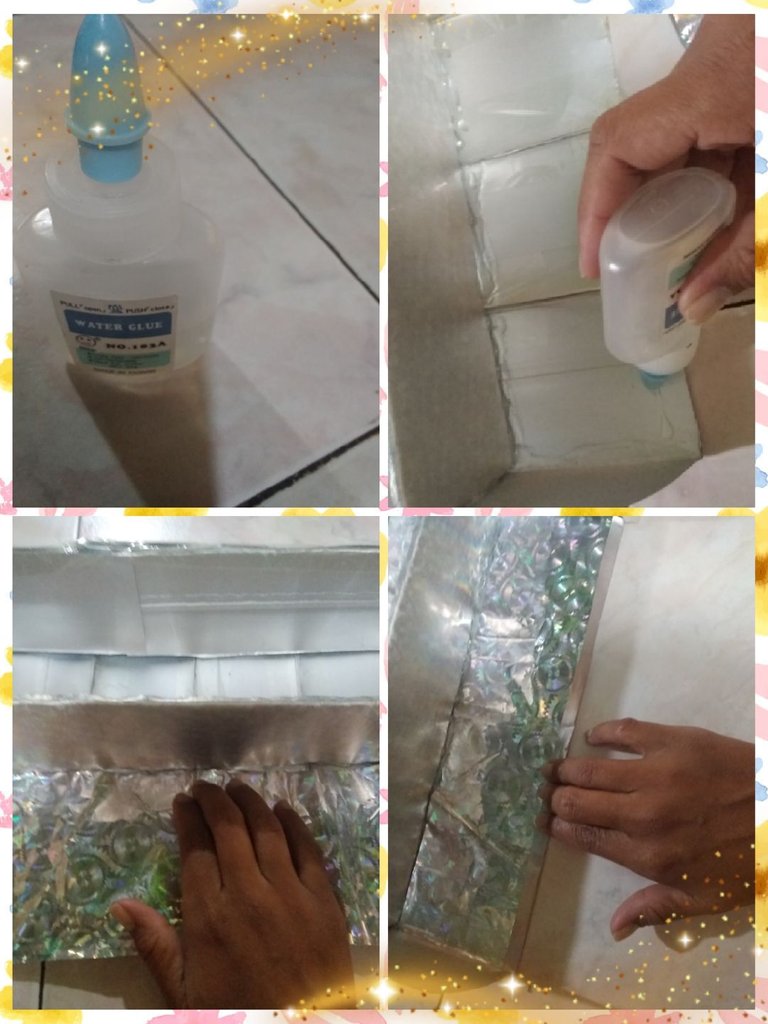
✔️ La división ya forrada la coloque a la mitad del estante le coloque abundante silicón, también le pegue los 4 soportes para darle firmeza.
✔️ Por último forre todo el estante con el papel de regalo metalizado por dentro y por fuera para ello use silicón líquido y ya listo el estante.
HOW DO I MAKE THE SHELF?
✔️ Take the tetrapak milk pots, cut the top lid to open them, remove the side lid and the front one from each one and those that remained on the right and left side, leave the lid one to close on the right side and on the left. left side.
✔️ Then with the cd mark and cut its curvature in the parts that will remain on the sides.
✔️ With the sticky tape I joined each of the parts and the shelf took shape, take the measurements to remove the division from the shelf, for this use a resistant cardboard box. Its measures are:
Width 7cm x 28.5 cm long, then I lined it with the metallic foami
Take out 4 supports of 2cm wide x 2cm long
✔️ Place the division already lined in the middle of the shelf, place plenty of silicone, also glue the 4 supports to give it firmness.
✔️ Finally, line the entire shelf with metallic wrapping paper inside and out, for this use liquid silicone and the shelf is ready.
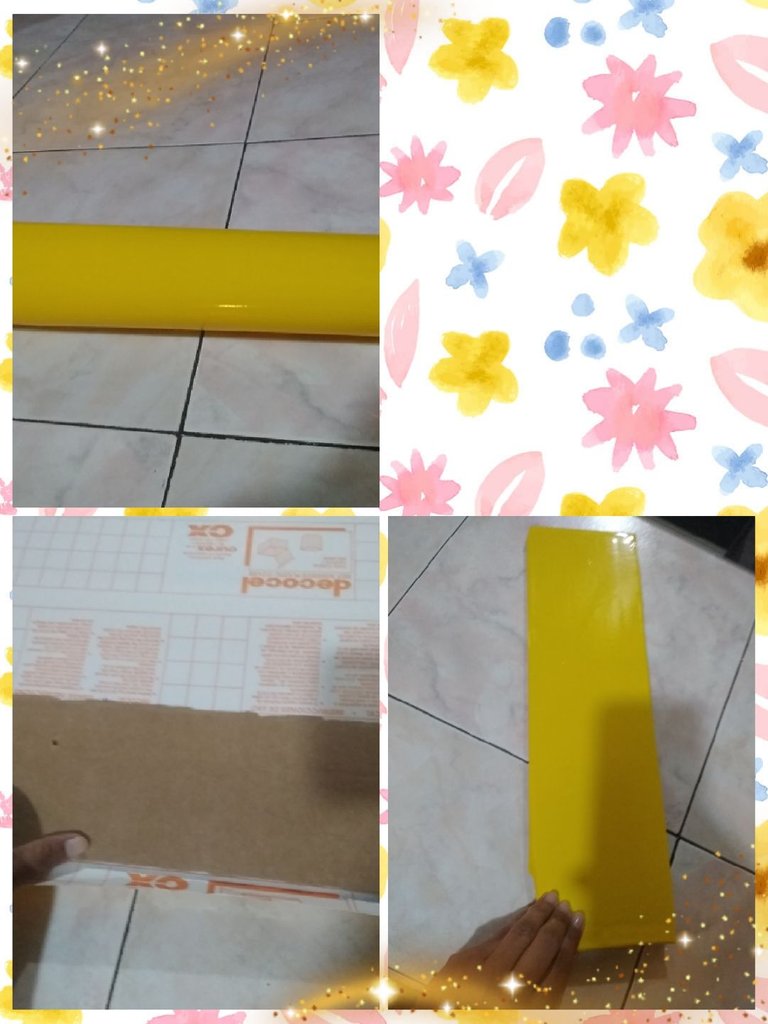
✔️ Para fijar el estante en la parte de atrás de la cocina, corte un rectángulo en cartón de caja las medidas son: 9cm de ancho x 30cm de largo, posteriormente lo forre con el papel contac amarillo.
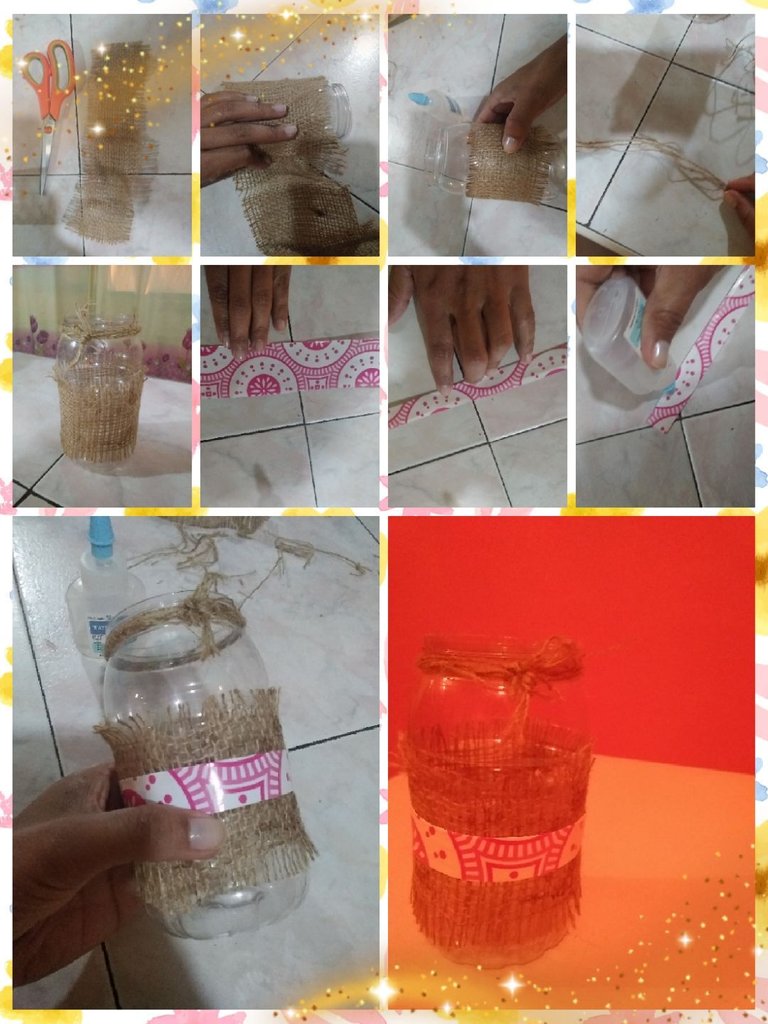
✔️ Tome el envase plático y lo forre a la mitad usando yute (esto es una especie de tela de saco) y en el centro coloque una franja de papel de regalo para decorarlo, saque unos hilos del mismo yute y le amarre al borde de arriba del envase para pegarlo use la pistola de silicón
✔️ To fix the shelf in the back of the kitchen, cut a rectangle out of cardboard, the measurements are: 9cm wide x 30cm long, then cover it with yellow contact paper.
✔️ Take the plastic container and line it in half using jute (this is a kind of sackcloth) and in the center place a strip of gift paper to decorate it, take out some threads from the same jute and tie it to the top edge from the container to glue it use the silicone gun
La franja que forre con el papel contac amarillo lo fije en la parte de atrás de la cocina con silicón caliente, encima de este pegue el estante sostuve por unos segundos y listo, al lado pegue el envase que forramos.
Para culminar tome los 4 cds los pegue dejando una distancia del otra estas representarán las hornillas de la cocina.
I fixed the strip that I covered with the yellow contact paper in the back of the kitchen with hot silicone, on top of this I glued the shelf I held for a few seconds and that's it, next to it I glued the container that we covered.
To finish, take the 4 cds, glue them leaving a distance from each other, these will represent the kitchen burners.
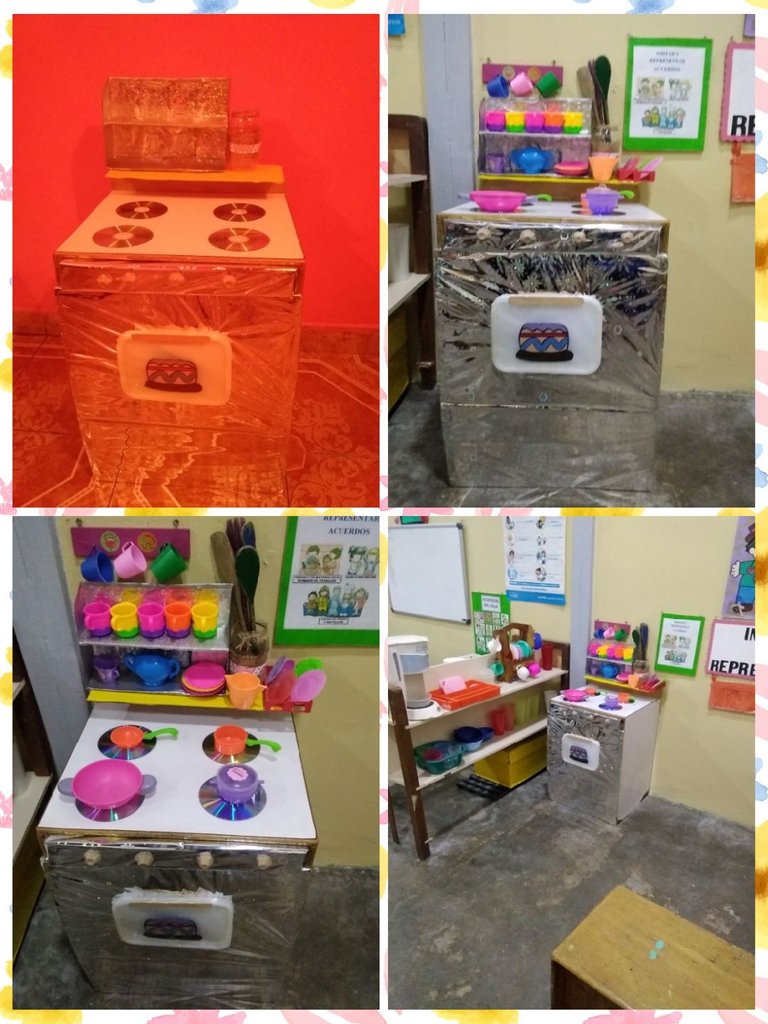
Y bien amigos culminado este grandioso proyecto una linda cocinita para mi niños y niñas 🤗, el sueño de los más pequeños tener una cocina como la de mami.
Me siento realmente satisfecha porque esto para mí represento un gran proyecto, porque como les dije jamás había trabajado en algo tan grande, valió la pena esta transformación y estos dos días de arduó trabajo, espero que ustedes también lo vean útil y se atrevan a reciclar, reusar y transformar como lo hice yo en esta ocasión por acá les dejo mi mágico resultado ✨.
Gracias a ti que te detienes a leer cada uno de mis post que tengas un lindo y bendecido día, un abrazo 🤗.
Las fotos fueron tomadas y editadas con mi celular
use la aplicación "Foto Collage"
La traducción la realice con el traductor de google
Hasta un Próximo Encuentro!!!
🤗😘
And well friends, this great project has been completed, a beautiful kitchen for my boys and girls 🤗, the dream of the little ones to have a kitchen like mommy's.
I feel really satisfied because this represents a great project for me, because as I told you, I had never worked on something so big, this transformation and these two days of hard work were worth it, I hope you also find it useful and dare to recycle , reuse and transform as I did on this occasion here I leave my magical result ✨.
Thanks to you who stop to read each of my posts, have a nice and blessed day, a hug 🤗.
The photos were taken and edited with my cell phone.
use "Photo Collage" app
The translation is done with google translator
Until a Next Meeting!!!
🤗😘
this is what you call DIY and recycle 😃 love the idea that you can upscale an old furniture and also make your younger one happy with ideas like this 😄 thank you for sharing about your work on this!
https://d.buzz
!ALIVE
@dayanita2! You Are Alive so I just staked 0.1 $ALIVE to your account on behalf of @ilovewintergem. (3/10)
The tip has been paid for by the We Are Alive Tribe through the earnings on @alive.chat, feel free to swing by our daily chat any time you want.

Felicidades por tu creatividad y por ser una educadora entregada y preocupada por sus pequeños, ahora el salón de clases será mucho mas atractivo y divertido, excelente forma de dar uso a un mueble viejo, le diste mucha vida!!
Hola @drhueso buenas tardes muchas gracias, si mi salón luce muy lindo 🤗
de seguro los niños se divertirán mucho en el área de dramatizacion..
Hola @samuelch si mis niños están felices encantados con este espacio🤗
Me encantó tu trabajo realmente muy creativo 😍
!discovery 30
Hola @mayifiestas muchas gracias un abrazo 🤗
This post was shared and voted inside the discord by the curators team of discovery-it
Join our community! hive-193212
Discovery-it is also a Witness, vote for us here
Delegate to us for passive income. Check our 80% fee-back Program
Guao quedó hermosa, me encantó el detalle de los cd como hornillas, te aseguro que los niños disfrutarán su nuevo juguete, y te digo muy en serio hasta yo me pondría a jugar con mis hijas en ella 🤭, te felicito por ese increíble talento 🤗
Hola @marlynmont gracias por tu apreciación, jajaja 😁 yo también juego con los niños en este espacio de eso se trata integrarse al juego, yo nunca tuve una cocina cuando niña, este es el sueño de todo niño
Hola Dayana. Que lindo ver a una maestra tan comprometida con sus pequeños alumnos. Esta cocinita te quedó genial, los nenes si que la van a disfrutar. Se nota que la hiciste con mucho cariño. Te felicito ❤️.
Hola @lauramica, gracias 🙏, si la realice con todo mi cariño me encanta ver a los niños felices, amo❤️ ser maestra😘 no cambiaría mi profesión por otra 🙏
The rewards earned on this comment will go directly to the people( @dayanita2 ) sharing the post on Twitter as long as they are registered with @poshtoken. Sign up at https://hiveposh.com.
Que lindo es ver que de esas maestras geniales que usan toda su creatividad para darles un ambiente bonito de aprendizaje, la cocina quedó espectacular , te felicito 🥰
Gracias amiga @irenenavarroart 🙏😘 hermosas palabras
Un espectáculo sin duda alguna te felicito por tanta creatividad 👏, te quedo mucho mejor que comprarla, que la disfruten mucho.
Gracias @yolimarag la están disfrutando muchos mis pequeños estudiantes 😘
Quiero un maestra asi de entregada para mi niño😍😍 jeje que bello el resultado final🥰🥰 felicidades por tan grande creatividad
Gracias que lindas palabras @milagrosmhbl te aseguro que somos muchas las maestras las que amamos nuestra profesión y nos esforzamos por dar lo mejor a nuestros pequeños estudiantes 🤗
Congratulations @dayanita2! You have completed the following achievement on the Hive blockchain and have been rewarded with new badge(s):
Your next target is to reach 3750 upvotes.
You can view your badges on your board and compare yourself to others in the Ranking
If you no longer want to receive notifications, reply to this comment with the word
STOPCheck out the last post from @hivebuzz:
Support the HiveBuzz project. Vote for our proposal!
Excelente transformación. Tus estudiantes estarán felices al ver esta cocina tan hermosa.
Hola si @creacioneslelys la cocinita se volvió el centro de las miradas de todos e incluso de mis otras colegas
Esta idea está demasiado increíble, aprovechaste cada material al máximo
Hola si de eso se trata de usar lo que se tiene a la mano sin tener que gastar y el resultado fue estupendo 🤗
Hermoso
Gracias amiga @gislandpoetic 🤗