
Saludos mis queridos amigos de esta gran comunidad.
Ahora les mostraré y nombraré los materiales a usar:

| Cartón (Retazo) | Cartulina | Hojas recicladas |
|---|---|---|
| Pinturas | Pinceles | Retazo de foami |
| Lápiz | Papel de calcar (carbón) | Pinzas |
| Cinta de raso | Dibujo de berenjena | Tijera |
| Silicón líquido | Abre hueco |
Comencemos el Procedimiento:

- Recortar el dibujo y marcar dos (2) piezas, una en cartón y otra en cartulina y recortar.
- Perforar un huequito en la parte de arriba de la berenjena.
- Aparte marcar las hojas y recortar.
- Sujetar en los laterales en la parte superior de las hojas.

- Aplicar silicón líquido en todo el centro en la parte de arriba para pegar las hojas y dejar secar.
- Después sacar las pinzas y perforar también.
- Aplicar silicón en la parte superior del cartón y pegar una hoja en blanco y recortar por todo el borde.
- Luego aplicar una mano de pintura morada sobre el cartón.

- Estando húmeda todavía la pintura, mojar el pincel en pintura morado oscuro e ir bordeando y uniendo o difuminando la pintura.
por un lado de la berenjena. - Luego sin dejar secar aplicar pintura vinotinto y seguir sombreando uniendo con la pintura húmeda. (Ver foto) y dejar secar.

- Luego colocar el dibujo sobre el papel de calcar y transferir con el lápiz.
- Comenzar a pintar con un pincel delineando la cara de la berenjena, pintando cejas, rellenar la lengua con pintura blanca
y sobre aplicar rojo para que quede rosada y rellenar la otra parte con negro. - Mientras dejamos secar, marcamos la parte de arriba de la berenjena en foami color verde.
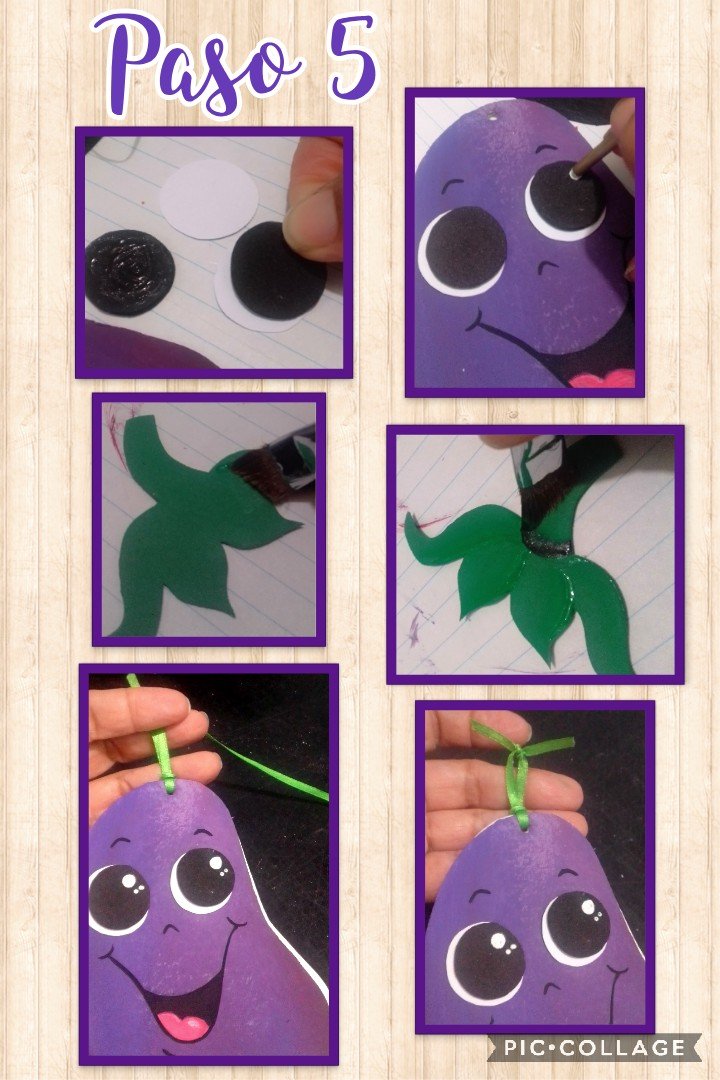
- Ahora recortarás cuatro (4) círculos, dos blancos y dos negros para formar los ojos.
- Aplicar silicón y pegar sobre la berenjena, y con un palito de madera pintar los puntos de luz en los ojos siempre en una misma dirección.
- Luego humedecer el pincel, y mojar sólo una punta y comenzar a sombrear la pieza. (ver foto)
- Ya casi terminada la pieza, introducir un pedacito de cinta del color que gustes por los orificios hechos y anudar para luego guindar.

- Por último aplicar silicón y pegar el tallo a la berenjena y así quedará lista esta linda libreta.
Ya terminado este fácil paso a paso les comento que, esta publicación la traduje con DeepL, usando etiquetas HTML y las fotos son capturadas por mi Blu G5 y editadas con Pic Collage.

Así, que te invito a aprender a hacer manualidades fáciles y sencillas.
Ahora me despido muy contenta por haber compartido este rato con ustedes, agradeciendo su tiempo
Muchas gracias por el comentario...
Saludos.
English
Greetings my dear friends of this great community.
Now I'll show you and name the materials to use:
| Cardboard (Scrap) | Cardboard | Recycled leaves |
|---|---|---|
| Paints | Brushes | Foami scraps |
| Pencils | Calcine paper | Paperboard |
| Pencil | Carbon paper | Tweezers |
| Satin ribbon | Eggplant pattern | Scissors |
| Liquid Silicone | Hole Opener |
Let's start the Procedure:
- Cut out the drawing and mark two (2) pieces, one on cardboard and the other on cardboard and cut out.
- Punch a hole in the top of the eggplant.
- Separately mark the leaves and cut out.
- Attach to the sides at the top of the leaves.
- Apply liquid silicone all over the center at the top to glue the leaves and let dry.
- Then remove the clamps and pierce as well.
- Apply silicone to the top of the cardboard and glue a blank leaf and trim around the edge.
- Then apply a coat of purple paint on the cardboard.
- While the paint is still wet, dip the brush in dark purple paint and go around and blend the paint.
On one side of the eggplant. - Then without letting dry apply vinotint paint and continue shading joining with the wet paint. (See photo) and let dry.
- Then place the drawing on the tracing paper and transfer with the pencil.
- Start painting with a brush outlining the face of the eggplant, painting eyebrows, fill the tongue with white paint and over apply red to make it pink and fill the other part with black.
and over apply red to make it pink and fill the other part with black. - While we let it dry, we mark the top of the eggplant in green foami.
- Now cut out four (4) circles, two white and two black to form the eyes.
- Apply silicone and glue on the eggplant, and with a wooden stick paint the dots of light in the eyes always in the same direction.
- Then wet the brush, and wet only one tip and start shading the piece. (see photo)
- Once the piece is almost finished, insert a small piece of ribbon of the color of your choice through the holes made and knot it and then hang it.
- Finally, apply silicone and glue the stem to the eggplant and this is how this beautiful notebook will be ready.
Now that this easy step by step is finished, I will tell you that I translated this publication with DeepL, using HTML tags and the photos are captured by my Blu G5 and edited with Pic Collage.
So, I invite you to learn how to make easy and simple crafts.
Now I say goodbye very happy to have shared this time with you, thanking you for your time.
Thank you very much for your comment...
Greetings.
Quedó muy bonita, algo muy útil en el área de la cocina para tomar nota. Saludos
Hola! Sí es muy útil.
Muchas gracias por tu comentario.
Saludos y bendiciones para ti!
Congratulations @elmundodebetty! You have completed the following achievement on the Hive blockchain and have been rewarded with new badge(s) :
Your next payout target is 1000 HP.
The unit is Hive Power equivalent because your rewards can be split into HP and HBD
You can view your badges on your board and compare yourself to others in the Ranking
If you no longer want to receive notifications, reply to this comment with the word
STOPTo support your work, I also upvoted your post!
Check out the last post from @hivebuzz:
Qué cuchitura!
Muchas gracias @equipodelta.