¡Bienvenidos a mi blog!
Hola queridos amigos de esta linda comunidad #hivediy, deseo estén bien, Dios todopoderoso guíe siempre sus vidas en el camino del bien.
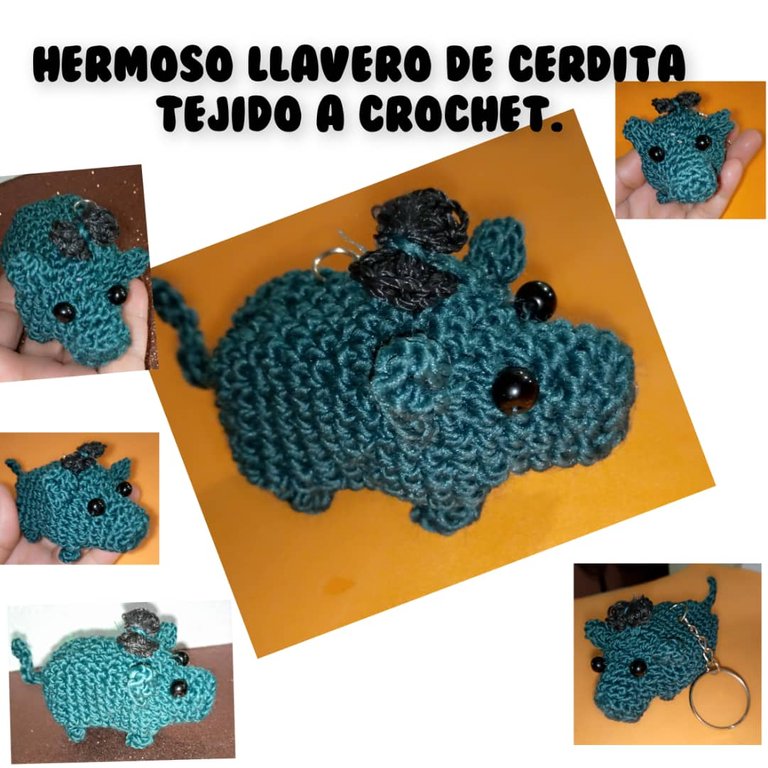
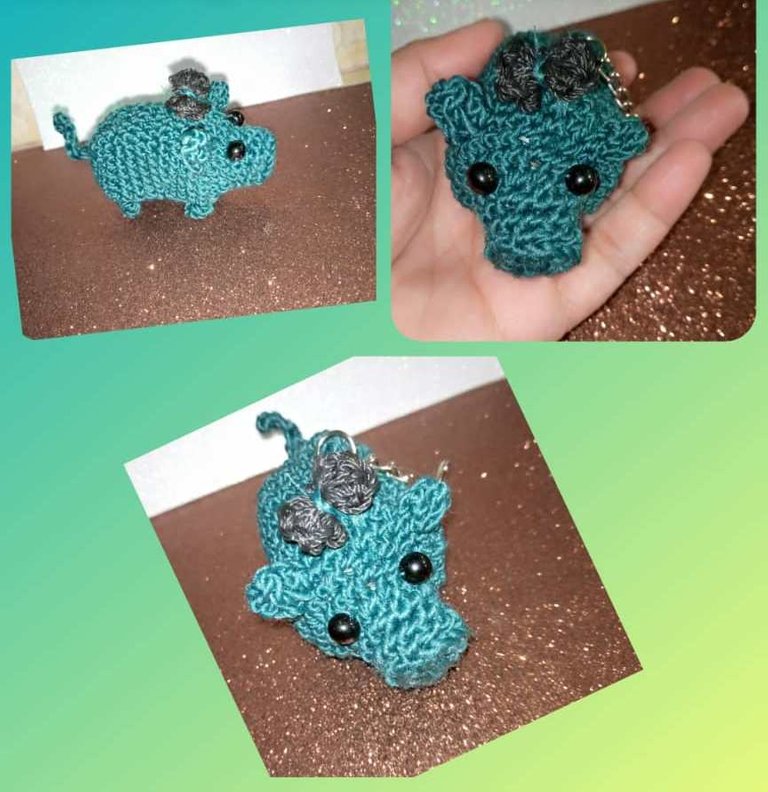
Hoy quiero mostrarle un tutorial de como realizar un : hermoso llavero de cerdita tejido en crochet.
Los tejidos en crochet siempre me llaman la atención, especialmente los de animales, quedan hermoso, ahora fue que me decidí a realizar uno. Es super fácil, invito a mis amigos a realizar su tejido de su animal preferido, el mio no es un cerdito, pero lo vi tan lindo y quise hacerlo.
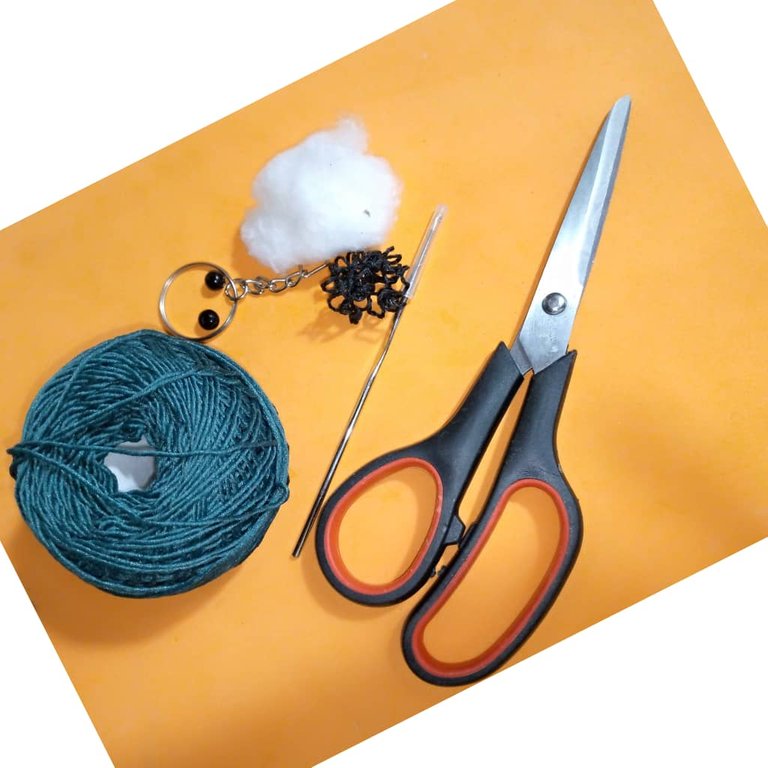
Materiales para la realización de la hermosa cerdita con su lazo negro: 🐷🐷
- Hilo de tejer.
- Aguja o ganchillo.
- Llavero.
- Pedazo de algodón.
- 2 mostacillas grandes
- Aguja e hilo para coser.
- Tijeras.
- Hilo de tejer negro para el lazo.
Paso a paso para la realización del llavero:
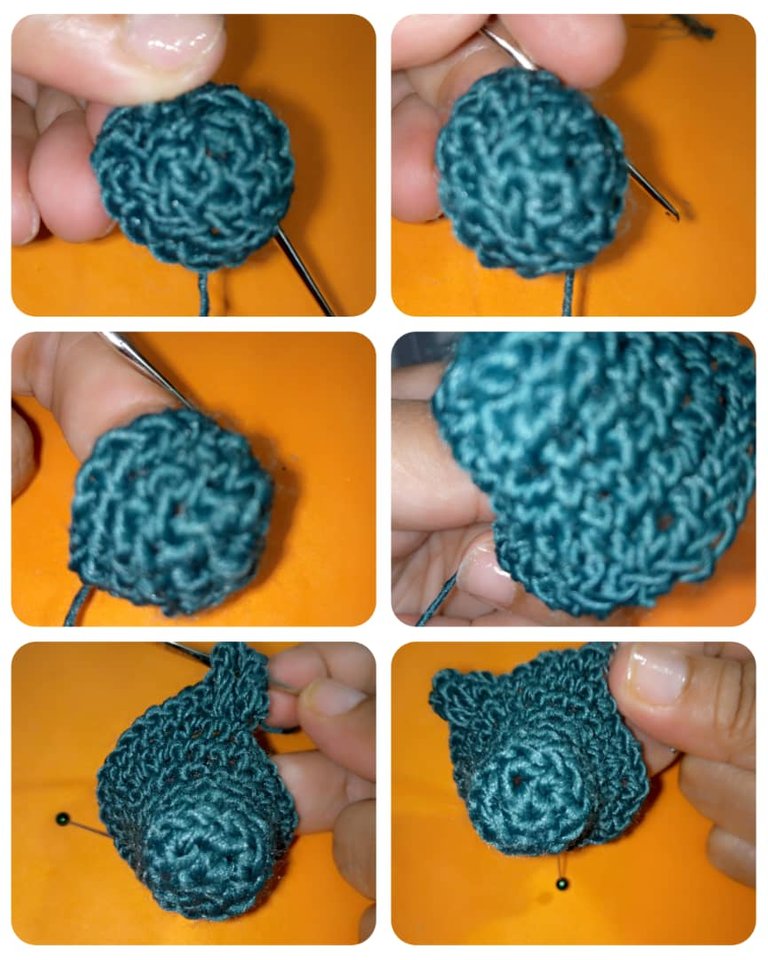
La cerdita está tejida en una sola pieza,
Primera vuelta: hacemos un anillo en el dedo como muestra la imagen, se hace una cadena y tejemos puntos 6 puntos bajo y cerrar con un punto deslizado.
Segunda vuelta: levantar una cadena, tejer con aumento en esta vuelta, hacer dos puntos bajos en un mismo hueco, al final vamos a tener doce puntos bajos.
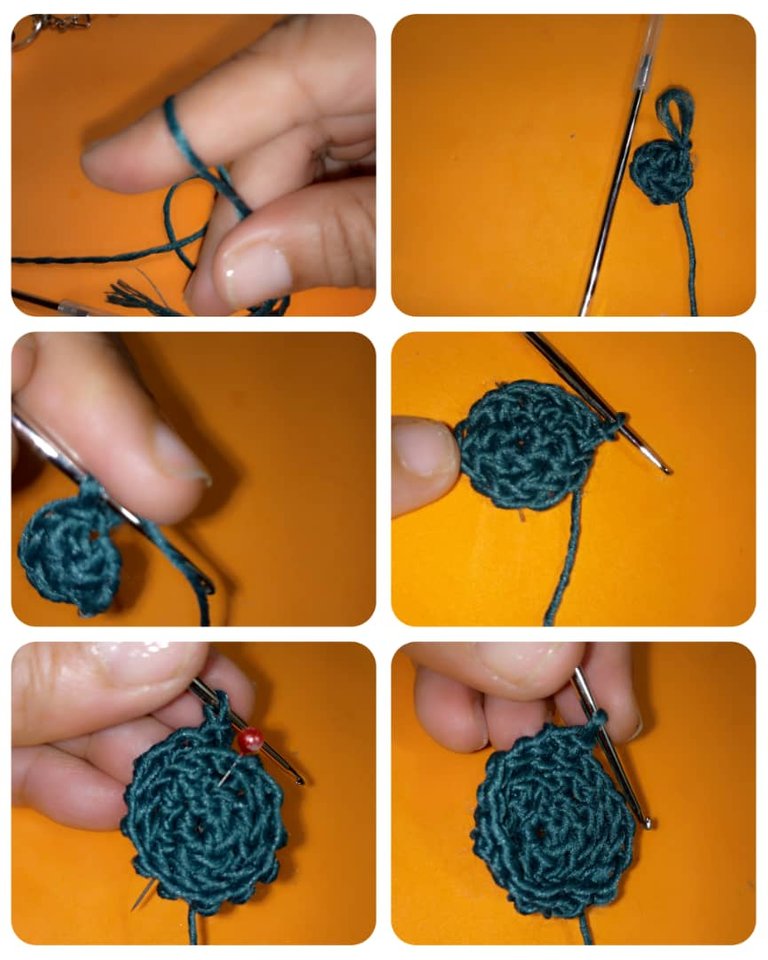
Tercera vuelta: en esta vuelta levantamos una cadena, tejemos un punto bajo en cada uno de los huequitos pero agarrando la hebra de la parte trasera. Igual como en la segunda vamos a tener doce puntos bajos y cerrar con un punto deslizado.
Cuarta vuelta: levantar una cadena ahora meter en cada uno de los huequitos un punto bajo, al final tendrá un total de 12 puntos bajos, cerramos con un punto deslizado.
Quita vuelta: Levantar una cadena, aquí también vamos a realizar aumento, de esta manera: 2 puntos bajos y en el siguiente punto tejer el aumento de punto bajo para el tercero colocó el aumento, tomando la hebra de adelante , cuando finalicemos con esta vuelta tendremos 16 puntos bajos.Cerrar con un punto deslizado
Sexta vuelta: hacer una cadena, hacer tres puntos bajos seguidos y después un aumento , al final vamos a tener 20 puntos bajos , cerrar con un punto deslizado.
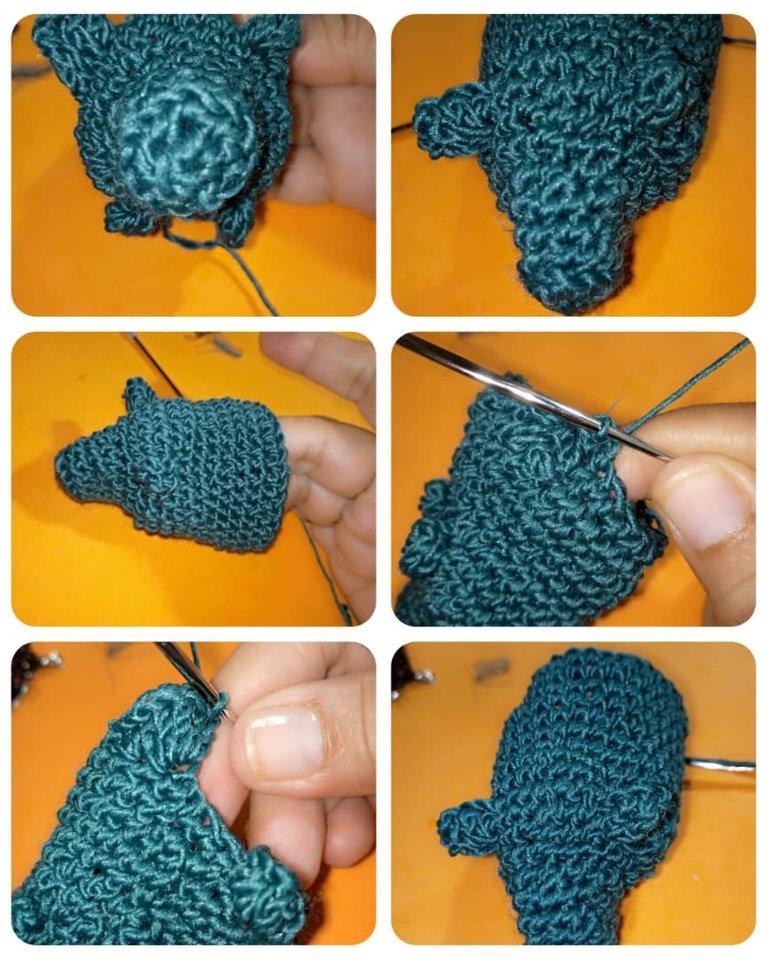
Séptima vuelta: hacer una cadena, vamos a tejer cuatros puntos bajos seguidos tomando las cerdas de afuera y en el punto que sigue , tejer un aumento, al final tenemos 24 puntos bajos y cerrar con un punto deslizados.
Octava vuelta: Levantar una cadena , seguido por tres puntos bajos y aumento en el siguiente punto, siempre tomando la hebra de afuera, aquí vamos a tener 30 puntos bajos y cerrar con punto deslizado.
Vuelta nueve: Levantar una cadena, tejer 10 punto bajos seguidos, tomando la hebra de adelante, lazada tejer las orejas , que se hace con un punto alto, punto alto doble, ahora hacemos una cadena , hacemos un punto alto doble y un punto alto y para finalizar un punto alto medio. Aquí tenemos la oreja, ahora tejer 6 puntos bajos seguidos y tejer la otra oreja con los mismos puntos de la primera oreja. Tejer con puntos bajos hasta finalizar la vuelta (10 puntos bajos) y cerrar con punto deslizado
Vuelta diez: Levantar una cadena, tejer dos puntos bajos seguido, 5 puntos altos tomados las hebras de adelante, hacer un punto popcorn para realizar la pata de la cerdita, tejer tomando todo el punto 7 puntos bajos, cuando llegue a las orejas bajamos y agarramos los dos puntos , tejemos 7 puntos bajos más. Así hacemos con la otra pata y hasta el final de la vuelta, cerramos con punto deslizado.
Vuelta 11: Levantar una cadena, tejer 30 puntos bajos hasta vuelta número 17

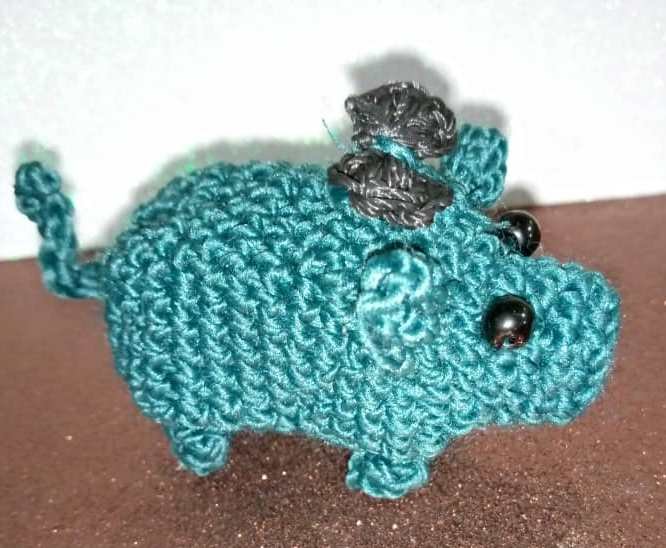
Miren como se va viendo la cerdita.
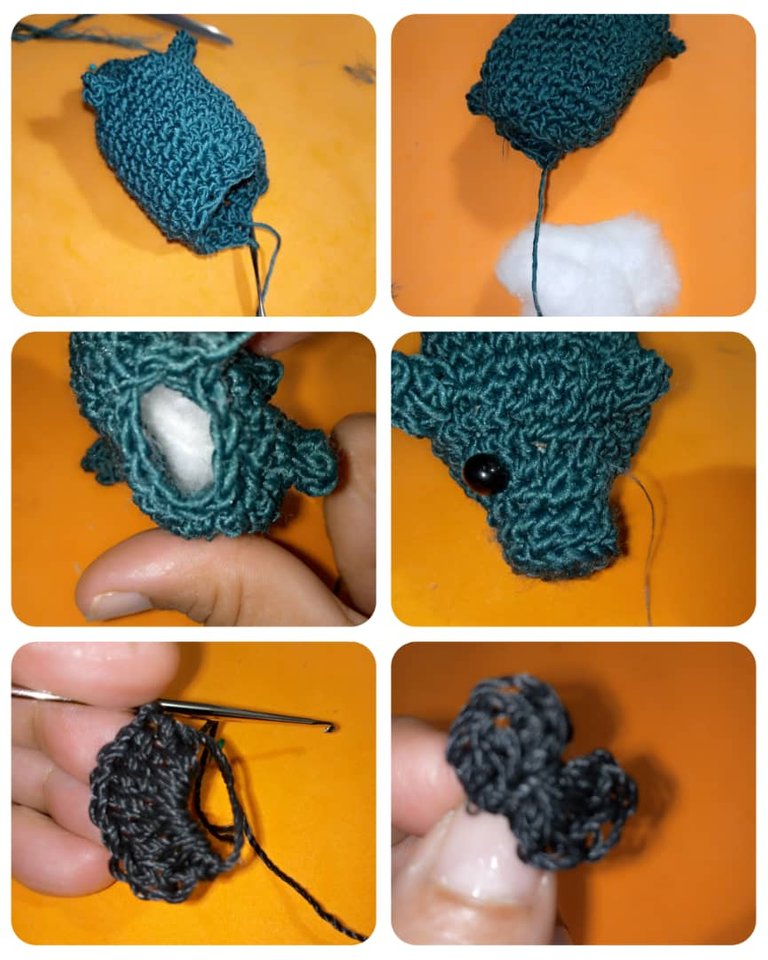
Vuelta 18:levantar una cadena, tejer 4 puntos bajos seguidos y en el siguiente punto hacer otra pata , tejer 5 puntos altos en el mismo punto y hacer un popcorn, luego tejer 23 puntos bajos ,luego tejer 5 puntos altos , hacer un popcorn, ya tenemos las 4 patitas.
Vuelta 19: levantar una cadena, tres puntos bajos seguidos y en el siguiente hacer una disminución tomando las hebras de afuera. Al final se debe tener 24 puntos bajos.
Vuelta 20: hacemos una cadena, dos puntos bajos y una disminución,al final tenemos 18 puntos bajos.Cerrar con un punto deslizado
Vuelta 21: Lentar una cadena, un punto bajo y una disminución, al final se tendrá 12 puntos bajos.
Rellenar con algodón.
Vuelta 22: cerrar el hueco con el mismo hilo.Para hacer la colita de la cerdita hacemos 9 cadenas y tejer 9 puntos bajos.
Pegar los ojos con una aguja. Para realizar el lazo hacer un anillo y colocar 10 puntos bajos, luego colocar por la mitad el hilo con que se tejió la cerdita y amarrar.Ahora coser y colocar en la parte de arriba.
Enganchar el llavero .
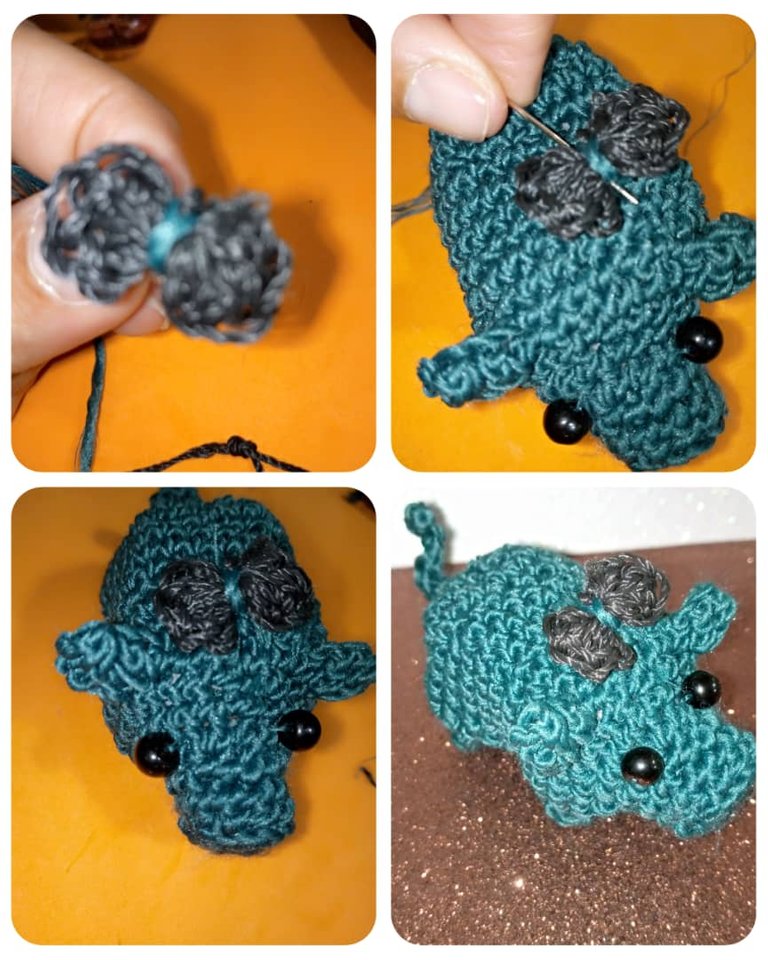
Así de hermosa quedó la cerdita , espero le guste
Hasta la próxima , bendiciones.

Las fotos son mías tomadas con telefono Infinix , editadas con incollage , traducida con DEEPL.
ESPAÑOL
Welcome to my blog!
Hello dear friends of this nice community #hivediy, I wish you are well, Almighty God always guide your lives on the path of good.
Today I want to show you a tutorial on how to make a : beautiful crochet knitted piggy keychain.
Crochet knits always catch my attention, especially those of animals, they are beautiful, now I decided to make one. It is super easy, I invite my friends to knit their favorite animal, mine is not a pig, but I saw it so cute and I wanted to do it.
Materials for the realization of the beautiful little piggy with her black bow: 🐷🐷
- Knitting yarn.
- Needle or crochet hook.
- Key ring.
- Piece of cotton.
- 2 large beads.
- Needle and thread for sewing.
- Scissors.
- Black knitting thread for the ribbon.
Step by step for the realization of the keychain:
The piggy is knitted in one piece,
First round: we make a ring on the finger as shown in the picture, make a chain and knit stitches 6 stitches under and close with a slip stitch.
Second round: lift a chain, knit with increase in this round, knit two low stitches in one hole, at the end we are going to have twelve low stitches.
Third row: in this row we pick up a chain, we knit a single crochet in each of the holes but holding the yarn at the back. As in the second row, we will have twelve single crochet stitches and close with a slip stitch.
Fourth row: Pick up a chain now put in each of the holes a single crochet, at the end you will have a total of 12 single crochet stitches, close with a slip stitch.
Fifth row: Pick up a chain, here we are also going to make an increase, in this way: 2 single crochet stitches and in the next stitch knit the increase of the single crochet for the third one we put the increase, taking the strand from the front, when we finish with this row we will have 16 single crochet stitches, close with a slip stitch.
Sixth row: make a chain, knit three single crochet stitches in a row and then an increase, at the end we will have 20 single crochet stitches, close with a slip stitch.
Seventh row: make a chain, we are going to knit four single crochet stitches in a row taking the outside bristles and in the next stitch, knit an increase, at the end we have 24 single crochets and close with a slip stitch.
Eighth row: Pick up a chain, followed by three single crochet stitches and increase in the next stitch, always taking the outside strand, here we will have 30 single crochet stitches and close with a slip stitch.
Turn nine: Pick up a chain, knit 10 single crochet in a row, taking the yarn from the front, knit the ears, which is done with a single crochet, double crochet, now we make a chain, we make a double crochet and a double crochet and a double crochet and to finish a medium crochet. Here we have the ear, now knit 6 single crochet stitches in a row and knit the other ear with the same stitches of the first ear. Knit with single crochet until the end of the row (10 single crochets) and close with slip stitch.
Turn ten: Pick up a chain, knit two single crochet stitches in a row, knit 5 double crochet stitches taking the strands in front, make a popcorn stitch to make the leg of the piggy, knit taking the whole stitch 7 single crochets, when you reach the ears you go down and grab the two stitches, knit 7 more single crochets. We do the same with the other leg and until the end of the row, close with slip stitch.
Turn 11: Pick up a chain, knit 30 single crochet stitches up to row number 17.
Look how the piggy is looking.
Row 18: pick up a chain, knit 4 single crochets in a row and in the next stitch make another leg, knit 5 double crochets in the same stitch and make a popcorn, then knit 23 single crochets, then knit 5 double crochets, make a popcorn, we already have the 4 legs.
Row 19: pick up one chain, three single crochet stitches in a row and in the next one make a decrease by picking up the outside strands. At the end you should have 24 single crochet stitches.
Row 20: make a chain, two single crochet stitches and a decrease, at the end you have 18 single crochet stitches.close with a slip stitch.
Turn 21: Loop one chain, one single crochet and one decrease, at the end you will have 12 single crochets.
Fill with cotton.
Row 22: close the hole with the same yarn, to make the pig's tail, make 9 chains and knit 9 single crochet stitches.
Glue the eyes with a needle. To make the bow, make a ring and place 10 single crochet stitches, then place the yarn used to knit the piggy in half and tie, sew and place on the top.
Hook the key ring.
This is how beautiful the piggy looked, I hope you like it.
Until next time, blessings.
The photos are mine taken with Infinix phone , edited with incollage , translated with DEEPL.
Oye que lindo, se ve muy fácil de hacer, gracias por compartir tu bella creatividad.
Me alegra que te guste, gracias, si es muy fácil, saludos
The rewards earned on this comment will go directly to the people( @mariajcastro28 ) sharing the post on Twitter as long as they are registered with @poshtoken. Sign up at https://hiveposh.com.
Gracias @poshtoken
Un trabajo muy bonito, la verdad. Todo lo que es tejido requiere de mucha paciencia y dedicación y todo eso se aprecia en el paso a paso y la cantidad de fotos que dejó del proceso creativo.
Si amigo , se necesita mucha paciencia para la realización, saludos.
Que bello amiga admirable tu trabajo y la dedicación, a demás del tiempo que te da armar este artículo con cada fotografía y la redacción, un gran aplauso 👏
Felicidades muy buen trabajo 👍
Preciosa cerdita tejida @josdelmi Se nota el esmero, paciencia, dedicación y tu post con alta calidad de las fotos y el paso a paso muy bien explicado.
Jeje se ve demasisdo Cuchi😍😍 me encanta. Yo se tejer, pero muy basico y aca en hive he visto tantas bellezas jeje que quiero aprender a hacerlas🥰
Qué belleza, me gusta mucho ese tipo de hilo!