¡Bienvenido a mi blog!
Hola amigos de esta linda comunidad #hivediy, Dios les bendiga a todos. Que hayan tenido un lindo día y ya están descansando en sus hogares para ir a trabajar mañana bien temprano.
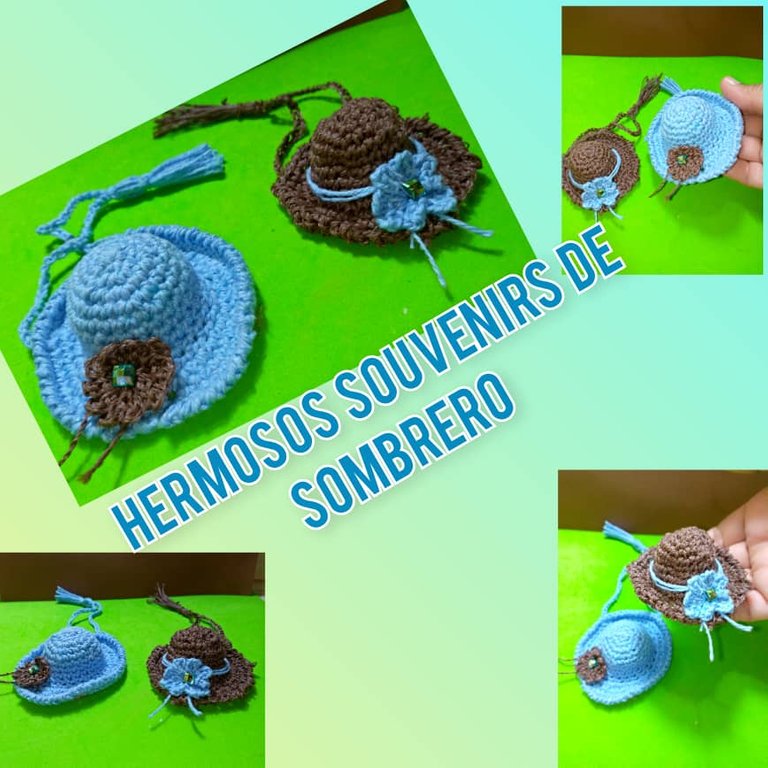
Hoy quiero mostrarle un tutorial de como realizar hermosos souvenir de sombrero tejido en crochet, ideal para fiestas, bautizos ,cumpleaños o para regalar a la persona favorita. Estos lindos sombreritos se pueden hacer del color de su preferencia.
Quiero regalarle a mis estudiantes ese detalle , se que les gustaran, pero para ellos compraré hilos de colores como : rojo, amarillo, violeta, entre otros , que deben quedar lindo y resaltar. ¡Sin mas manos a la obra!
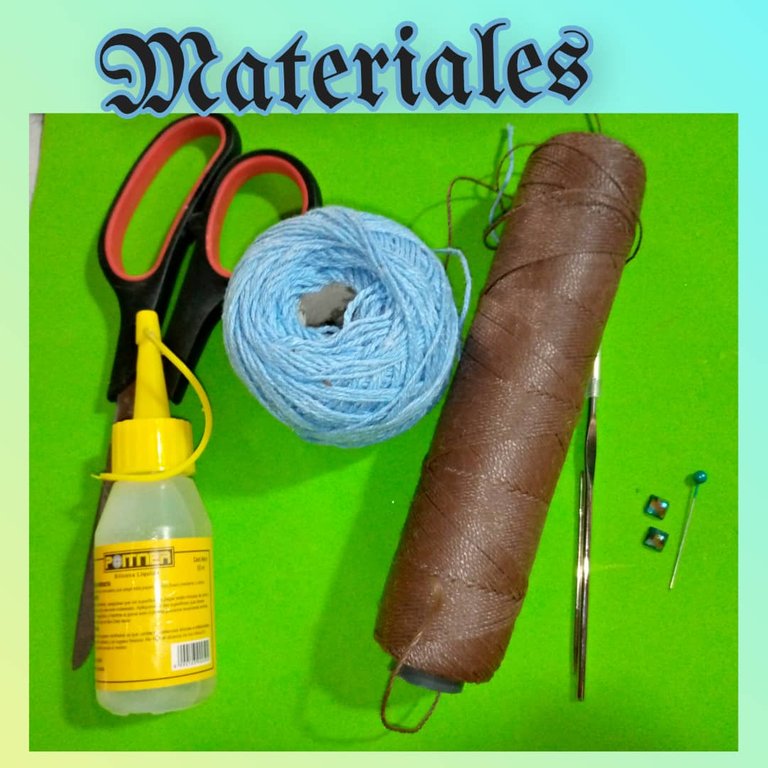
Materiales que utilizaremos para la realización de los hermosos souvenirs de sombrero tejido en crochet:
- Hilos de tejer color azul.
- Hilo de tejer color marrón.
- Aguja de tejer o ganchillo.
- Silicona líquida.
- Tijeras.
- 2 piedras brillantes de color azul.
- 1 aguja de coser grande.
- 1 sujetador.
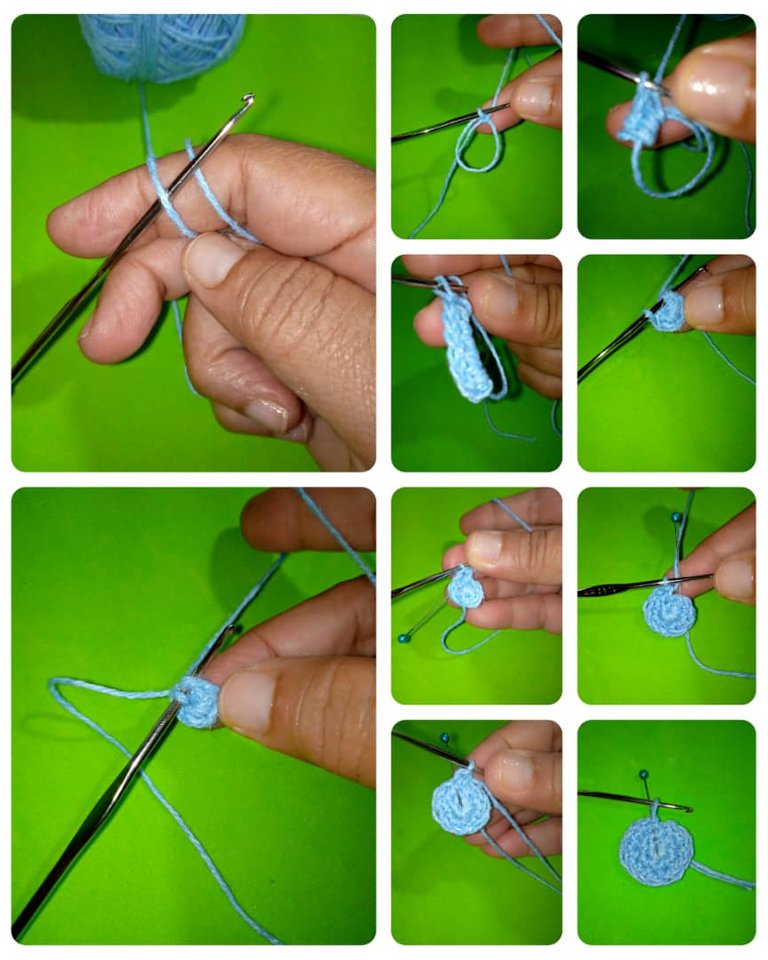
Para la realización del hermoso sombrero tejido en crochet, comenzamos con los siguientes pasos:
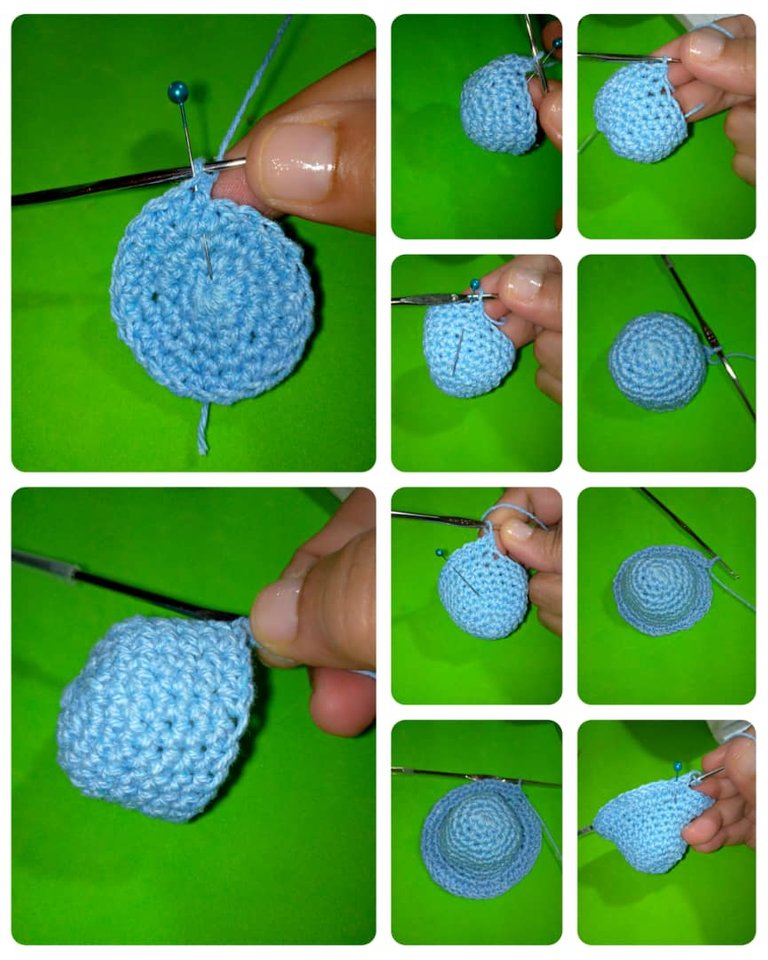
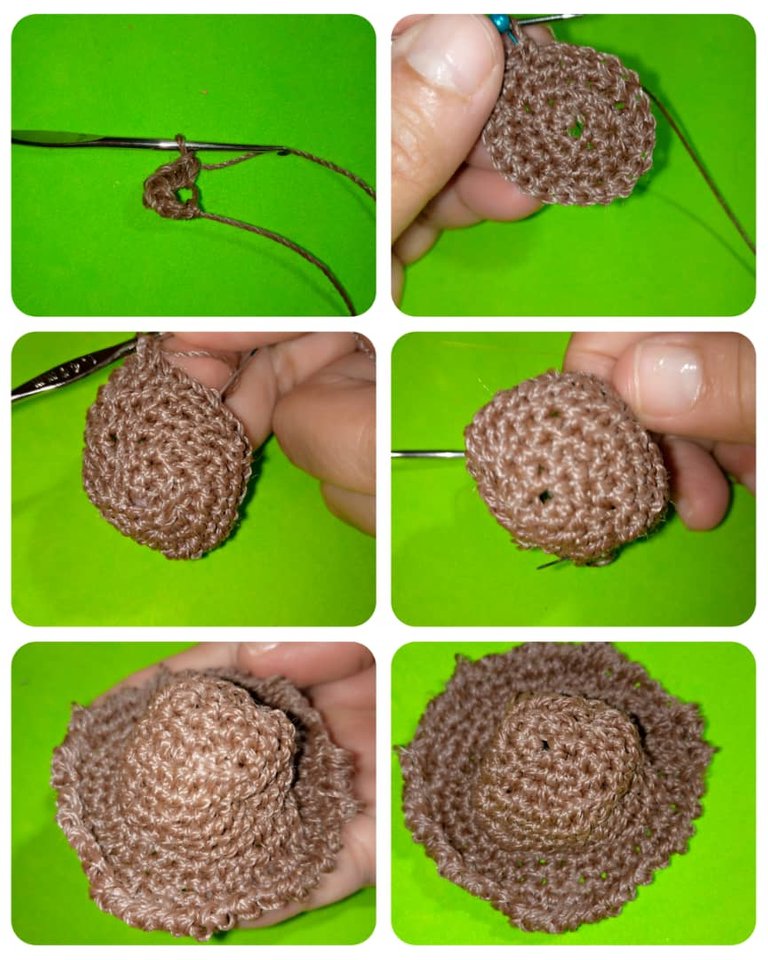
Lo primero que haremos es un anillo mágico dentro del dedo índice ,enrollamos tomamos una lazada o hacemos una cadena,esta no va a contar como punto , hacemos seis medio luego cerramos el anillo .
No vamos a cerrar con punto deslizado ya que trabajaremos en forma de espirar, esa va a hacer nuestra primera vuelta.
Segunda vuelta: para la segunda vuelta tejimos medio punto lo identificamos como la aguja sujetador, lo colocamos para saber en donde termina la vuelta, hacemos medio punto más en el mismo hueco, en esta vuelta trabajamos dos medio puntos en cada punto, al final tendremos un total de doce medios punto.
Tercera vuelta: retiramos el sujetador y en donde estaba hacemos un medio punto , luego colocamos el sujetador para saber en donde termina la vuelta, en esta vuelta hacer dos medios puntos en un punto y el siguiente un medio punto en un punto, aquí tendremos 18 medios puntos.Quitamos el sujetador.
Cuarta vuelta: colocamos un medio punto en donde esta el sujetador , en ese mismo punto colocamos un medio punto, la secuencia va a hacer. dos medios puntos en un mismo punto y luego un medios puntos solo o en cada hueco, aquí tendremos 24 medios puntos.
Quita vuelta: colocamos un medio punto en donde estaba el sujetador , aquí no se hace aumento , se hacen 24 puntos medios.
Desde la vuelta 5 hasta la 9 no se hacen aumento se trabaja con 24 puntos medios. Recuerda colocar el sujetador para identificar en dónde termina la vuelta, además con la tijera cortar el excedente del hilo.
Aquí vamos a ver la altura del sombrero.
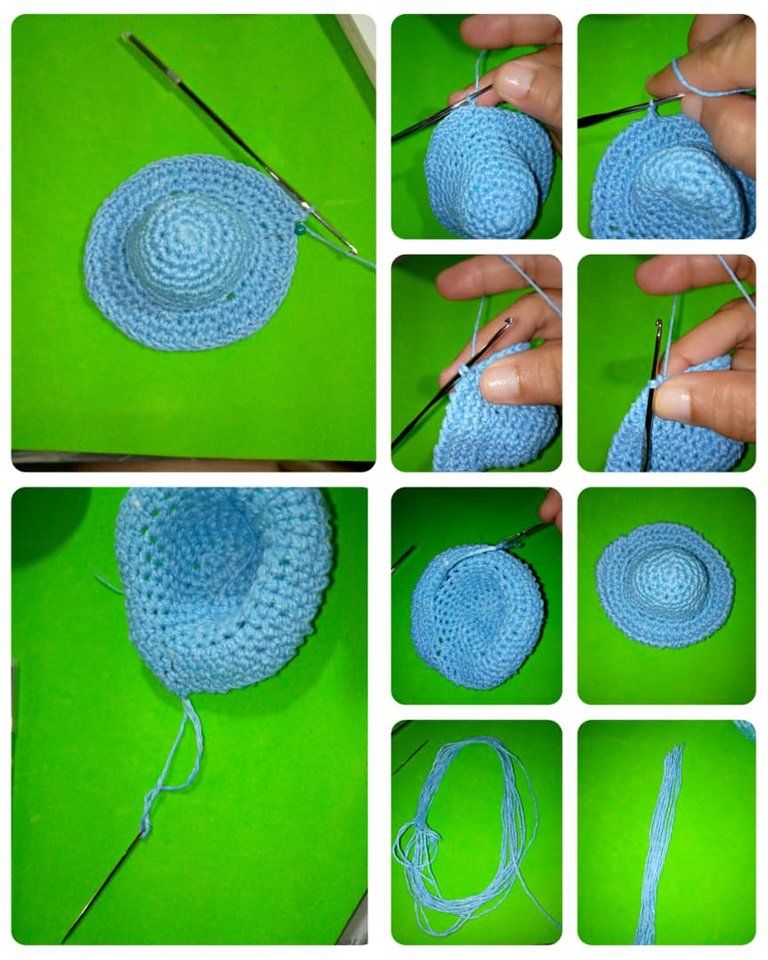
Vuelta 10: aquí en esta vuelta vamos a realizar aumentos, tejemos en cada punto dos medios puntos, para hacer un total de 48 medios puntos .
Vuelta 11: en esta vuelta hacemos lo mismo que la anterior , por lo tanto también tendremos 48 medios puntos.
Vuelta 12: En el primer punto hacer dos medios puntos osea hacer un aumento, hacer 7 medios puntos y ahora un aumentos, dos medios puntos en un punto, así lo vamos a hacer hasta terminar la vuelta.Cerrar la vuelta con punto deslizado
Vuelta 13: hacer punto cangrejo, colocó una cadena agarro una lazada hago un giro en el ganchillo y realizo un medio punto. Con esta vuelta terminamos.
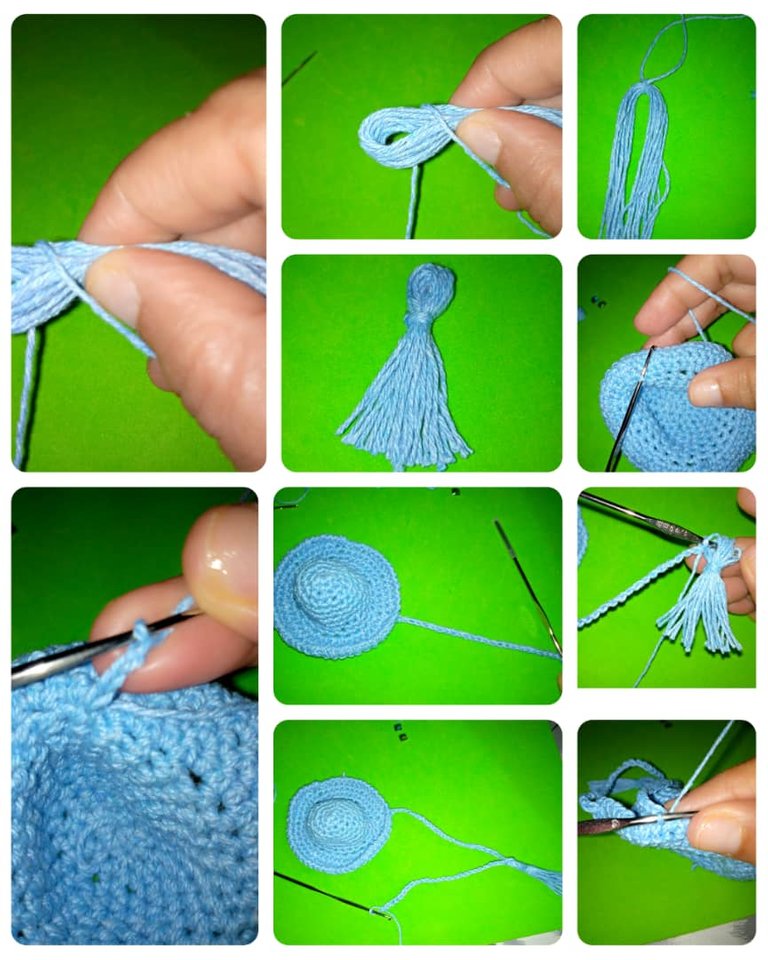
Para hacer la borla: tomamos varios pedazos de hilo, lo doblamos , luego por donde está doblado amarramos con hilo y en la parte de abajo cortamos el excedente con las tijeras.
- Ahora para colocar las cuerdas al sombrero, comenzamos por la parte de atrás del sombrero tejer 4 cadenas y en la parte de arriba lo pegamos , luego tejemos 25 cadenas , colocamos la borla , tejemos 25 cadenas más y lo pegamos como lo hicimos del otro lado.
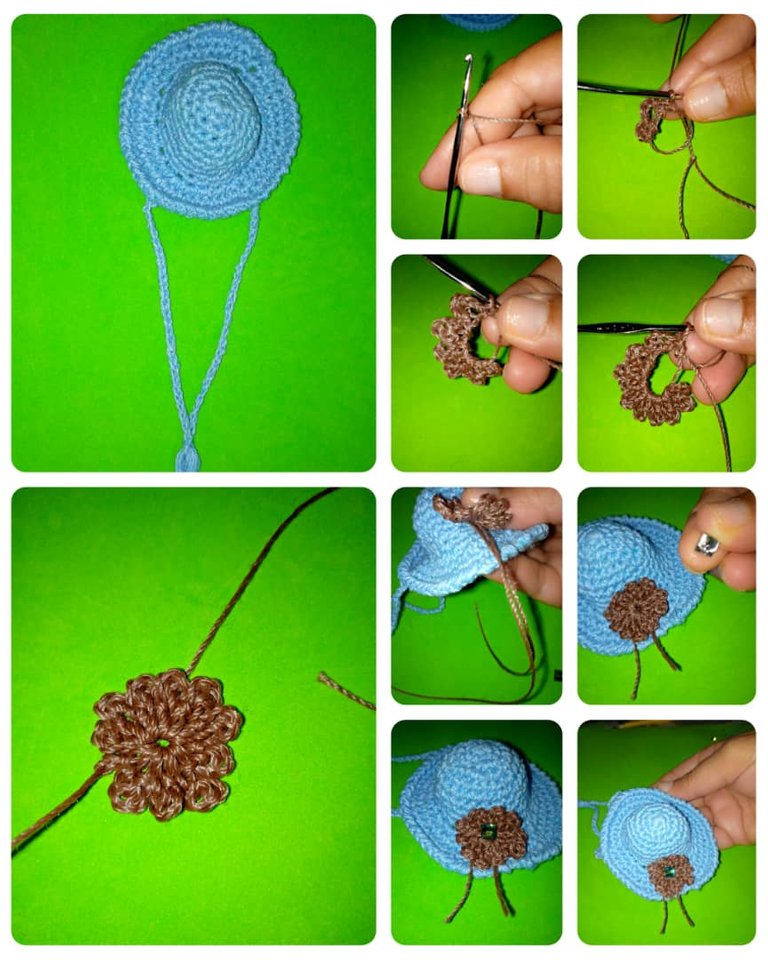
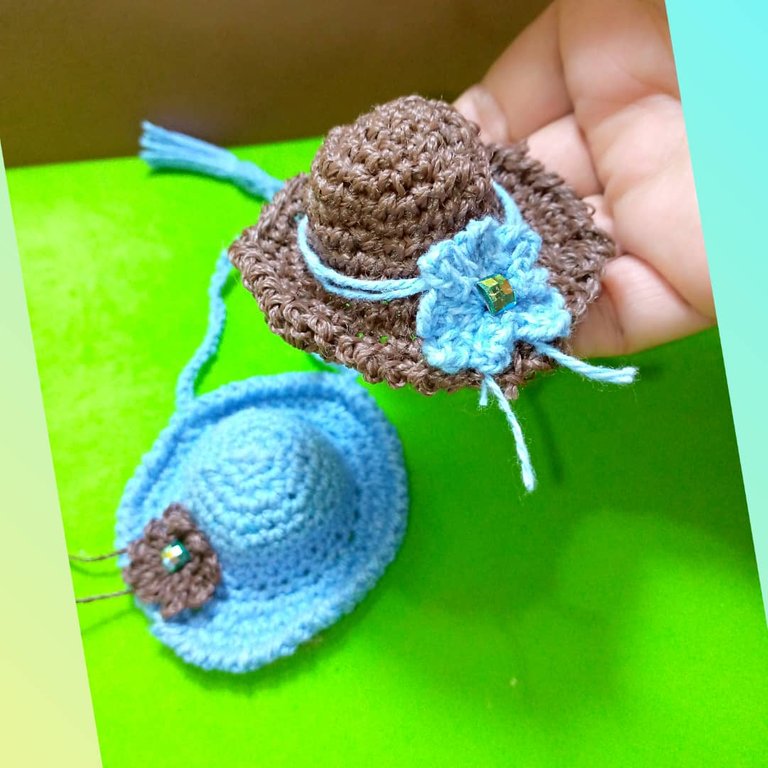
- Para realizar la flor, hacemos un anillo levantamos una cadena, hacemos 5 cadenas, 1 medio punto, así vamos a realizar esa secuencia de 5 cadena y un medio punto hasta obtener 10 puntos, cerramos el anillo y quedará como una flor muy linda.Lo pegamos al sombrero y pueden ver lo bello que quedó.
- Con silicona líquida pegamos la piedra en la flor del sombrero.
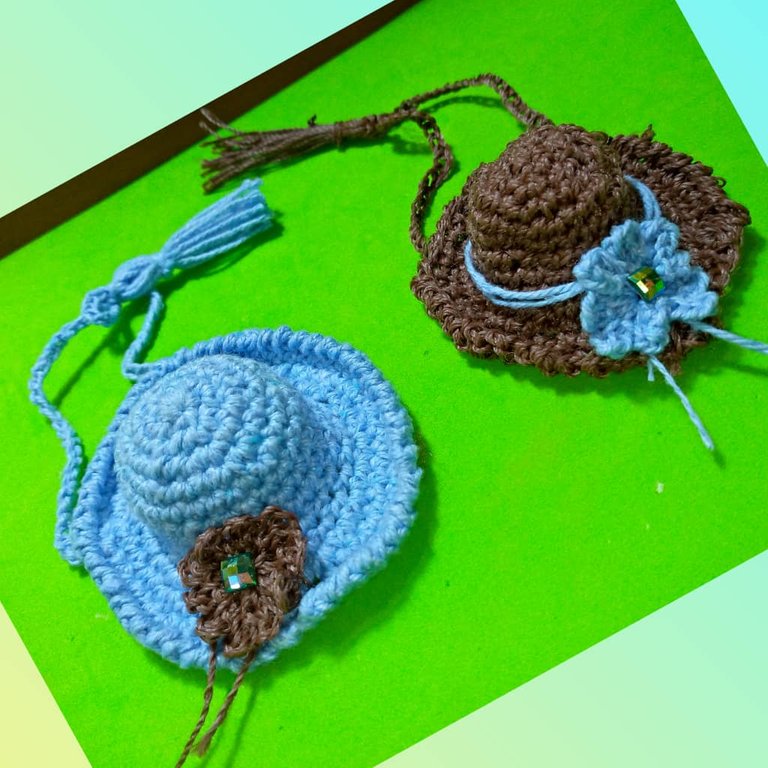
- Con los mismos pasos o vueltas realicé el otro sombrero de color marrón , el hilo es de menos grosor , pero igual quedó lindo.
Aquí podemos observar lo lindo que quedó.
Espero les haya gustado, hasta la próxima , bendiciones.

ESPAÑOL
Welcome to my blog!
Hello friends of this nice #hivediy community, God bless you all. Have had a nice day and you are already resting at home to go to work bright and early tomorrow.
**Today I want to show you a tutorial on how to make beautiful crochet knitted hat souvenirs, ideal for parties, baptisms, birthdays or to give to your favorite person ** These cute little hats can be made in the color of your choice.
I want to give that detail to my students, I know they will like them, but for them I will buy yarns of colors like: red, yellow, purple, among others, which should look nice and stand out. **Without further ado, let's get to work!
Materials that we will use for the realization of the beautiful crochet knitted hat souvenirs:
- Blue color knitting yarn.
- Brown knitting yarn.
- Knitting needle or crochet hook.
- Liquid silicone.
- Scissors.
- 2 blue shiny stones.
- 1 large sewing needle.
- 1 fastener.
For the realization of the beautiful crochet knitted hat, we start with the following steps:
The first thing we will do is a magic ring inside the index finger ,we roll up we take a loop or make a chain,this is not going to count as a stitch , we make six half then we close the ring .
We are not going to close with slipped stitch since we are going to work in the form of exhale, that is going to make our first round.
Second row: for the second row we knit a half stitch, we identify it as the holding needle, we place it to know where the row ends, we knit another half stitch in the same hole, in this row we work two half stitches in each stitch, at the end we will have a total of twelve half stitches.
Third row: we remove the fastener and where it was we make a half stitch , then we place the fastener to know where the row ends, in this row we make two half stitches in one stitch and the next one half stitch in one stitch, here we will have 18 half stitches.We remove the fastener.
Fourth row: we place a half stitch where the fastener is, in that same stitch we place a half stitch, the sequence is going to do. two half stitches in the same stitch and then a half stitch alone or in each hole, here we will have 24 half stitches.
Remove row: we place a half stitch where the fastener was, here we do not increase, we make 24 half stitches.
From row 5 to 9 no increase is made, we work with 24 half stitches. Remember to place the fastener to identify where the row ends, also with the scissors cut the excess yarn.
Here we are going to see the height of the hat.
Turn 10: here in this round we are going to make increases, we knit in each stitch two half stitches, to make a total of 48 half stitches .
Turn 11: in this row we do the same as the previous one, so we will also have 48 half stitches.
Row 12: In the first stitch make two half stitches, that is, make an increase, make 7 half stitches and now an increase, two half stitches in one stitch, so we will do it until the end of the row. Close the row with slip stitch.
Turn 13: make a crab stitch, place a chain, grab a loop, make a turn on the crochet hook and make a half stitch. With this round we are done.
To make the tassel: we take several pieces of yarn, we fold it, then where it is folded we tie with yarn and at the bottom we cut the excess with scissors.
- Now to attach the strings to the hat, we start at the back of the hat we weave 4 chains and at the top we glue it , then we weave 25 chains , we place the tassel , we weave 25 more chains and we glue it as we did on the other side.
- To make the flower, we make a ring, we raise a chain, we make 5 chains, 1 half stitch, so we are going to make that sequence of 5 chains and a half stitch until we get 10 stitches, we close the ring and it will look like a very pretty flower, we glue it to the hat and you can see how beautiful it is.
- With liquid silicone we glue the stone on the flower of the hat.
- With the same steps or turns I made the other brown hat, the thread is less thick, but it was still nice.
Here we can see how nice it was.
I hope you liked it, until next time, blessings.
Muy bonitos!! 🌻🌻 también pueden usarse como llaveritos o para las muñecas barbie 🌺🌸🌻🌹 gracias por este tutorial!!
Gracias amiga @imena, si también puede usarse como llavero. Bendiciones
Thank you for sharing this post on HIVE!
Your content got selected by our fellow curator hafizullah & you just received a little thank you upvote from us for your great work! Your post will be featured in one of our recurring compilations which are aiming to offer you a stage to widen your audience within the DIY scene of Hive. Next time make sure to post / cross-post your creation within the DIYHub community on HIVE and you will receive a higher upvote ;) Stay creative & HIVE ON!
Please vote for our hive witness <3
Gracias por la selección @diyhub .
Hermosisimo, es un trabajo delicado que requiere de concentración. Saludos
Si amiga @celeni de mucha concentración ya que si haces un punto que no es debido no queda la forma, bendiciones.
Congratulations @josdelmi! You have completed the following achievement on the Hive blockchain And have been rewarded with New badge(s)
Your next payout target is 6000 HP.
The unit is Hive Power equivalent because post and comment rewards can be split into HP and HBD
You can view your badges on your board and compare yourself to others in the Ranking
If you no longer want to receive notifications, reply to this comment with the word
STOPTo support your work, I also upvoted your post!
Check out the last post from @hivebuzz:
Support the HiveBuzz project. Vote for our proposal!
¡Felicitaciones!
Estás participando para optar a la mención especial que se efectuará el domingo 4 de diciembre del 2022 a las 8:00 pm (hora de Venezuela), gracias a la cual el autor del artículo seleccionado recibirá la cantidad de 1 HIVE transferida a su cuenta.
¡También has recibido 1 ENTROKEN! El token del PROYECTO ENTROPÍA impulsado por la plataforma Steem-Engine.
1. Invierte en el PROYECTO ENTROPÍA y recibe ganancias semanalmente. Entra aquí para más información.
2. Contáctanos en Discord: https://discord.gg/hkCjFeb
3. Suscríbete a nuestra COMUNIDAD y apoya al trail de @Entropia y así podrás ganar recompensas de curación de forma automática. Entra aquí para más información sobre nuestro trail.
4. Visita nuestro canal de Youtube.
Atentamente
El equipo de curación del PROYECTO ENTROPÍA
Muy bueno. !CTP
Posted via Veews
Veews