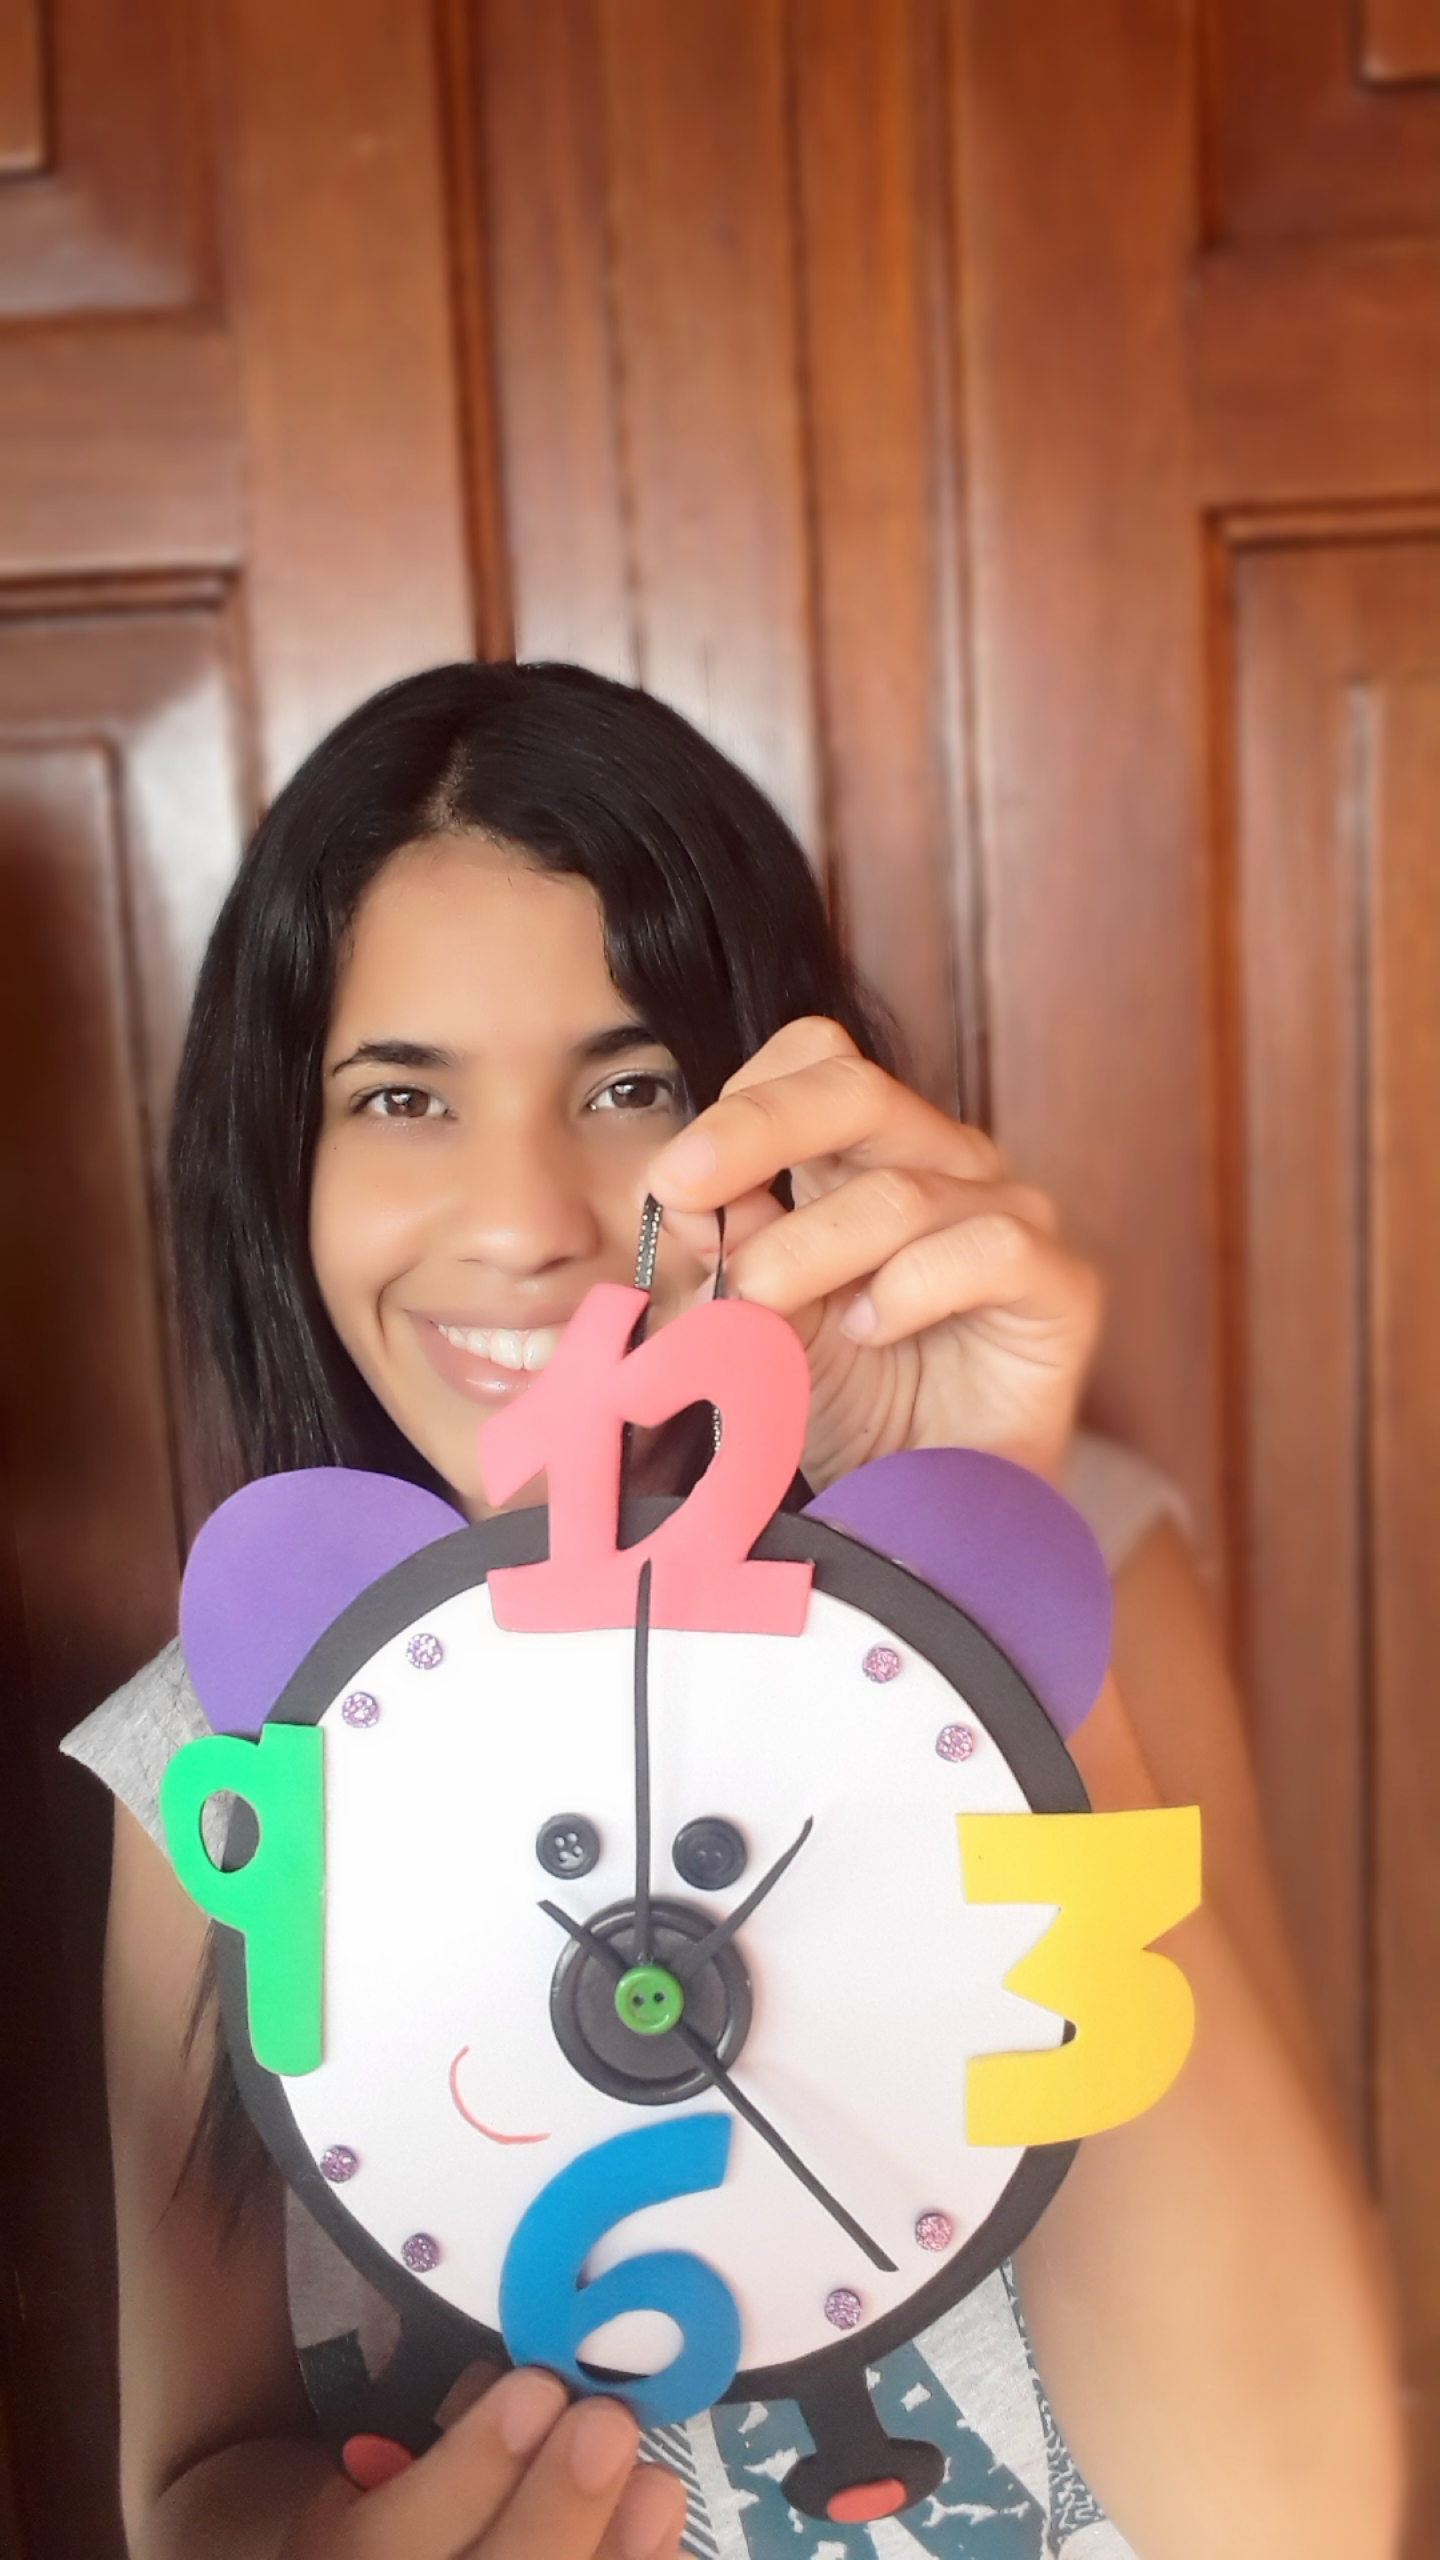

Hola mis personitas favoritas de la colmena, saludos una vez más y gracias por seguir mi trabajo desde el otro lado de la pantalla, hoy traigo para ustedes un mágico reloj de pared, muy divertido por cierto, espero que lo encuentren útil y puedan recrear este reloj para los más pequeños de la casa. Mientras lo hacía me acordé de la canción del reloj que cantaba cuando estaba en preescolar, así que no sólo me gustó el resultado sino que disfruté cada paso y estoy muy contenta de compartirlo con vosotros. Pero el reloj marca 1 tic toc toc pasemos al paso a paso.

Hello my favorite little people of the hive, greetings once again and thank you for following my work from the other side of the screen, today I bring for you a magical wall clock, very funny by the way, I hope you find it useful and can recreate this clock for the little ones of the house. While I was making it I remembered the clock song I used to sing when I was in preschool, so not only I liked the result but I enjoyed every step and I am very happy to share it with you. But the clock strikes 1 tic toc toc toc let's move on to the step by step.
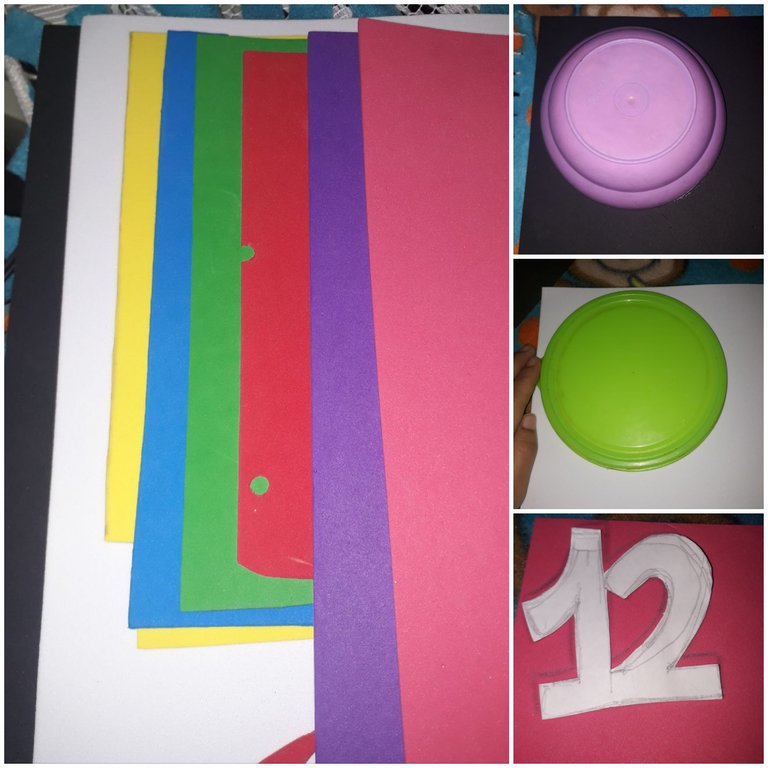
Materiales:
Foami : Blanco, Negro,
Amarillo, Azul,
Verde, Morado,
Rosa y Rojo.
3 botones.
Cinta corta.
Tijeras.
Pistola de silicona.
Barra de silicona.
Plancha de silicona.
Moldes.
Materials:
Foami : White, Black,
Yellow, Blue,
Blue, Green,
Purple, Pink and Red.
3 buttons.
Short ribbon.
Scissors.
Silicone gun.
Silicone bar.
Silicone iron.
Molds.
PASO A PASO
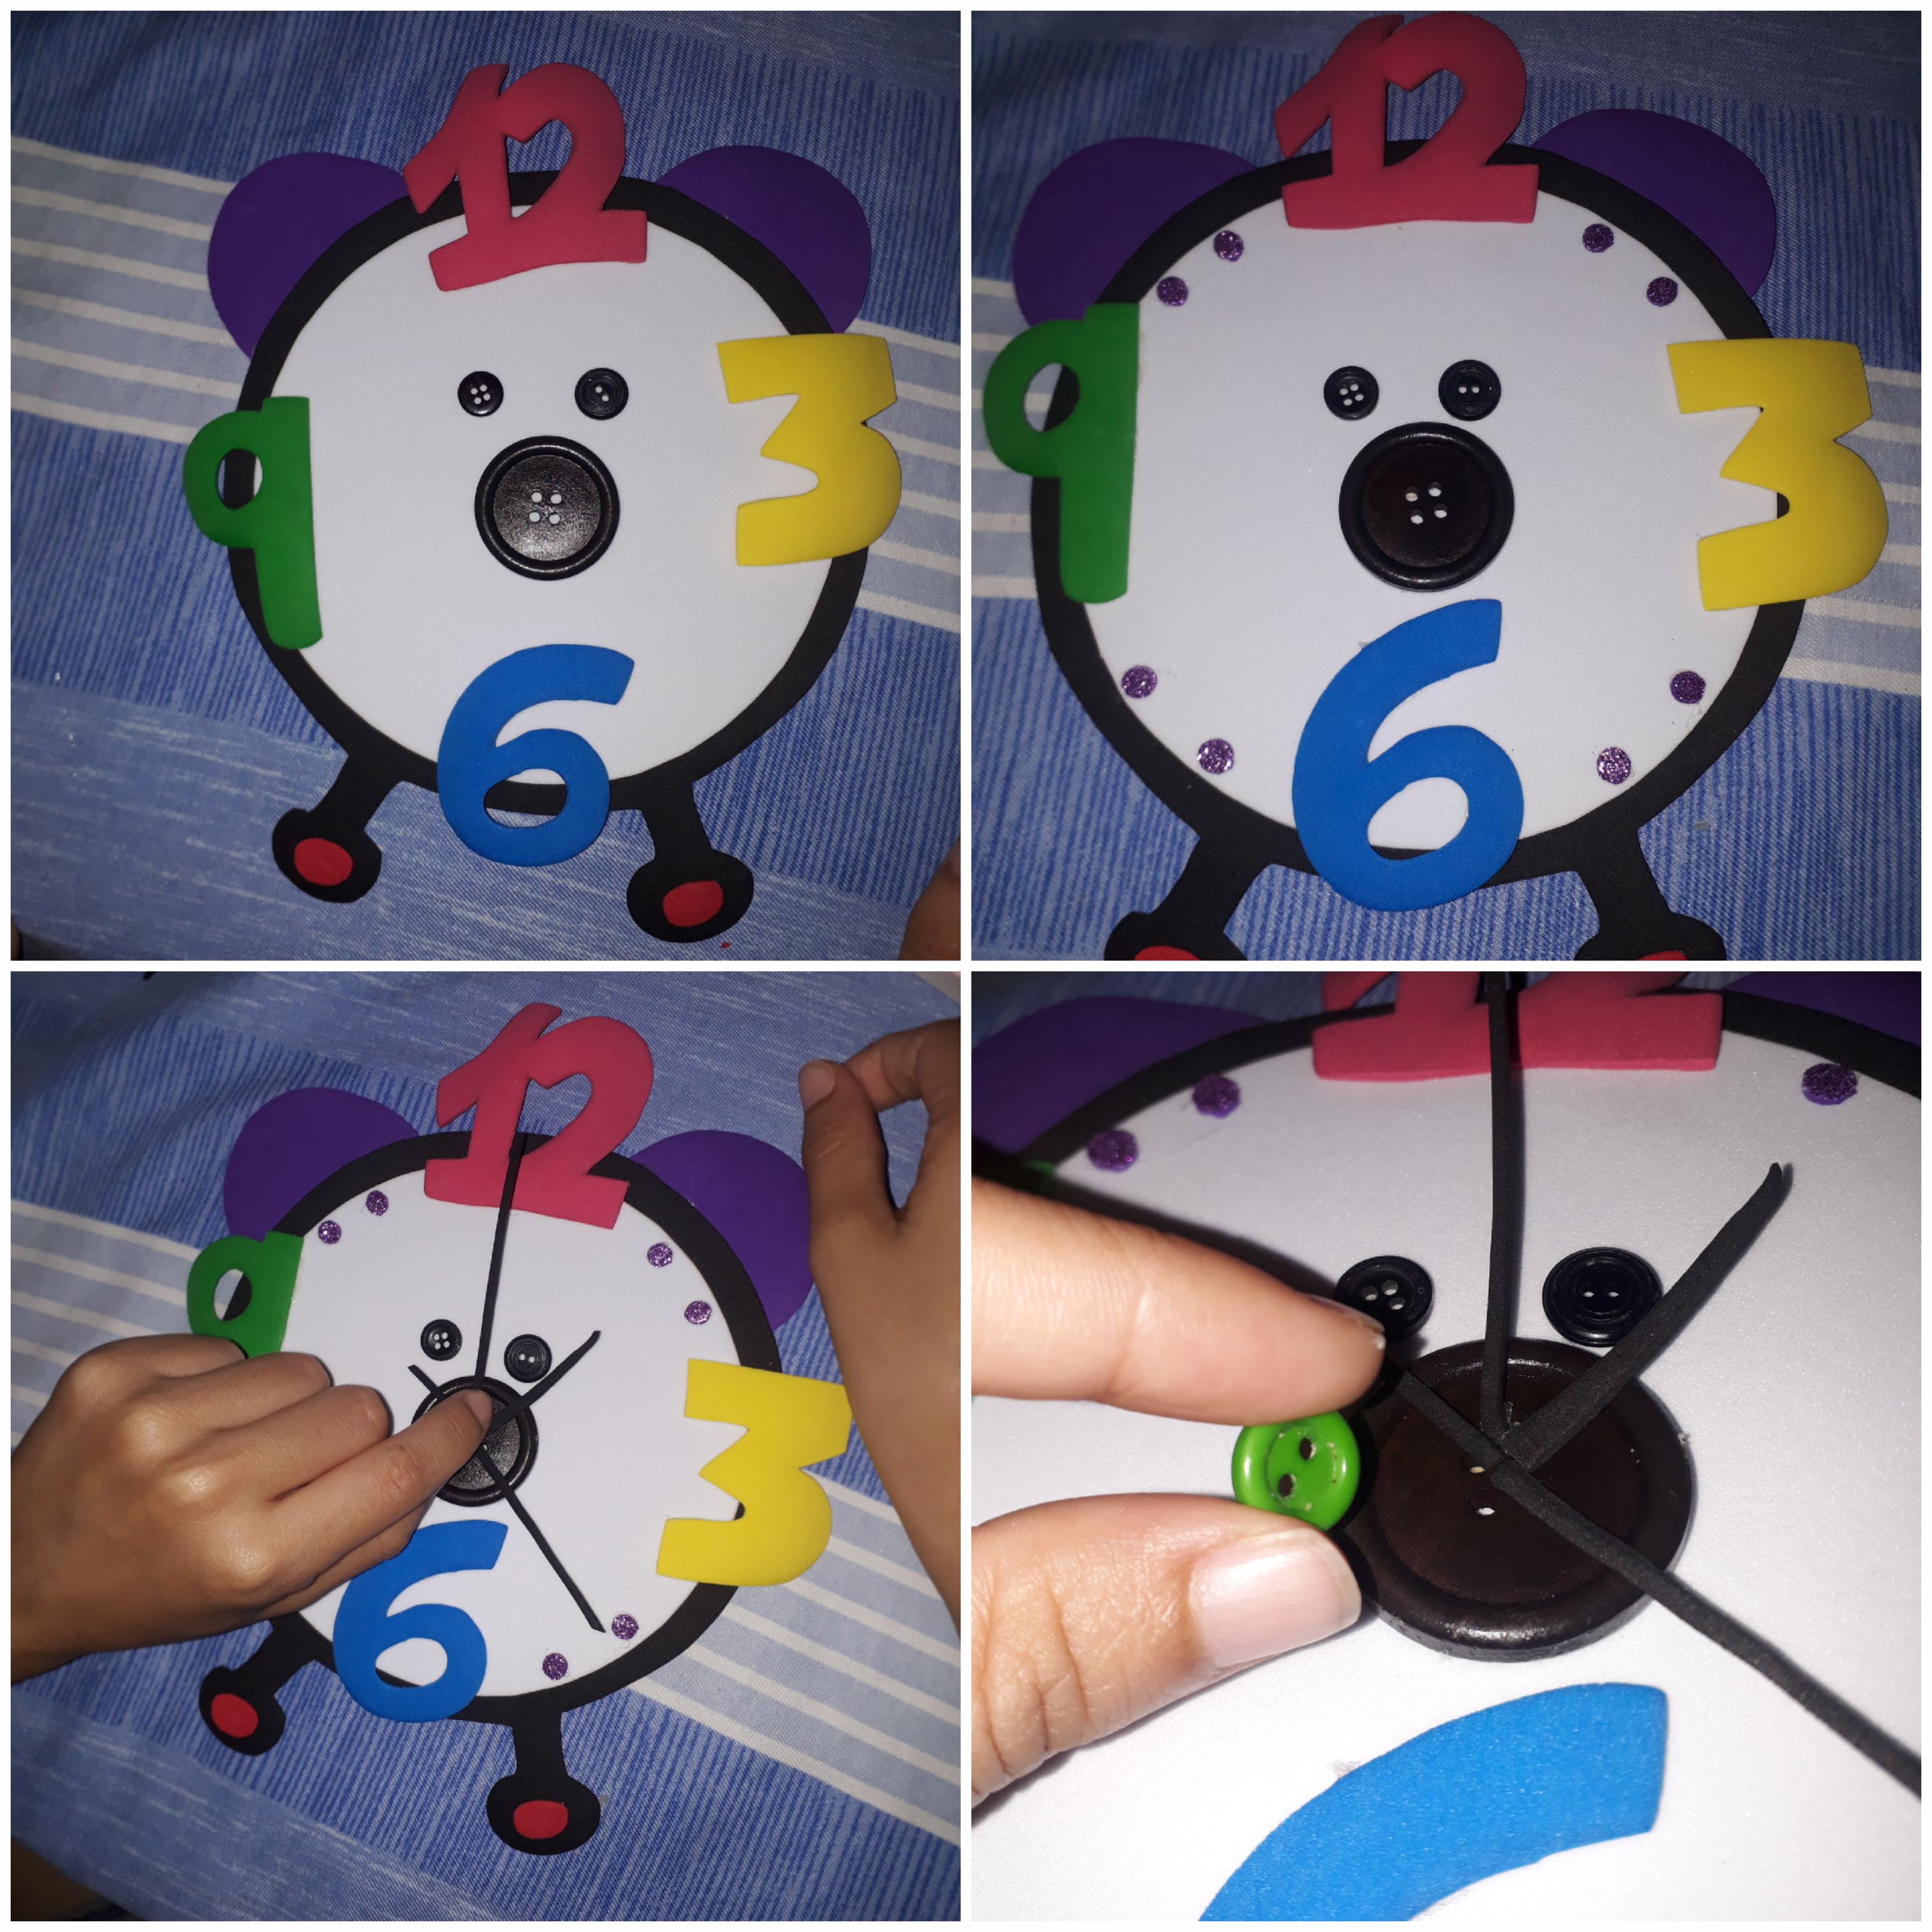
Una vez que tengas todos tus materiales ordenados, con la ayuda de 2 tazas haz 2 círculos uno más grande que el otro, el más grande lo hice en negro y el más pequeño en blanco, también hice mis moldes de los números 12, 3, 6 y 9 que serán los que resaltarán el reloj.
STEP BY STEP
Once you have all your materials ordered, with the help of 2 cups make 2 circles one bigger than the other, the bigger one I did in black and the smaller one in white, I also made my molds of the numbers 12, 3, 6 and 9 that will be the ones that will highlight the clock.
Lo siguiente que haremos será dibujar unas formas de patitas al reloj y luego procederemos a recortar cada uno de los detalles, como las orejas y los números. Debes recortar 8 círculos pequeños con la ayuda de un sacabocados, una vez que tengamos todo listo con la plancha daremos forma a nuestros detalles, recuerda no dejarlos mucho tiempo porque pueden perder el diseño y dañarse.
The next thing we will do is to draw some shapes of little legs to the clock and then proceed to cut out each of the details, such as the ears and numbers. You must cut out 8 small circles with the help of a punch, once we have everything ready with the iron we will shape our details, remember not to leave them too long because they can lose the design and get damaged.
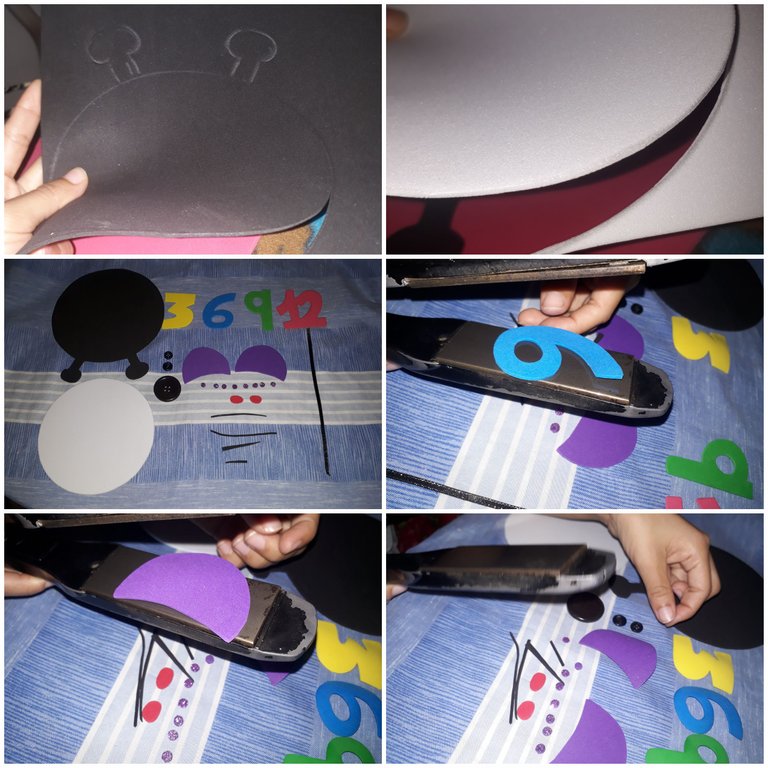
Una vez que tenemos todos nuestros detalles listos, con la ayuda de la pistola de silicona pegaremos primero la base, es decir el círculo blanco sobre el círculo negro, luego las orejas y los pequeños detalles de las patitas, y para guiarnos colocaremos los ojitos que se ven que son 2 botones pequeños y la nariz que es 1 botón grande.
Once we have all our details ready, with the help of the silicone gun we will first glue the base, that is to say the white circle on the black circle, then the ears and the small details of the little legs, and to guide us we will place the little eyes that you can see that are 2 small buttons and the nose that is 1 big button.
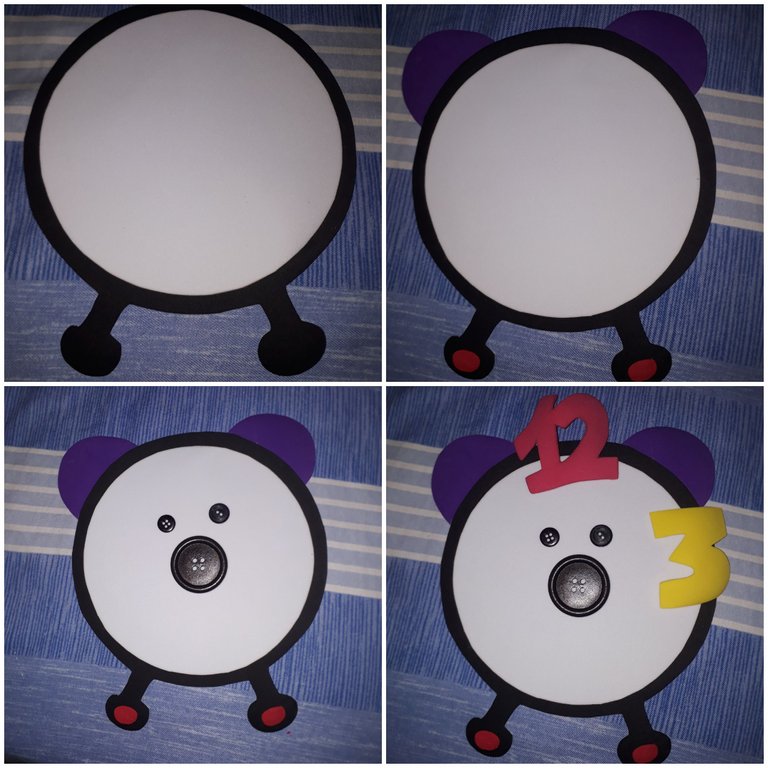
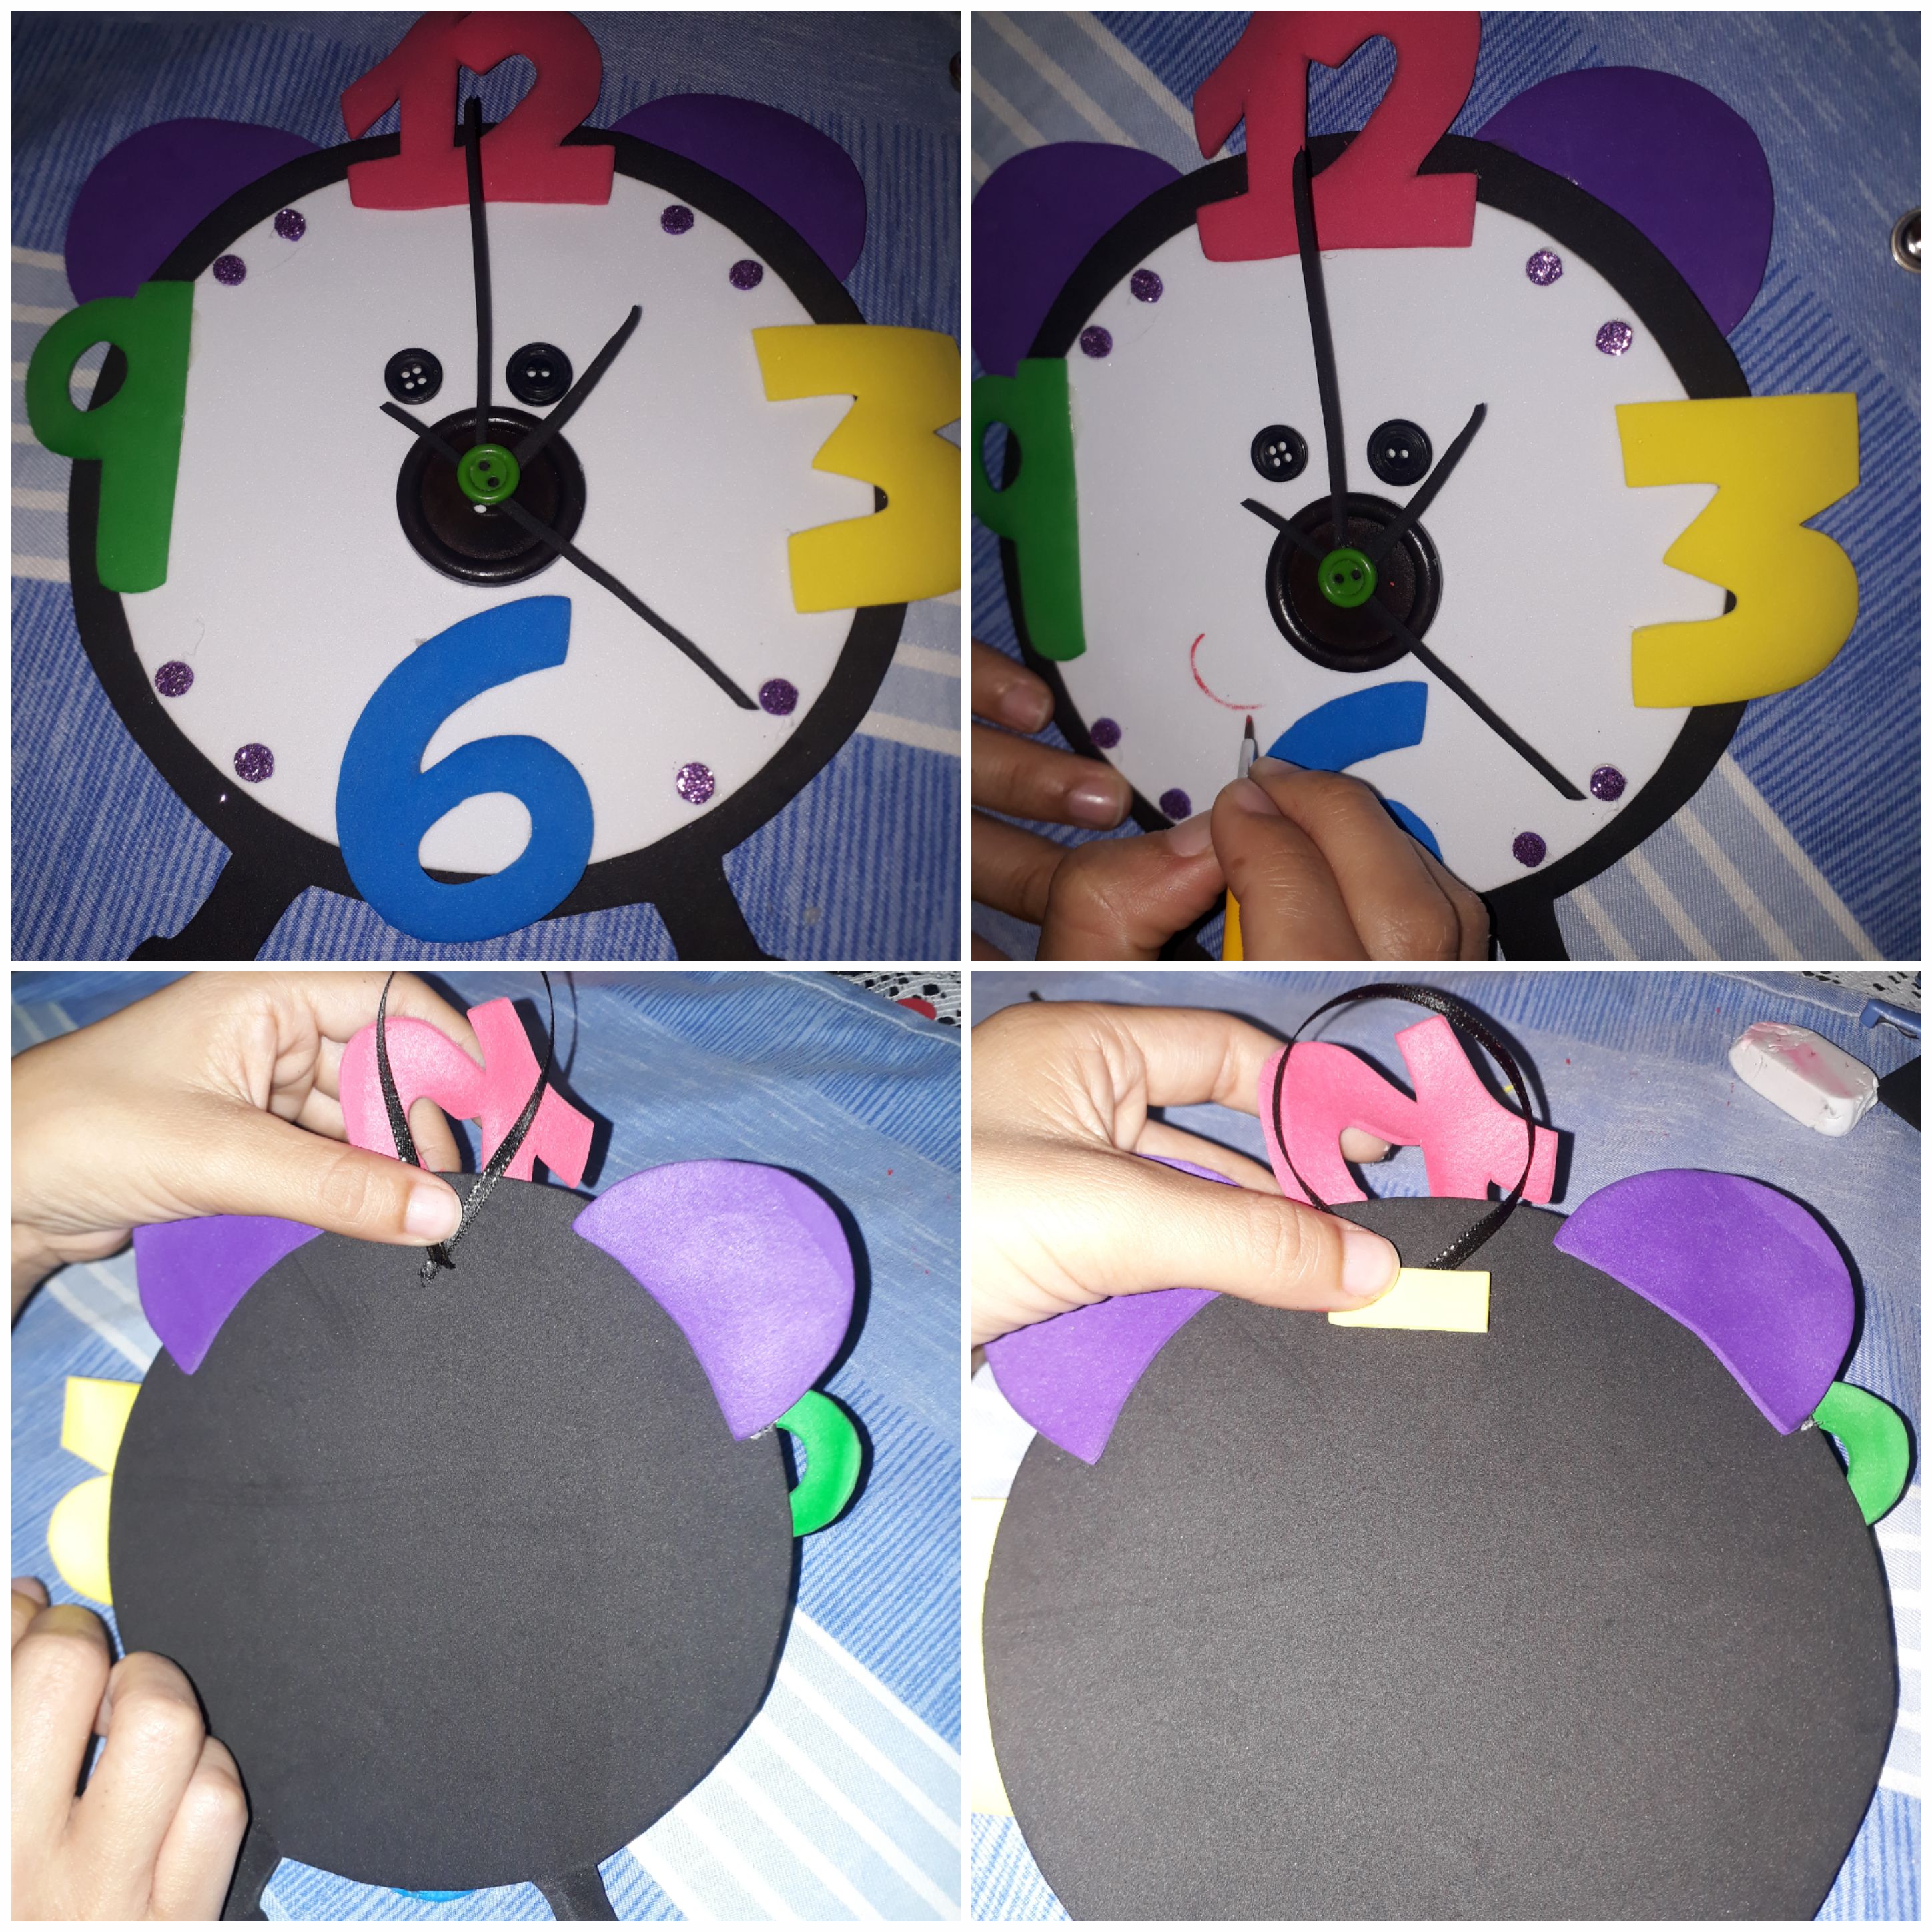
We finish decorating our clock by placing the details, and with black foami we will make the hands that mark the time, once the hands of the clock are glued and we place a button on the top.
Terminamos de decorar nuestro reloj colocando los detalles, y con foami negro haremos las manecillas que marcan la hora, una vez pegadas las manecillas del reloj y colocamos un botón en la parte superior.
Finally, draw a mouth on one side of her cheek and glue the ribbon on the back to back it up.
Por último, dibuja una boca en uno de los lados de su mejilla y pega el lazo en la parte de atrás para respaldarlo.
As you can see we have finished, I hope you liked my work.

Gracias por su tiempo y gracias por su apoyo. Juntos hacemos vida en esta comunidad.
Thank you for your time and thank you for your support. Together we make life in this community.

Traducción realizada con la versión gratuita del traductor www.DeepL.com/Translator
Cada vez quedo más sorprendida con tu trabajo, ese reloj esta demasiado lindo y sería excelente en un salón de clases de primaria, para orientar a los niños para que aprendan la hora en reloj analógicos, ya que conozco varios adultos que aún se les dificultad. Excelente Manualidad. Bendiciones🤗🌹
Que linda!
Muchisimas gracias, tu comentario me llena de alegría.
Que bueno que pasaras por aquì, aunque muchas veces no seamos tan recompensados monetariamente, un comentario de esto vale muchísimo, porque nos ayuda a continuar dando lo mejor de nosotros. Te mando un abrazo!
Tienes mucha razón al decir que los comentarios valen muchísimo, ya que estos nos animan a continuar, quisiera poder tener más valor para además del comentario darte una buena recompensa, ya que tus trabajos y tu manera de explicar el proceso me impulsan a querer incursionar en las manualidades, pero como te dije, primero debo equiparme. Dios te bendiga tus manos y tu creatividad, para que sigas llevando más bellezas con material de rehúso. Bendiciones🙌🤗🌹
Your content has been voted as a part of Encouragement program. Keep up the good work!
Use Ecency daily to boost your growth on platform!
Support Ecency
Vote for Proposal
Delegate HP and earn more
Thank you very much, I hope to do better and better.
Thank you for sharing this amazing post on HIVE!
Your content got selected by our fellow curator @stevenson7 & you just received a little thank you via an upvote from our non-profit curation initiative!
You will be featured in one of our recurring curation compilations and on our pinterest boards! Both are aiming to offer you a stage to widen your audience within and outside of the DIY scene of hive.
Join the official DIYHub community on HIVE and show us more of your amazing work and feel free to connect with us and other DIYers via our discord server: https://discord.gg/mY5uCfQ !
If you want to support our goal to motivate other DIY/art/music/homesteading/... creators just delegate to us and earn 100% of your curation rewards!
Stay creative & hive on!
Thank you very much for the support, it is very gratifying that this post has been selected, I will continue to do my best.
Precioso te quedo ese reloj, muy colorido. Una manera muy divertida para enseñar la hora a los niños. A mi hija en el colegio le mandaron hacer un reloj con material de provecho, lo hice con cartulina y fue una manera que ella aprendiera la hora en el reloj de aguja.
Que Dios bendiga tus manos y tú creatividad