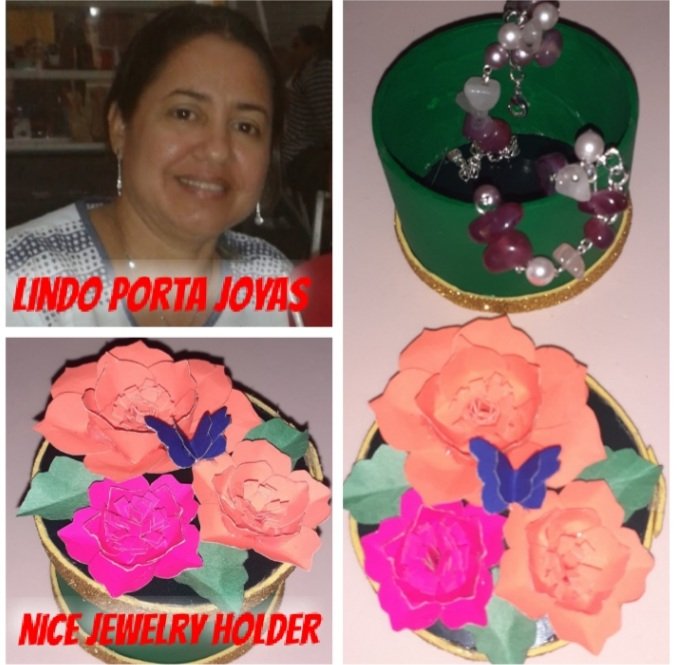
Feliz inicio de semana amigos de esta hermosa comunidad #Hve Diy, espero que se encuentren bien y ahora en este mes del amor y de la amistad celebremos con lindos detalles hecho a mano, para ese ser querido ya sea su novia o amiga además lo podemos hacer con mucho cariño, fácil y rápido con materiales que tenemos en casa, queda muy lindo y es de gran importancia para la mujer ya que en el podemos guardar las joyas que queremos y usamos siempre .
Así que amigos les enseño hacer paso a paso este detalle, vean y tomen apunten para que hagan este lindo 💓COFRE PORTA JOYAS💓
💘💘💘💘💘💘💘💘💘💘💘💘💘💘💘💘💘💘💘💘💘
Happy start of the week friends of this beautiful community #Hve Diy, I hope you are well and now in this month of love and friendship celebrate with nice handmade details, for that loved one whether your girlfriend or friend also we can do it with love, easy and fast with materials we have at home, it is very nice and is of great importance for women because in it we can keep the jewelry we want and always use.
So friends I show you how to make this detail step by step, watch and take note to make this cute 💓JEWELRY COVER💓
💘💘💘💘💘💘💘💘💘💘💘💘💘💘💘💘💘💘💘💘💘
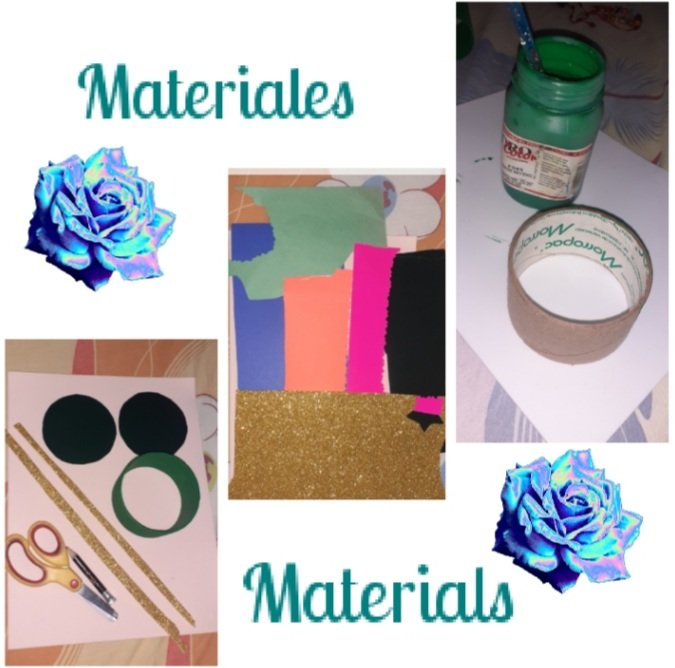
MATERIALES:
1- Un rollo de cartón de tirro de embalaje desgastado.
2- Cartulinas de colores:
▪︎ Negro.
▪︎ Naranja.
▪︎ Verde.
▪︎ Fucsia.
▪︎ Azul.
3- Foami dorado escarchado.
4- Silicón.
5- Tijera.
6- Lapiz.
7- Pintura verde.
8- Pincel.
MATERIALS:
1- A roll of worn out cardboard packaging pull-tab.
2- Colored cardstock:
▪︎ Black.
▪︎ Orange.
▪︎ Green.
▪︎ Fuchsia.
▪︎ Blue.
3- Gold frosted foami.
4- Silicone.
5- Scissors.
6- Pencil.
7- Green paint.
8- Brush.
LA ELABORACIÓN PASO A PASO :
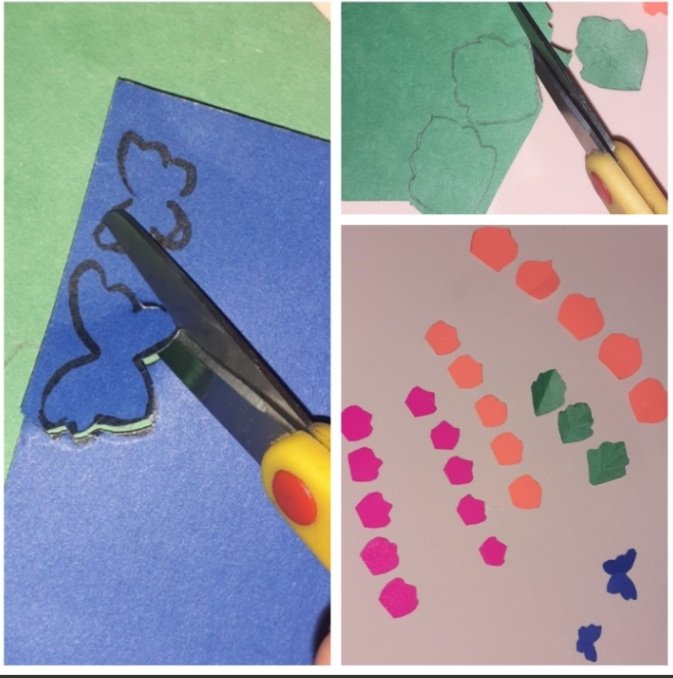
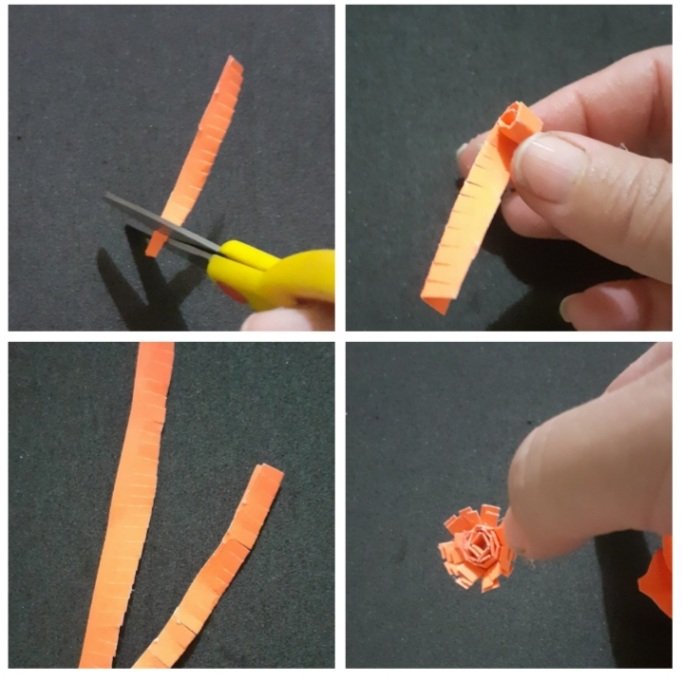
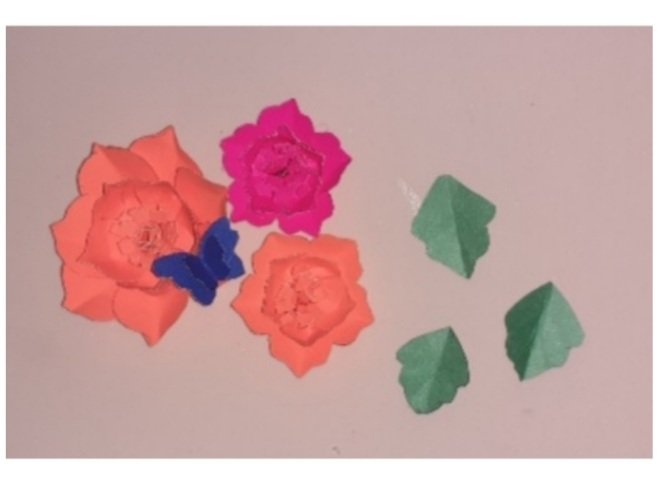
Paso 1: Elaboracion de las rosas, hojas y mariposa.
▪︎ Sacamos moldes de la mariposa , hojas y pétalos para las rosas .
▪︎ Después pintamos esos moldes en cada cartulina .
▪︎ Calcamos tres hojas verdes de 3 cm cada una.
▪︎ Calcamos dos mariposas en la cartulina azul una de 2 cm y la otra de 3 cm.
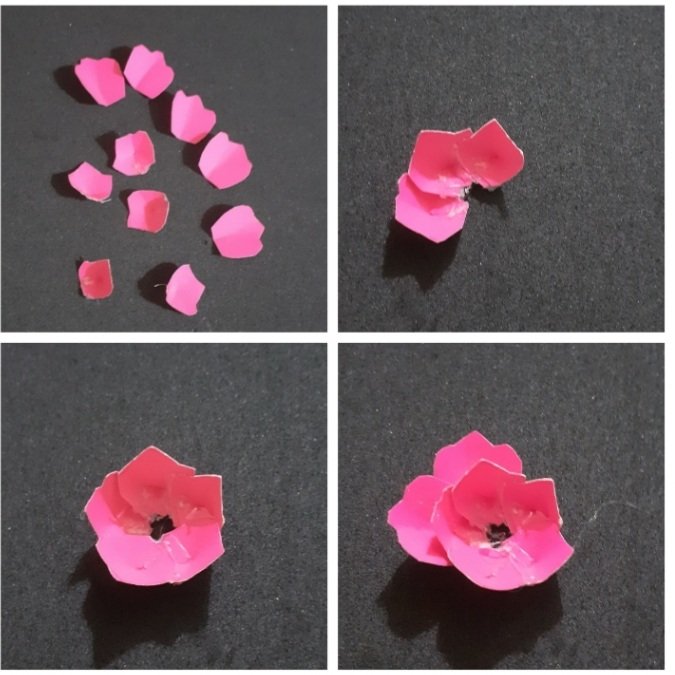
▪︎ Calcamos sietes pétalos naranjas de 3 cm y cinco pétalos de 2 cm para la rosa grande.
▪︎ Calcamos para las dos rosas pequeñas diez pétalos de 2 cm, cinco pétalos de color fucsia, cinco color naranja y diez pétalos de 1,5 cm, cinco pétalos naranjas y cinco de color fucsia .
▪︎ Con la tijera recortamos todos los moldes que calcamos para la elaboración de las rosas, mariposa y hojas.
THE ELABORATION STEP BY STEP :
Step 1: Elaboration of the roses , leaves and butterfly .
▪︎ We take out molds of the butterfly , leaves and petals for the roses .
▪︎ Then we painted those molds on each cardstock .
▪︎ We traced three green leaves of 3 cm each .
▪︎ We traced two butterflies on the blue cardstock one 2 cm and the other 3 cm.
▪︎ We traced seven 3 cm orange petals and five 2 cm petals for the large rose.
▪︎ We calculated for the two small roses ten 2 cm petals, five fuchsia petals, five orange petals and ten 1.5 cm petals, five orange petals and five fuchsia petals .
▪︎ With the scissors we cut out all the molds that we traced to make the roses, butterfly and leaves.

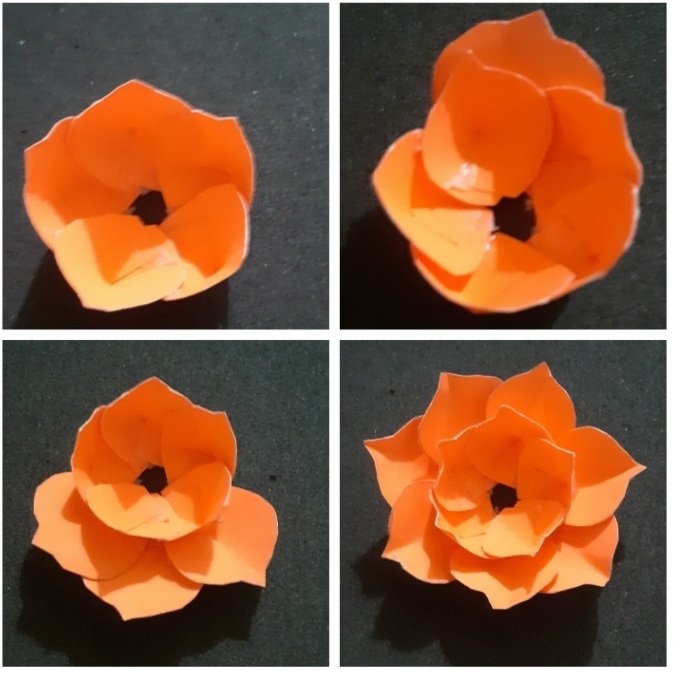
▪︎ Pegamos cada pétalo para ir formando cada rosa, primero una capa con los pétalos más pequeños y después otra capa con los pétalos más grande.
▪︎ Le hacemos el centro a la rosa con un listón de 1,5 cm de ancho y 10 cm de largo le cortamos con la tijera una pestaña damos vuelta en espiral lo alborotamos y listo el centro de la rosa.
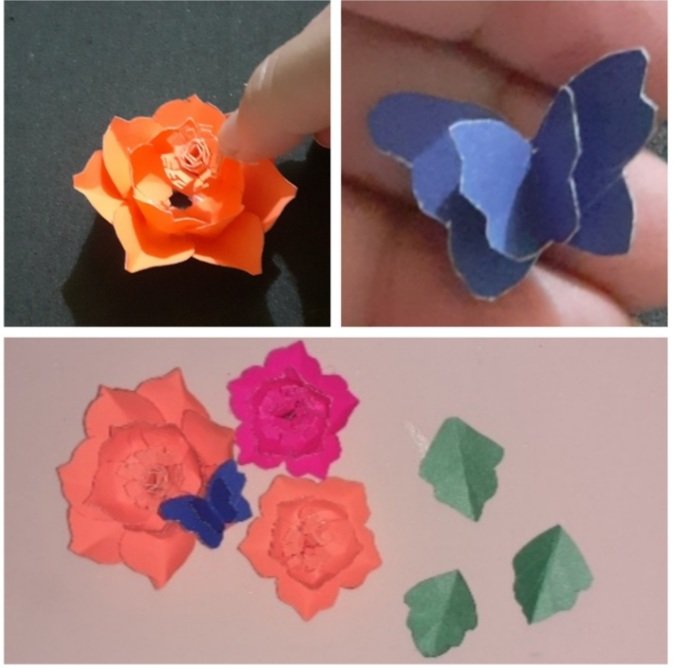
▪︎ Pegamos las dos mariposas y sacamos una sola mariposa (reservamos ).
Glue each petal to form each rose, first a layer with the smaller petals and then another layer with the larger petals.
▪︎ We make the center of the rose with a ribbon of 1.5 cm wide and 10 cm long we cut with the scissors a tab we turn it in a spiral and ready the center of the rose.
Glue the two butterflies together and remove a single butterfly (reserve).

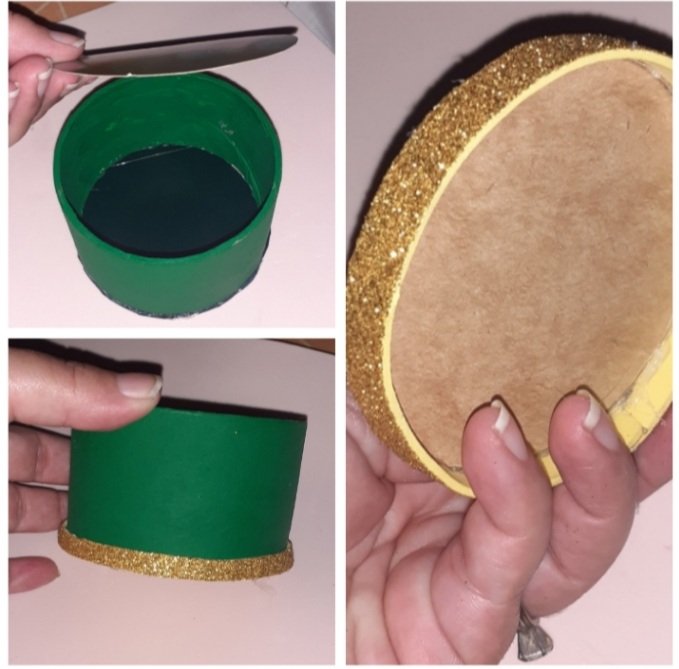
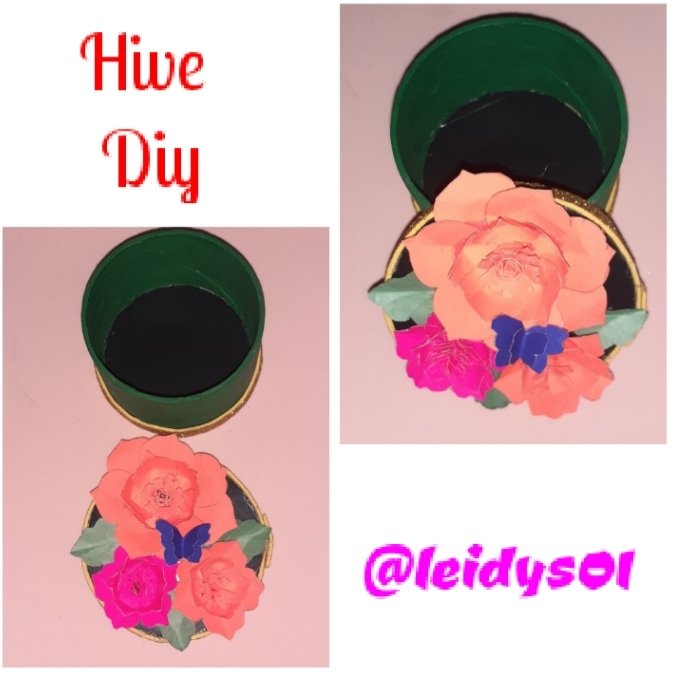
Paso 2: Elaboración de el cofre del porta joyas.
▪︎ Tomamos el rollo de cartón del tirro desgastado y lo pintamos en color verde dejamos secar.
▪︎ Marcamos con el mismo rollo un círculo en la cartulina negra para pegarla y hacer la base del cofre .
▪︎ Luego hacemos la tapa del cofre igual, marcamos con el rollo y cortamos un círculo .
▪︎ Sacamos unos listones de foami dorado escarchado , pegamos en la orilla de abajo del cofre para decorar .
▪︎ Y para hacer la tapa del cofre le pegamos con silicón el listón de foami dorado escarchado en la orilla del círculo de cartón negro .
Step 2: Making the jewelry box.
▪︎ We take the cardboard roll from the worn out strip and paint it in green color let it dry.
▪︎ We mark with the same roll a circle on the black cardboard to glue it and make the base of the chest .
▪︎ Then we make the lid of the chest the same way, mark with the roll and cut a circle .
▪︎ We take out some frosted gold foami ribbons , glue on the bottom edge of the chest to decorate .
▪︎ And to make the lid of the chest we glue with silicone the frosted gold foami ribbon on the edge of the black cardboard circle .

Paso 3:Decoración del cofre porta joyas.
▪︎ Listo todos los accesorios para decorar la tapa del cofre procedemos.
▪︎ Decoramos pegando en la tapa del cofre con silicón las tres rosas, tres las hojas y la mariposa .
Step 3: Decoration of the jewelry box.
▪︎ Ready all the accessories to decorate the lid of the chest we proceed.
▪︎ We decorate by gluing the three roses, three leaves and the butterfly on the lid of the box with silicone.
Y miren amigos de #Hive Diy que lindo detalle para regalar para esta bella ocasión del día de ❤ san valentin o la amistad ❤.
And look #Hive Diy friends what a nice detail to give as a gift for this beautiful occasion of ❤ valentines day or friendship ❤.
Deje volar su imaginación amigos... con amor se puede crear muchos detalles lindo para regalar 🎁🎁
Let your imagination run wild friends... with love you can create many cute details to give as gifts 🎁🎁

Gracias por el apoyo mi bella comunidad #Hive Diy, espero que les guste mi post.
Les deseo feliz semana de 👄 SAN VALENTIN 👄 a todos los enamorados de 💓 HIVE 💓
Fotos mías y tomada de mi samsung A 10, fotos editadas por frame y traducida por deepl.
<
Thank you for the support my beautiful #Hive Diy community, I hope you like my post.
I wish you happy 👄 SAN VALENTIN week 👄 to all 💓 HIVE 💓 lovers 💓.
Photos mine and taken from my samsung A 10, photos edited by frame and translated by deepl.
Me encantaron las florecitas, quedó precioso. Aprovecho invitarte al discord de la comunidad por si no estas y solicitar tu rol.
https://discord.gg/tYENgKmTHA