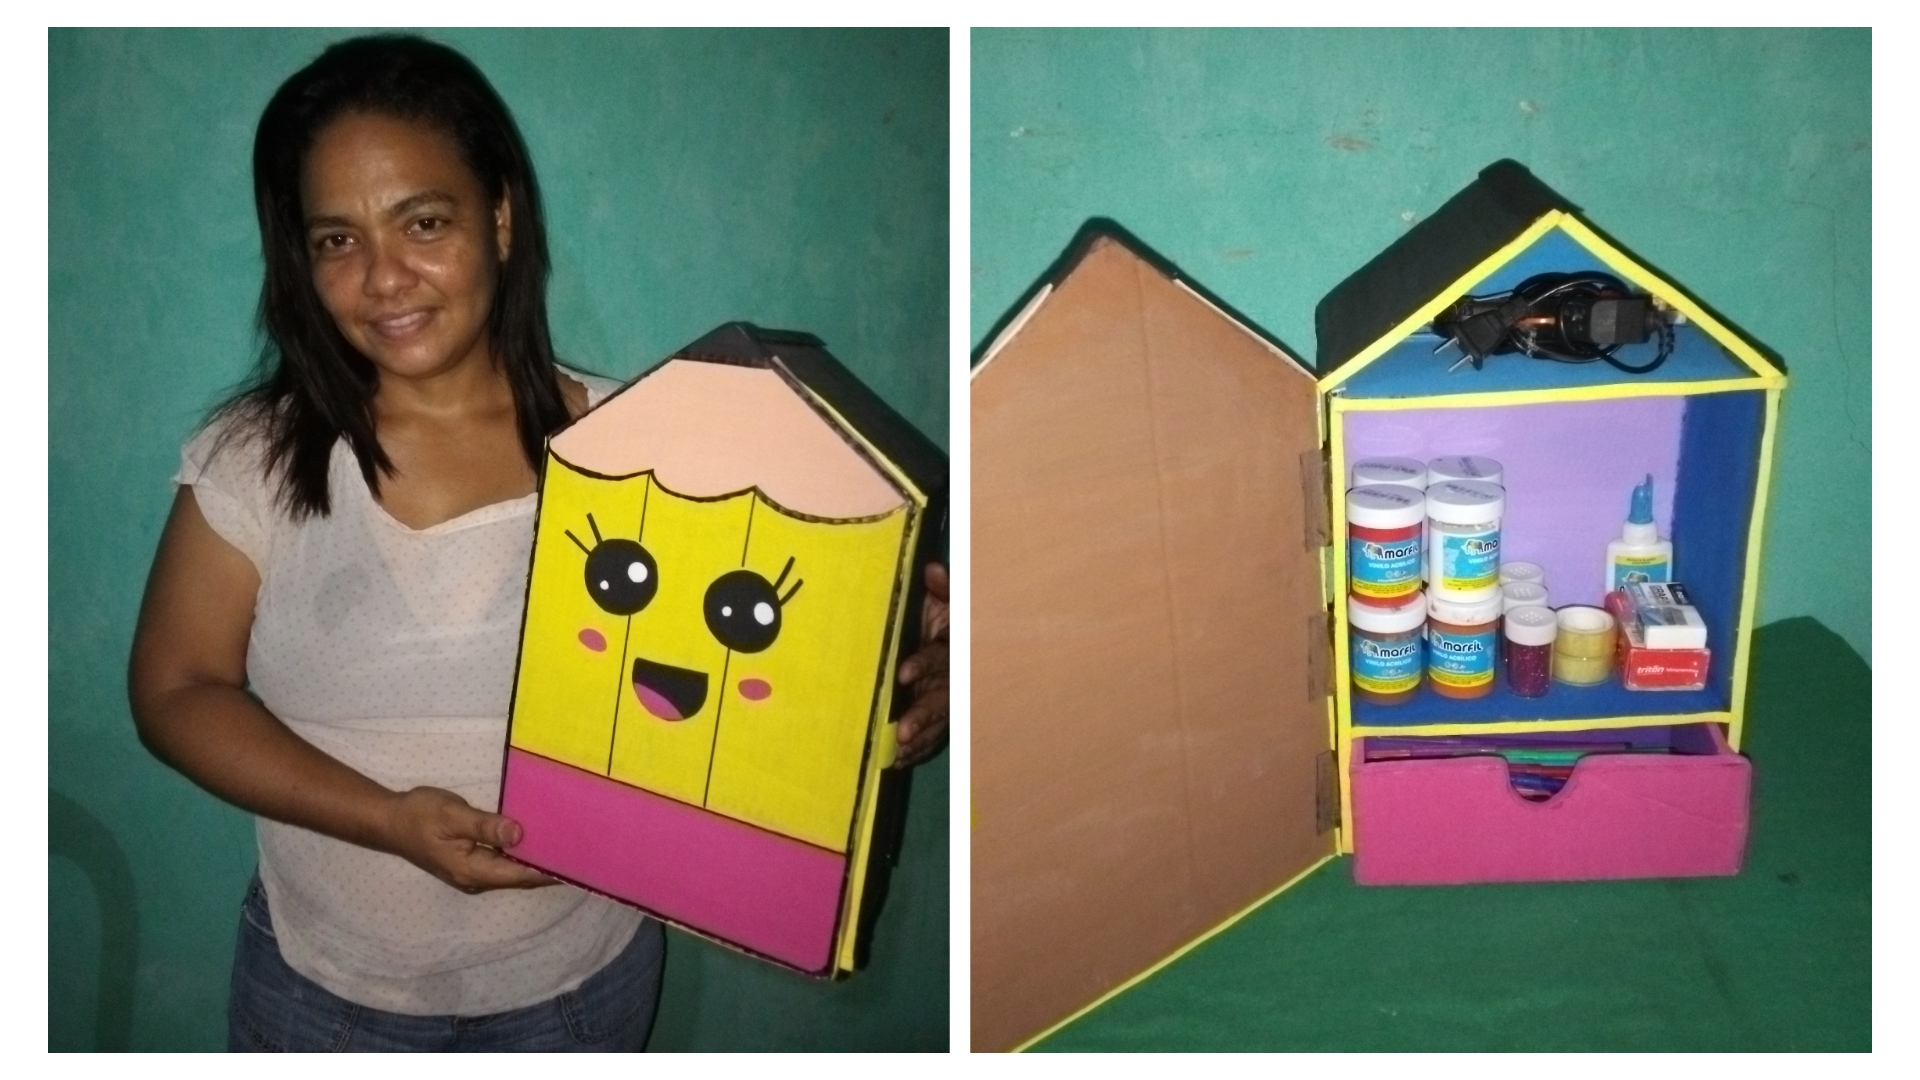
Hello everyone happy and blessed day for everyone today I bring you one of my creative activities that I like to do with much love for you a step by step of a pencil organizer to make our desk look cheerful and lively is also a good choice for the little ones in the house and so from small teach them to keep order and the good thing that are super simple materials that can be found in the house. Here is the tutorial.
Hola a todos feliz y bendecido día para todos el día de hoy les traigo una de mis actividades creativas que me gusta hacer con mucho cariño para ustedes un paso a paso de un organizador con forma de lápiz para que nuestros escritorio se vea alegre y animado también es buena opción para los pequeños de la casa y así desde pequeño enseñarlos a mantener el orden y lo bueno que son materiales super sencillo que podemos encontrar en la casa. Aquí les dejos el tutorial.
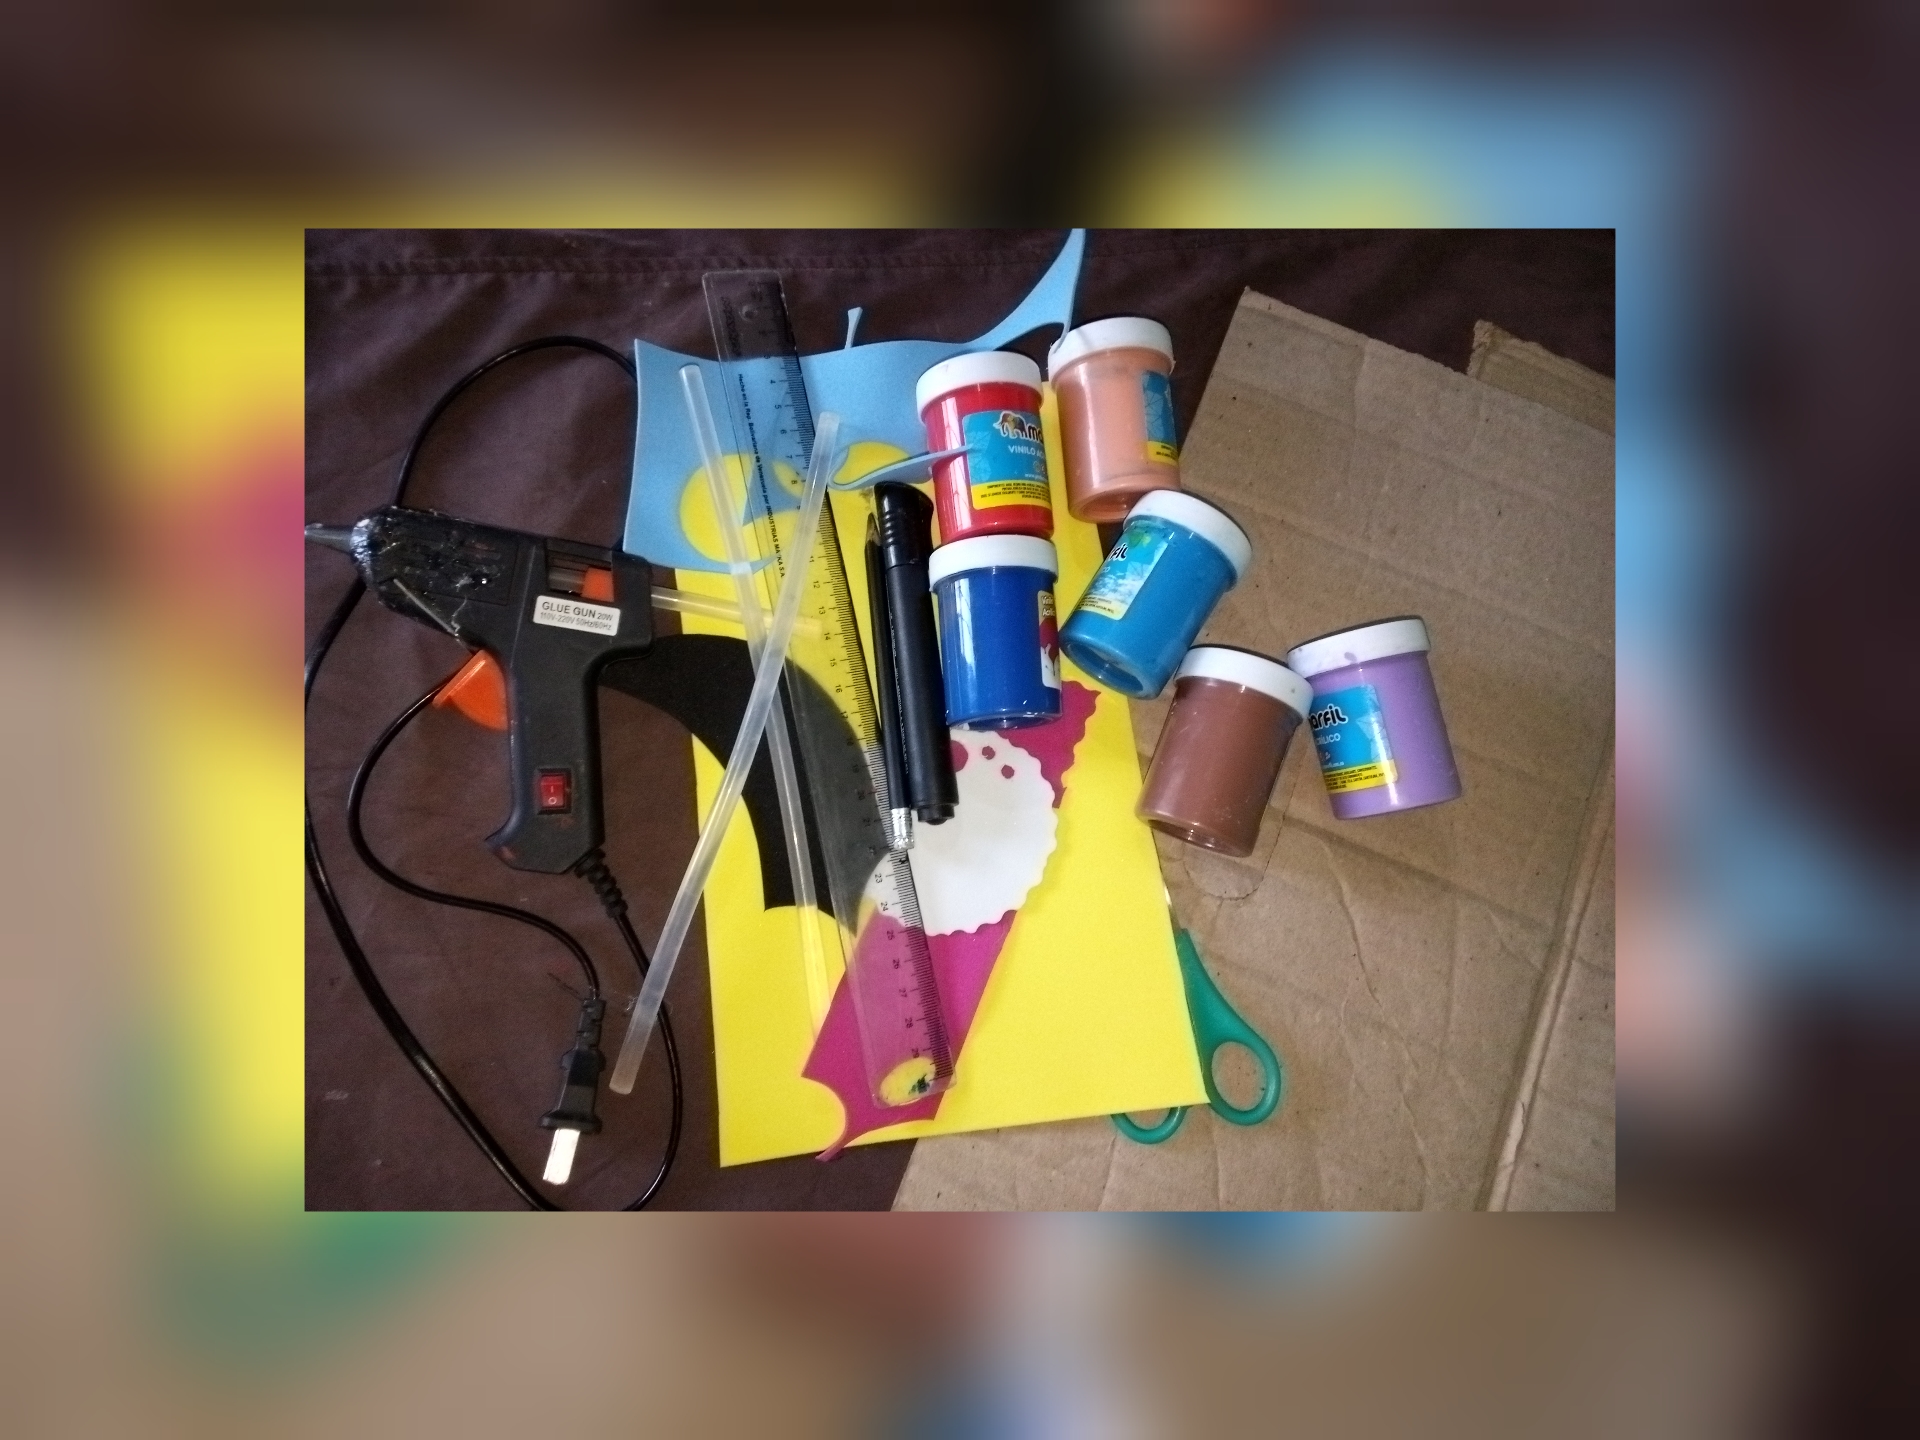
Materials.
Materiales.
- Cardboard.
- Paint.
- Brush.
- Hot glue.
- Ruler.
- Pencil.
- Marker pen.
- Scissors.
- Magic clasp.
- Eva rubber.
- Carton.
- Pintura.
- Pincel.
- Silicón caliente.
- Regla.
- Lápiz.
- Rotulador.
- Tijera.
- Cierre mágico.
- Goma Eva.
Step by step.
Paso a paso.
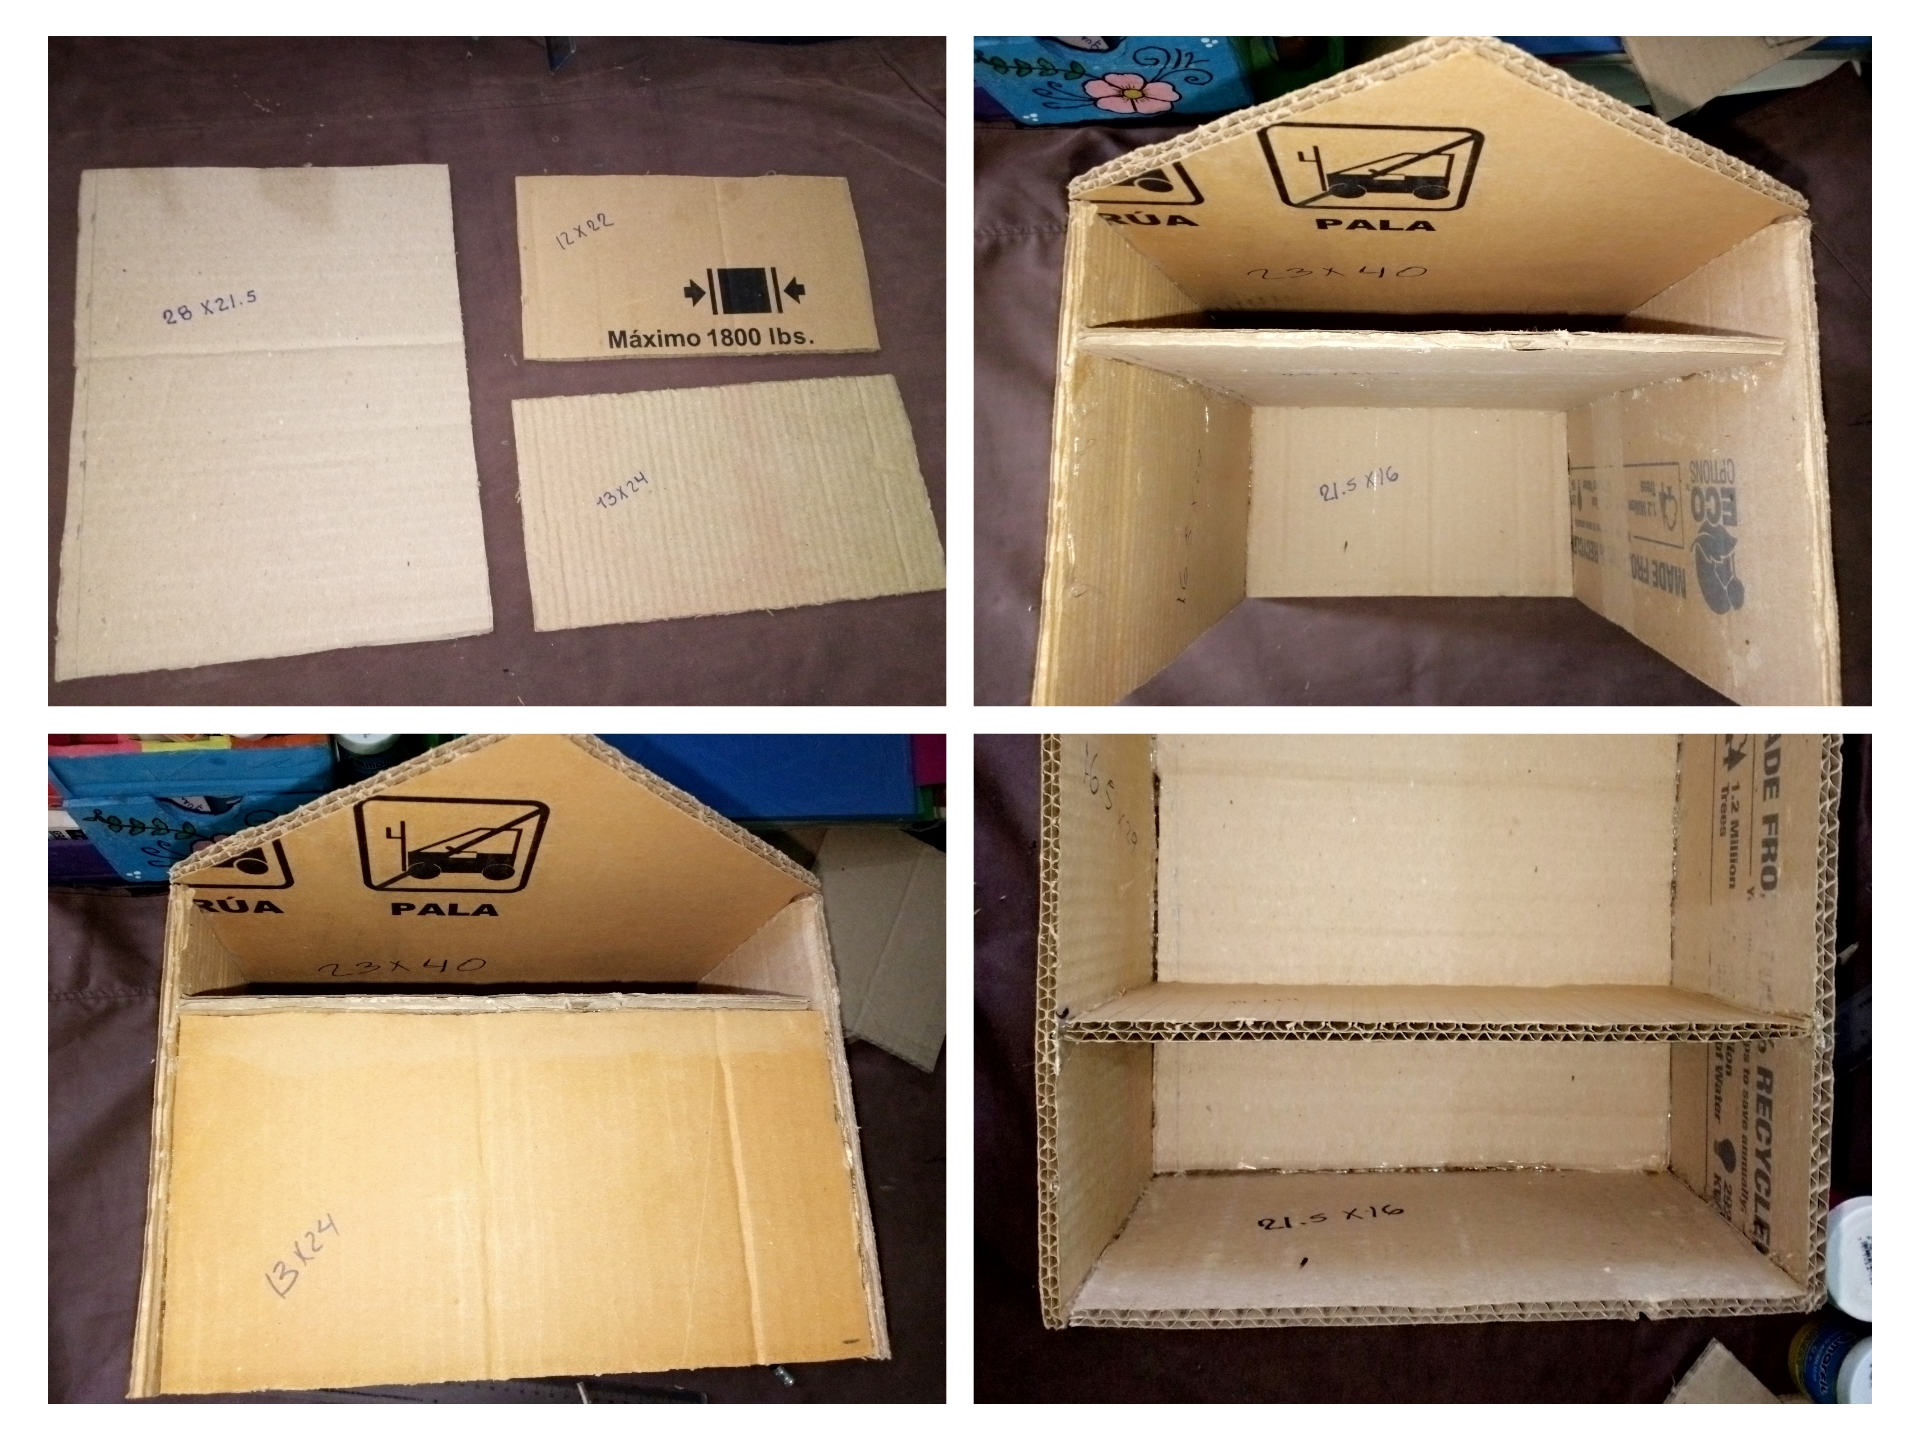
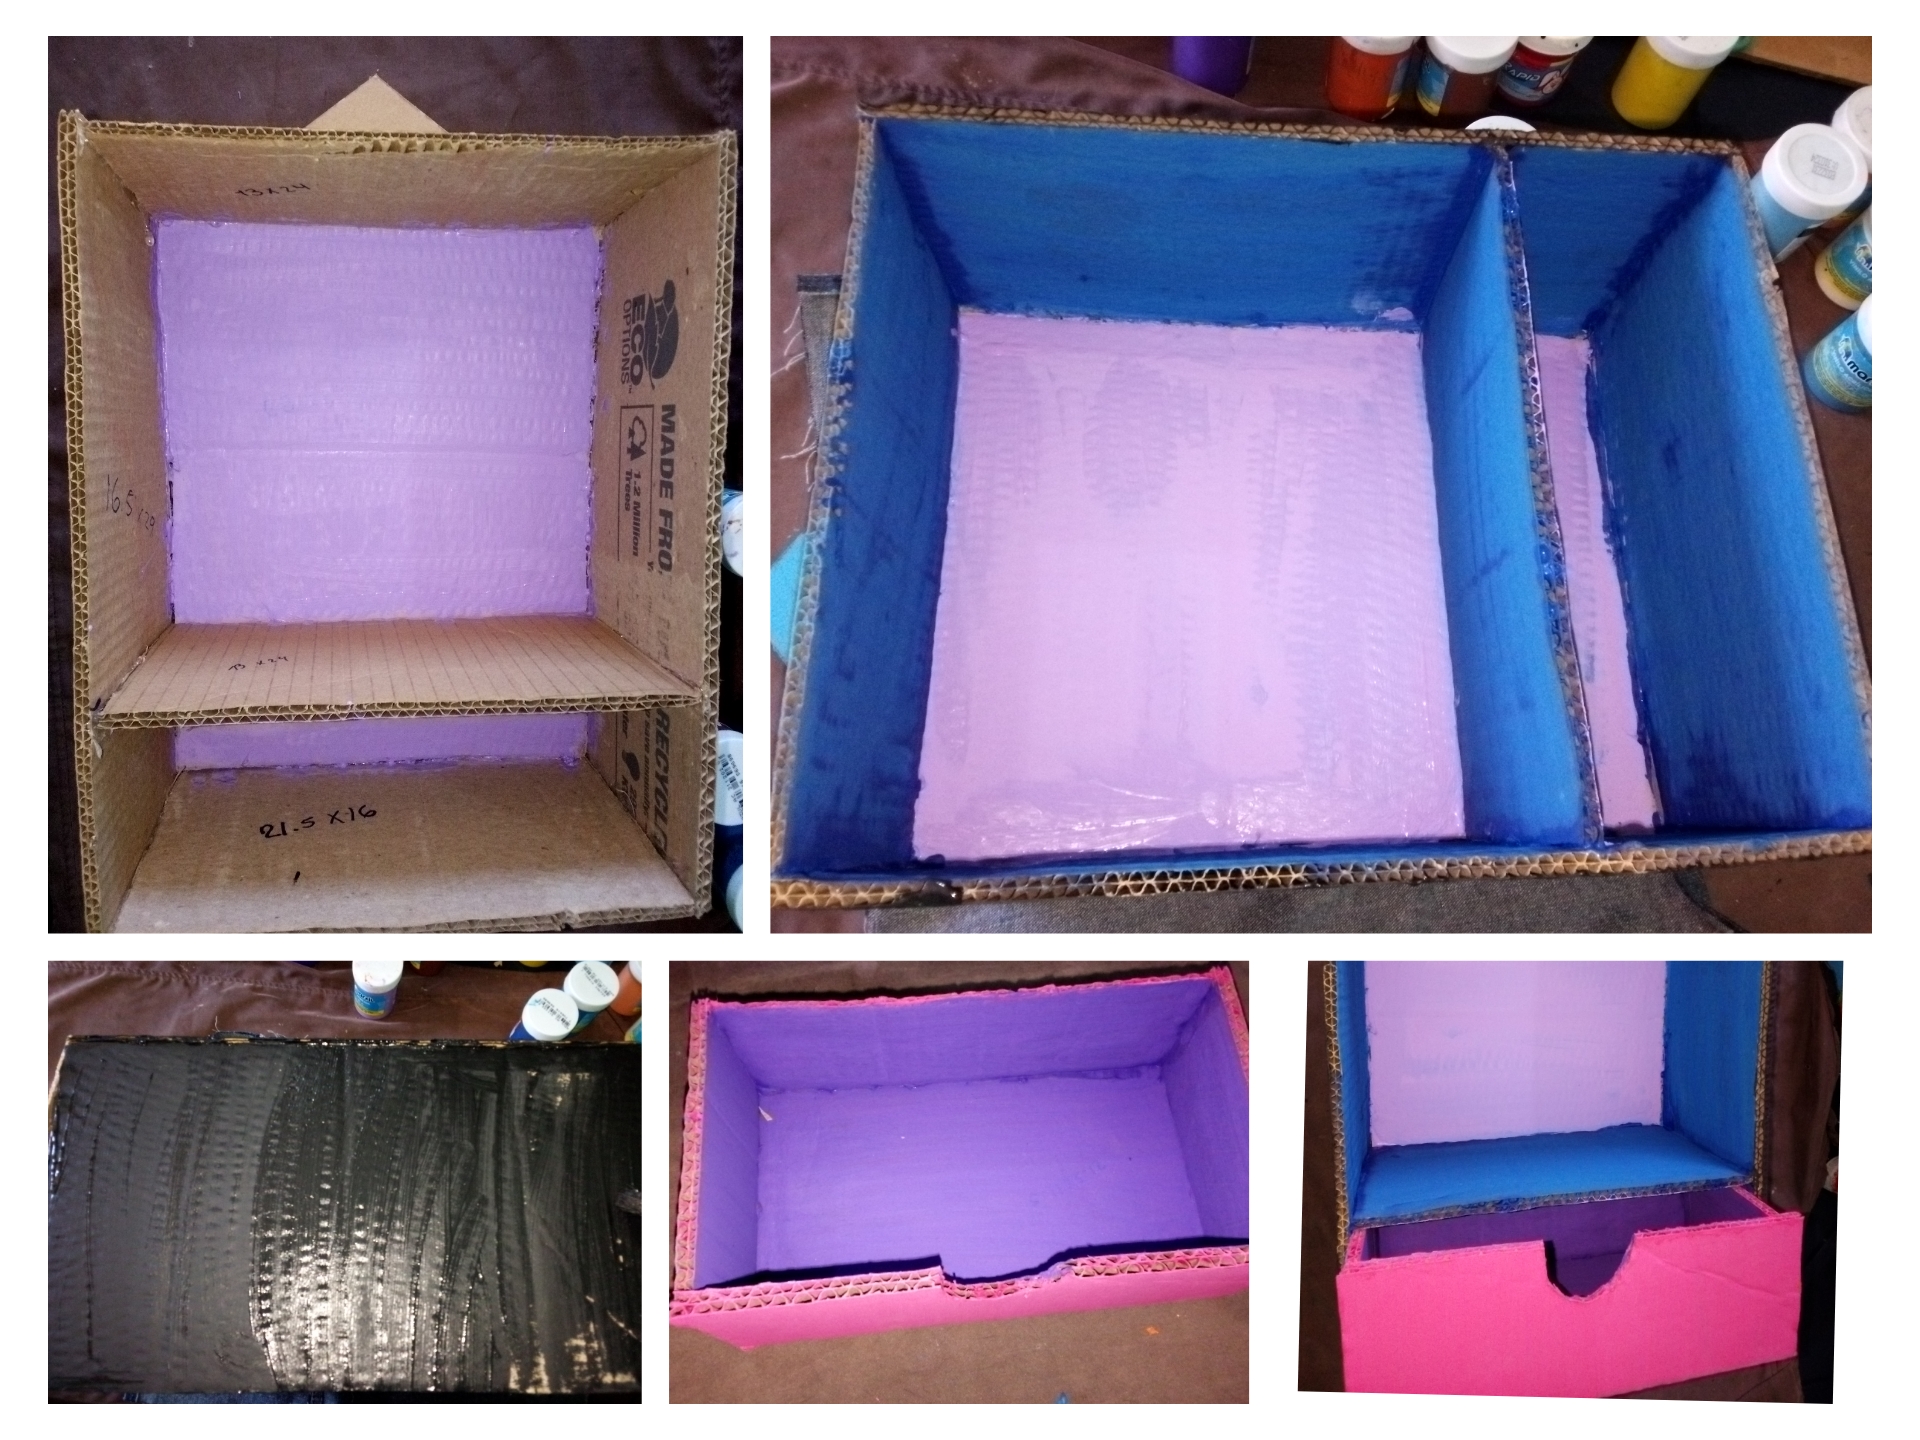
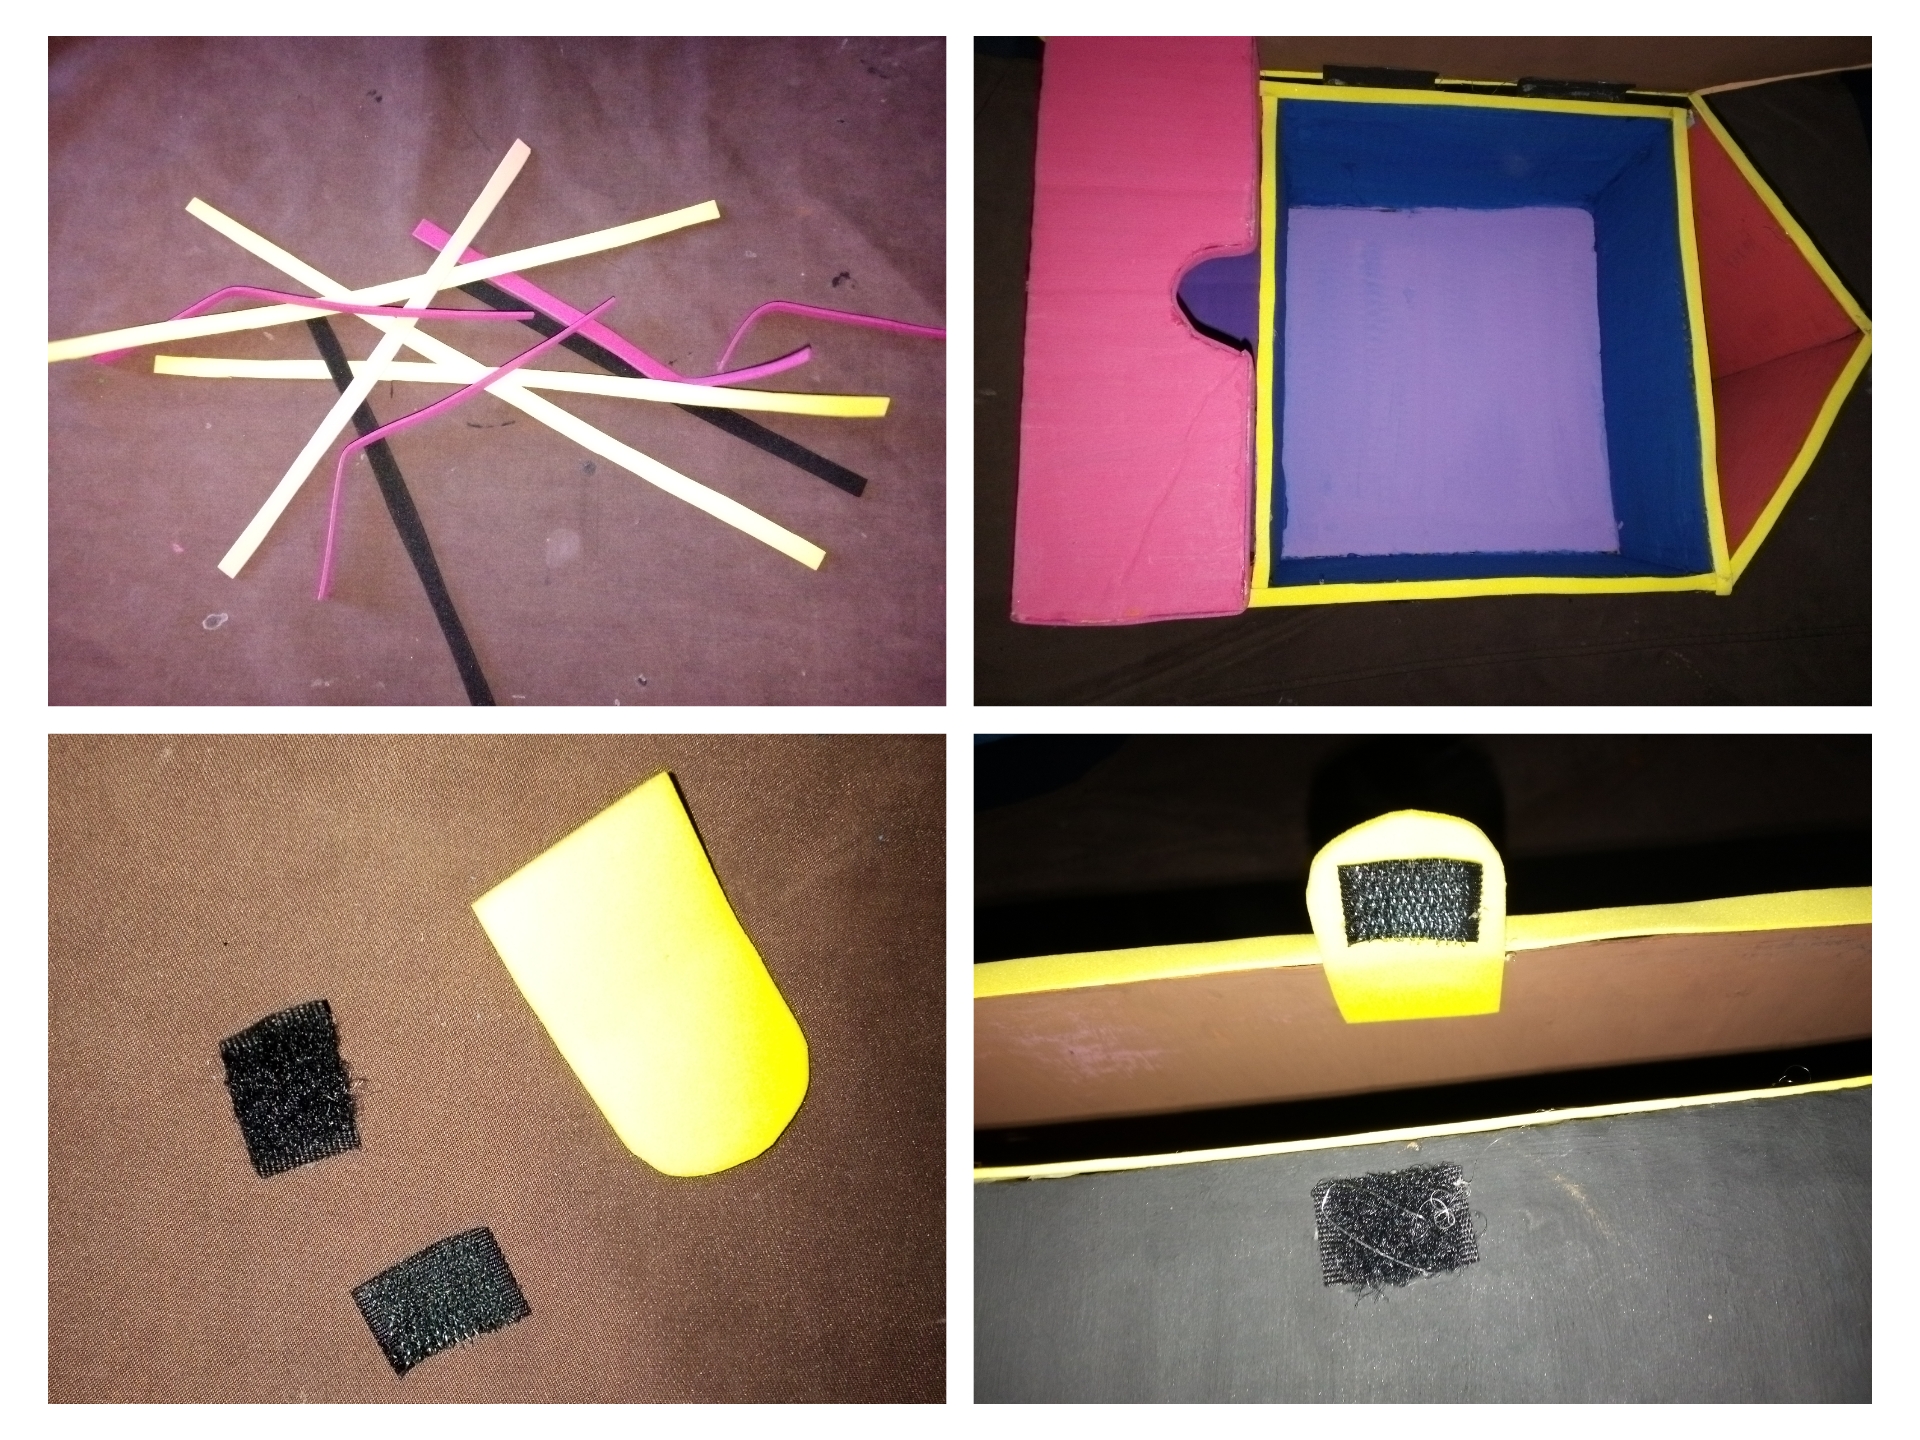
✓We start by cutting a 23x40 cm cardboard with the help of the ruler and make a triangle at the tip to make a pencil point shape then cut two 16.5x 29 cm cardboard for the sides, glue with Silicon and make a 21x16 cardboard base and glue it down.
✓For the upper part make a 12x22 cm cardboard and another one of 13x24 cm and make another cardboard of 28x21.5 cm to divide the inside. I thought it was a good idea because in that space we can keep a letter, ruler or something else of the same size. Then take the cardboard number 13x24 and glue with silicone on the final surface of the division. On the inside, glue the other cardboard on the bottom, leaving a space of 8 cm to place a drawer.
✓ Comenzamos cortando un cartón de 23x40 cm con la ayuda de la regla y realiza un triángulo en la punta para que hagamos forma de una punta de lápiz luego corta dos cartónes de 16.5x 29 cm para los laterales pega con Silicon y haz una base de cartón de 21x16 y pegamos abajo.
✓Para la parte de arriba realiza un cartón de 12x22cm y otra de 13x24 cm aparte realiza otro cartón de 28x21.5 cm para dividir por dentro a mi pareció buena idea porque en ese espacio podemos guardar hojas tipo carta, regla u otra cosa del mismo tamaño. Después toma el cartón número 13x24 y pega con silicón en la superficie final de la división. Por dentro pega el otro cartón en la parte de abajo dejado un espacio de 8 cm para colocar una gaveta.

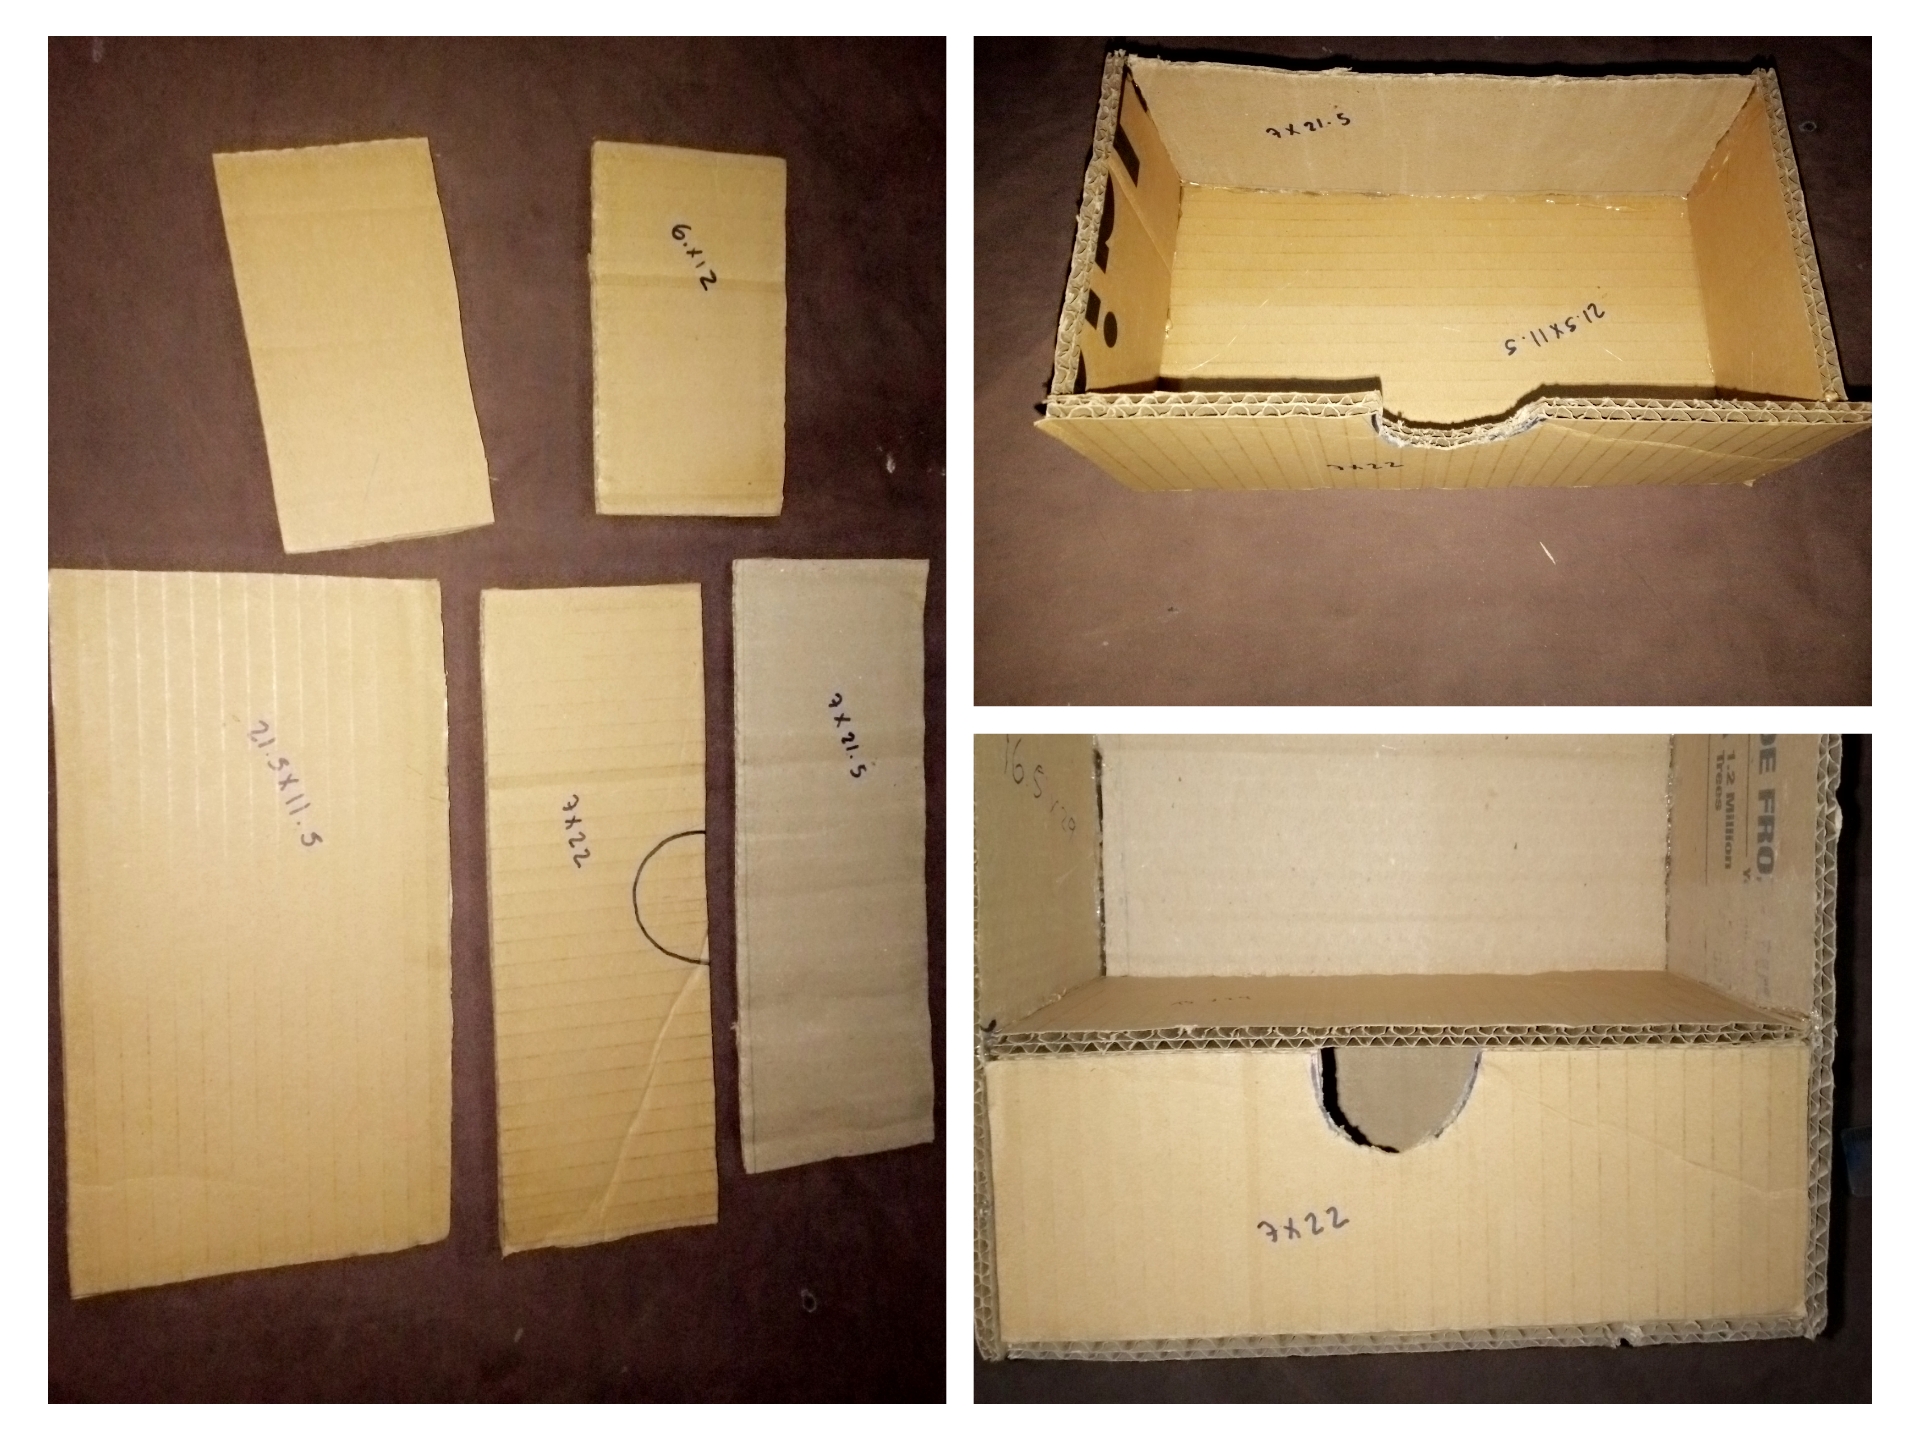
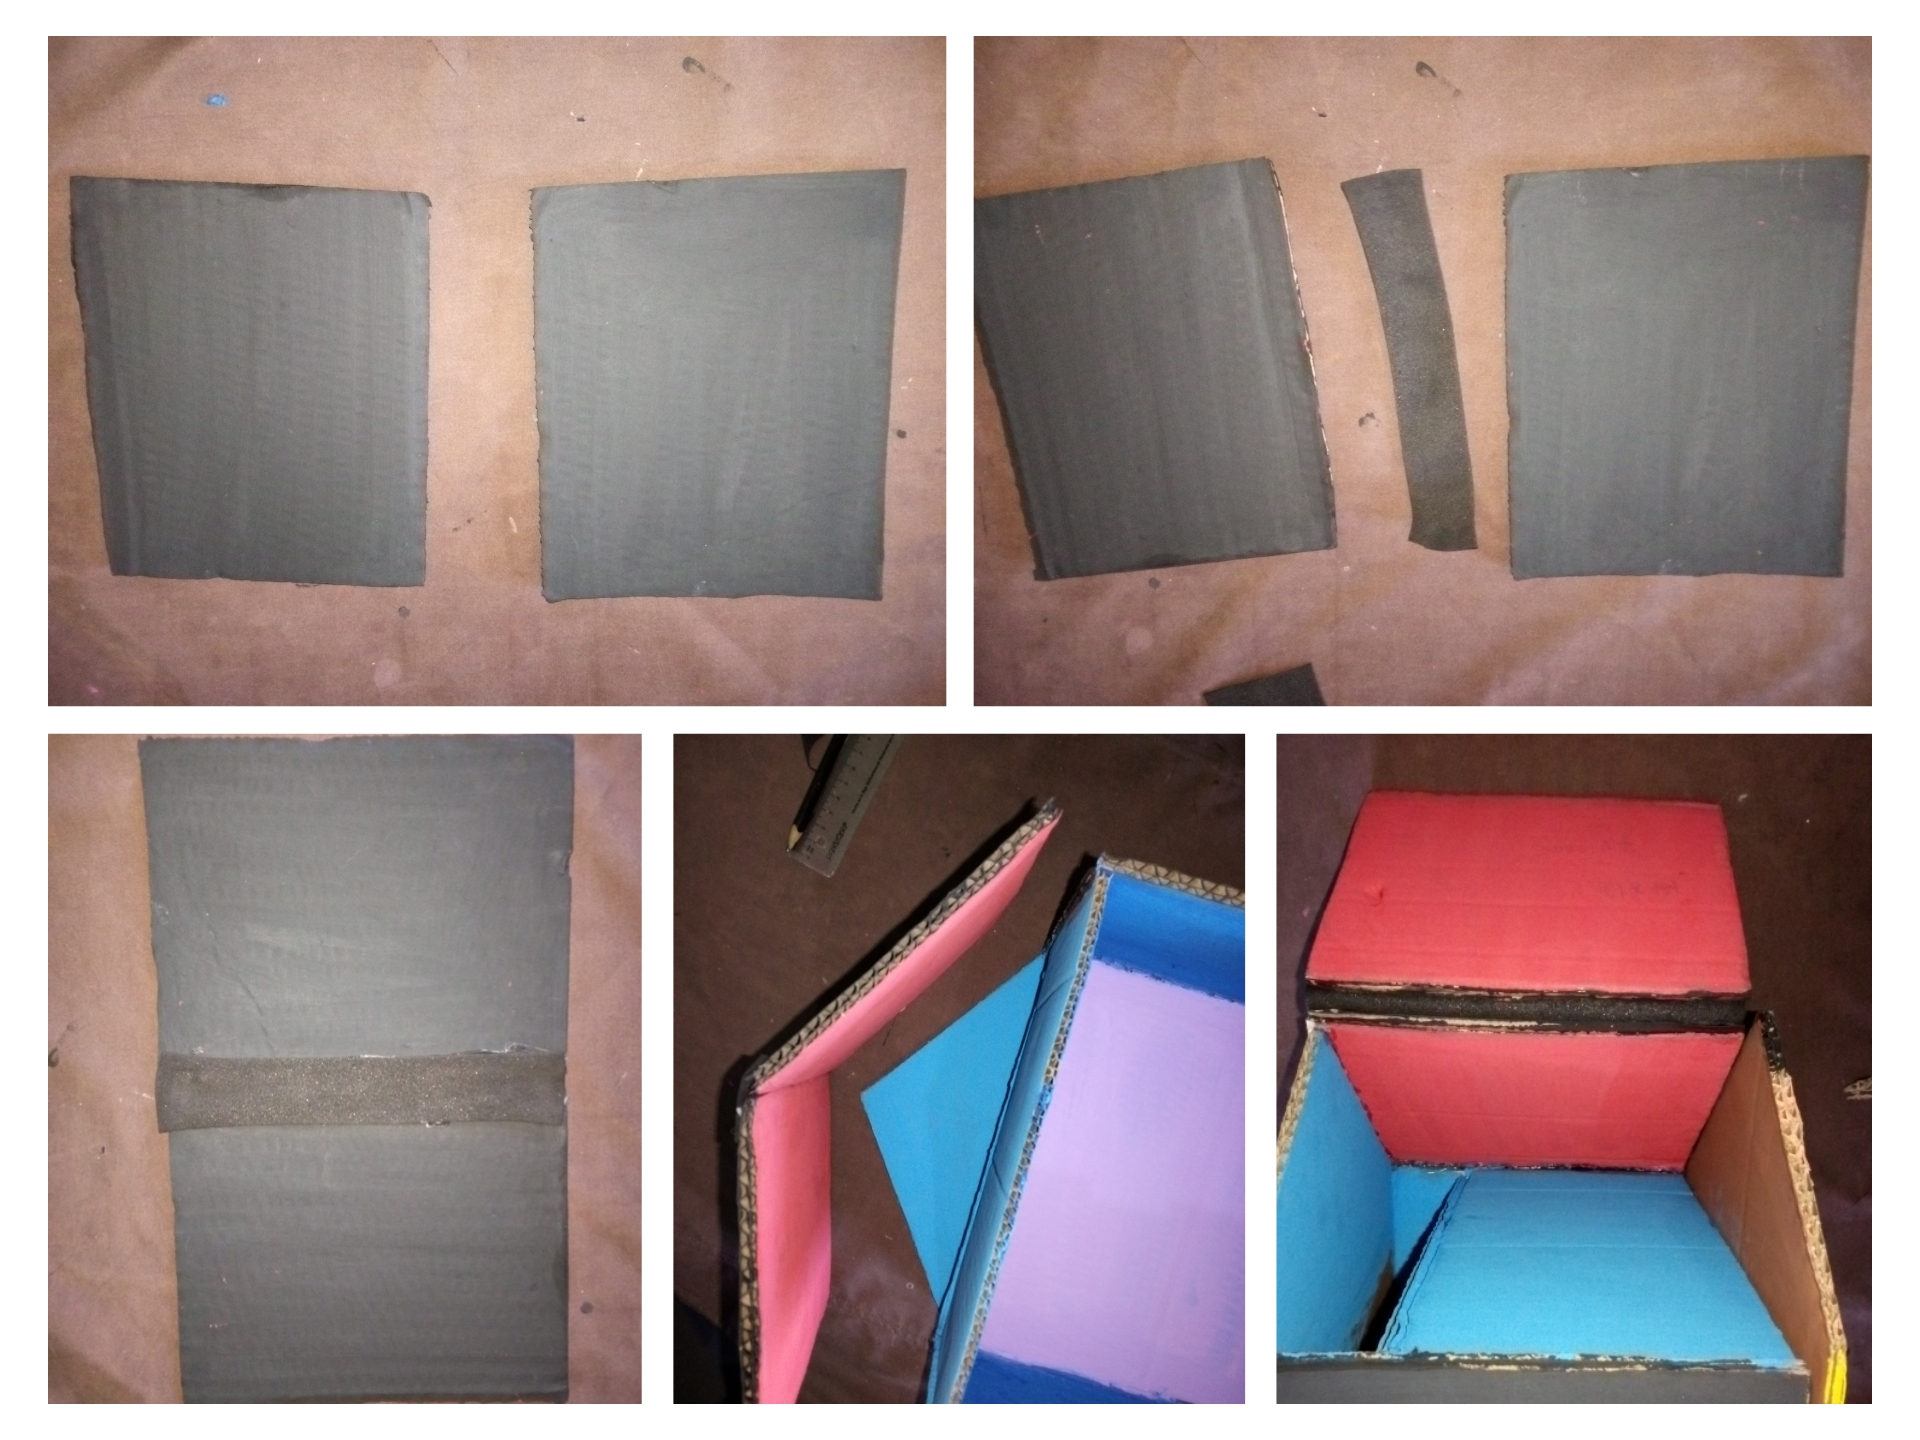
✓Next step, for the drawer or drawer in the photo we see the measures we need to make our drawer glue the pieces with hot Silicon. Once finished we paint with acrylic paint in the color we like.
✓ Siguiente pasó, para el gaveta o cajón en la foto vemos las medidas que necesitamos hacer nuestro cajón pegamos las piezas con Silicon caliente. Una vez terminada pintamos con pintura acrílica del color que más nos guste.
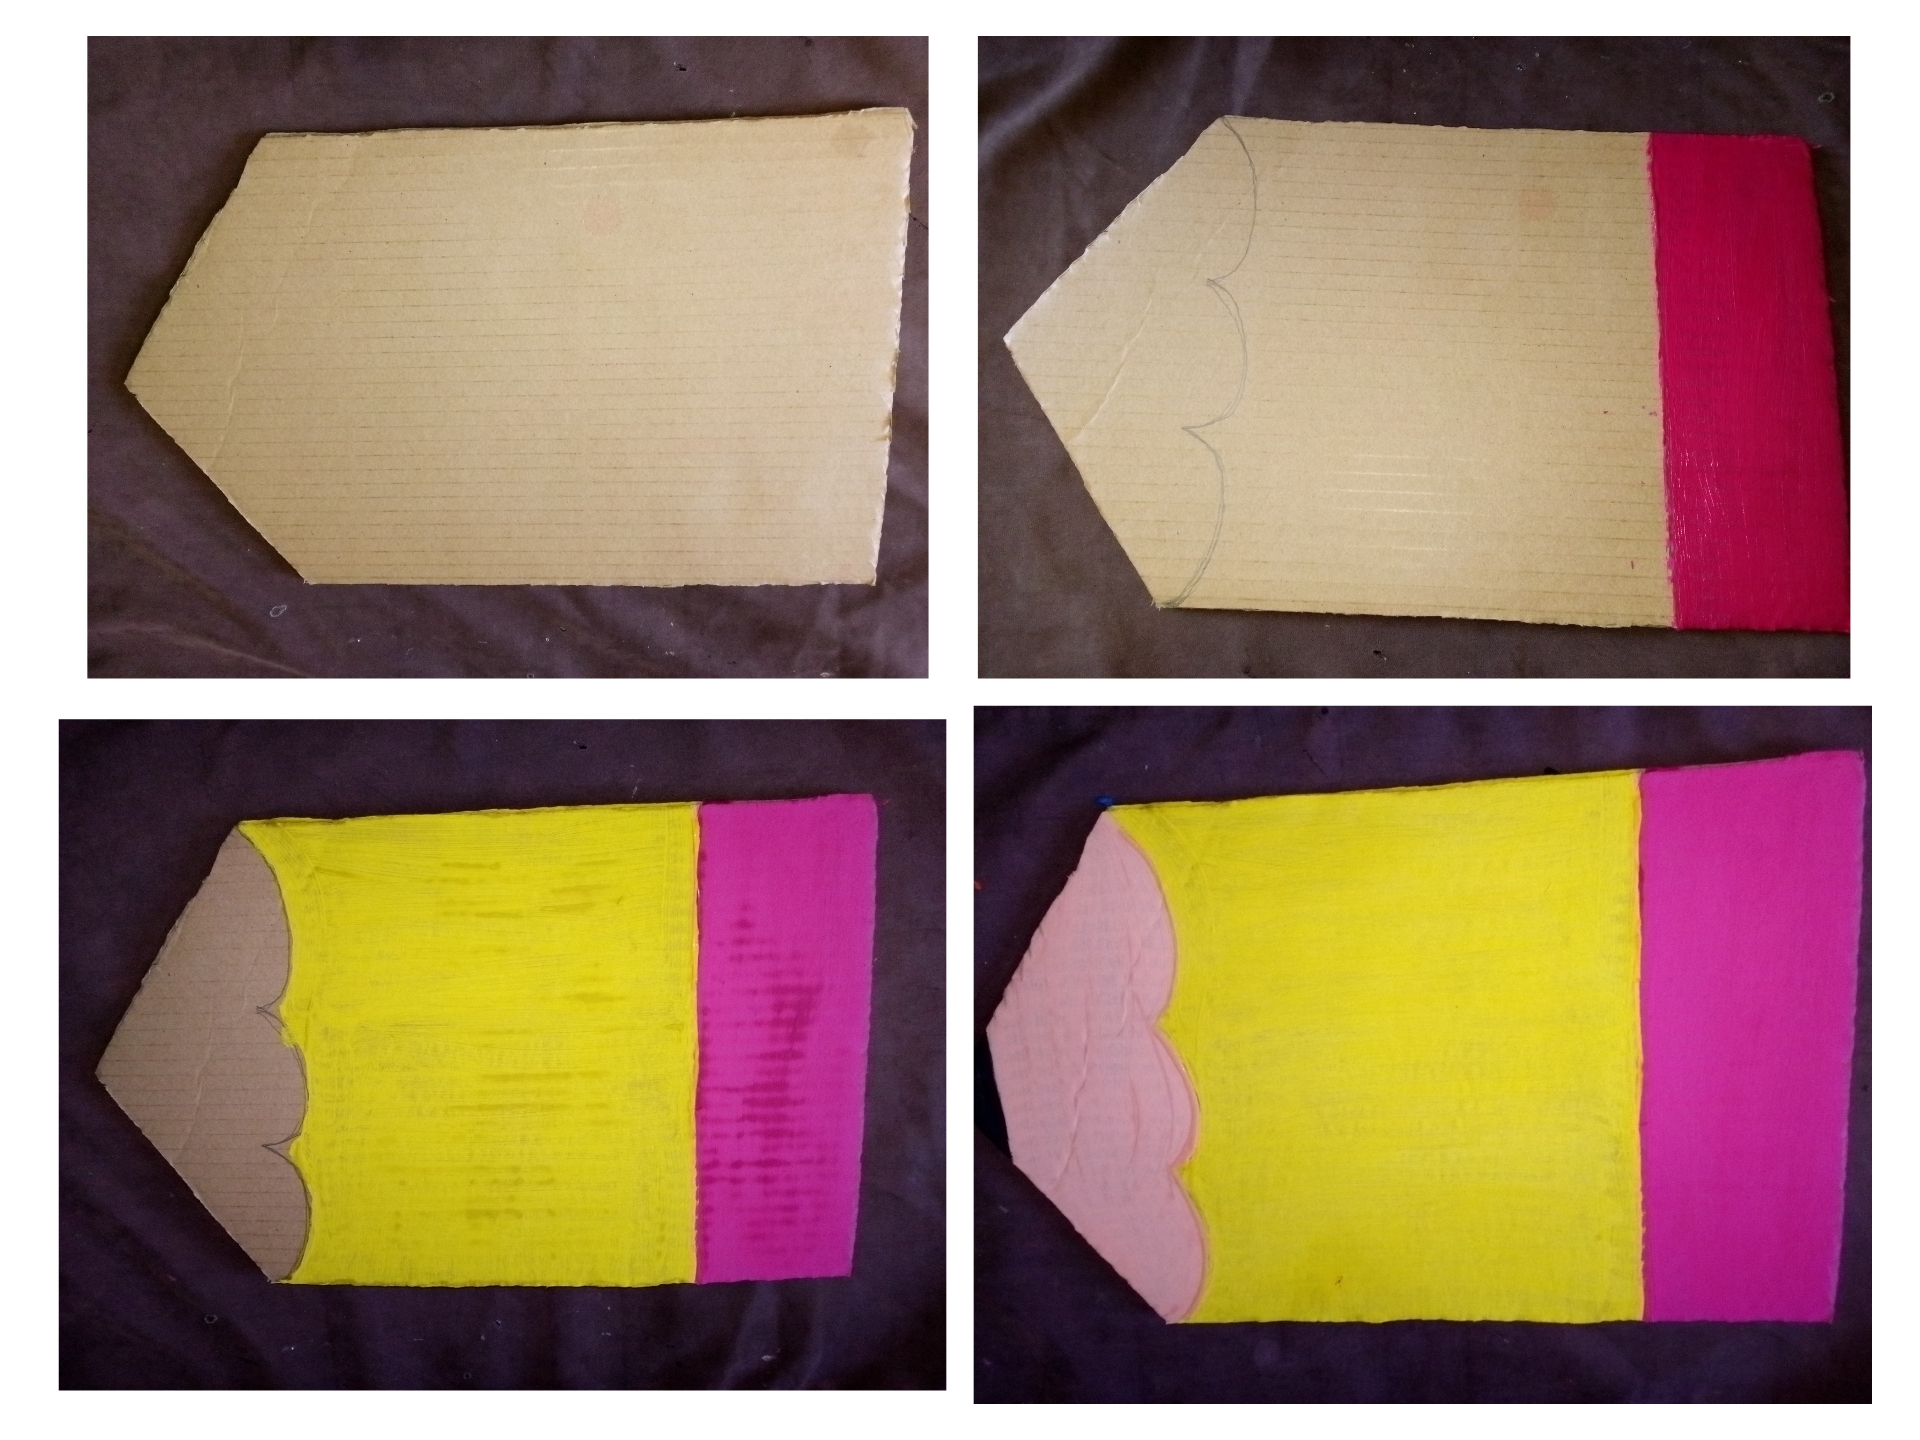
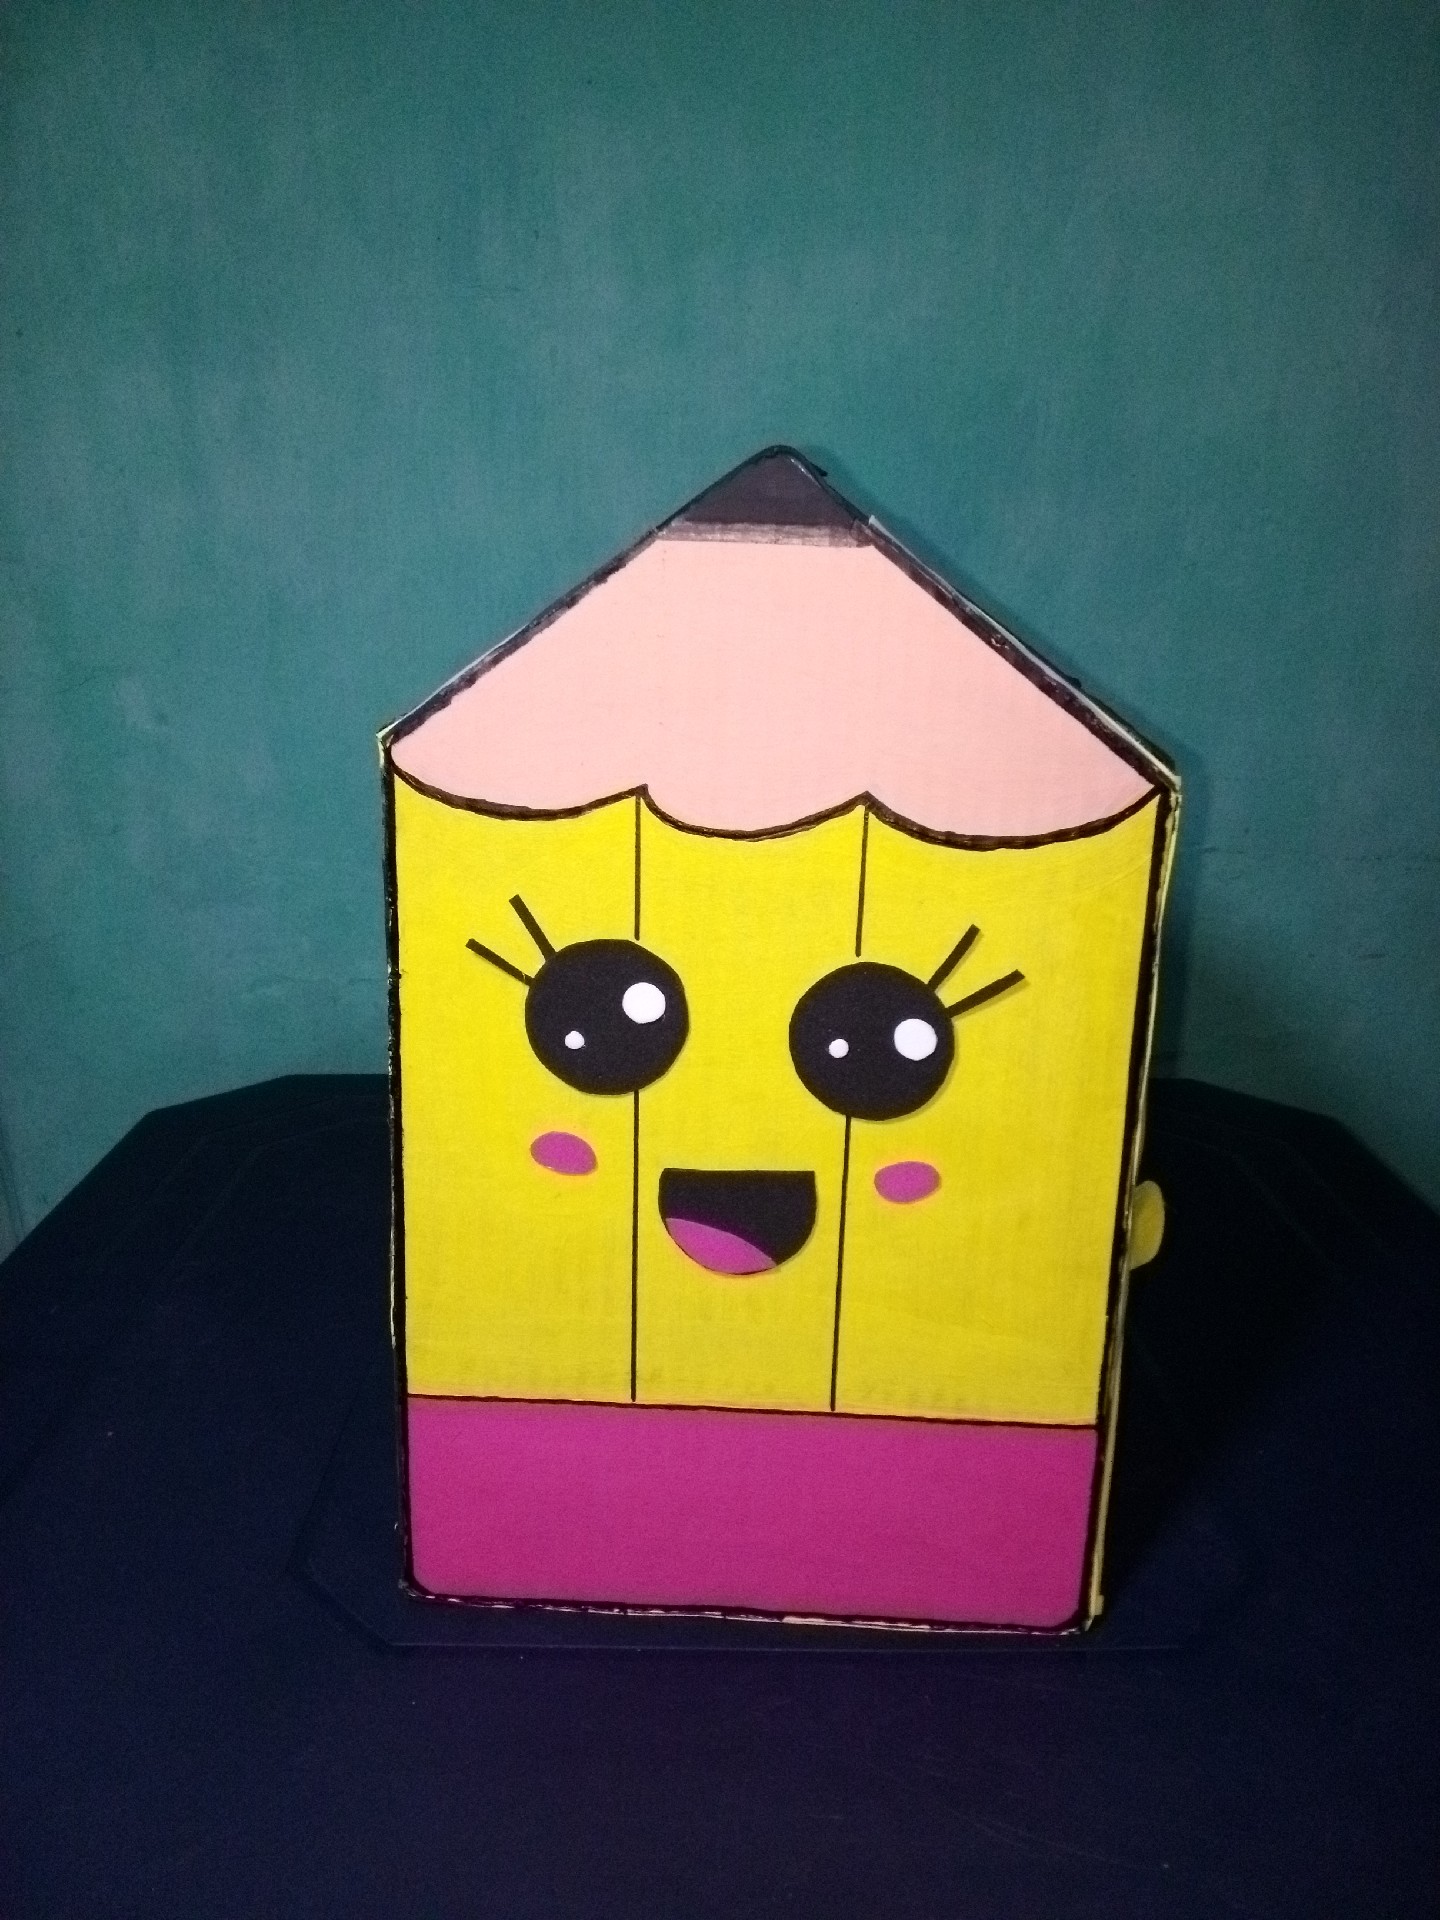
✓ For the roof or the pencil-shaped surface we glue two cardboards and a strip of Eva rubber in the middle to be able to open the cardboard on one side fixes a cardboard so that it does not move and the other leaves it unglued. Now cut a cardboard of 24x 42 cm for the front or cover with the triangular tip taking into account the size of the organizer to make it straight and paint it with yellow, pink, black and flesh color to give the most realistic impression of a pencil.
✓ Para el techo o la superficie con forma de lápiz pegamos dos cartones y una tira de goma Eva en medio para poder abrir el cartón de un lado fija un cartón para que no se mueva y el otro la deja sin pegar. Ahora cortar un cartón de 24x 42 cm para la parte delantera o tapa con la punta triangular tomando en cuenta la medida del organizador para que quede recto pintare con un amarillo, rosado, negro y carne para que de la impresión más realista de un lápiz.
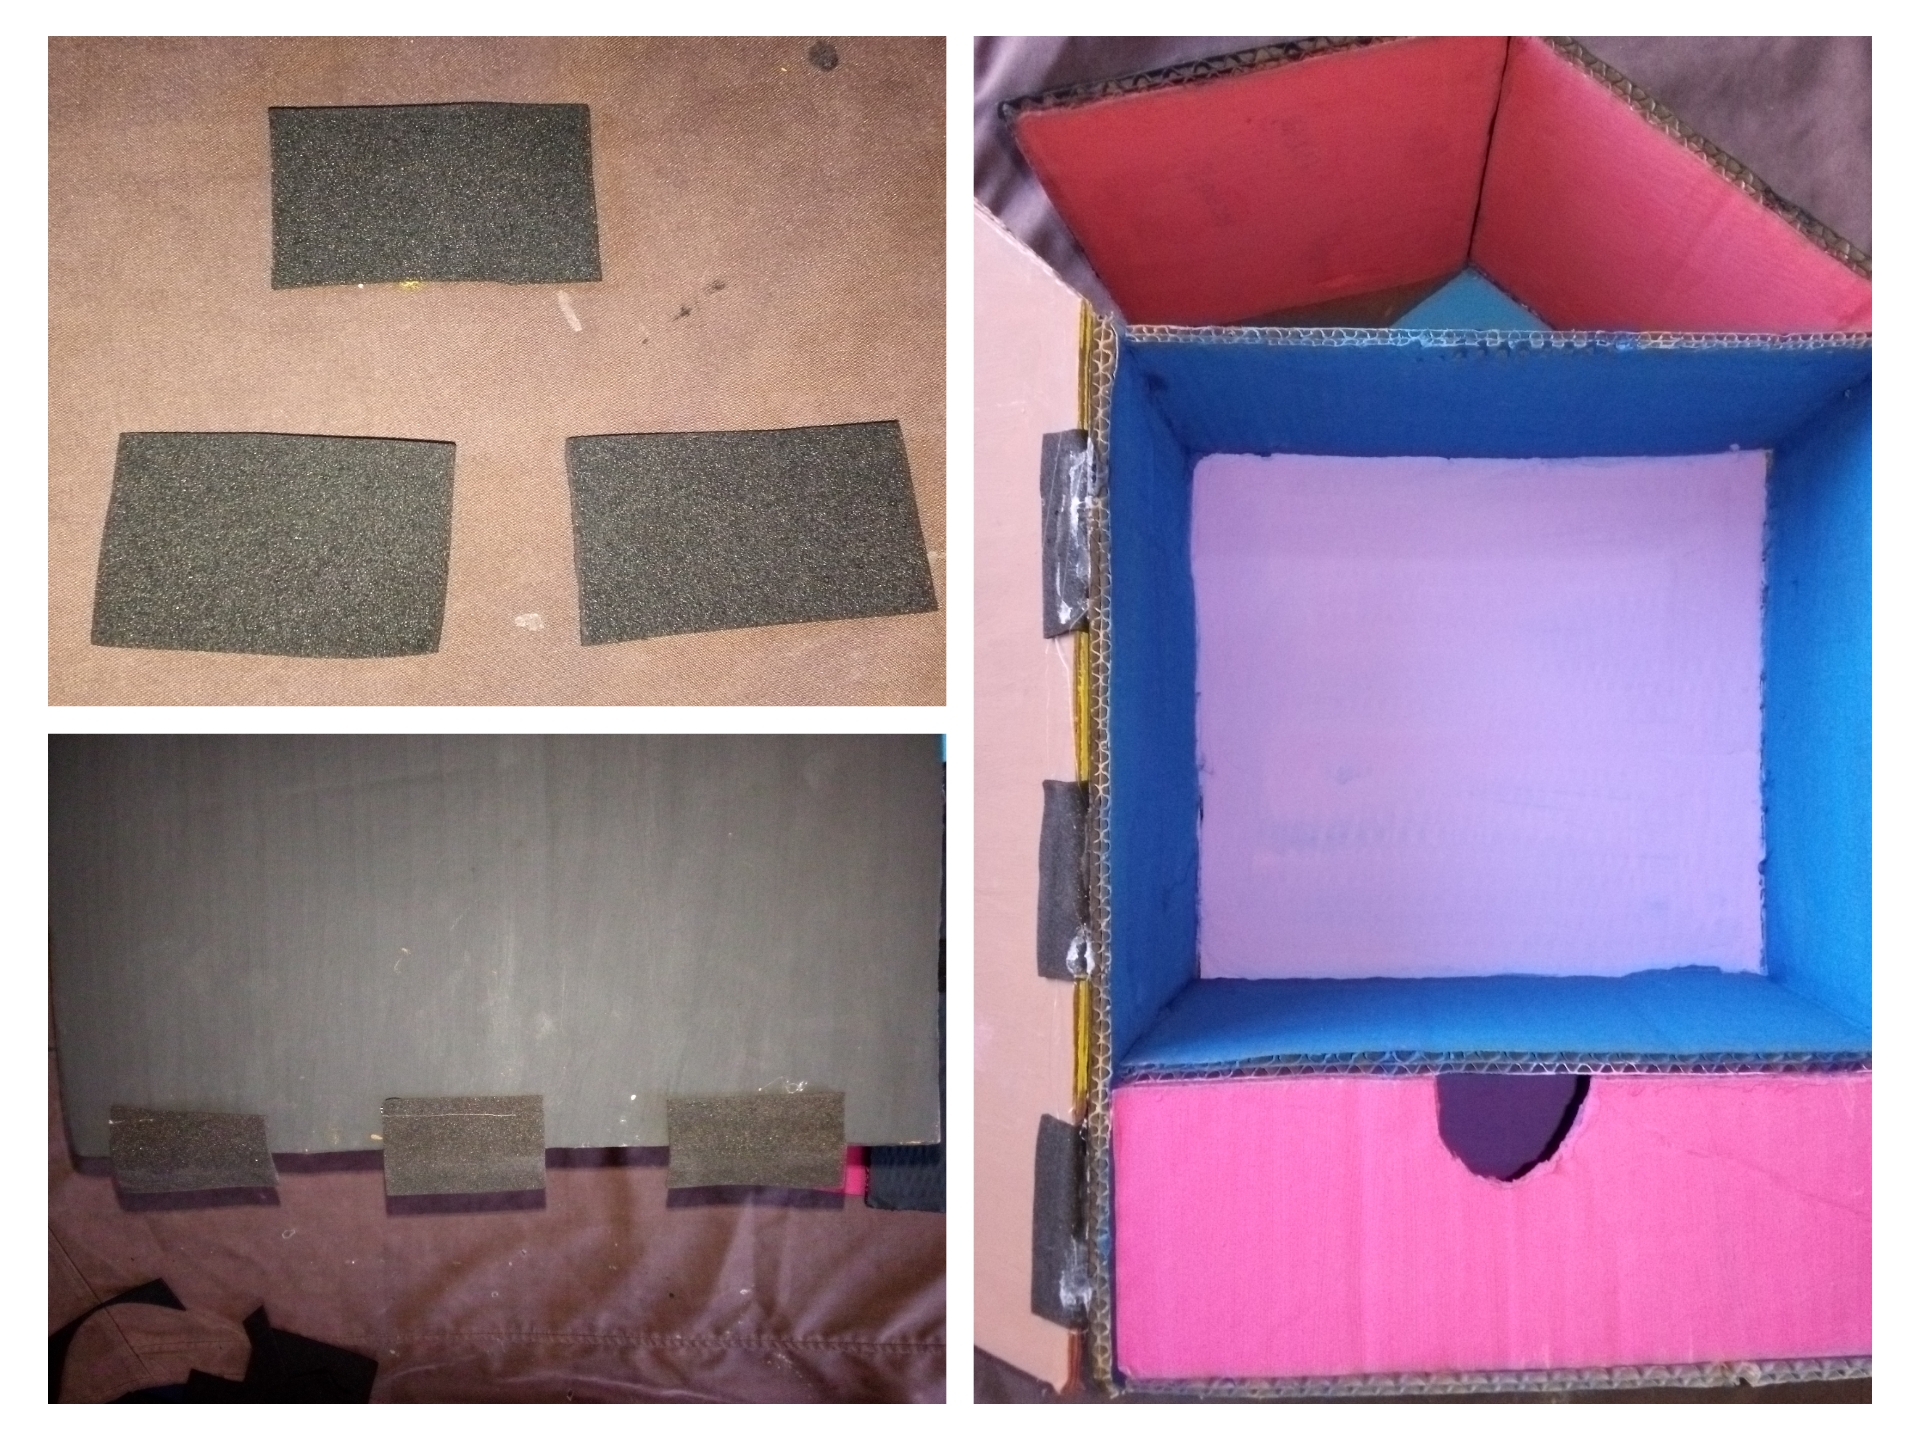
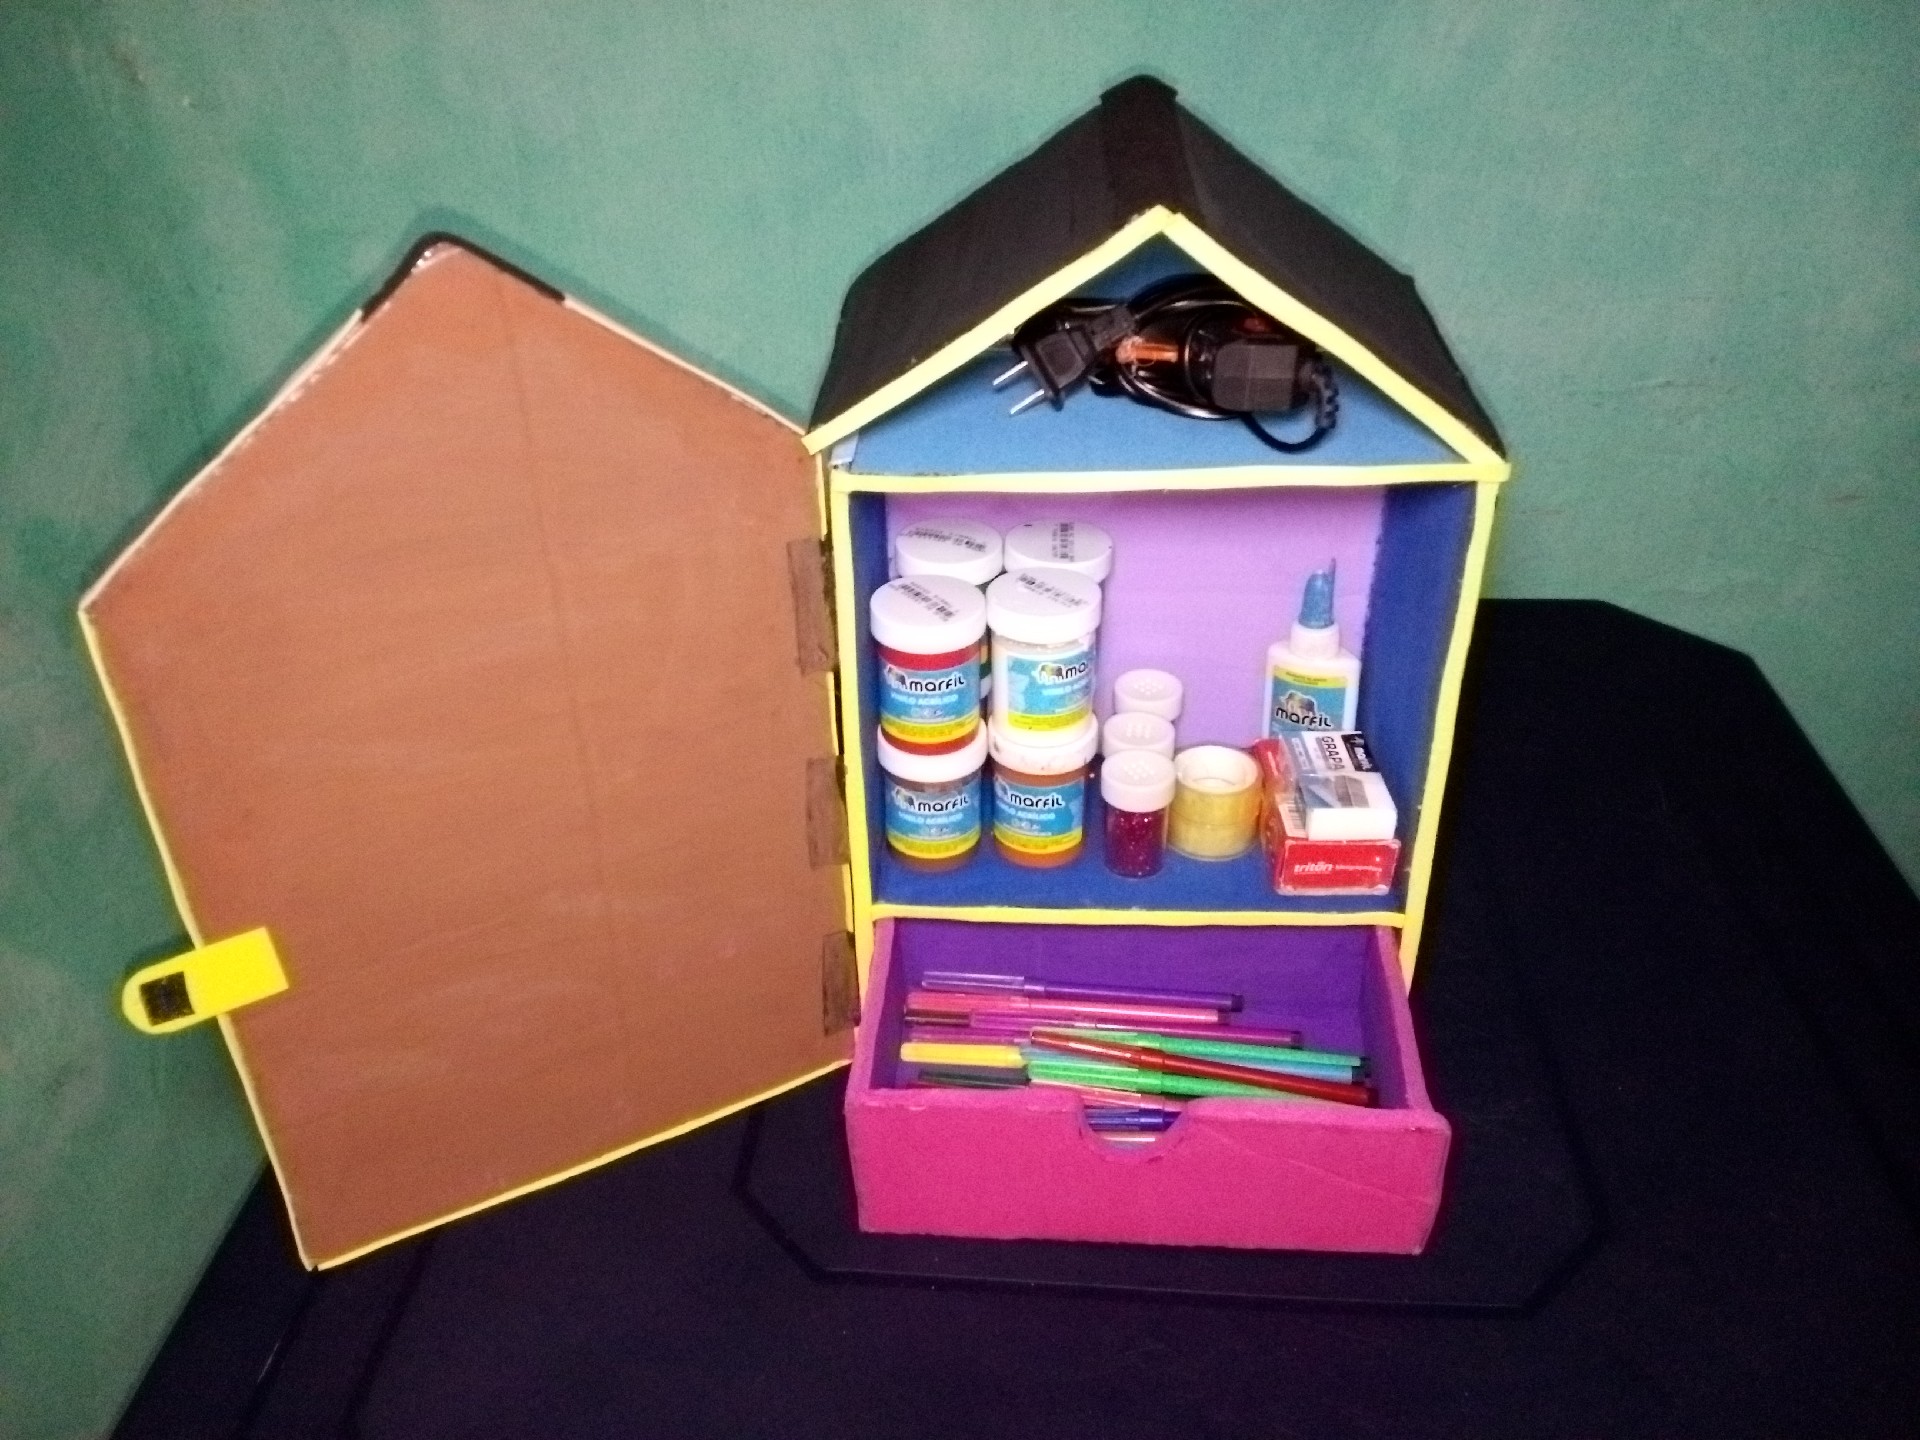
✓ To glue the lid with three pieces of eva rubber, place hot silicone on one side and glue the lid. Then with strips of eva rubber of the same color of the box glue around or edge of the box. Then make a closure with a piece of eva rubber on the lid with a magic clasp that is so that the lid does not open. And ready we have finished our organizer to store our things. I hope you like them and have enjoyed a different and beautiful organizer.
✓Para pegar la tapa con tres trozos de goma eva, coloca silicona caliente por un lado y pega la tapa. Luego con tiras de goma eva del mismo color de la caja pega alrededor o borde de la caja. Luego haz un cierre con un trozo de goma eva en la tapa con un cierre mágico que es para que la tapa no se abra. Y listo ya tenemos terminado nuestro organizador para guardar nuestras cosas. Espero que os gusten y hayáis disfrutado de un organizador diferente y bonito.
Final result. // Resultado final.
Gracias por visitar.
Todas las fotos y el contenido son originales que hago diariamente para mi blog. Para La traducción uso deepl.com y los marcos es usado de la app cogalle maker.📷🖼️🤗
Thank you for visiting
All photos and content are original that I make daily for my blog. For The translation I use deepl.com and the frames is used from cogalle maker.📷🖼️🤗 app.
!discovery 25
Thanks for your support.
You're welcome 🙂
This post was shared and voted inside the discord by the curators team of discovery-it
Join our community! hive-193212
Discovery-it is also a Witness, vote for us here
Delegate to us for passive income. Check our 80% fee-back Program
Thank you for sharing this post on HIVE!
Your content got selected by our fellow curator stevenson7 & you just received a little thank you upvote from us for your great work! Your post will be featured in one of our recurring compilations which are aiming to offer you a stage to widen your audience within the DIY scene of Hive. Stay creative & HIVE ON!
Please vote for our hive witness <3
Qué bello amiga, cada día admiro más todo lo que las mentes creativas pueden hacer a través del reciclaje. ¡Felicidades!
Gracias, annafenix.
Está bellísimo, es muy útil e importante tener todo organizado para encontrar todo y no perder tiempo buscando donde está cada cosa q vamos a necesitar 👍
Así es no hace las cosas más fácil de encontrar gracias por tu comentario feliz día.
Hola @lexim. te felicito hiciste un hermoso trabajo creativo y original. ¡Saludos!
Hola gracias que bien que te haya gustado. 🤗