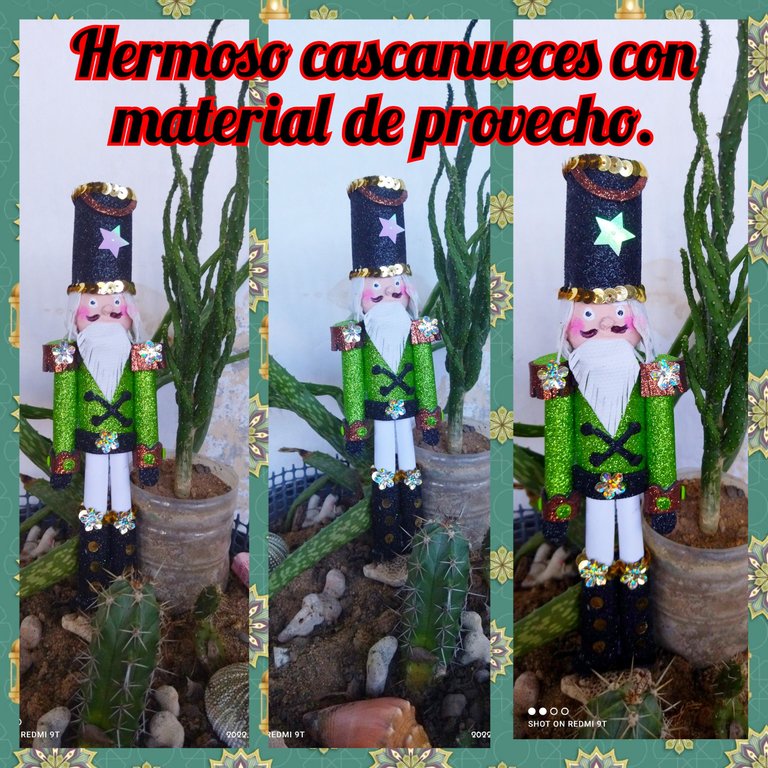

Feliz día gente de #hive reciban de parte mía un abrazo virtual que vaya cargado de mucha buena vibra, y de de mucha energía positiva, hoy les traigo un tutorial bastante significativo para mí, ya que como les dije en el post anterior, voy a realizar una serie proyectos que si bien es cierto me anticipo a la navidad, también es cierto que les dije que los voy a elaborar poco a poco para que no me agarre desprevenida.
El proyecto que voy a elaborar hoy es un personaje que representa muy bien lo que es la navidad, estoy segura que solo al verlo nos hace saber que estamos en presencia de esta época tan hermosa, les hablo de un cascanueces, uno de los personajes que más me gusta, saben ustedes que son y para que sirven realmente estos muñecos, ¡No! Pues ya te lo explico.
El cascanueces según la leyenda se trata de la historia de un príncipe que tenía la habilidad de romper las nueces con sus dientes y que por cosas del destino fue hechizado por una ratonancita celosa porque este se iba a casar con un hermosa princesa, siendo convertido en el juguete que todos conocemos, una historia realmente divertida que mezcla la fantasía. En la actualidad este personaje es muy famoso en las fiesta de navidad, yo por ejemplo soy amante de estos personajes y tengo una colección de ellos elaborados en madera, por eso hoy quise hacer uno pero ya saben con materiales de reciclaje, con esos materiales que tenemos en la casa y que muchas veces no le sacamos el provecho para realizar un detalle bonito, por eso el día de hoy quiero mostrarte que si se puede y aquí te dejo el tutorial paso a paso.
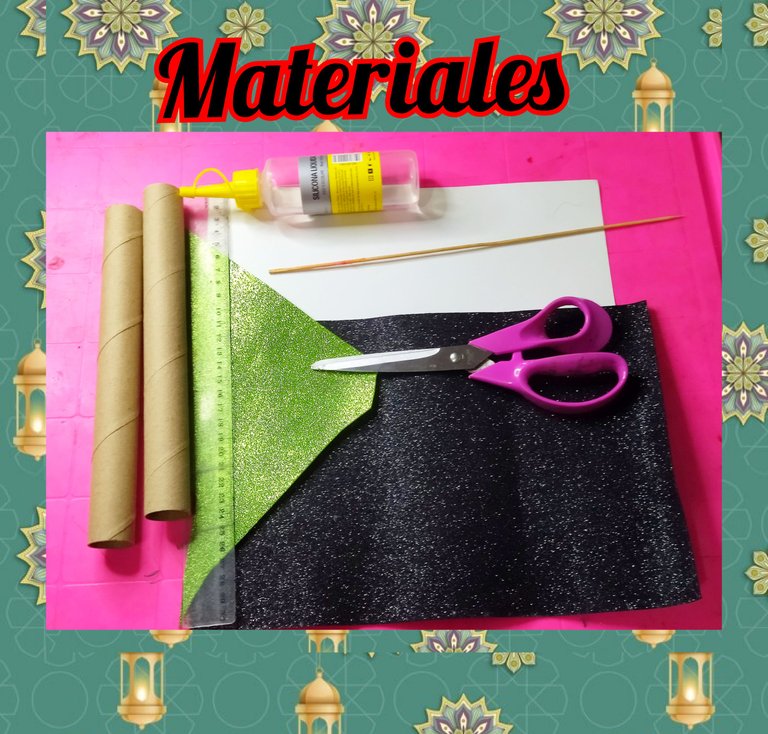
MATERIALES

 🎄PASO A PASO🎄
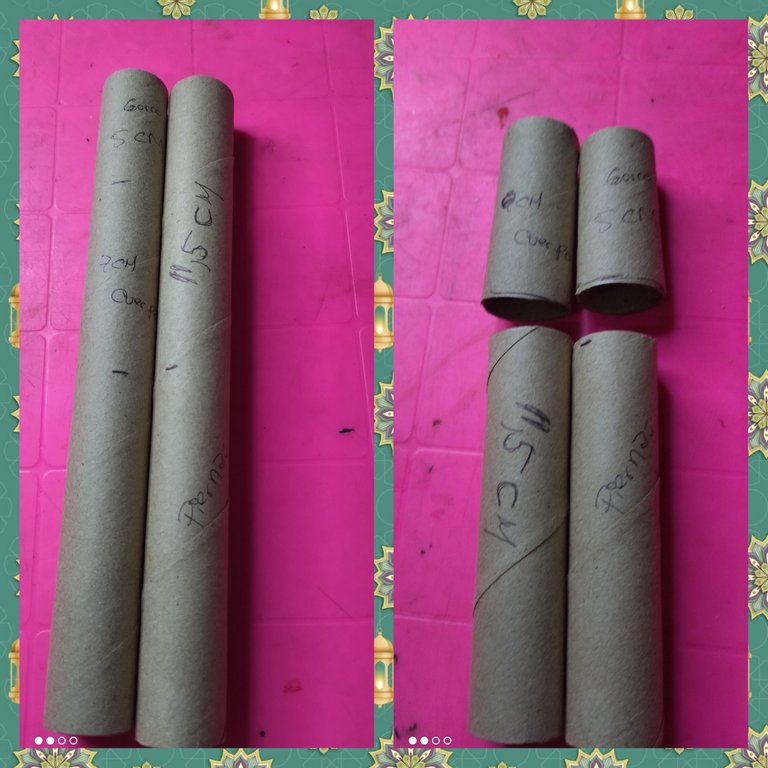
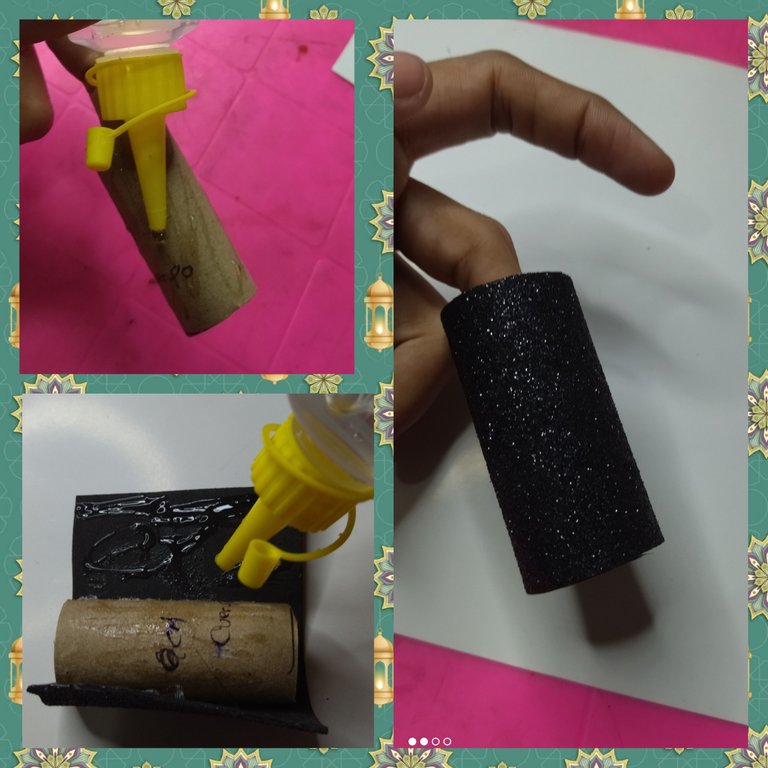
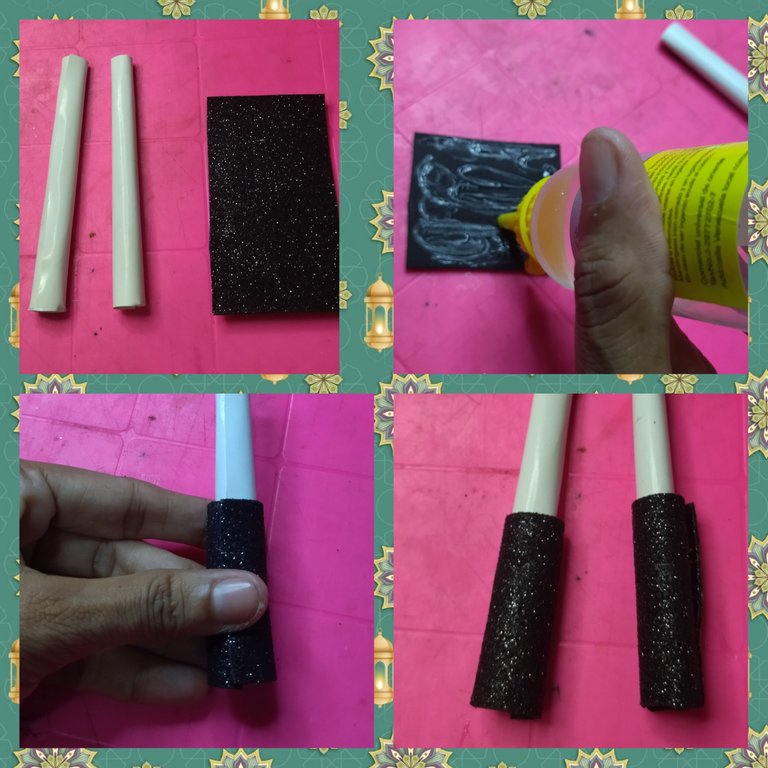
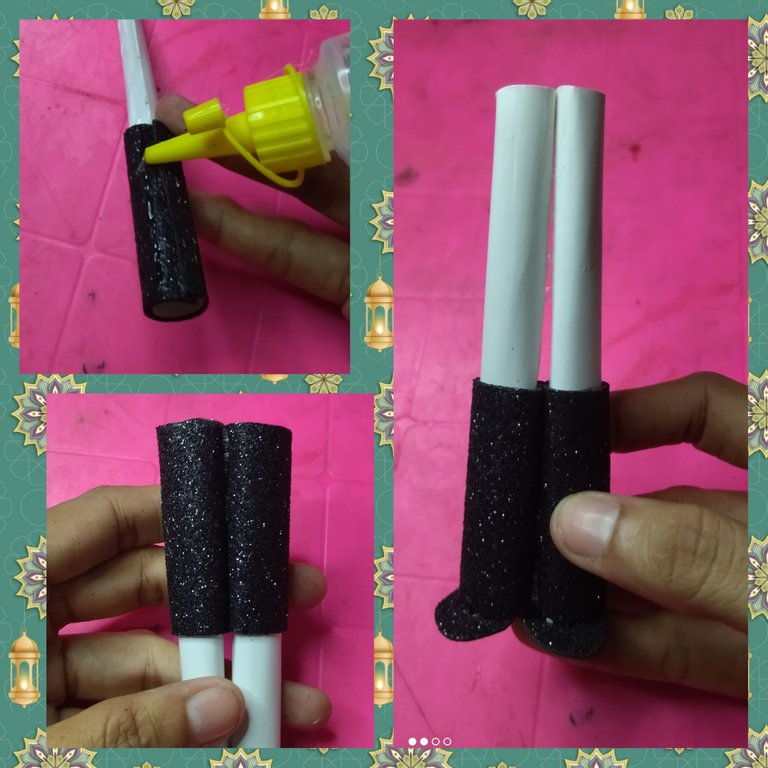
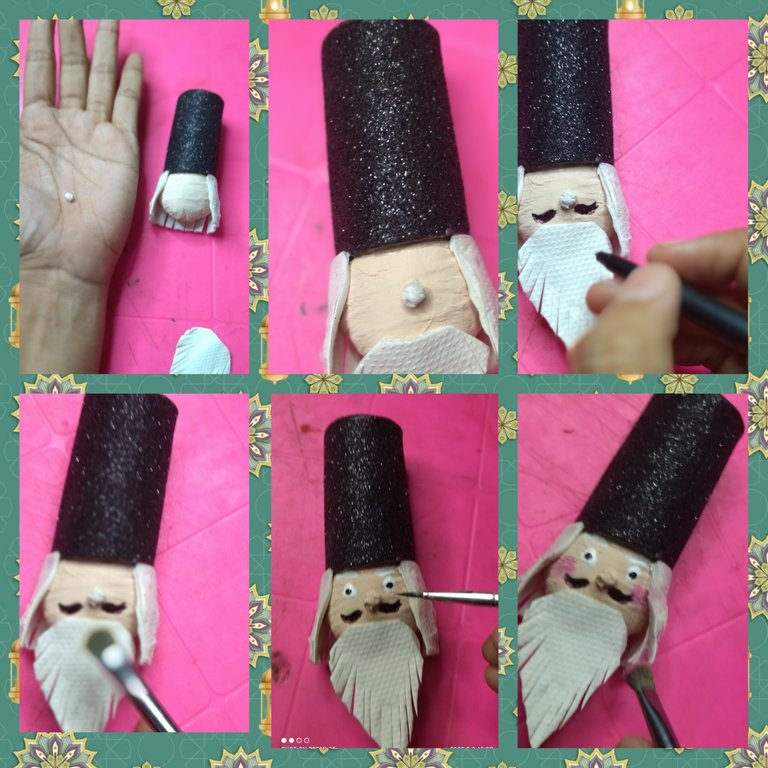
Tome los tubitos de los empaques de inciensos que ya se habían acabado y marque con ayuda de un lapicero y la regla, primero unos 5 cm de alto el cuál será mi gorro, luego marque otro de unos 6 a 7 Cms que será el cuerpo, luego los recorte.
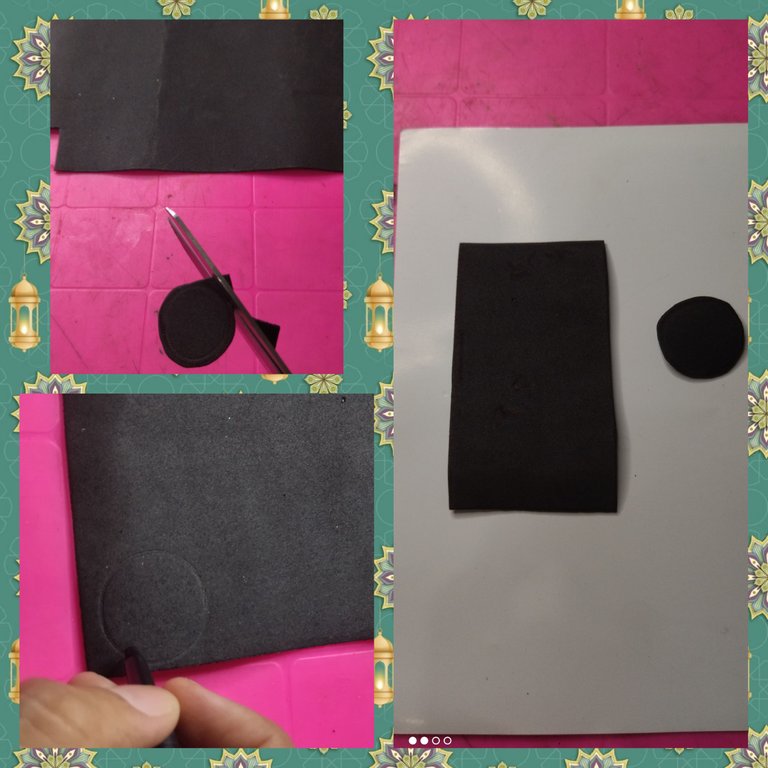
Luego marque en un pedazo de foami escarchado de color negro un círculo y un rectangulo de unos 11 cm de largo por unos 6 de ancho y recortó.
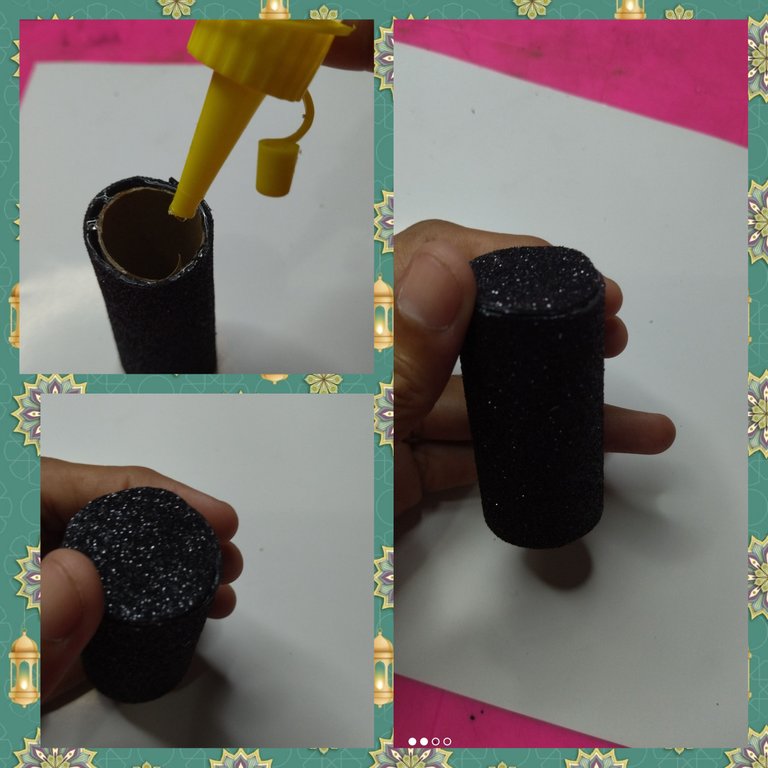
A la pieza de cartón que recortamos que será el gorro, le aplicó silicón liquido y después lo forre con el rectangulo de foami escarchado que recorte previamente, ejerciendo un poco de presión en la unión del foami para que quede bien.
Cuando ya pegue todo, aplicó silicón en la tapa del gorro y pego el círculo ya recortado previamente.
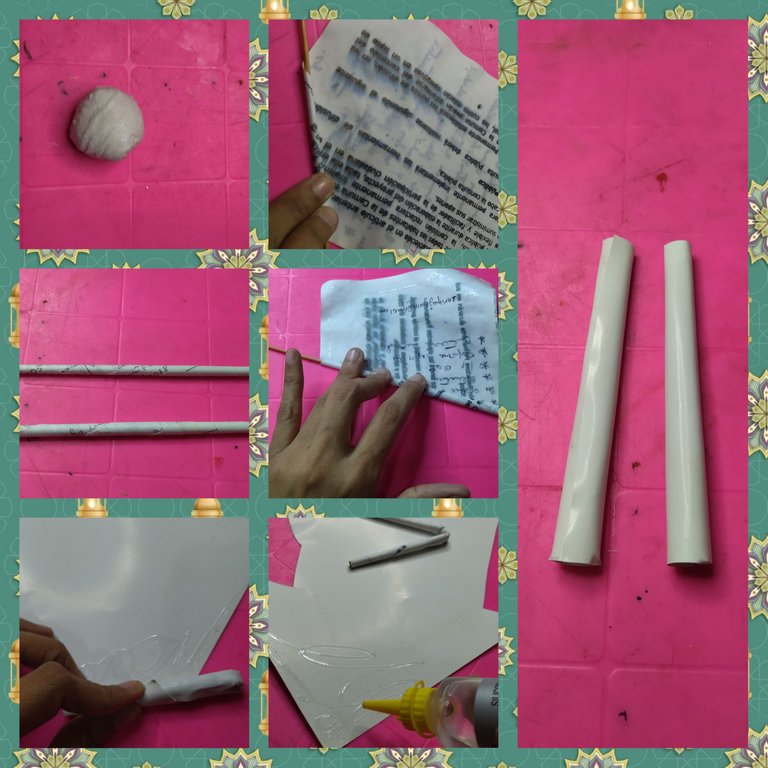
Aquí hicimos varias piezas del personajes, por ejemplo tome cuatro hojas de papel sanitario y la enrolle aplicandome un poco de pega blanca, dándole la forma redonda y la dejamos secar.
También tome varias hojas de reciclaje las cuales con ayuda de un palillo de altura fui enrollando, de hecho hice 4, dos delgadas para los brazos y dos gruesas que serán las piernas.
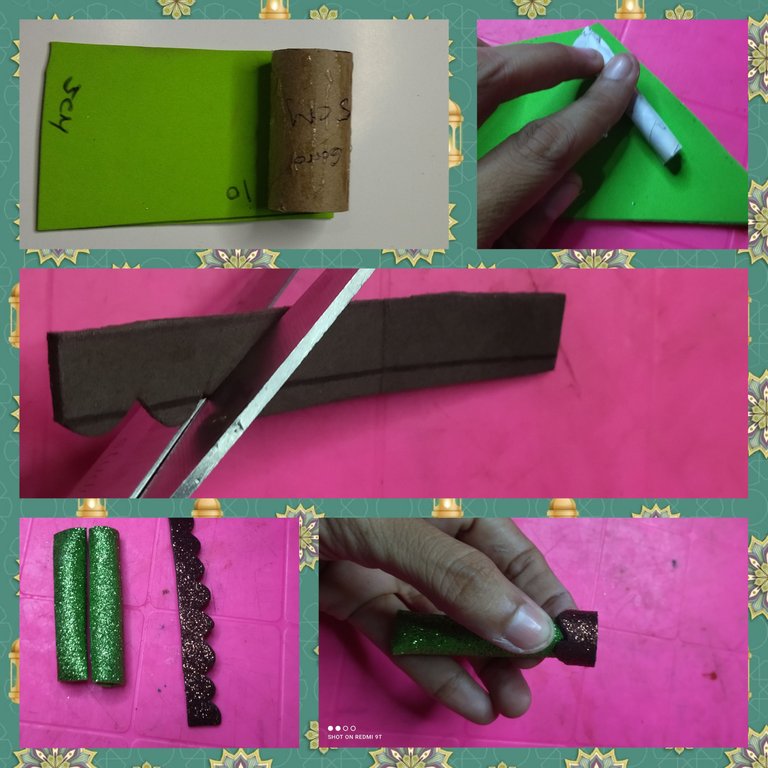
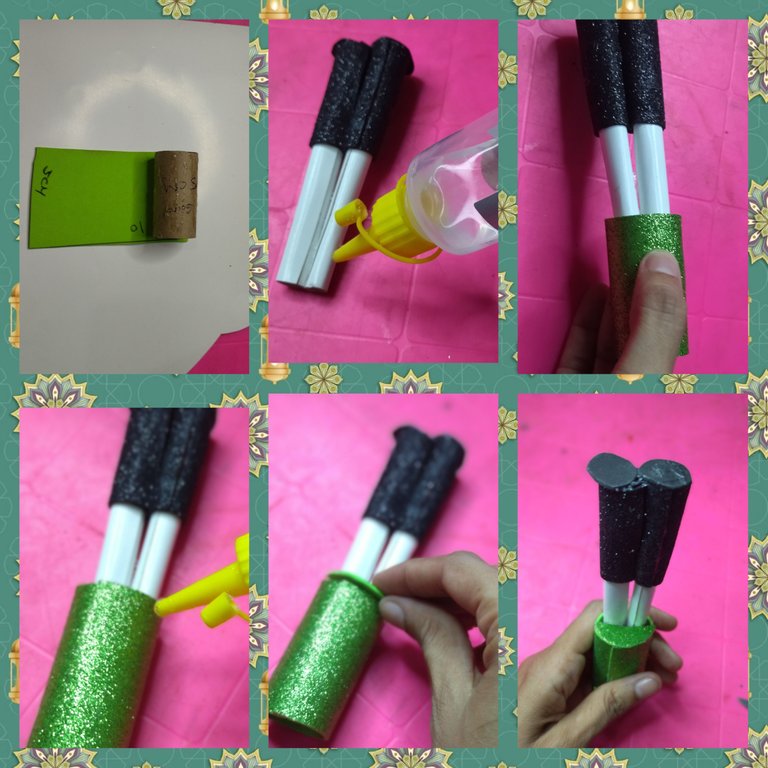
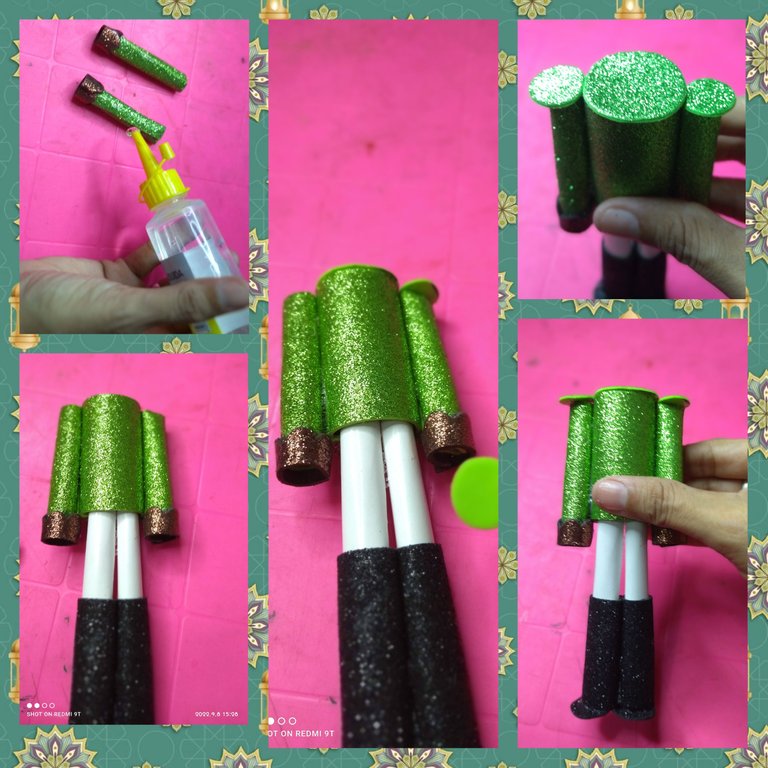
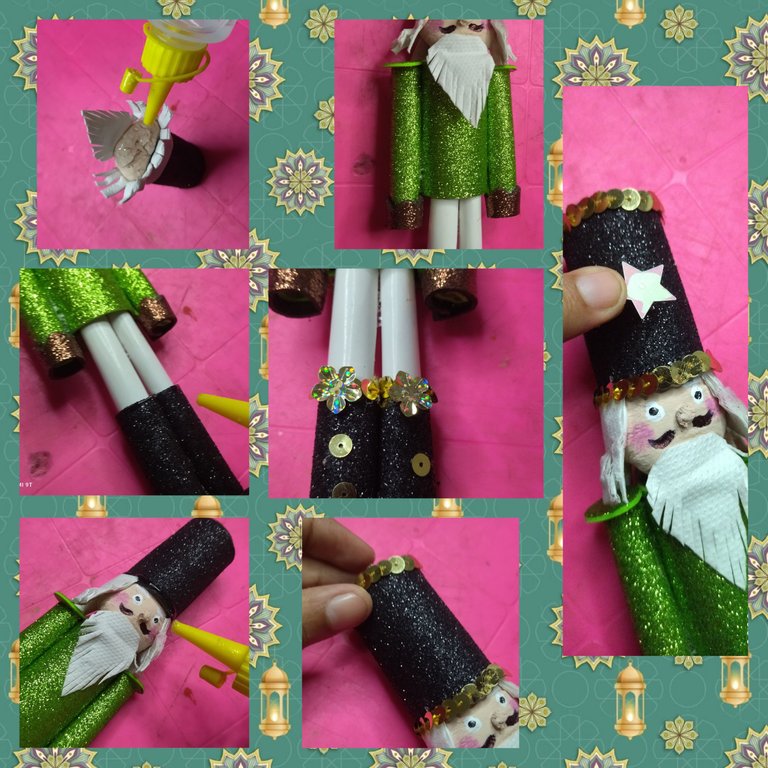
Con el foami verde escarchado saque un rectangulo de 11 cm de largo por 5 cm, y tome el tubo de cartón de 5 cm que recorte y le aplicó el silicón liquido y forro con el foami escarchado.
Luego recorte dos tiritas del largo de los brazos a las cuales le aplicamos silicón y forro los palitos de papel que hice previamente que serán mis brazos, también recorte una tira de 1 cm y recorte haciéndole unos semicírculos y los pegamos a la pieza de los brazos.
Ahora recorte un trocito del foami negro y forre las piernitas para que quede como una botas.
Recorte unas plantillas de las botas y las pegue luego aplique un poco de silicón liquido no mucho para que no se note embarrado, en las piernitas y las pego bien juntas.
Forre también la parte del cuerpo, yo lo hice con el Foami escarchado verde cuando seco le aplique silicón liquido en la parte alta de las piernas y las pegue del cuerpo, metiéndole dentro del tubito, véase la fotografía para que entienda bien como es.
Aplico el silicón en cada brazo y fijamos en el cuerpo del muñeco, luego recorte tres círculos uno grande y dos pequeños y los coloque el grande en la parte de arriba de el cuerpo, y los dos pequeños en la parte de arriba del hombro.
Ahora vamos a trabajar con la cabeza del muñeco primero lo pinto con un poco de pintura al frío de color piel, cuando está seco lo pego del gorro, también le pegue el cabello, que lo hice con tres hojas de papel higiénico dobladas y le recorto, queda increíble.

Luego tome un pedacito de papel y lo enrolle para formar la nariz la cuál pegue y pinte, con una plumilla le dibuje los bigotes y con la pintura blanca y negra dibuje los ojos y las cejas y para darle un toque lindo con el rubor le dibuje las mejillas. Y por último le peque una barba elaborada también con papel sanitario.
Después pegue la cabeza al cuerpo del muñeco y allí si comienzo a darle los detalles decorativos, que pueden ser cualquiera, depende de tu gusto.
Yo utilice lentejuelas doradas para decorar el gorro y las botas, también pegue una aplicación de estrella y otras de flores doradas.
Con un pedazo de foami marrón recorte y pegamos en los hombros,y un pedacito de foami negro le recorte y saque el centro y pegamos como especie de un cinturón.
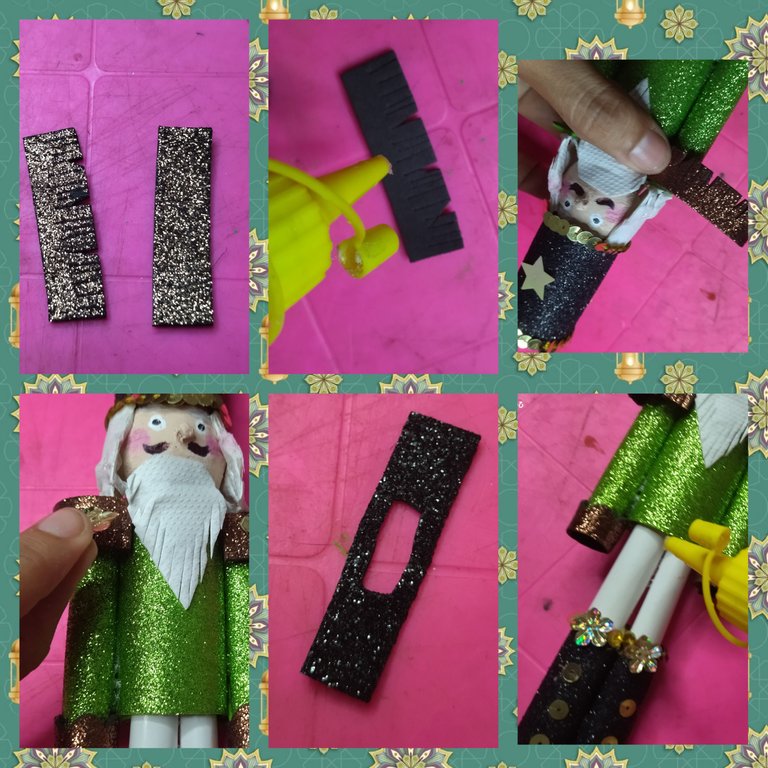
Ahora recorte dos tiritas de foami negro muy pequeñas así como cuatro círculos, y pegamos las tiras en el pecho formando una (x) y en cada extremo colocamos los puntos y finalmente pego una flor en el cinturón y listo hemos terminado.
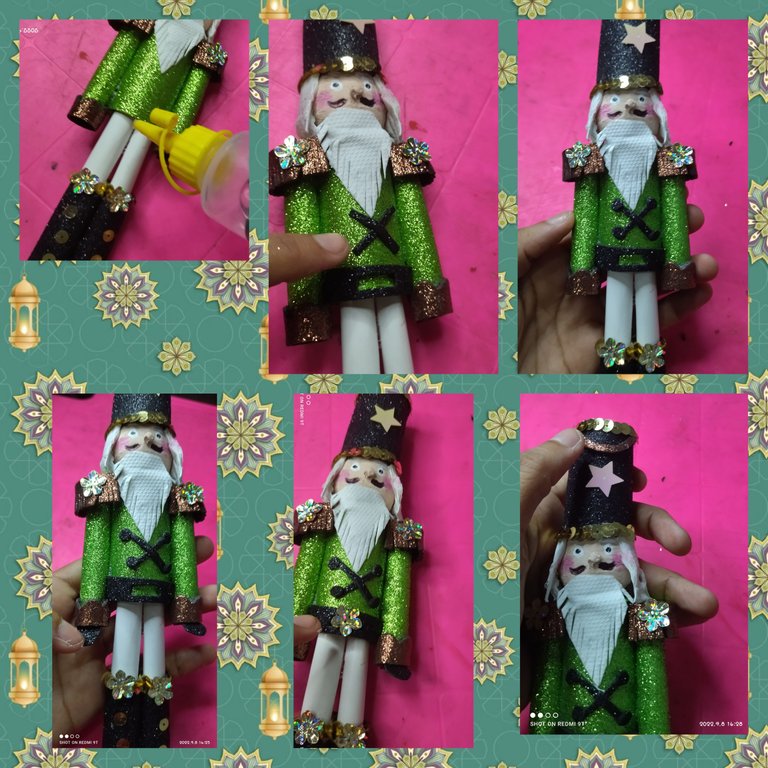
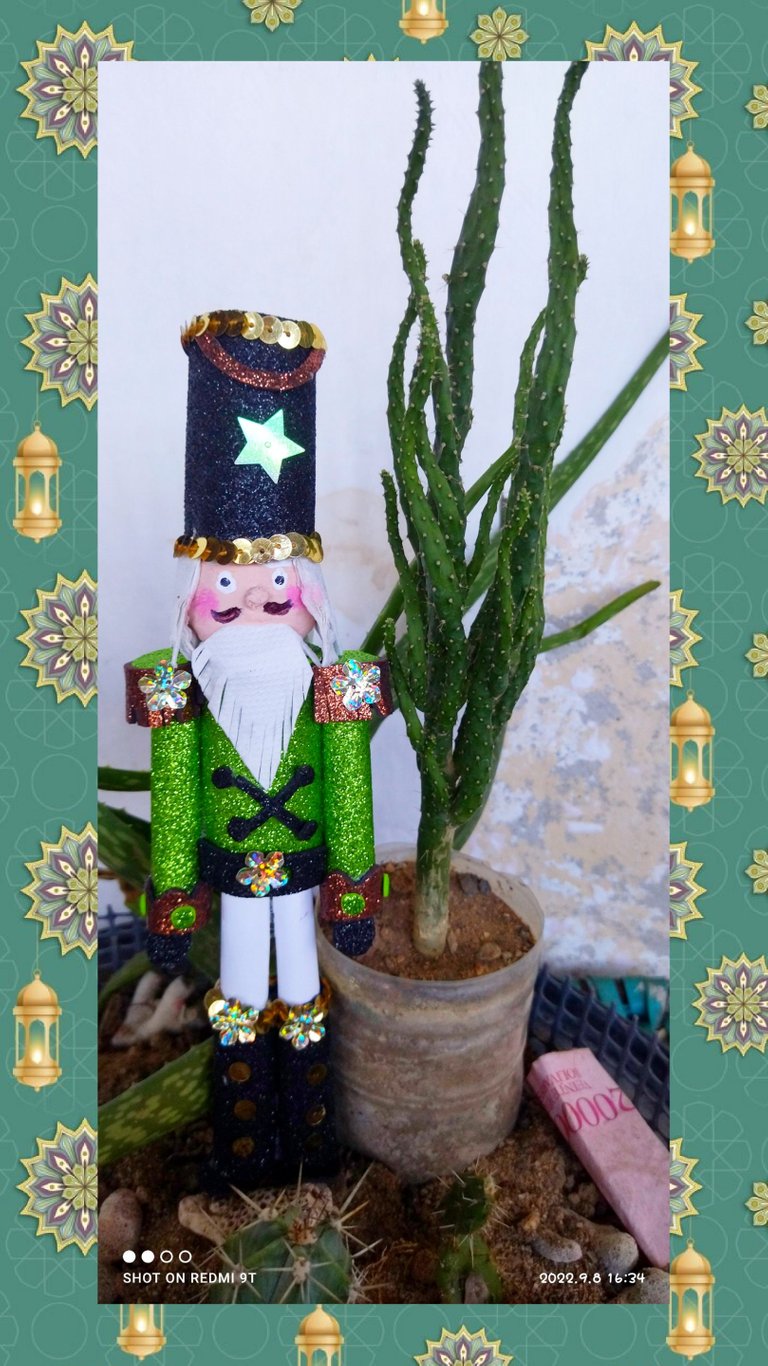
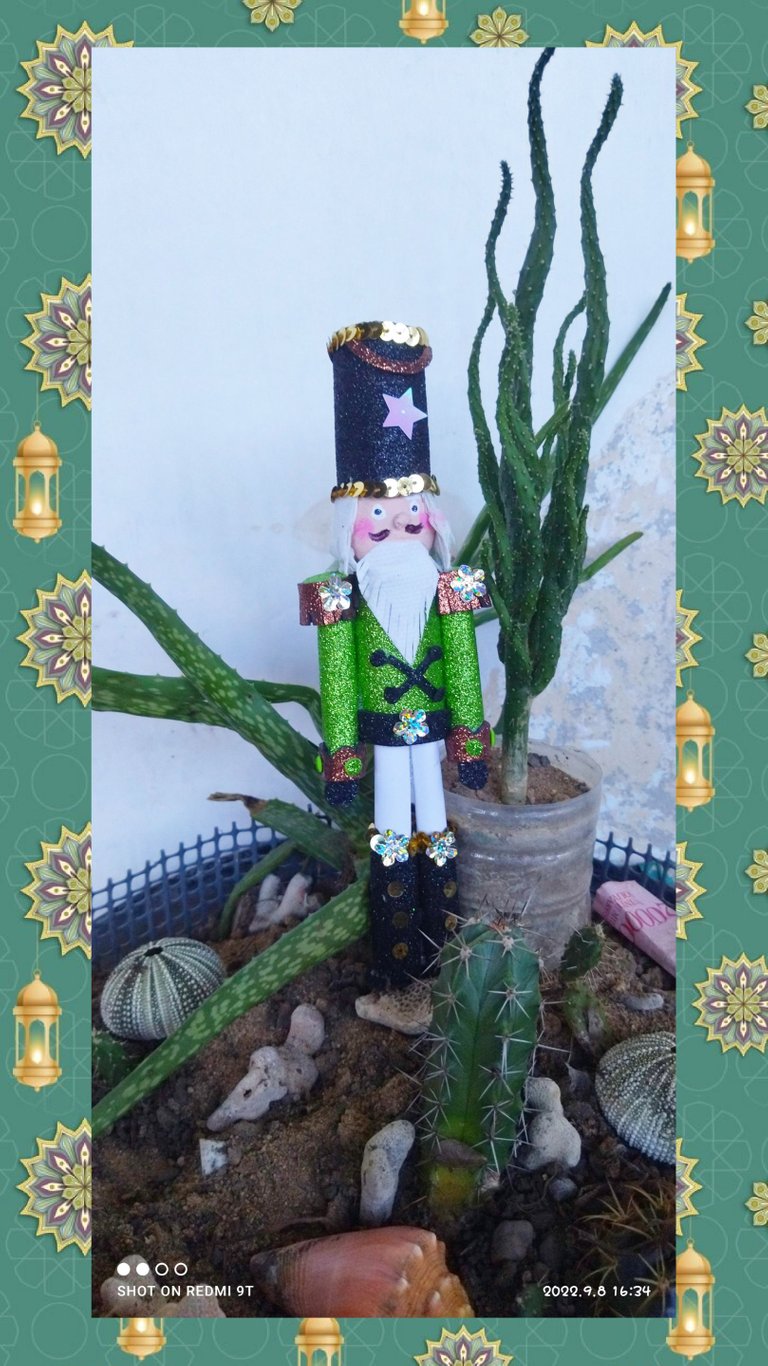
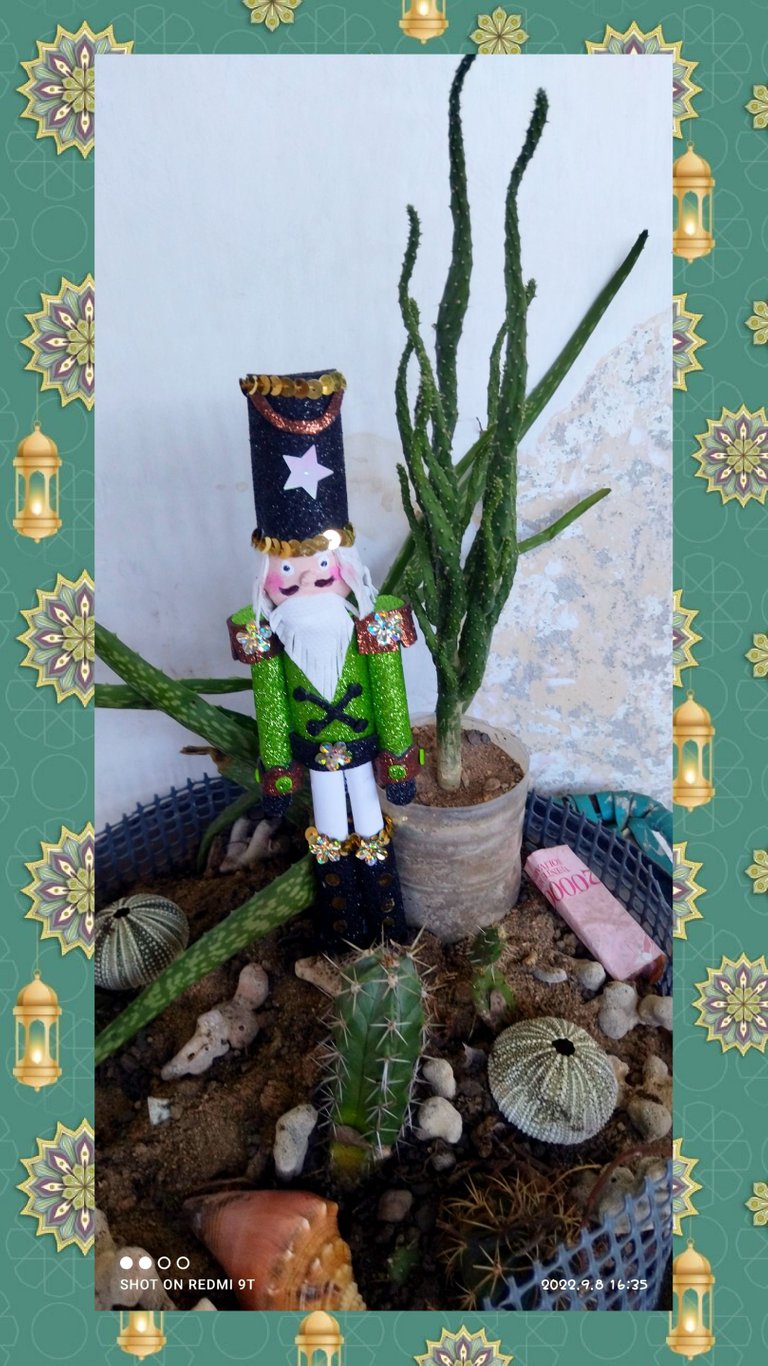
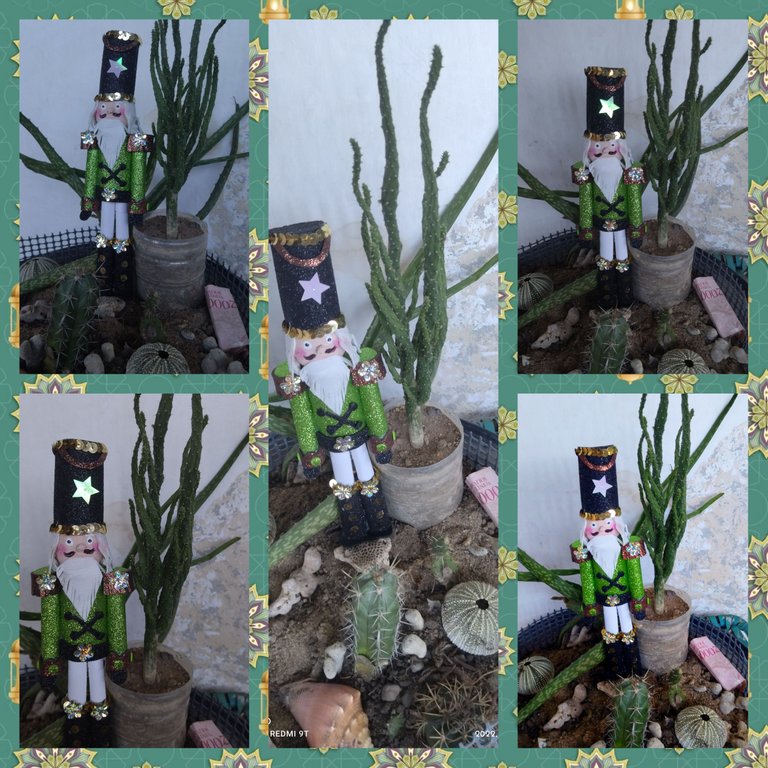
Listo aquí pueden notar como quedo mi hermoso cascanueces que fue elaborado totalmente por mi persona, y les digo disfrute a horrores elaborar este proyecto, así que te invito a ti que estás allí a qué te animes y lo pongas en práctica y claro me dejes saber cómo te fue.
RESULTADO
Por ahora es todo mis amores ya concluimos con esta belleza de pieza navideña que han creado mis manos, y la cual espero les guste a todos, si es así házmelo saber déjame tu comentario que me ayude a crecer como artesana, y ya saben vota y rebloguea, saludos y nos vemos en el próximo post.
 🇺🇸🎄 ENGLISH 🎄🇺🇸
Happy day #hive people, receive a virtual hug from me that is loaded with a lot of good vibes, and a lot of positive energy, today I bring you a very significant tutorial for me , since as I told you in the previous post, I am going to carry out a series of projects that, although it is true that I anticipate Christmas, it is also true that I told you that I am going to elaborate them little by little so that I am not caught off guard.
The project that I am going to elaborate today is a character that represents very well what Christmas is, I am sure that just by seeing him he lets us know that we are in the presence of this time so beautiful, I am talking about a nutcracker, one of the characters that I like the most, do you know what these dolls are and what they are really for, No! Well, I'll explain it to you.
The nutcracker according to legend is the story of a prince who had the ability to break nuts with his teeth and who, by fate, was bewitched by a jealous little mouse because he was going to marry a beautiful princess, being turned into the toy we all know, a really funny story that mixes fantasy. Currently this character is very famous at Christmas parties, for example I am a lover of these characters and I have a collection of them made of wood, so today I wanted to make one but you know with recycled materials, with those materials that we have in the house and that many times we do not take advantage of it to make a nice detail, that's why today I want to show you that it is possible and here I leave you the step-by-step tutorial.
MATERIALS
🎄STEP BY STEP🎄
Take the tubes from the incense packages that had already run out and mark with the help of a pen and the ruler, first about 5 cm high which will be my hat, then Mark another 6 to 7 cm that will be the body, then cut them out.
Then mark a circle and a rectangle about 11 cm long by 6 wide on a piece of black frosted foami and cut it out.
To the piece of cardboard that we cut out, which will be the hat, she applied liquid silicone and then lined it with the rectangle of frosted foami that I previously cut, exerting a little pressure on the union of the foami so that it fits well.
When I glued everything, I applied silicone to the cap of the hat and I glued the previously cut circle.
Here we made several pieces of the character, for example take four sheets of toilet paper and roll it up applying a little white glue, giving it a round shape and let it dry.
I also took several sheets of recycling which with the help of a height stick I was rolling up, in fact I made 4, two thin ones for the arms and two thick ones that will be the legs.< /div>
With the frosty green foami, take a rectangle 11 cm long by 5 cm, and take the 5 cm cardboard tube that you cut and apply the liquid silicone and line it with the frosty foami.
Then cut two strips the length of the arms to which we apply silicone and cover the paper sticks that I made previously that will be my arms, I also cut a strip of 1 cm and cut out making semicircles and glue them to the arm piece.
Now cut out a piece of the black foami and line the legs so that it looks like boots.
Cut out some insoles from the boots and glue them, then apply a little liquid silicone, not too much so that it doesn't look muddy, on the legs and glue them well together.
I also covered the part of the body, I did it with the green frosted Foami when dry I applied liquid silicone to the upper part of the legs and glued them to the body, putting it inside the tube, see the picture so you understand how it is.
I apply the silicone on each arm and fix it on the body of the doll, then cut out three circles, one large and two small, and place the large one on the top of the body, and the two small ones on the top of the shoulder.
Now we are going to work with the head of the doll, first I paint it with a little skin-colored cold paint, when it is dry I glue it to the hat, I also glue the hair, I made it with three folded sheets of toilet paper and cut it out, it looks amazing.
Then take a small piece of paper and roll it up to form the nose which you glue and paint, with a pen draw the mustaches and with the black and white paint draw the eyes and the eyebrows and to give it a nice touch with the blush I drew the cheeks. And finally, I cut him a beard also made with toilet paper.
Then glue the head to the doll's body and there I start to give it the decorative details, which can be any, depending on your taste.
I used gold sequins to decorate the hat and boots, I also glued a star appliqué and gold flower appliqués.
Cut out a piece of brown foami and glue it to the shoulders, and cut out a piece of black foami and remove the center and glue it as a kind of belt.
Now cut out two very small strips of black foami as well as four circles, and stick the strips on the chest forming an (x) and on each end we place the dots and finally stick one flower on the belt and that's it, we're done.
Ready here you can see how my beautiful nutcracker turned out, which was made entirely by me, and I tell you to enjoy to the horrors of making this project, so I invite you who are there to encourage you and put it into practice and of course let me know how it went.
RESULT
That's all for now, my loves, we're done with this beauty of a Christmas piece that my hands have created, and which I hope everyone likes, if so, let me know, leave me your comment help me grow as an artisan, and you know vote and reblog, greetings and see you in the next post.
The rewards earned on this comment will go directly to the people( @mayifiestas ) sharing the post on Twitter as long as they are registered with @poshtoken. Sign up at https://hiveposh.com.
Gracias 😁
Amiga me encanto como te quedo, el año pasado quise hacer mi cascanueces y no lo hice, me has alertado para hacerlo con tiempo, me encanta los materiales que usaste, gracias por tu lindo tutorial, en el tono verde también queda precioso 💚
Saludos amiga que bueno que te gustó, por supuesto hay que hacerlos con tiempo y se pueden hacer en diferentes colores y tamaños te aseguro que se verán increíbles, saludos 🎄🌿
Me encantó su cascanueces amiga le quedó muy hermoso la felicito, una de las fechas más maravillosas para mí en lo particular es la Navidad y con su lindo adorno me hizo transportarme mentalmente a esa hermosa época del año, Gracias por compartirnos el paso a paso de la elaboración de este hermoso personaje, ojalá lo pueda hacer pronto para también tener uno en mi hogar 🤗💓
Que bueno que le gustó amiga, en definitiva la navidad es la mejor época del año, ojalá cuando haga el muñeco pueda verlo, de seguro será hermoso.💕🌿💕
Me encanta, quedó bellísimooo😍
Gracias 😁😁
Thank you for sharing this amazing post on HIVE!
Your content got selected by our fellow curator @rezoanulvibes & you just received a little thank you via an upvote from our non-profit curation initiative!
You will be featured in one of our recurring curation compilations and on our pinterest boards! Both are aiming to offer you a stage to widen your audience within and outside of the DIY scene of hive.
Join the official DIYHub community on HIVE and show us more of your amazing work and feel free to connect with us and other DIYers via our discord server: https://discord.gg/mY5uCfQ !
If you want to support our goal to motivate other DIY/art/music/homesteading/... creators just delegate to us and earn 100% of your curation rewards!
Stay creative & hive on!
Agradecida con su apoyo, muchas gracias 💕💕💕