¡Hola, amigos!
Hello, friends!
It is a pleasure to share after so many problems with the internet. For me the Christmas season is magical, Christmas is a time of reflection and meetings with family and friends, it is therefore very propitious occasion to beautify our spaces.
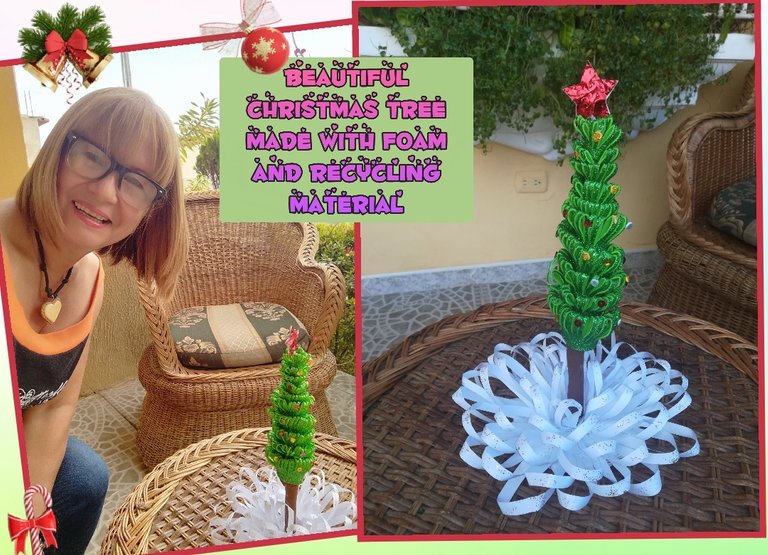
Today I will share with you a tutorial to make a nice Christmas tree that we can give as a gift or to brighten up that special place where we sit every day to write for our favorite page: Hive or to decorate a special corner of our home.
Lindo Arbolito de Navidad // Cute Christmas Tree
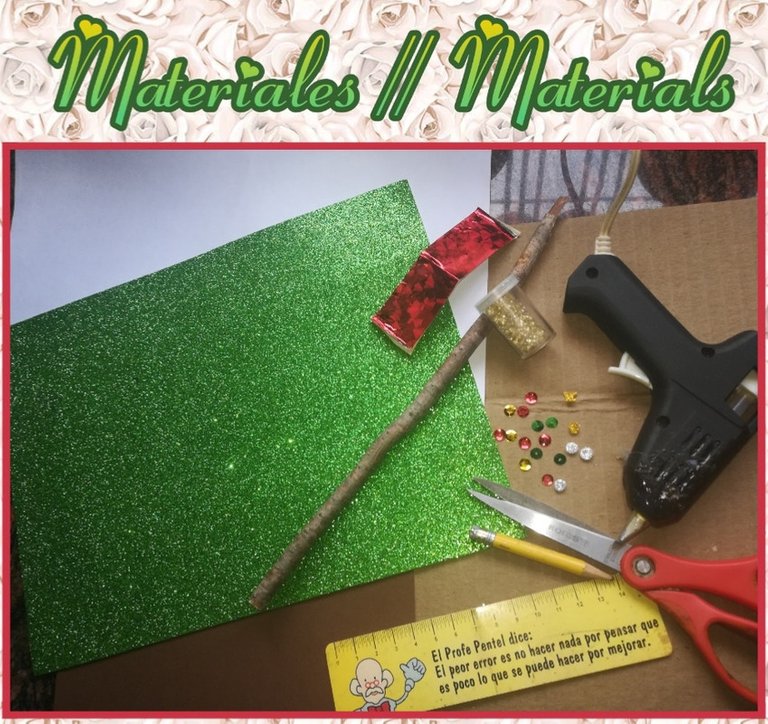
- Foami escarchado verde y marrón
- 1 Palo seco
- 2 Círculos de cartón
- 1 Palillo
- 1 hoja de Papel blanco
- Lentejuelas rojas, doradas y plateadas
- Pistola de Silicona para engomar
- Green and brown frosted Foami
- 1 Dry stick
- 2 Cardboard circles
- 1 toothpick
- 1 sheet of white paper
- Red, gold and silver sequins
- Silicone Glue Gun

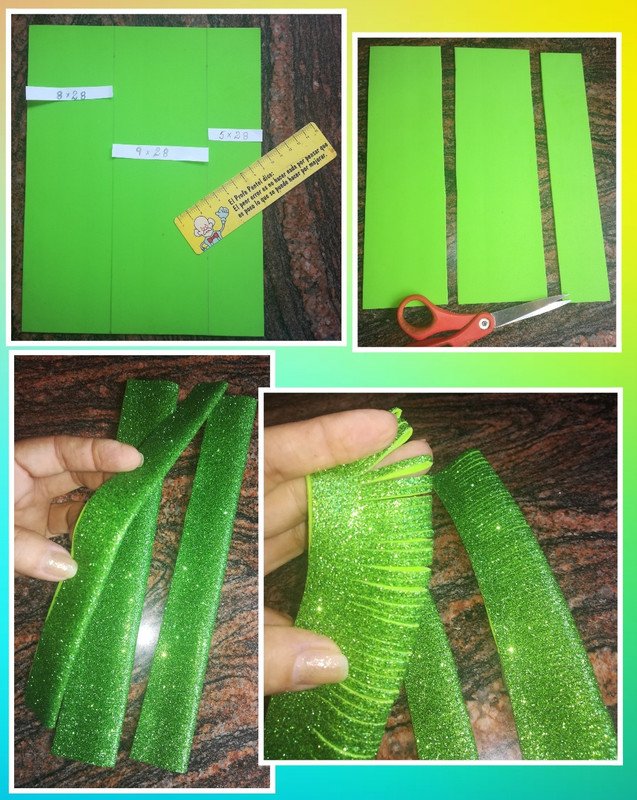
1.- Cortar el foami verde en tres tiras de diferentes medidas ( ver las medidas en las ilustraciones), seguidamente doblamos las tiras y con ayuda del silicón las pegamos en algunas partes para facilitar los cortes que haremos armónica y en forma constante con la tijera a lo largo del foami.
Cut the green foami into three strips of different sizes (see the measurements in the illustrations), then fold the strips and with the help of silicone glue them in some parts to facilitate the cuts that we will make harmoniously and steadily with the scissors along the length of the foami.
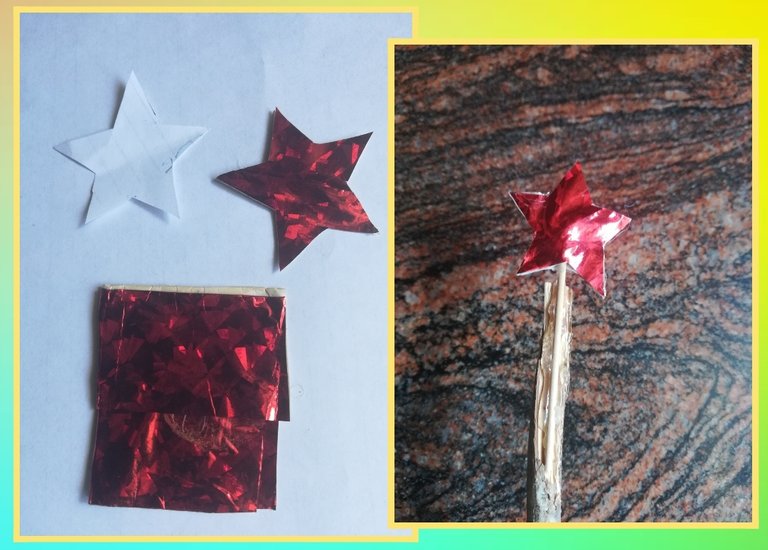
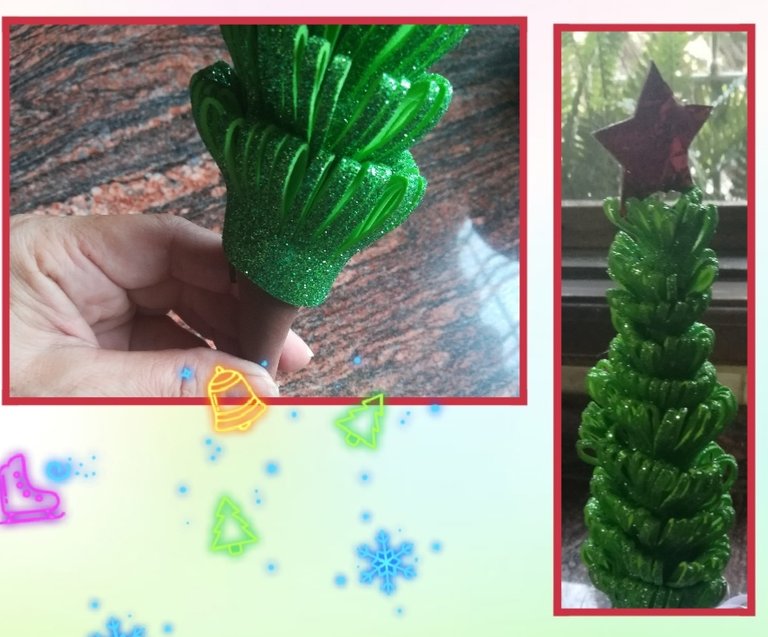
2.- Haremos dos estrellas idénticas, estas pueden ser en color plateado, dorado o rojo (en mi caso solo disponía de papel de revista rojo), luego las pegamos en el palillo para posteriormente fijarla en la cúspide del arbolito.
We will make two identical stars, these can be in silver, gold or red color (in my case I only had red magazine paper), then we glue them on the toothpick to later fix them on the top of the tree.
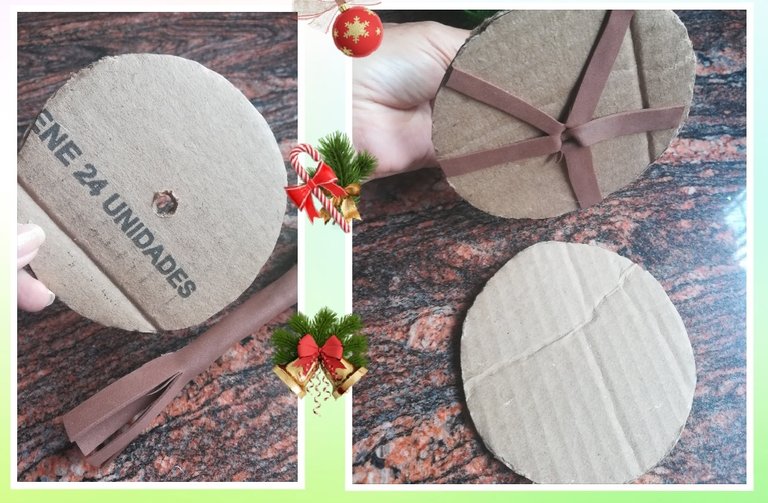
3.- Usaremos un palo seco que se constituirá en el tronco del árbol, lo revestimos con foami marrón, teniendo cuidado que su largo se extienda 3 cm más. Esta prolongación la cortamos en tiras y estas especies de raíces facilitaran el sostén del árbol a la base. Para la base: recortamos dos círculos de cartón de 12 cm de diámetro y abriremos un orificio en el centro de uno de ellos para incrustar el tronco. A continuación fijaremos con silicón cada tira marrón y finalmente anexamos el otro círculo para asegurar y fijar mejor el arbolito
We will use a dry stick that will become the trunk of the tree, we cover it with brown foami, taking care that its length extends 3 cm more. We cut this extension into strips and these kind of roots will facilitate the support of the tree to the base. For the base: cut out two cardboard circles of 12 cm in diameter and open a hole in the center of one of them to embed the trunk. Then we will fix with silicone each brown strip and finally we will attach the other circle to secure and fix the tree.
4.- Acto seguido, con silicón pegamos la tira más delgada de foami verde desde la punta e iremos enrollando a lo largo del palo, con giros circulares. Empezamos con la tira más delgada en la parte superior y continuamos su descenso hasta finalizar con la tira más gruesa.
Next, with silicone we glue the thinnest strip of green foami from the tip and we will roll it along the stick, with circular turns. We start with the thinnest strip at the top and continue its descent until we finish with the thickest strip.
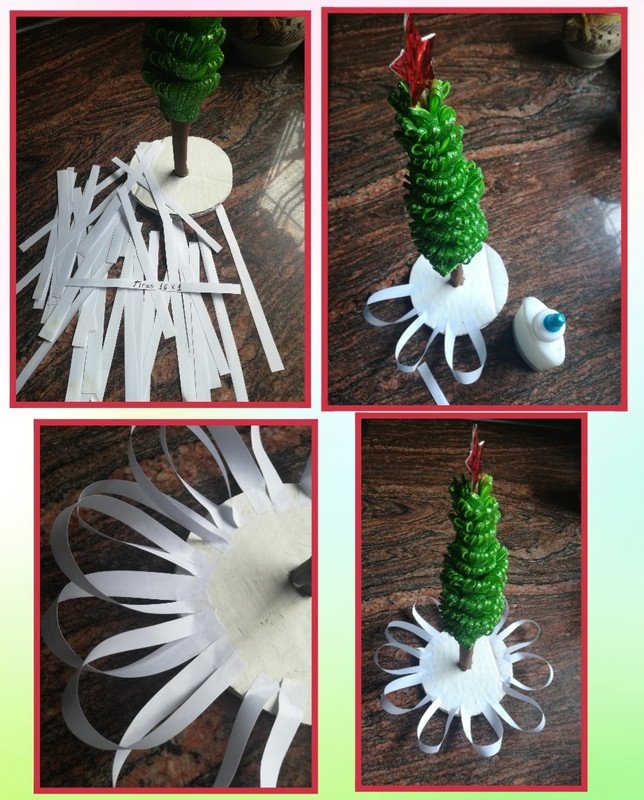
5.- Procedemos a pintar de blanco la base por ambas caras, al secar la pintura comenzamos a pegar tiras de papel blanco de 16 x 1 cm por el borde de la base hasta llegar al tronco del árbol.
We proceed to paint the base white on both sides, when the paint dries we begin to glue strips of white paper of 16 x 1 cm along the edge of the base until reaching the trunk of the tree.
6.- Para darle mayor elegancia y resaltar la alegría de la navidad decoramos algunas “ramas” del arbolito con lentejuelas de diversos colores para simular bolitas prendadas del árbol, podemos sustituir las lentejuelas por pedacitos de foami escarchado que hemos guardado de otras manualidades (usé una combinación de ambos elementos). Recordemos siempre la importancia de reutilizar y aprovechar materiales que tenemos en casa, para así preservar nuestro ambiente usando racionalmente los recursos naturales.
To give it more elegance and highlight the joy of Christmas we decorate some "branches" of the tree with sequins of different colors to simulate little balls attached to the tree, we can replace the sequins with pieces of frosted foami that we have saved from other crafts (I used a combination of both elements). Let's always remember the importance of reusing and taking advantage of materials we have at home, in order to preserve our environment by using natural resources rationally.
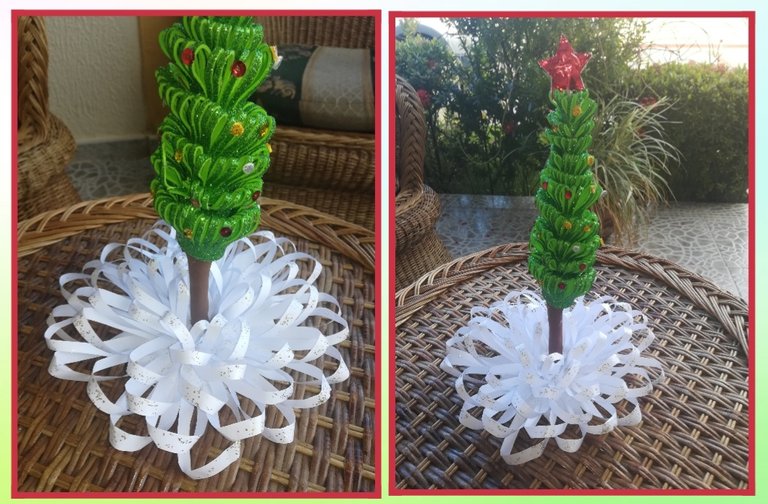
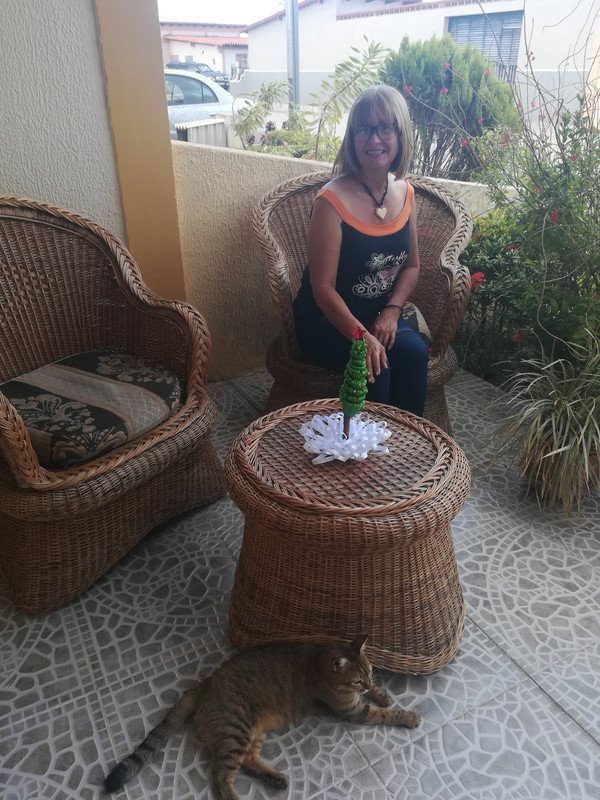
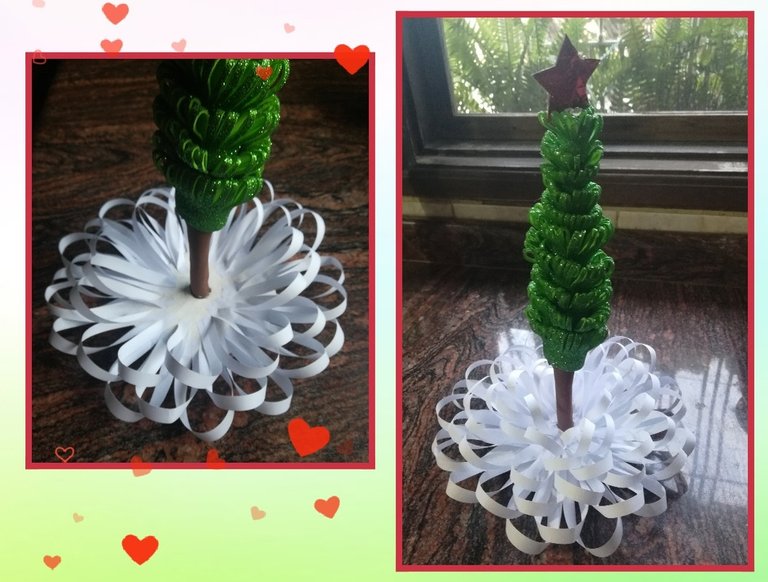
¡Mira que lindo quedó mi Arbolito de Navidad! // Look how cute my Christmas tree turned out!
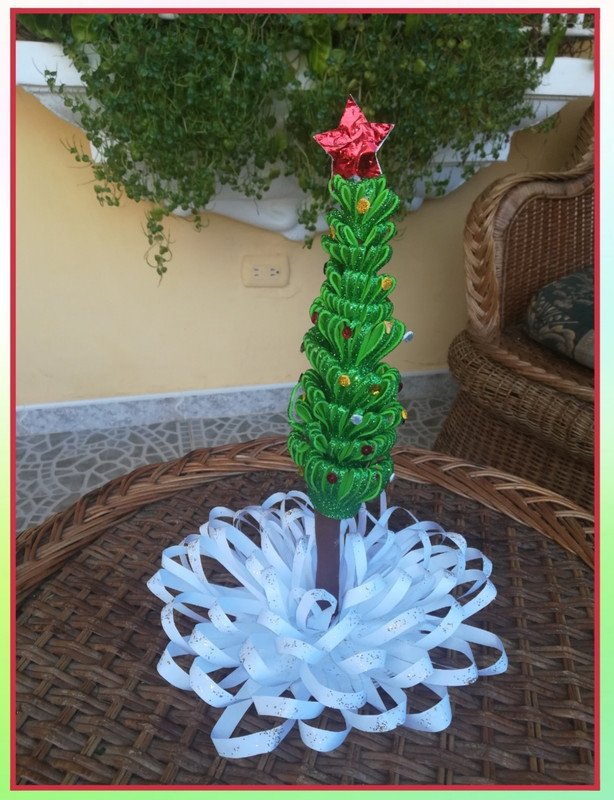
Fotos propias tomadas desde mi teléfono celular HUAWEI. Imágenes editadas por mí en Youcollage.
Traducido con www.DeepL.com/Translator (versión gratuita).
Own photos taken from my HUAWEI cell phone. Images edited by me at Youcollage.
Translated with www.DeepL.com/Translator (free version)

Te quedo cute, es un detalle hermosa para tu estar, se ve muy agradable y con ese gato hermoso falta el café y yo jejeje
saludos mily
HiHola amiga querida. Esta semana te voy a visitar y me brindas el café. Podemos dar un paseito y tomarnos unas fotos. Dile a Daysi y a Theresa
Si va. Avísame a mi celular
Hermoso detalle para el centro de mesa, me encanto.
Me encanta que sea de tu agrado. Es muy fácil de elaborar 🤗🌲
Que lindo te ha quedado tu arbolito de navidad y lo mejor lo fácil que se ve de hacer. Felicidades