
Queridos amigos de #hivediy les deseo un excelente domingo para todos,
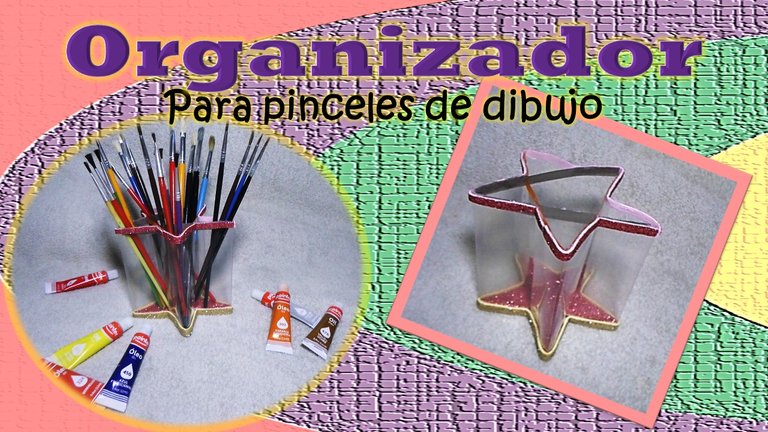
Hoy les he querido mostrar un organizador que elaboré para los pinceles, ya que tenía un desorden en casa tremendo y a la hora de pintar era un desastre, ahora con este nuevo organizador los he podido ordenar por su numeración y me será mucho más fácil a la hora de pintar. A continuación, les diré los materiales que utilicé y paso a paso como lo fui elaborando.

Dear friends of #hivediy I wish you all a great Sunday,
Today I wanted to show you an organizer that I made for the brushes, because I had a tremendous mess at home and when it was time to paint it was a disaster, now with this new organizer I have been able to sort them by their numbering and it will be much easier when painting. Next, I will tell you the materials I used and step by step how I made it.
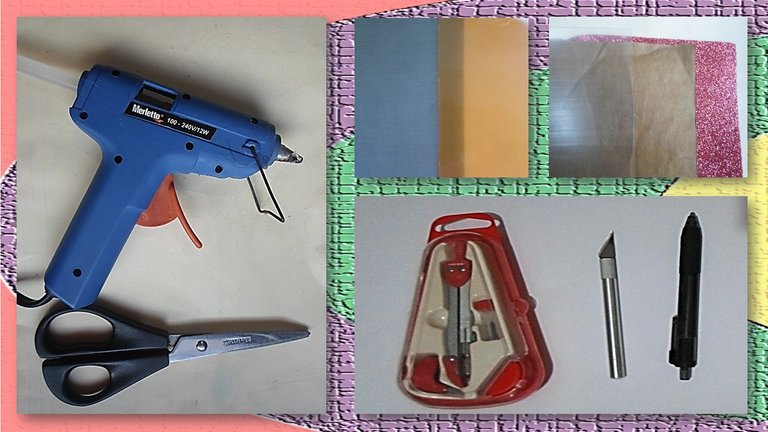

3 láminas de plástico flexible, una blanca, una naranja y otro gris
Foami amarillo y rosa oscuro
Cartón
Tijera
Pistola silicón
Cuchilla de maqueta
Bolígrafo
Compas
Regla de medida

3 flexible plastic sheets, one white, one orange and one gray.
Yellow and dark pink Foami
Cardboard
Scissors
Silicone gun
Model knife
Pen
Compass
Measuring ruler
.
.
.

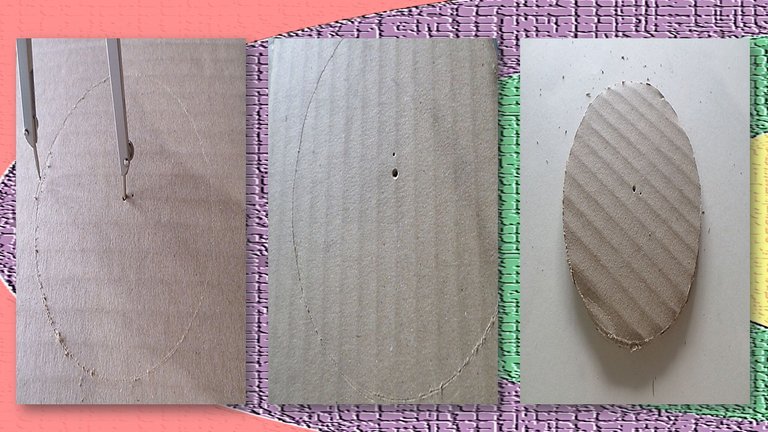
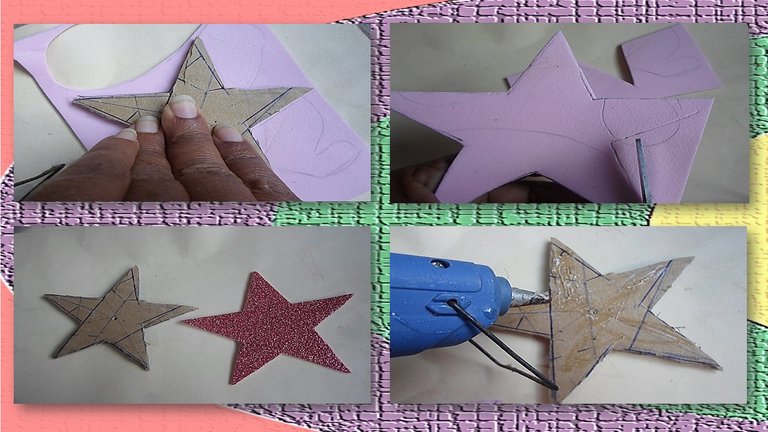
Para comenzar, con ayuda del compás, marqué un circulo de 5cm de diámetro el cual luego recorté con las tijeras.

To begin, with the help of the compass, I marked a 5cm diameter circle which I then cut out with the scissors.
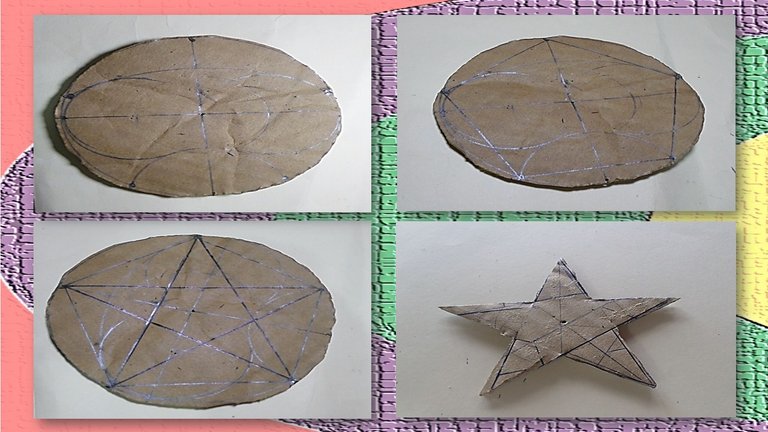
Teniendo ya el círculo, me propuse a darle la forma de estrella, primero, con el bolígrafo y apoyándome en la regla, hice las líneas divisorias y luego, con el compás, luego hice otras 2 circunferencias, una ubicada en el un punto medio entre el centro y el borde, y la otra con el borde como epicentro, también hice una semicircunferencia usando la distancia entre el borde y la circunferencia pequeña como diámetro. Teniendo esto, hice un pentágono usando de referencia a sus bordes las dos esquinas de la circunferencia pequeña con el centro en el borde, el borde del lado opuesto del centro de dicha circunferencia y otros dos puntos más en los bordes hechos con la semicircunferencia. Teniendo esto, uní todas las puntas del pentágono y procedí usarlas de guía para recortar y obtener la estrella.
Having already the circle, I proposed to give it the shape of a star, first, with the pen and leaning on the ruler, I made the dividing lines and then, with the compass, then I made 2 other circles, one located at the midpoint between the center and the edge, and the other with the edge as epicenter, I also made a semicircle using the distance between the edge and the small circle as diameter. Having this, I made a pentagon using as reference to its edges the two corners of the small circle with the center at the edge, the edge of the opposite side of the center of that circle and two more points on the edges made with the semicircle. Having this, I joined all the points of the pentagon and proceeded to use them as a guide to cut out and obtain the star.
Con la estrella ya realizada, la utilicé de guía en el foami para hacer una estrella con dicho material, después recortarla y, con ayuda del silicón en barra, pegué la estrella de foami a la de cartón y darle una buena tonalidad para su base.
With the star already made, I used it as a guide in the foami to make a star with that material, then cut it out and, with the help of the silicone stick, I glued the foami star to the cardboard one and gave it a good color for its base.
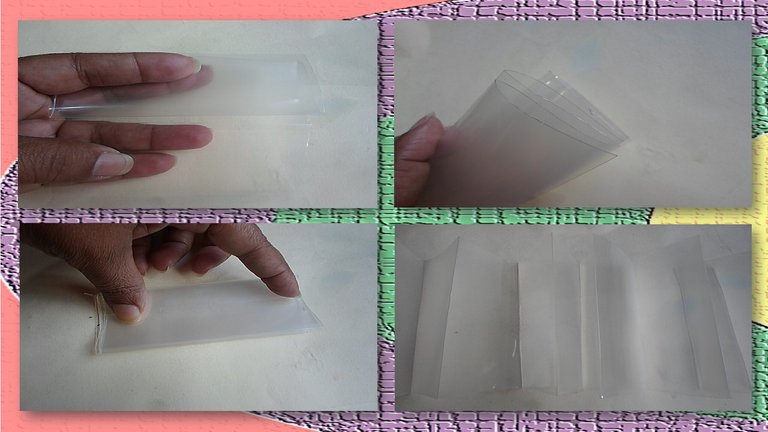
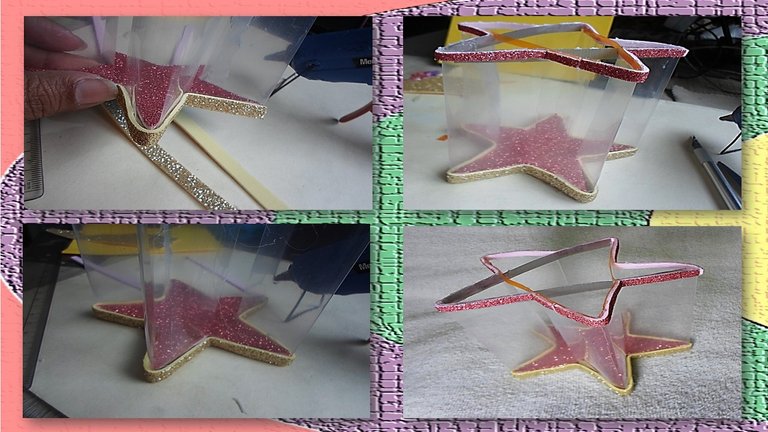
Ahora que la estrella está completada, procedo a usar la lámina transparente de plástico flexible la cual, para comenzar, la recorte para que tuviera una altura de 10cm y la doblé, usando la estrella como guía, para obtener el ancho que necesitaría y así recortarla para poder usarla, dejando un pequeño lado como sobrante para poder unirla al final.
Now that the star is completed, I proceeded to use the transparent flexible plastic sheet which, to begin with, I cut it so that it had a height of 10cm and folded it, using the star as a guide, to obtain the width I would need and thus cut it to be able to use it, leaving a small side as a surplus to be able to join it at the end.
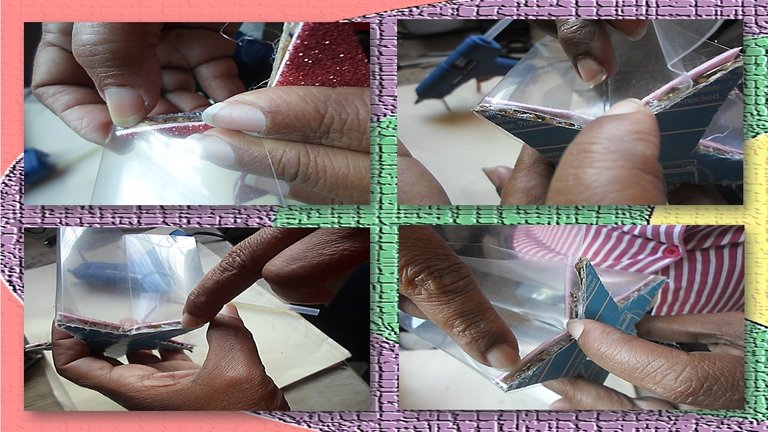
Con ayuda del silicón de barra, uní cada lado de la estrella de cartón con la lámina transparente y luego uní las láminas usando el sobrante de esta para asegurarme de que no se separaran
With the help of the silicone stick, I joined each side of the cardboard star with the transparent sheet and then I joined the sheets using the leftover to make sure they didn't separate.
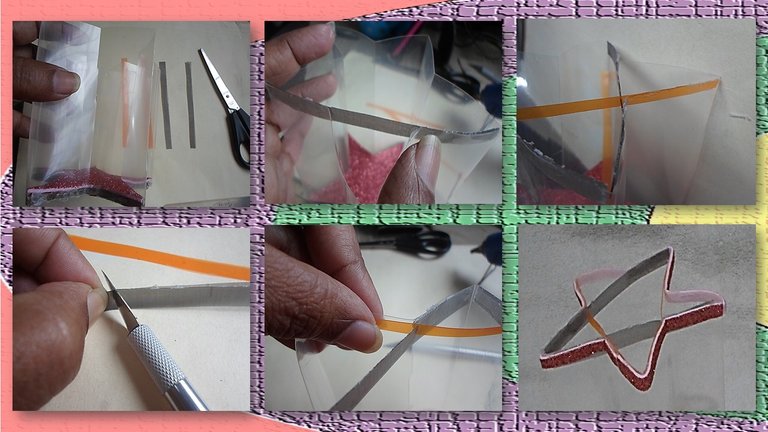
Una vez juntadas las piezas, recorté unas láminas de colores de 5 mm de ancho, usando la cuchilla de maqueta le hice una pequeña corte en donde se cruzarían, las ubiqué en la parte superior del organizador, manteniendo su forma de estrella. Teniendo ubicadas las piezas, pegué con el silicón de barra, la idea es que estas laminas me dividan la parte superior del organizador para poder distribuir los pinceles como me es cómodo para trabajar posteriormente.
Once the pieces were joined, I cut some colored sheets of 5 mm wide, using the model cutter I made a small cut where they would cross, I placed them on the top of the organizer, keeping its star shape. Having located the pieces, I glued them with the silicone bar, the idea is that these sheets divide the upper part of the organizer to be able to distribute the brushes as it is comfortable for me to work later.
Para decorar el organizador, recorté unas tiritas de foami amarillo para con un grosor de 5mm y nuevamente usando el silicón en barra, los pegué por todo el alrededor del organizador.
To decorate the organizer, I cut some strips of yellow foami for a thickness of 5mm and again using the silicone stick, I glued them all around the organizer.
Y ahora pueden ver como quedó el organizador con la forma de estrella
And now you can see how the organizer with the star shape turned out.

Espero que les haya gustado este hermoso organizador tanto como a mi me gusto crearlo, pasen un buen día
Adios.
I hope you liked this beautiful organizer as much as I liked creating it, have a nice day.
Have a nice day.

The photos were taken with a SAMSUNG F2.5 camera
DeepeL was used
Dividers made in Microsoft Power Point.
Hola Tania :) Que buena idea la de trabajar con ese material transparente, podes obtener la forma que quieras. Ahora tus oinceles van a estar ordenados y en un contenedor muy hermoso.
Saludos, que tengas un lindo día ❣️.
Gracias por visitar mi post @lauramica , el trabajo con láminas transparentes me gusta mucho, me alegra saber que le gustara. Feliz tarde.🌷🌹🏵️🌻🌸🌼☘️💮💐🌷🌹🏵️🌻🌸🌼💮💐☘️🌷🌹🏵️🌻🌸🌼💮💐☘️
Thank you for sharing this amazing post on HIVE!
Your content got selected by our fellow curator @rezoanulvibes & you just received a little thank you via an upvote from our non-profit curation initiative!
You will be featured in one of our recurring curation compilations and on our pinterest boards! Both are aiming to offer you a stage to widen your audience within and outside of the DIY scene of hive.
Join the official DIYHub community on HIVE and show us more of your amazing work and feel free to connect with us and other DIYers via our discord server: https://discord.gg/mY5uCfQ !
If you want to support our goal to motivate other DIY/art/music/homesteading/... creators just delegate to us and earn 100% of your curation rewards!
Stay creative & hive on!
Amazing
Gracias🌹🌷
Hola.
Trabajar con estas laminas no es muy cómodo y menos haciendo estas figuras de estrella, en tu post se ve que dominaste este material. Se ve lindo el organizador.
Es un material duradero, me gusta trabajarlo , gracias @creacioneslelys , me complace saber que le gustó, feliz noche🌻💐🌸💮🏵️🌼🌷🌹🌻💐🌸💮🏵️🌼🌷🌹🌻💐🌸💮🏵️🌼🌷🌹🌻💐🌸💮🏵️🌼🌷🌹🌻💐🌸💮🏵️🌼🌷🌹🌻💐🌸💮🏵️🌼🌷🌹.
Me gusta que hayas combinado brillos con un material transparente, se ve elegante y lograste muy bien la figura de la estrella. Hermoso trabajo, gracias por compartir
Gracias @bleuclair me alegra que el trabajo te gustará, a mi me gusta mucho la transparencia como queda en los objetos, gracias por visitar mi post 🌺🌼🌸🏵️💐💮🌹🌺🌷🌻🌼🌸🏵️💐💮🍀🌹🌺🌷
Mi hermana que organizador tan bello, realmente eres una artista y lo demuestras en cada publicación que realizas, todo lo que haces es hermoso, me encantó, muy bien trabajado 😘😘😘😘❤️
Gracias mi hermana @lileisabel , era algo que me lo debía a mí misma y a mis amados pinceles, ellos ahora quedaron más ordenados, tu siempre me alegras con tus lindos comentarios🌻💐🌸💮🏵️🌼🌷🌹🌻💐🌸💮🏵️🌼🌷🌹🌻💐🌸💮🏵️🌼🌷🌹🌻💐🌸💮🏵️🌼🌷🌹🌻💐🌸💮🏵️🌼🌷🌹🌻💐🌸💮🏵️🌼🌷🌹.
No digo más que la verdad, el organizador de pinceles es una belleza 😍❤️
🌷🌹😘
Hola Tania, la forma de tu organizador es genial y muy original, me gustó mucho tiene su dificultad.
Gracias @equipodelta ,este organizador lo hice con mucho gusto, mis pinceles se lo merecían. Feliz tarde🌷🌹🏵️🌻🌸🌼☘️💮💐🌷🌹🏵️🌻🌸🌼💮💐☘️🌷🌹🏵️🌻🌸🌼💮💐☘️
Dear @taniagonzalez,
May I ask you to review and support the Dev Marketing Proposal (https://peakd.com/me/proposals/232) we presented on Conference Day 1 at HiveFest?
The campaign aims to onboard new application developers to grow our ecosystem. If you missed the presentation, you can watch it on YouTube.
You cast your vote for the proposal on Peakd, Ecency,
Thank you!
Congratulations, your post has been upvoted by @dsc-r2cornell, which is a curating account for @R2cornell's Discord Community. We can also be found on our hive community & peakd as well as on my Discord Server
Felicitaciones, su publication ha sido votado por @dsc-r2cornell. También puedo ser encontrado en nuestra comunidad de colmena y Peakd así como en mi servidor de discordia