
Saludos Hivers, deseo que hayan iniciado muy bien la semana. Yo pensando en hacer un DIY utilitario, de esos que me piden mis hijas por partida doble, porque siempre me pasa que hago uno para la creación de contenido dentro de Hive, pero tengo que hacer otro para que mis dos hijas, cada una tenga uno. Y hoy me toca hacer dos más en lugar de uno, porque este proyecto lo hice para mí, pero también tengo que hacer ahora a mis hijas.
Greetings Hivers, I hope you have started the week very well. Me thinking of doing a utilitarian DIY, one of those that my daughters ask me twice, because it always happens to me that I do one for content creation within Hive, but I have to do another so that my two daughters, each have one. And today I have to do two more instead of one, because I did this project for myself, but now I also have to do it for my daughters.
Me di cuenta que necesitaba una base para mi celular, y estuve pensando en el diseño de una base que fuese desarmable, porque a veces viajamos y quería llevarla conmigo. También quería que el celular quedara algo elevado y que lo pudiera usar tanto vertical como horizontalmente, porque cuando escribo los blog, suelo poner un video o un podcast en mi teléfono y siento que un poquito alto lo veo mejor.
I realized that I needed a base for my cell phone, and I was thinking about designing a base that could be disassembled, because sometimes we travel and I wanted to take it with me. I also wanted the cell phone to be somewhat elevated and that I could use it both vertically and horizontally, because when I write the blogs, I usually put a video or a podcast on my phone and I feel that a little higher I see it better.
Hace un par de días, un nuestro compañero llamado @nitsuga12 realizó un proyecto buenísimo con cortes de MDF, hizo una base para el monitor de mesa, y le quedó genial. Espero pronto poder replicarla, me encantan los proyectos que hacen que nuestro lugar de trabajo sea más agradable y confortable. Por eso, pensé en una pieza que me ayude a organizar mejor mis dispositivos, ya que el celular por ejemplo siempre lo tengo recostado en algo.
A couple of days ago, a friend of ours called @nitsuga12 made a really cool project out of MDF cutouts, he made a base for the tabletop monitor, and it turned out great. I hope to replicate it soon, I love projects that make our workplace more pleasant and comfortable. For this reason, I thought of a piece that would help me better organize my devices, since for example I always have my cell phone leaning against something.
Para realizar mi Base para Celular utilicé cartón reciclado. Ahora no solo no boto el cartón, además en estas noches fui a comprar algo de noche, en la farmacia en el centro de la ciudad, y ya habían sacado los negocios su basura, incluyendo las cajas donde les llegan las mercancías, y ellas están muchas recién abiertas y en buen estado. Pues paro mi carro, me bajo y recojo cajas... Pensando que no me vea ningún conocido porque pensará que estoy loca, pero no puedo dejar ese material de provecho.
Bueno, los invito a ver el Tutorial para esta Base para Celular, espero que te guste.
To make my Base for Cell Phone I used recycled cardboard. Now not only do I not throw away the cardboard, also these nights I went to buy something at night, at the pharmacy in the center of the city, and the businesses had already taken out their garbage, including the boxes where the merchandise arrives, and they are many newly opened and in good condition. Well, I stop my car, I get out and pick up boxes... Thinking that no acquaintance will see me because they will think I'm crazy, but I can't leave that useful material.
Well, I invite you to see the Tutorial for this Cell Phone Base, I hope you like it.

- Cartón reciclado
- Hoja para hacer el patrón
- Papel contac
- Bolígrafo - Regla - Cuter
* Recycled carton * Sheet to make the pattern contact paper * Ballpoint pen - Ruler - Cuter
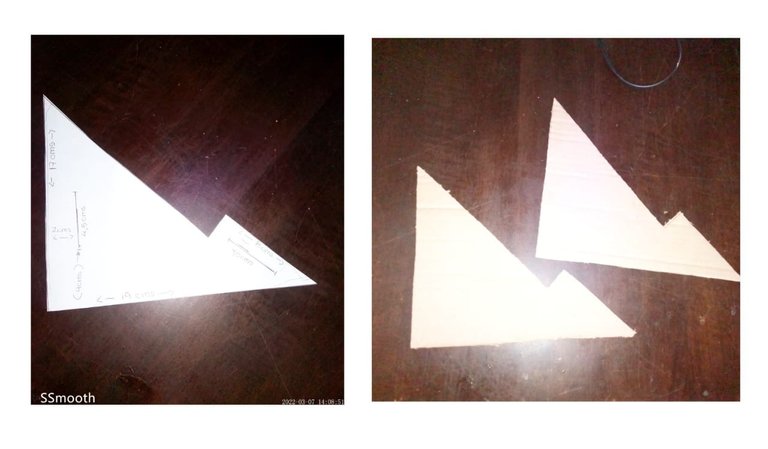
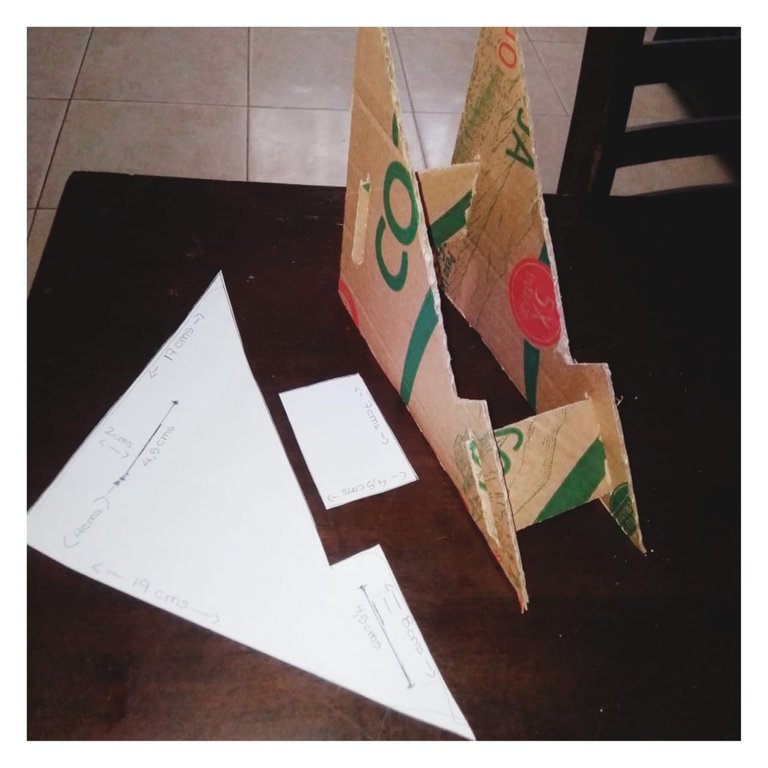
Paso 1: Primero haces la plantilla de la Base para el Celular, a continuación te muestro la que hice, podrás ver las medidas que tiene cada pieza. Para elaborar esta base vamos a necesitar dos piezas por cada patrón, es decir dos piezas de los laterales y dos piezas de los rectángulos conectores, y listo. Este diseño es muy fácil y prolijo de hacer.
Step 1: First you make the template for the Cell Phone Base, then I will show you what I did, you will be able to see the measurements of each piece. To make this base we are going to need two pieces for each pattern, that is, two pieces for the sides and two pieces for the connecting rectangles, and that's it. This design is very easy and neat to make.

Paso 2: Cortamos nuestros patrones en el cartón. Trata de realizar los cortes con el cuter, ya que quedarán mas limpios. Pero si no tienes puedes usar la tijera, solo que es un poco más difícil dependiendo de que tan grueso es tu cartón. Es importante que tengas el mayor cuidado para no doblar el cartón, sobre todo cuando cortas con tijera. Yo si disponía de un cuter y con la regla realicé mis cortes.
Step 2: We cut out our patterns on the cardboard. Try to make the cuts with the cutter, as they will be cleaner. But if you don't have any you can use scissors, it's just a little more difficult depending on how thick your cardboard is. It is important that you take the greatest care not to bend the cardboard, especially when you cut with scissors. I did have a cutter and with the ruler I made my cuts.
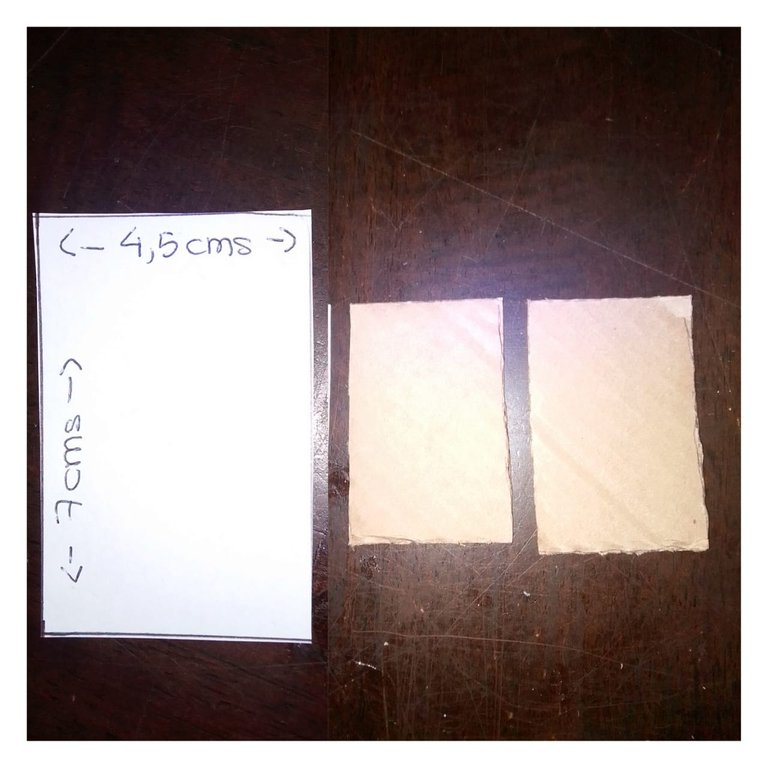
Paso 3: Haz un chequeo de que las piezas hayan quedado iguales, si es necesario ajusta el tamaño en este momento para que ambas queden exactas.
Step 3: Make a check that the pieces are the same, if necessary adjust the size at this time so that both are exact.
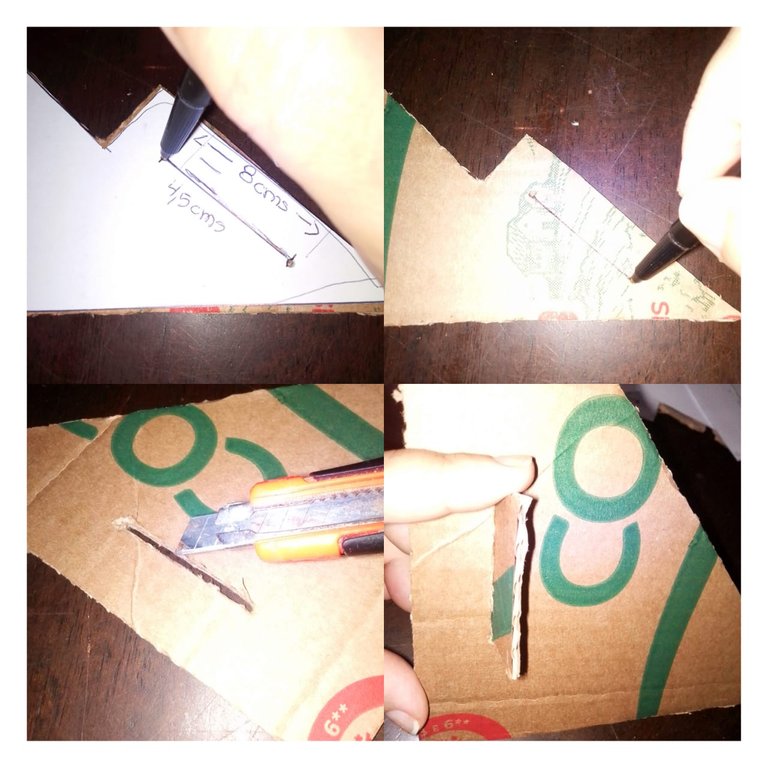
Paso 4: Monta el patrón en el cartón y marca haciendo presión con un bolígrafo los puntos de las ranuras, donde empiezan y donde terminan las dos ranuras de este diseño. Luego, con el cuter y la regla pasas varias veces para abrirlas, el grueso de la ranura dependerá del grueso del cartón que utilizastes, trata de no excederte ya que al meter la pieza en la ranura, esta debe quedar ajustada.
Step 4: Assemble the pattern on the cardboard and mark the points of the grooves with pressure with a pen, where the two grooves of this design begin and end. Then, with the cutter and the ruler you pass several times to open them, the thickness of the slot will depend on the thickness of the cardboard you used, try not to overdo it since when you put the piece in the slot, it must be adjusted
 )
)
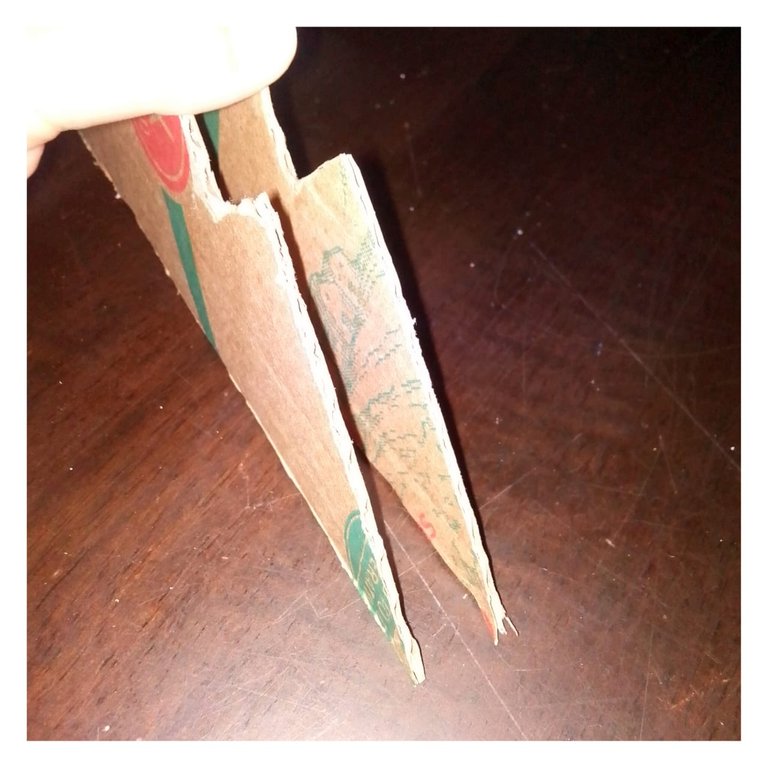
A continuación te muestro la estructura de mi Base para Celular, solo con haberla cortado en el cartón, ya funciona. Solo tienes que insertar los rectángulos o piezas conectoras a las piezas laterales y debe quedar bien soportado.
Next I show you the structure of my Base for Cell Phone, just by having cut it in the cardboard, it already works. You just have to insert the rectangles or connecting pieces to the side pieces and it should be well supported.
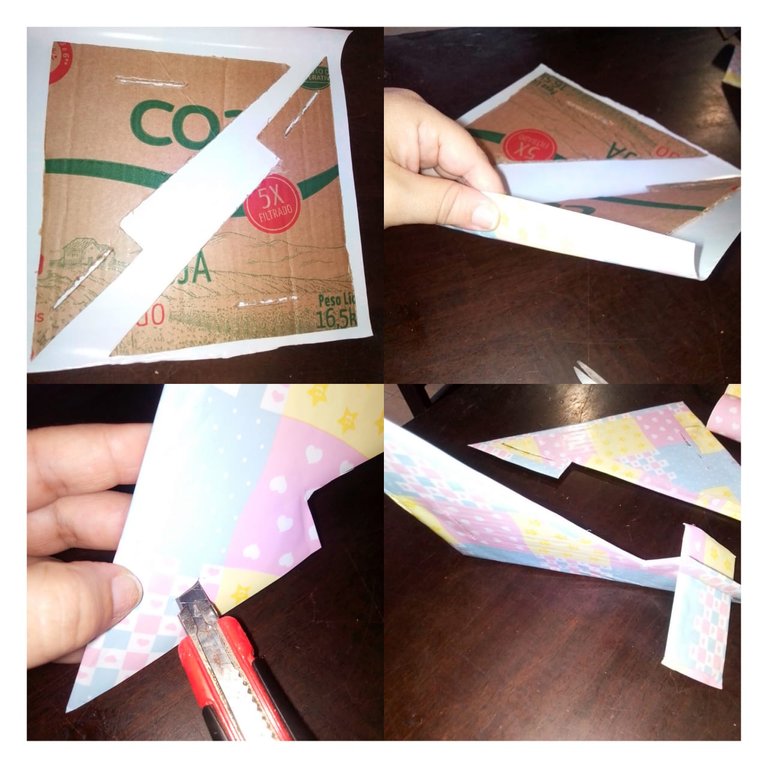
Paso 5: Desarma tu base porque ahora la vamos de decorar. Yo utilicé un papel contac que tengo y voy a aprovecharlo hasta que se me termine, pero igualmente pudieras pintarlo, también puedes forrarlo con alguna cartulina, con lo que desees personalizarlo. Forrarlo fue muy fácil y rápido por lo sencillo del diseño.
Step 5: Disarm your base because now we are going to decorate it. I used contact paper that I have and I'm going to take advantage of it until I run out, but you could also paint it, you can also cover it with some cardboard, with whatever you want to personalize it. Covering it was very easy and fast due to the simplicity of the design.
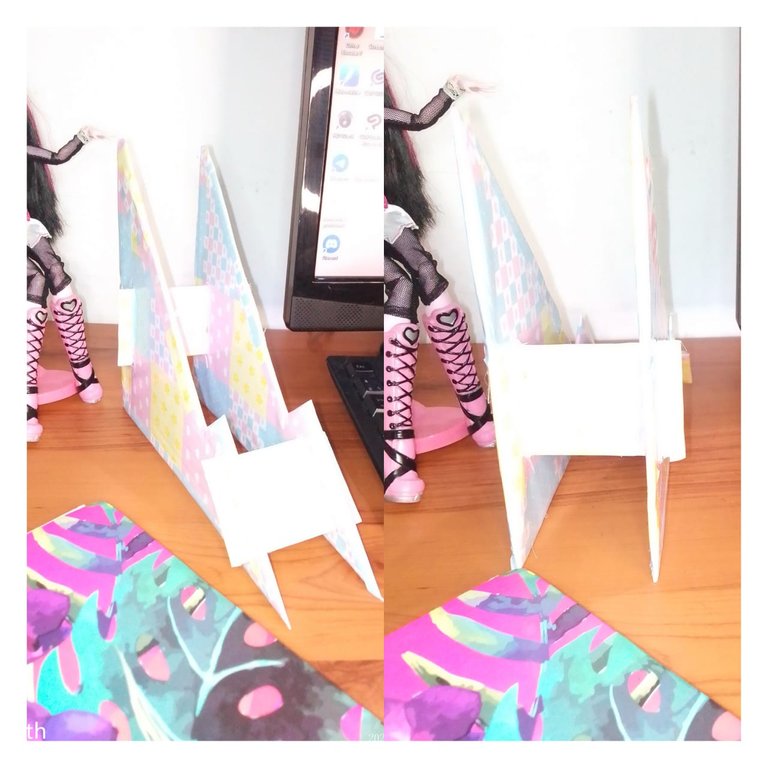
Ya terminado de forrar, armé mi Base para Celular, solo hay que ajustar el ancho de acuerdo a tu dispositivo. Ármalo que quede igual de ancho adelante y atrás. Si quieres dejarlo fijo, pudieras poner unos puntos de silicón caliente en las uniones, para que esté bien fijo, pero el mío me interesaba que tuviese la opción de desarmarlo para llevármelo de viaje. Si haces bien los cortes, te queda bien ajustado y no es necesario fijarlo, pero esto lo decides tu.
Once finished lining, I put together my Base for Cell Phone, you just have to adjust the width according to your device. Arm it so that it is equal in width in the front and back. If you want to leave it fixed, you could put some points of hot silicone in the joints, so that it is well fixed, but I was interested in mine having the option of disassembling it to take it on a trip. If you make the cuts well, it fits you well and it is not necessary to fix it, but this is up to you.
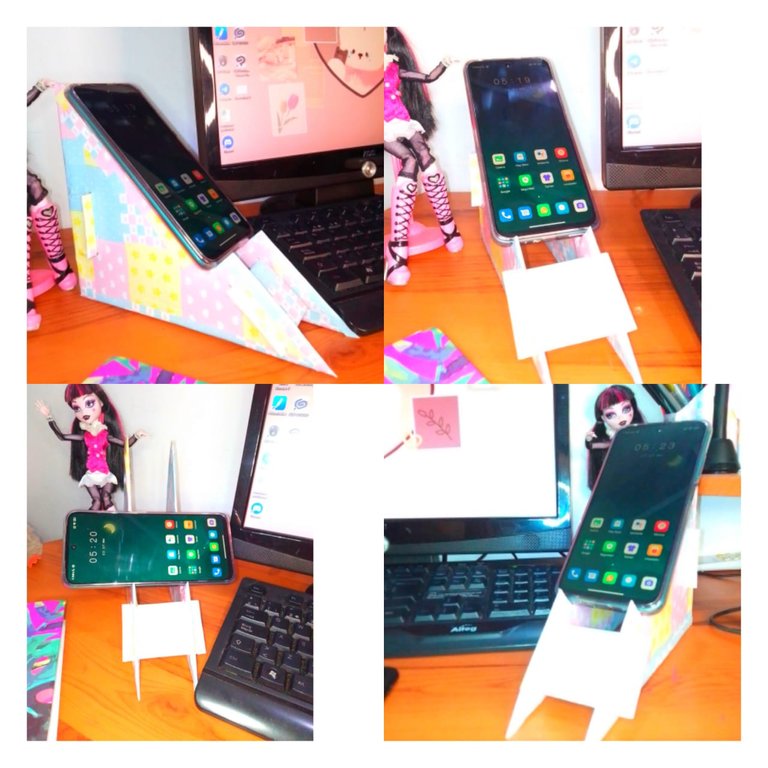
Deseo que te haya gustado el tutorial, se hace muy rápido, y es bueno porque te aseguro que tendrás varios encargos de tus familiares y amigos que lo vean, será tema de conversación, porque de verdad es muy útil y queda con unos acabados hermosos, muy prolijos y lucen muy bien en tu estación de trabajo, en tu peinadora si ves las redes sociales, un video o algo.
Por ejemplo, yo cuando cocino me llevo mi celular a la cocina, pues ahora tiene un lugar para estar seguro, en buena posición y alejado de la superficie en su propia base.
I wish you liked the tutorial, it is done very quickly, and it is good because I assure you that you will have several orders from your family and friends who see it, it will be a topic of conversation, because it is really very useful and it has beautiful finishes, very neat and look great at your work station, in your hairdresser if you're watching social media or a video or something.
For example, when I cook I take my cell phone to the kitchen, because now it has a place to be safe, in a good position and away from the surface on its own base.

Las fotos las tomé con mi teléfono SSmoth 6.5. Los Collage con Photo Collage Maker e InShot. Usé Traductor Google.
Las fotos las tomé con mi teléfono SSmoth 6.5.
Los Collage con Photo Collage Maker e InShot.
Usé Traductor Google.
Me voy a fabricar una base para mí celular, tal como lo explicas en el tutorial.
Muy bueno que hayas dejado espacio para los cables del cargador y audífonos, así no se doblan.
Tuviste una buena idea al compartimos tal útil manualidad, al alcance de todos.
Felicidades, saludos 🌟
Gracias, que bueno que te gustó. Si, y ahora que lo dices pienso que no hablé sobre eso...
Pero si fue importante en el diseño que tuviese esas posibilidades.
Gracias de nuevo...
muy original
Gracias... Muy amable...
Buen trabajo amiga, lo vi en la mañana y me faltó dejarte el comentario.
Gracias... Aprendiendo todos los días...
Para haberlo hecho de cartón realmente quedo muy prolijo, la mayoría de veces contamos con un área de trabajo tan reducida que cada centímetro tenemos que optimizarlo.
Me alegro que haya salido bien y que haya sido tan útil que tuviste que hacer mas de uno para la familia jajaja, tal vez te pida uno para mi 😅
Congratulations @yennysferm71! You have completed the following achievement on the Hive blockchain and have been rewarded with new badge(s):
Your next payout target is 500 HP.
The unit is Hive Power equivalent because post and comment rewards can be split into HP and HBD
You can view your badges on your board and compare yourself to others in the Ranking
If you no longer want to receive notifications, reply to this comment with the word
STOPTo support your work, I also upvoted your post!
Check out the last post from @hivebuzz:
Support the HiveBuzz project. Vote for our proposal!
Estamos felices de que nos acompañaste en esta mañana en Curaciones matutinas te esperamos el próximo Martes a las 9:00 AM. Saludos, @yennysferm71.
¡Felicidades! Esta publicación obtuvo upvote y fue compartido por @la-colmena, un proyecto de Curación Manual para la comunidad hispana de Hive que cuenta con el respaldo de @curie.
Si te gusta el trabajo que hacemos, te invitamos a darle tu voto a este comentario y a votar como testigo por Curie.
Si quieres saber más sobre nuestro proyecto, acompáñanos en Discord: La Colmena.
Your content has been voted as a part of Encouragement program. Keep up the good work!
Use Ecency daily to boost your growth on platform!
Support Ecency
Vote for new Proposal
Delegate HP and earn more
Vengo a comentar y no puedo evitar recordar que en la curación dijiste que ibas recogiendo cajas por calle, lo dijiste de un modo chistoso. Tu post está muy bien estructurado y explicas muy bien el proceso.
Saludos.
#creativecoin #archon
!hivebits