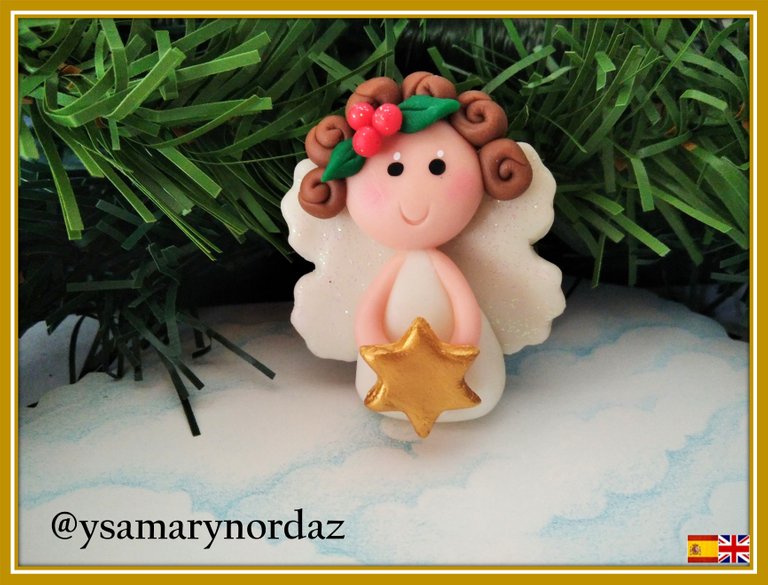
Hola querida comunidad de #Hivediy. Se avecina el mes de diciembre y desde ya comenzamos a realizar manualidades para decorar nuestro hogar. Este es un mes que trae alegría y representa la unión familiar, cada familia tiene sus costumbres en cuanto a la decoración de su hogar. El día de hoy quiero compartir con todos ustedes un paso a paso de un imán de Ángel de navidad elaborado en masa flexible, el cual podrás colocar en tu nevera para así decorarla. La masa flexible es una masa parecida a la plastilina muy fácil de manejar y con ella puedes hacer infinidades de figuras. A continuación, les presento el siguiente paso a paso. ¡Vamos a comenzar!
Hello dear #Hivediy community. The month of December is coming and we are already starting to make crafts to decorate our home. This is a month that brings joy and represents family union, each family has its customs regarding the decoration of its home. Today I want to share with all of you a step by step of a Christmas Angel magnet made in flexible dough, which you can place on your fridge to decorate it. The flexible dough is a dough similar to plasticine that is very easy to handle and with it you can make countless figures. Here is the next step by step. Let's get started!
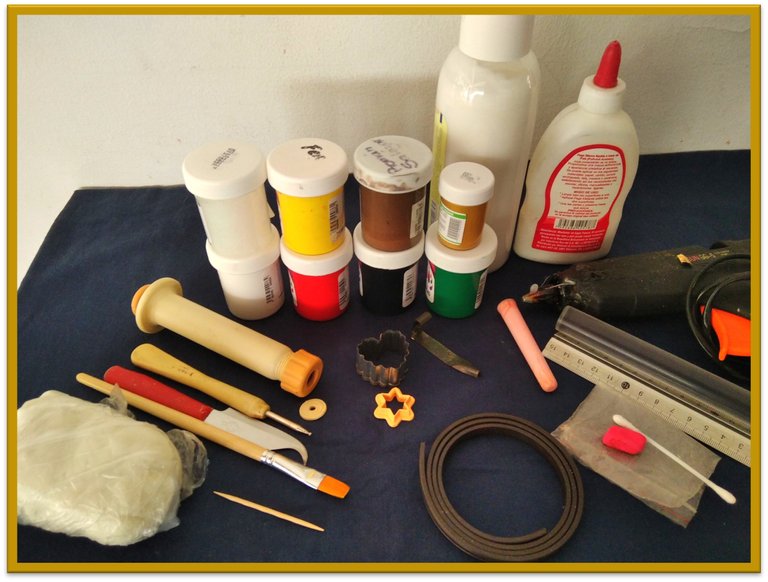
Materiales:
•Masa flexible
•Pinturas: rojo, verde oscuro, marrón, amarillo, blanco, negro, color piel y dorada.
•Gel escarchado
•Pincel
•Regla
•Bolillo metálico
•Esteca de cuchillo
•Duya con disco
•Palillo
•Hisopo
•Tiza pastel roja
•Pega blanca
•Pistola y pega de silicon
•Rodillo
•Cortadores de corazón y estrella.
•Marcador de sonrisa
•Imán
•Crema humectante
Materials:
•Flexible clay
•Paints: red, dark green, brown, yellow, white, black, skin color and gold.
•Frosted gel
•Brush
•Rule
•Metal ball flexible clay
•Pottery clay cutter
•Clay gun extruder
•Toothpick
•Cotton bud
•Red pastel chalk
•White glue
•Gun and silicone glue
•Roller
•Heart y star cutters.
•smile marker
•Magnet
•Moisturizing lotion
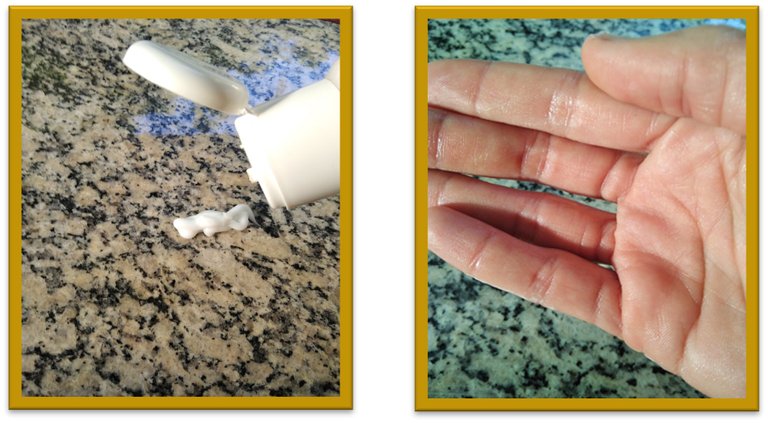
Paso 1
Limpia la superficie donde trabajarás la masa y unta un poco de crema humectante en ella, de esta manera la masa no se pegará. Igualmente, te recomiendo colocar en tus manos para que sea más fácil el amasado.
Step 1
Clean the surface where you will work the dough and spread a little moisturizing cream on it, this way the dough will not stick. Likewise, I recommend placing it in your hands to make kneading easier.
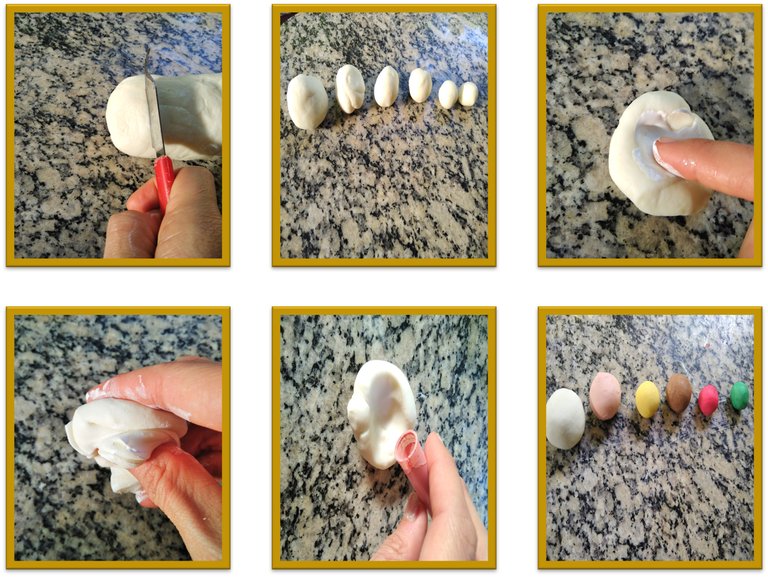
Paso 2
Coloca la masa flexible sobre la superficie y con la ayuda de la esteca de cuchilla corta seis porciones, (no importa que no tengan el mismo tamaño) en este caso la porción dependerá de cual color utilizarás más. Luego, con tu dedo toma un poco de pintura de los colores con los que trabajaras y colócasela a la masa. Seguidamente amásala hasta que el color quede uniforme. Ten a la mano unas bolsitas plásticas y colócales un poco de crema humectante, luego guarda las porciones de masa ya pintadas.
Step 2
Place the flexible dough on the surface and with the help of the pottery clay cutter cut six portions, (it does not matter that they are not the same size) in this case the portion will depend on which color you will use more. Then, with your finger, take a little paint of the colors with which you will work and place it on the dough. Then knead it until the color is uniform. Have some plastic bags on hand and put a little moisturizing cream on them, then save the portions of dough already painted.

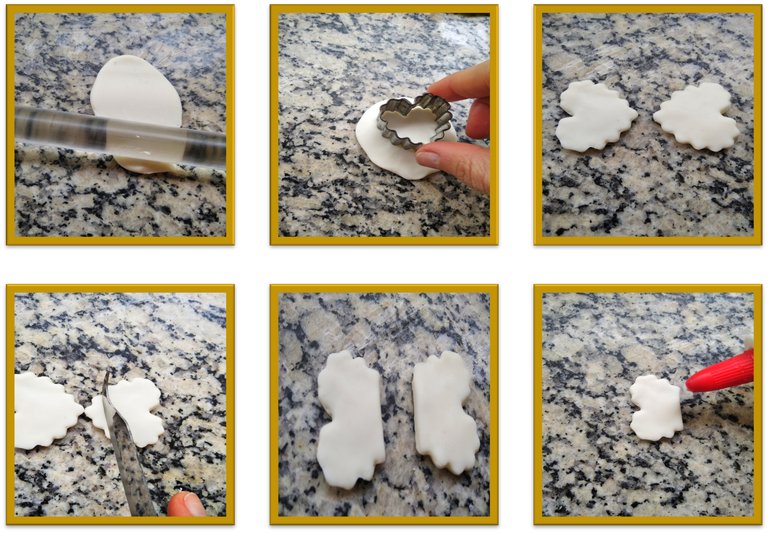
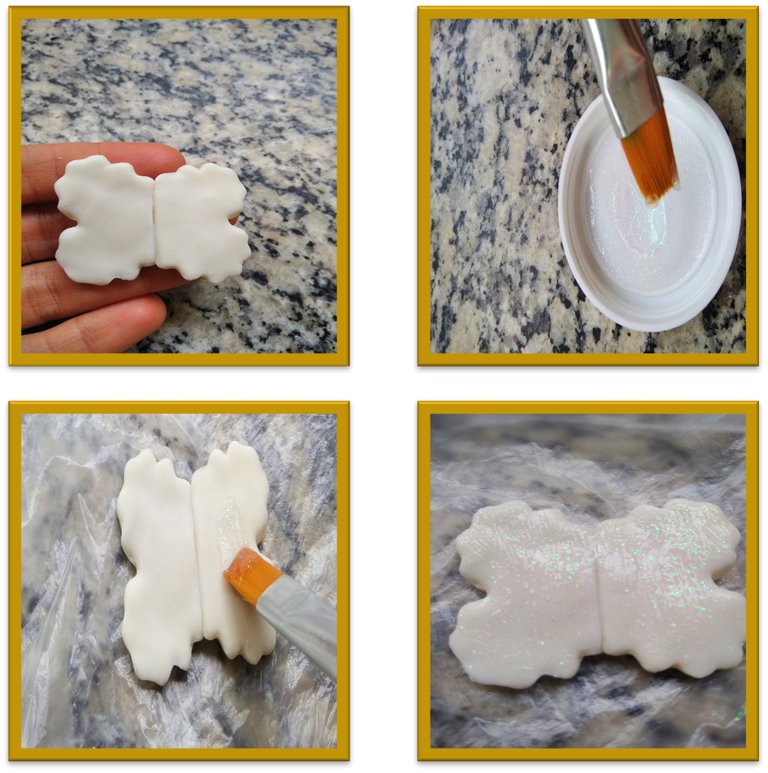
Paso 3
Para hacer las alas del ángel, toma la masa de color blanco y colócala sobre la superficie, con la ayuda del rodillo extiéndela. Una vez extendida, coloca el cortador en forma de corazón sobre la masa para así cortar dos corazones. Toma la esteca de cuchilla y corta las puntas de los mismos. Posteriormente, pega los dos corazones con la pega blanca. Por último, aplícale con el pincel una capa de gel escarchado.
Step 3
To make the wings of the angel, take the white dough and place it on the surface, with the help of the rolling pin, spread it out. Once extended, place the heart cutter on the dough to cut two hearts. Take the knife stick and cut off the ends of them. Subsequently, paste the two hearts with the white glue. Finally, apply a layer of frosted gel with the brush.
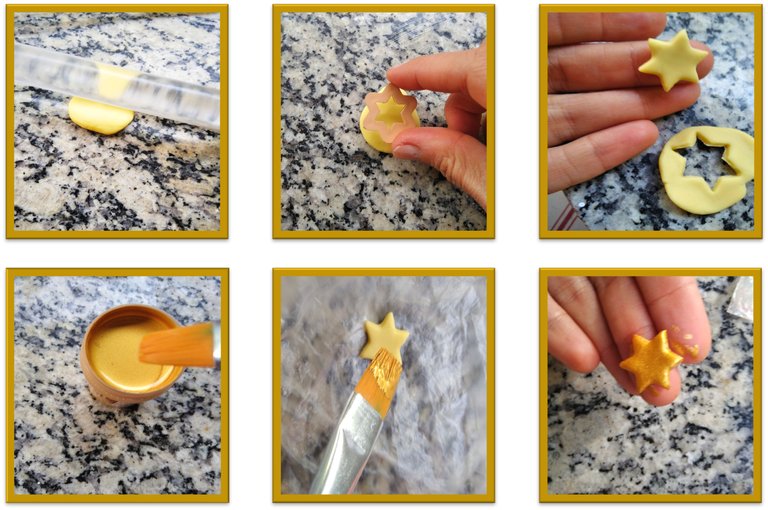
Paso 4
En este paso haz lo mismo que el paso anterior, pero con el color amarillo. Toma la masa de color amarillo colócala sobre la superficie y con la ayuda del rodillo extiéndela. Una vez extendida, coloca el cortador en forma de estrella sobre la masa para así obtener la misma. Luego, píntala con el color dorado.
Step 4
In this step do the same as the previous step, but with the color yellow. Take the yellow dough, place it on the surface and with the help of the rolling pin, spread it out. Once extended, place the star-shaped cutter on the dough to obtain it. Then paint it with the gold color.
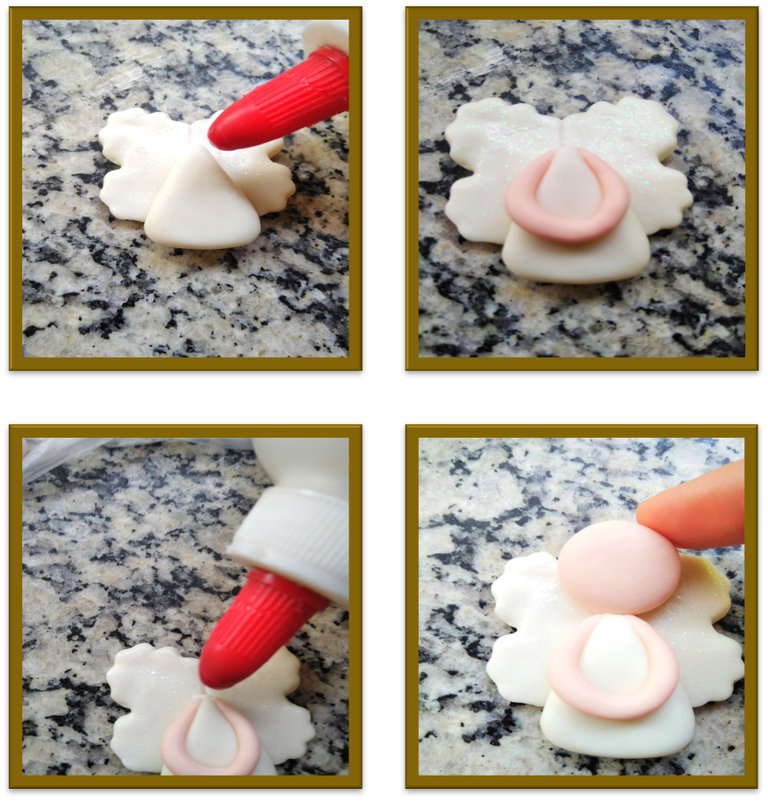
Paso 5
Para hacer el cuerpo del ángel. Toma la masa de color blanco y haz una bolita. Luego, ve modelando un triángulo. Ahora, pon un poco de pega en el centro de las alas y coloca el triángulo dejando un espacio para colocar la cabeza del ángel.
Step 5
To make the body of the angel. Take the white dough and make a ball. Then go modeling a triangle. Now, put some glue in the center of the wings and place the triangle leaving a space to place the angel's head.

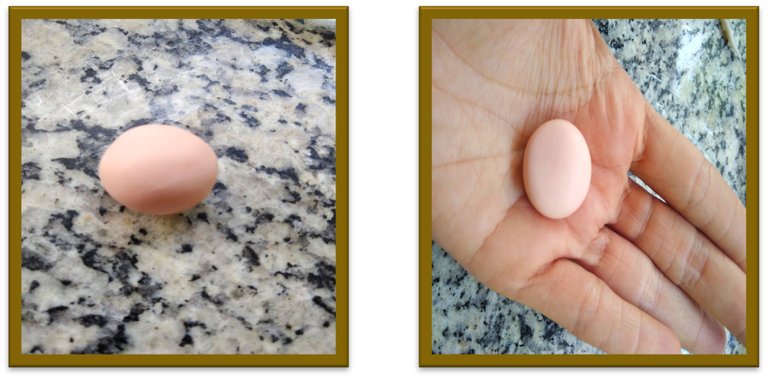
Paso 6
Para hacer la cabeza del ángel, toma un poco de masa color piel y forma una bolita. Luego con la palma de tu mano aplánala un poco.
Step 6
To make the angel's head, take some skin-colored dough and roll it into a ball. Then with the palm of your hand flatten it a bit.
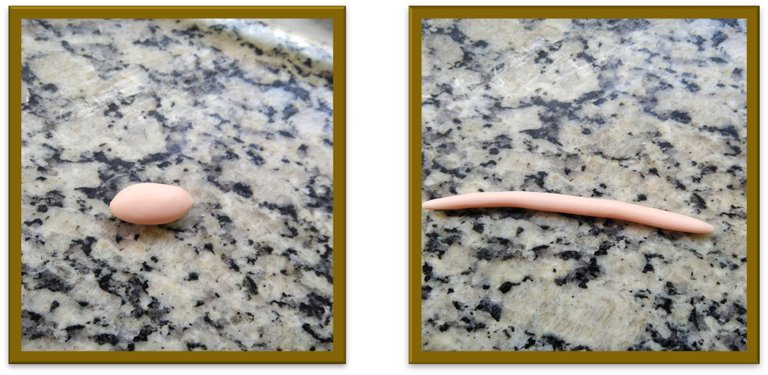
Paso 7
Para realizar los brazos, con la masa color piel, forma con tus manos una especie de cilindro delgado. Luego, pon un poco de pega a los lados de la parte de arriba del triángulo y coloca lo que serían los brazos del ángel. Una vez tengas los brazos pegados, es el momento de colocar la cabeza, realiza el mismo procedimiento colocando pega en la punta del triángulo y pega la cabeza.
Step 7
To make the arms, with the skin-colored dough, form a kind of thin cylinder with your hands. Then, put some glue on the sides of the top of the triangle and place what would be the arms of the angel. Once you have the arms glued, it is time to place the head, carry out the same procedure by placing glue on the tip of the triangle and glue the head.
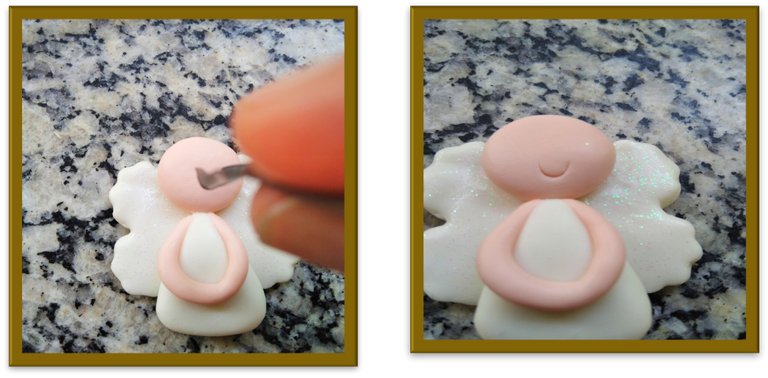
Paso 8
Para hacer la sonrisa, toma el marcador de sonrisa y colócalo sobre la masa.
Step 8
To make the smile, take the smile marker and place it on top of the dough.
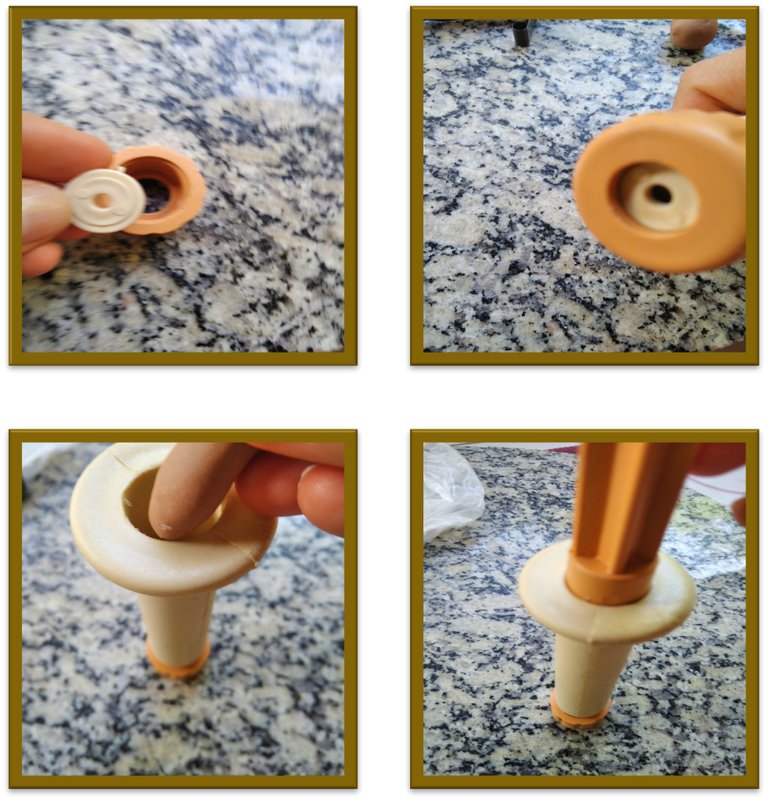
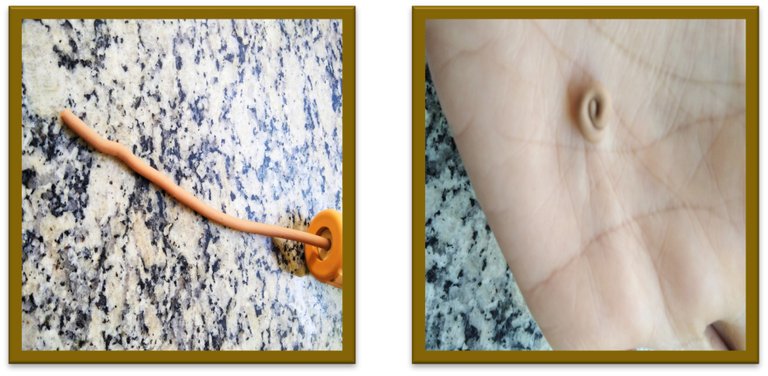
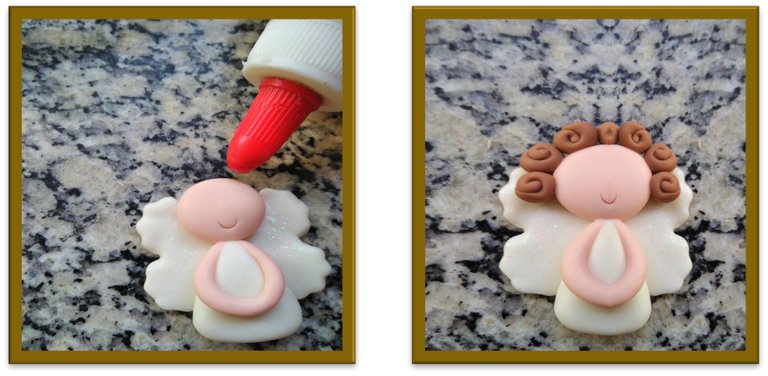
Paso 9
Para realizar el cabello. Toma la masa color marrón y colócala dentro de la gruya la cual tiene un disco con forma de círculo, luego presiona. Corta pequeñas porciones de la masa y luego ve enrollándolas como especie de un espiral. Posteriormente, pégalas alrededor de la cabeza.
Step 9
To make the hair. Take the brown dough and place it inside the crane which has a circular disk, then press. Cut small portions of the dough and then roll them up like a spiral. Then glue them around the head.
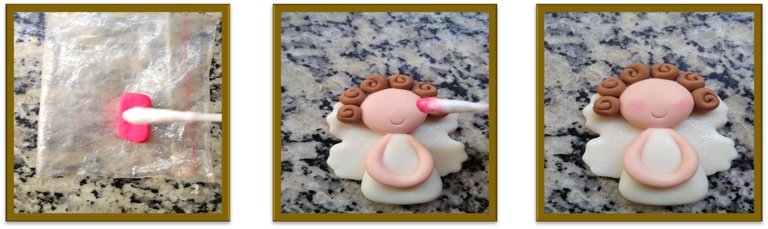
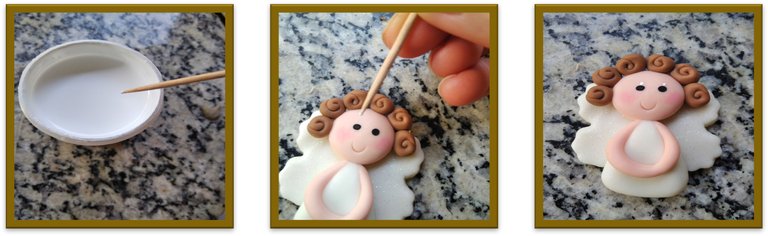
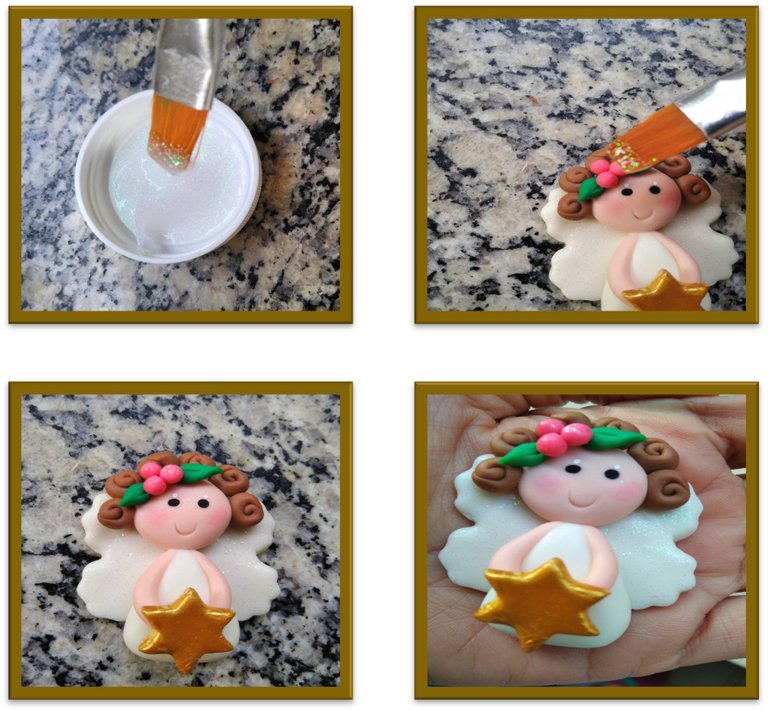
Paso 10
Para pintar las mejillas del ángel. Toma el hisopo y pásalo por encima de la tiza. Luego, pinta las mejillas suavemente.
Step 10
To paint the cheeks of the angel. Take the cotton bud and run it over the chalk. Then, lightly paint the cheeks.
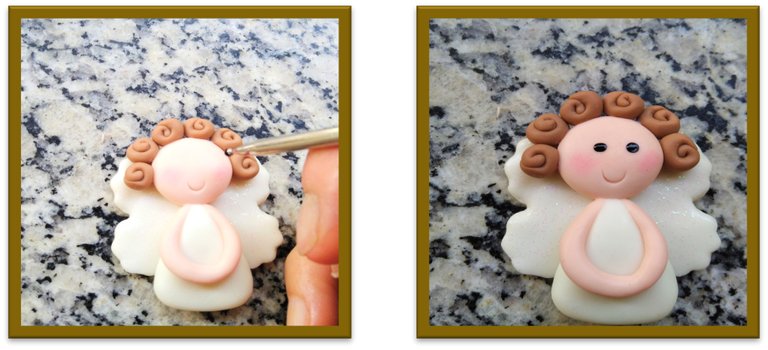
Paso 11
Para pintar los ojos del ángel. Toma el bolillo metálico y sumérgelo dentro de la pintura color negro. Luego, pinta los ojos. Una vez la pintura haya secado, ahora pinta con el palillo un puntito blanco sobre los ojos para darle iluminación.
Step 11
To paint the angel's eyes. Take the metal bobbin and dip it into the black paint. Then paint the eyes. Once the paint has dried, now paint a small white dot over the eyes with the toothpick to give it lighting.
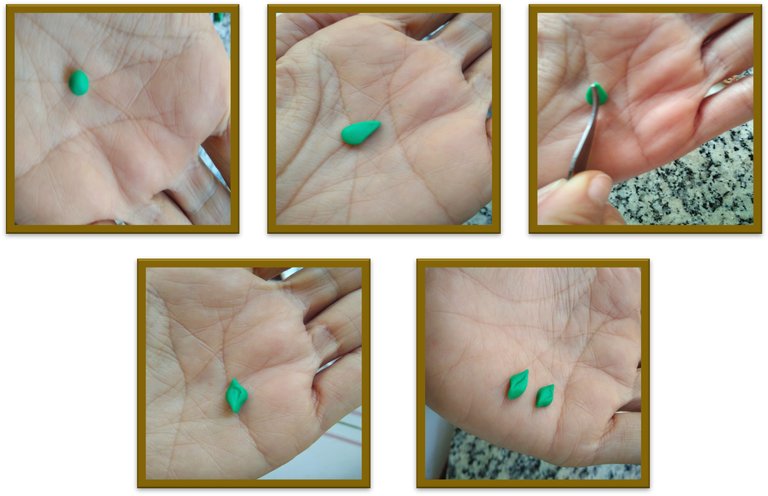
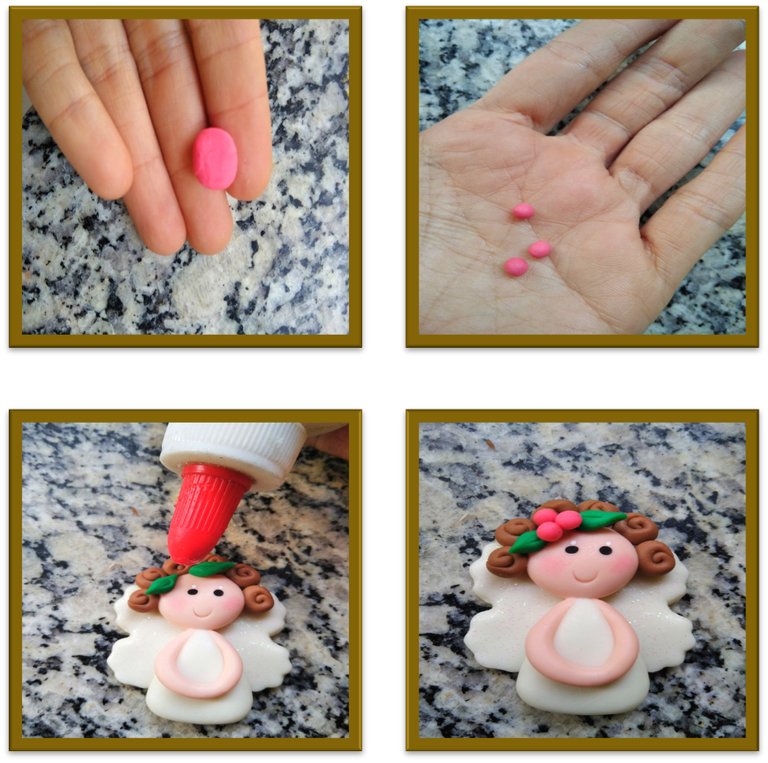
Paso 12
Para hacer el adorno de la cabeza. Toma un poco de masa color verde y forma dos hojitas. Luego, corta un poco el centro de las mismas con la esteca de cuchilla. Forma tres bolitas de masa color rojo. Ahora, pega las hojitas y las tres bolitas en el centro.
Step 12
To make the ornament of the head. Take a little green dough and form two leaves. Then, cut a little the center of them with the pottery clay cutter. Form three balls of red dough. Now, stick the leaves and the three balls in the center.
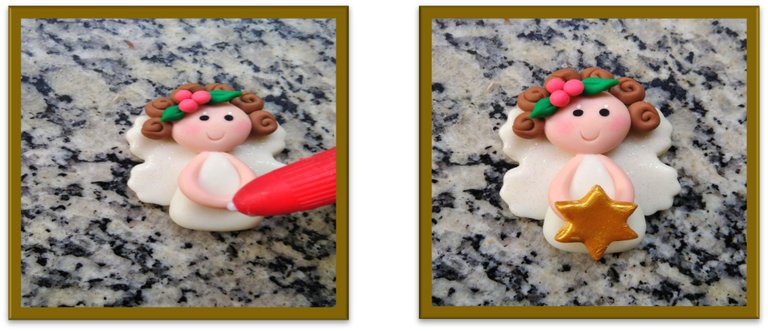
Paso 13
Toma la estrella y pégala sobre la mano del ángel.
Step 13
Take the star and stick it on the angel's hand.
Paso 14
Aplica gel brillante sobre las bolitas del adorno de la cabeza. Una vez esté listo el ángel, espera a que se seque por completo.
Step 14
Apply glitter gel to the beads of the headpiece. Once the angel is ready, wait for it to dry completely.
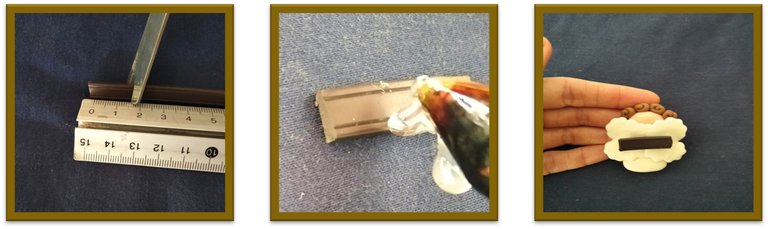
Paso 15
Cuando esté seca la figura. Corta 1,5 de imán y luego, pégalo a la parte de atrás del ángel.
Step 15
When the figure is dry. Cut 1,5 of the magnet, then glue it to the back of the angel.
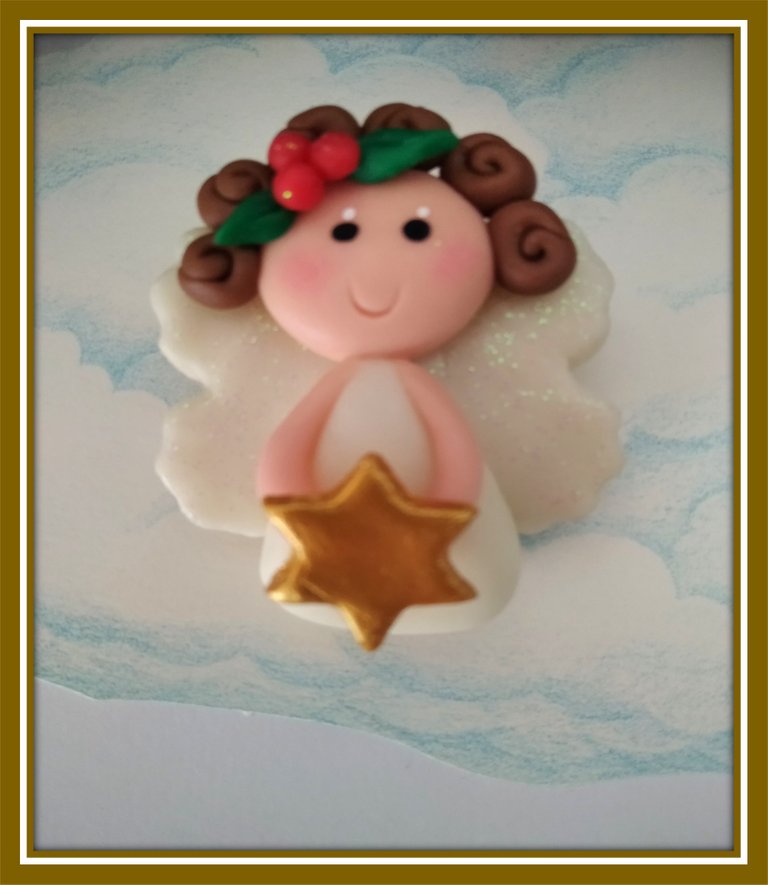
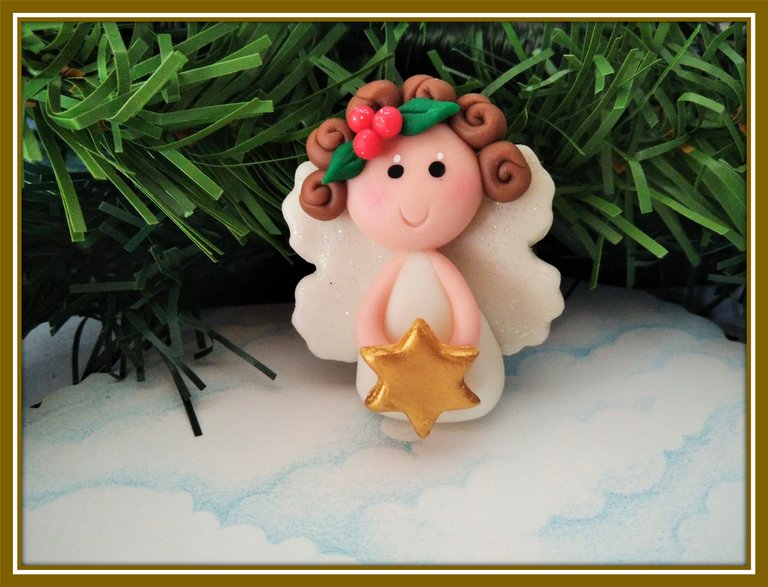
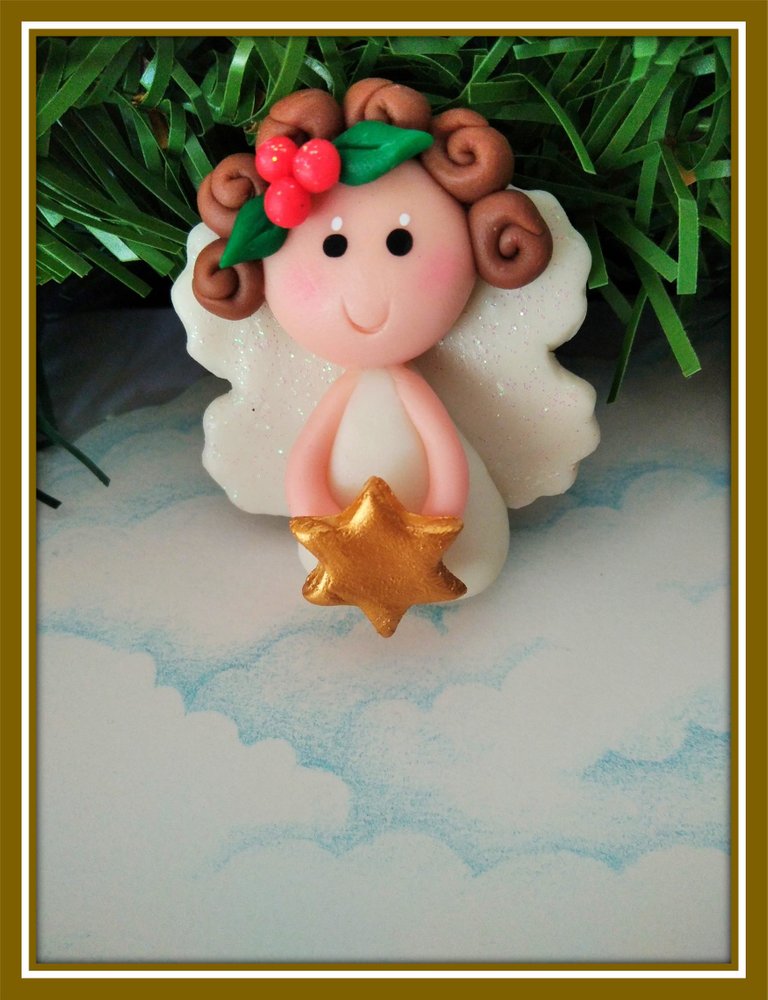
El resultado final es una figura de ángel muy bonita; los colores blanco, rojo, verde y dorado que identifican a la navidad hacen que la figura resalte. Tienes la opción de utilizar esta figura para muchas manualidades, puedes utilizarla como aplique para decorar cajas, bolsitas de regalo, prendedores, entre otros. Espero les haya gustado este paso a paso y se animen a crear hermosas figuras. ¡Hasta una próxima oportunidad!
The end result is a very pretty angel figure; The white, red, green and gold colors that identify Christmas make the figure stand out. You have the option of using this figure for many crafts, you can use it as an applique to decorate boxes, gift bags, pins, among others. I hope you liked this step by step and are encouraged to create beautiful figures. See you soon!
Las fotografías fueron tomadas por mi con mi teléfono celular Redmi Note 8.
The photos were taken by me with my Redmi Note 8 cell phone.

Que ternura de angelito, te quedó hermoso, admiro tu paciencia para trabajar con detalles tan pequeño, genial amiga . Gracias por compartir
Hola @yusma21. Muchas gracias por visitar mi publicación, me alegra saber que te gustó mi trabajo. Como dices tu hay que tener paciencia para realizar detalles muy pequeños, pero cuando ves el resultado final te llenas de satisfacción. Que pases un feliz día.
Hola @ysamaraynordaz pasaba por aquí y me encanto tu ángel, es un trabajo precioso, felicitaciones.
Hola @jessiencasa. Muchas gracias por tu mensaje, me alegra saber que te gustó mi trabajo. Saludos.
Congratulations @ysamarynordaz! You have completed the following achievement on the Hive blockchain and have been rewarded with new badge(s):
Your next target is to reach 1000 upvotes.
You can view your badges on your board and compare yourself to others in the Ranking
If you no longer want to receive notifications, reply to this comment with the word
STOPSupport the HiveBuzz project. Vote for our proposal!
Pero que hermoso, esto seguro dura años y años en nuestra nevera, lograr un acabado tan perfecto como ese no debe ser nada simple.
Hola @jennyzer. Muchas gracias por tu mensaje. Tienes razón las figuras hechas con masa flexible duran muchos años. Para hacer estas figuras solo hay que tener un poco de paciencia y dedicación pero es un arte muy bonito. En mi caso me gusta mucho trabajar con este material ya que se pueden realizar muchas manualidades. Te envío un gran abrazo.