¡Hola comunidad de Hive!
Hello Hive community!
Hola amigos creativos de hive blog, espero estén de maravilla, estoy muy, muy emocionada por qué ya tengo mi rol asignado en esta maravillosa comunidad, y es que las reglas se han modificado y este es uno de los requisitos para poder participar en concursos y demás actividades, así que si aún no tiene tu rol puedes solicitarlo en el Discord de la comunidad de Hive DIY.
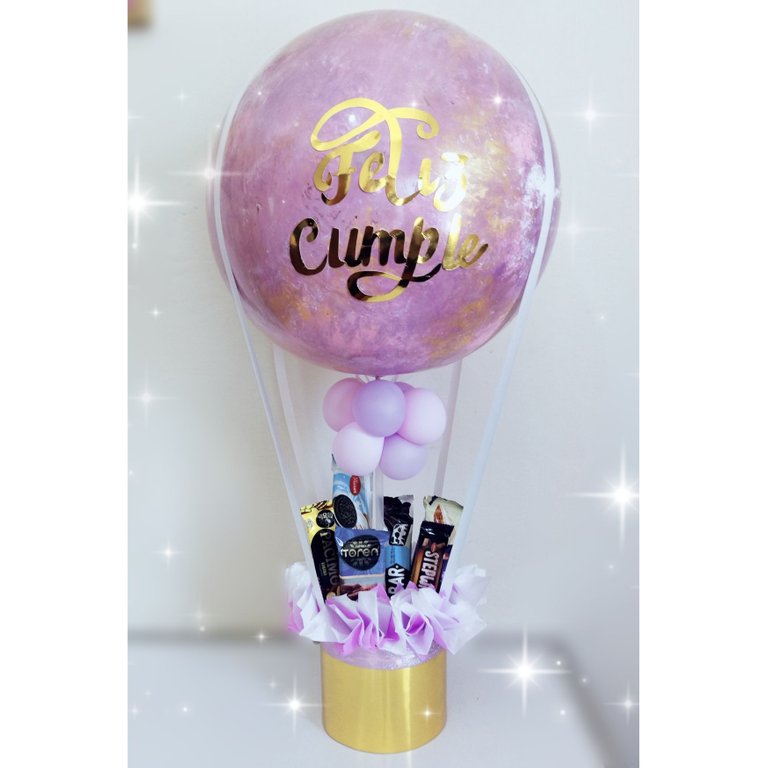
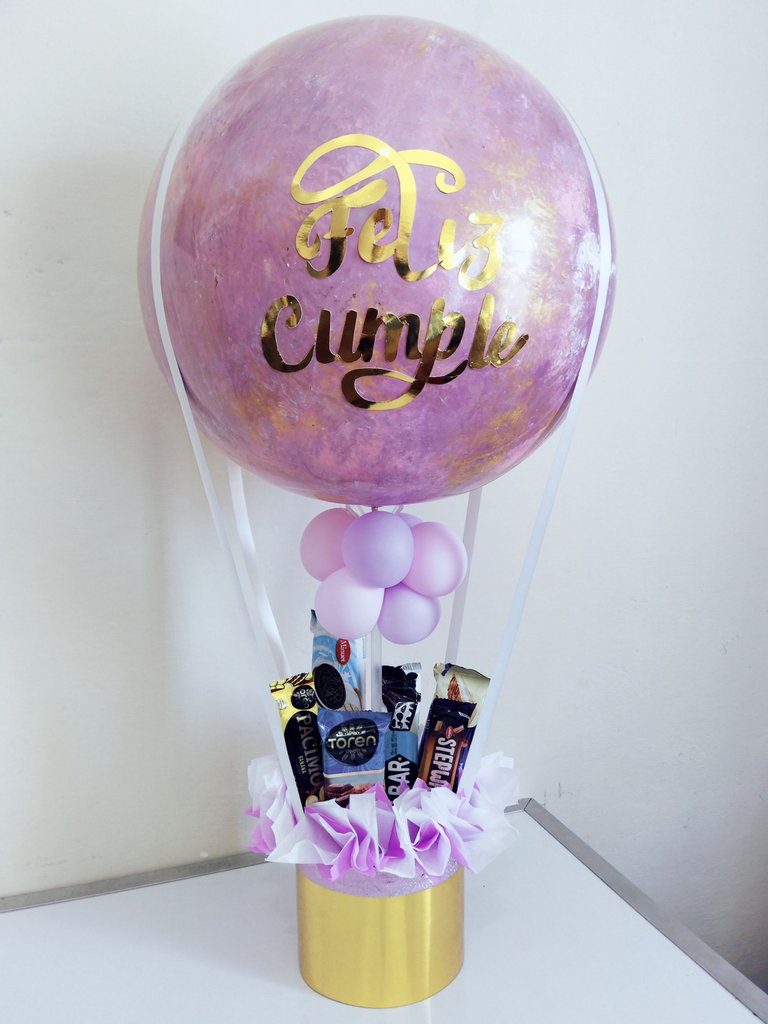
Por otra parte también esto emocionada como elaboré este hermosísimo arreglo de dulces inspirado o con temática de globo aerostático, les cuento que este fué un encargo muy especial de mi mejor amiga Eucarys para su mamá, ella se encuentra en Perú y quería sorprender en su cumpleaños con un lindo obsequio en un día tan especial, yo me siento tan feliz y honrada de que mi amiga me haya hecho cómplice de esta linda sorpresa.
Hello creative friends of hive blog, I hope you are wonderful, I am very, very excited because I already have my role assigned in this wonderful community, and is that the rules have been modified and this is one of the requirements to participate in contests and other activities, so if you still do not have your role you can request it on the Discord of the Hive DIY community.
On the other hand I am also excited about how I made this beautiful candy arrangement inspired or with a hot air balloon theme, I tell you that this was a very special order from my best friend Eucarys for her mom, she is in Peru and wanted to surprise on her birthday with a nice gift on such a special day, I feel so happy and honored that my friend has made me an accomplice of this nice surprise.

Aquí están la señora Yuvanna(mamá de Eucarys) muy feliz con su arreglo obsequio.| Here is Mrs. Yuvanna (Eucarys' mom) very happy with her gift arrangement.
Necesitaremos || We will need
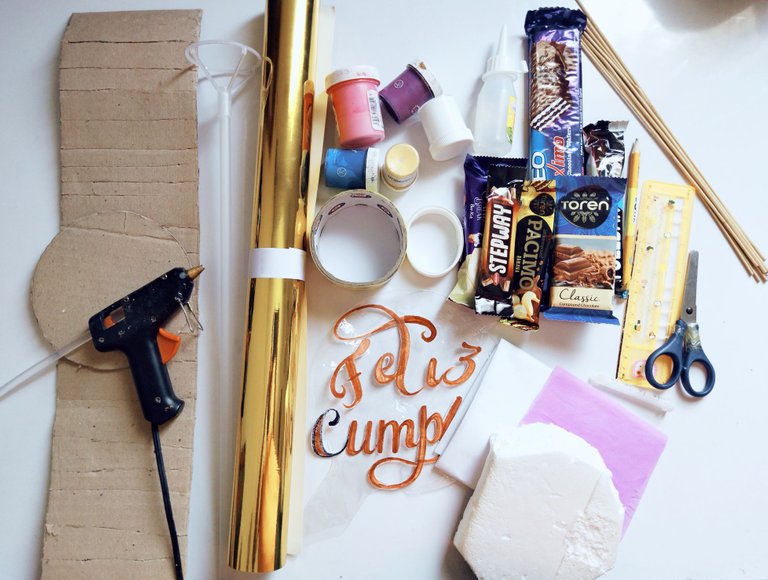
- Cartulina metalizada dorada
- Cartón
- Palillo para globo grande
- Tijera
- Lápiz
- Palillos de altura
- Silicón en barra
- Papel de seda blanco
- Papel crepé lila
- Cinta adhesiva
- Cinta plástica rosada y blanca
- Globo burbuja de 18"
- Chuchería o dulces
- Globos de fiesta, rosado y morado
- Anime
- Jeringa (solo el tubo)
- Pintura al frío morada, rosada, dorada y blanca.
- Molde de letras (feliz cumple)
- Gold metallized cardboard
- Cardboard
- Big balloon stick
- Scissors
- Pencil
- Height sticks
- Silicone stick
- White tissue paper
- Lilac crepe paper
- Adhesive tape
- Pink and white plastic tape
- 18" bubble balloon
- Candy or candy
- Pink and purple party balloons
- Anime
- Syringe (tube only)
- Cold paint purple, pink, gold and white.
- Letter mold (happy birthday)
Paso 1 || Step 1
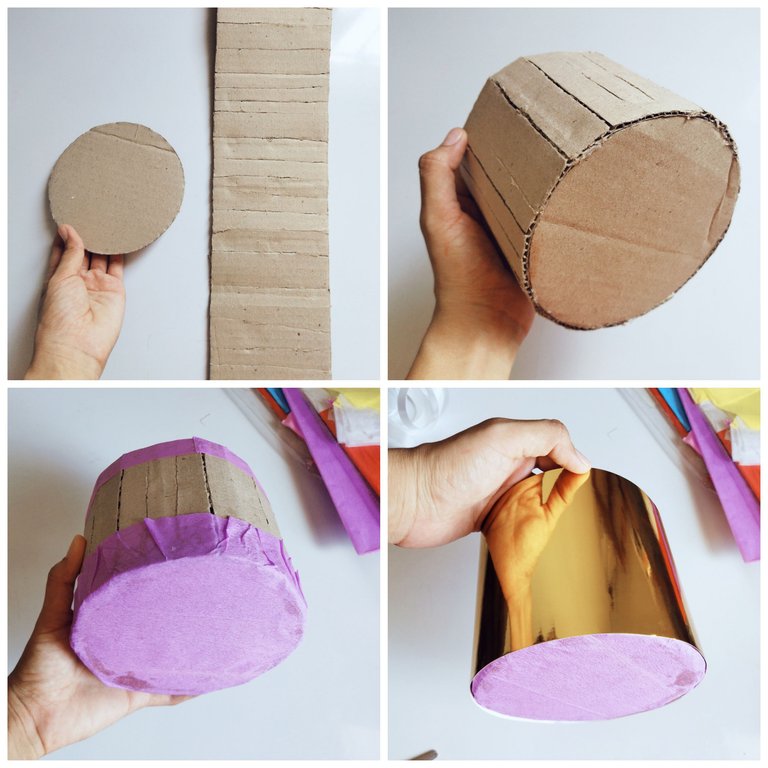
El primer paso a realizar este lindo arreglo es armar el cilindro que será la base de arreglo, en este caso utilicé cartón reciclado, luego corté un círculo en cartón y una tira de 12 de alto y lo suficientemente larga para cubrir todo el círculo. En el borde del cilindro pegué papel crepé lila al igual en la la parte de abajo, luego forré el cilindro con cartulina dorada.
The first step to make this beautiful arrangement is to assemble the cylinder that will be the base of the arrangement, in this case I used recycled cardboard, then I cut a circle in cardboard and a strip of 12 high and long enough to cover the entire circle. On the edge of the cylinder I glued lilac crepe paper as well as on the bottom, then I lined the cylinder with gold cardboard.
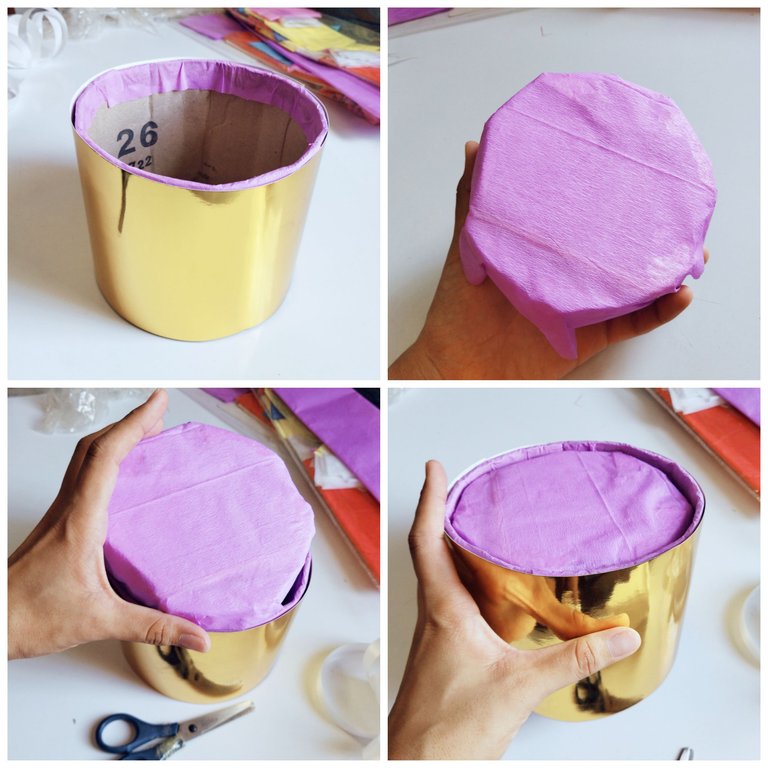
Luego de tener el cilindro listo y forrado, prosedí a corta un círculo de anime que cupiera en el cilindro pero que quedará ajustado (esto es muy importante pues si el anime queda muy pequeño se va a hundir cuando le coloquemos las demás cosas), este círculo de anime lo forré antes de meterlo al cilindro y quedaría como te muestro en la imagen 👆👆👆
After having the cylinder ready and lined, I proceeded to cut a circle of anime that will fit in the cylinder but will be tight (this is very important because if the anime is too small it will sink when we place the other things), this circle of anime I lined it before putting it into the cylinder and it would look like I show you in the image 👆👆👆👆👆
Paso 2 || Step 2
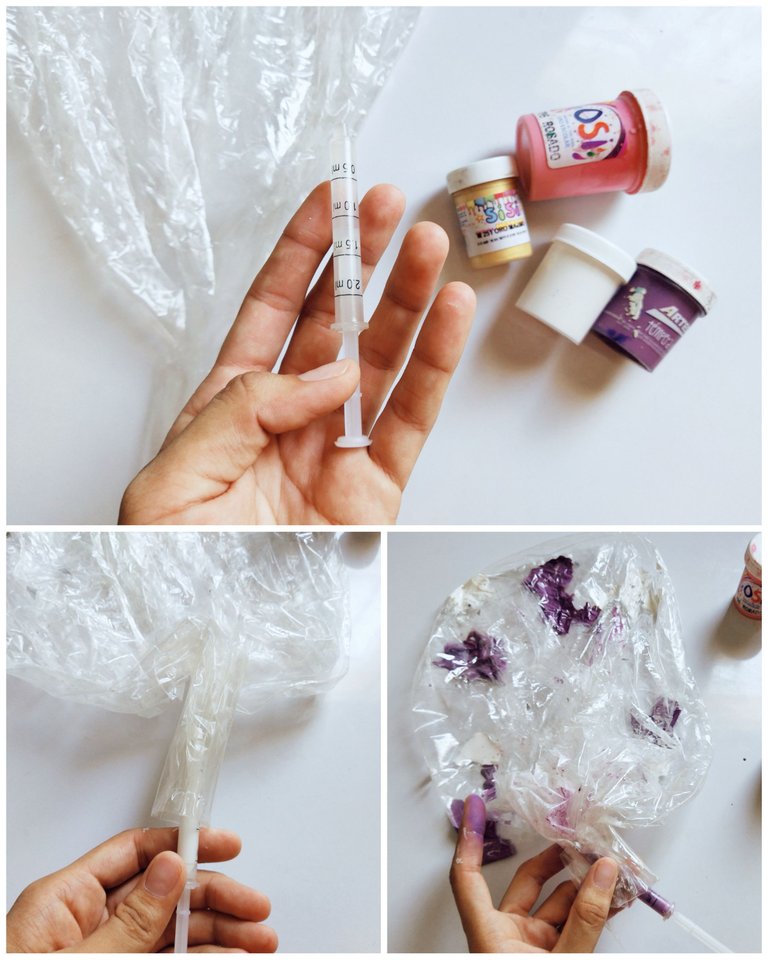
Ahora vamos con la parte más divertida de este tutorial, con el globo burbuja previamente estirado (debemos inflar con una máquina o bomba para poder estirarlo) con la jeringa tomamos pintura y comenzamos a introducirla en el globo, comencé con los colores más claros.
Now let's go with the most fun part of this tutorial, with the bubble balloon previously stretched (we must inflate it with a machine or pump to stretch it) with the syringe we take paint and begin to introduce it into the balloon, I started with the lighter colors.
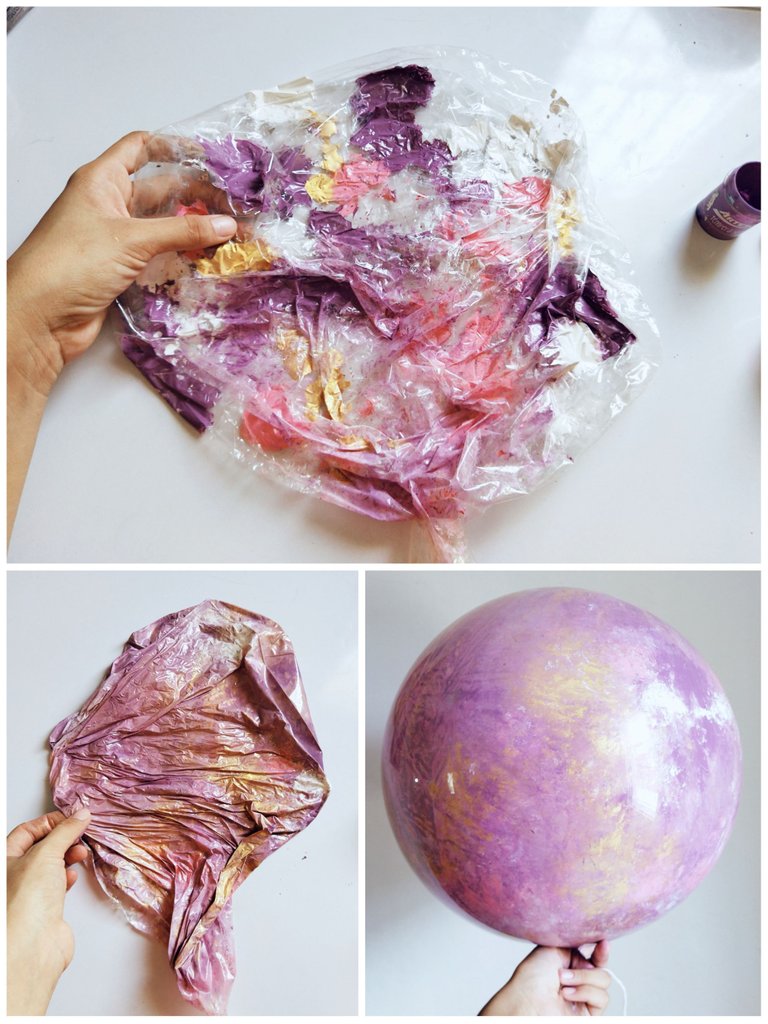
Luego de haber colocado todo los colores en distintos puntos del globo vamos a aplastar para juntar un poco los colores y tratar de cubrir todos los lados del globo, luego Aún teniendo la pintura fresca inflamos el globo y amarramos el pico con un hilo fuerte.
After having placed all the colors in different points of the balloon we are going to squash to join a little the colors and try to cover all the sides of the balloon, then still having the fresh paint we inflate the balloon and tie the beak with a strong thread.
Paso 3 || Step 3
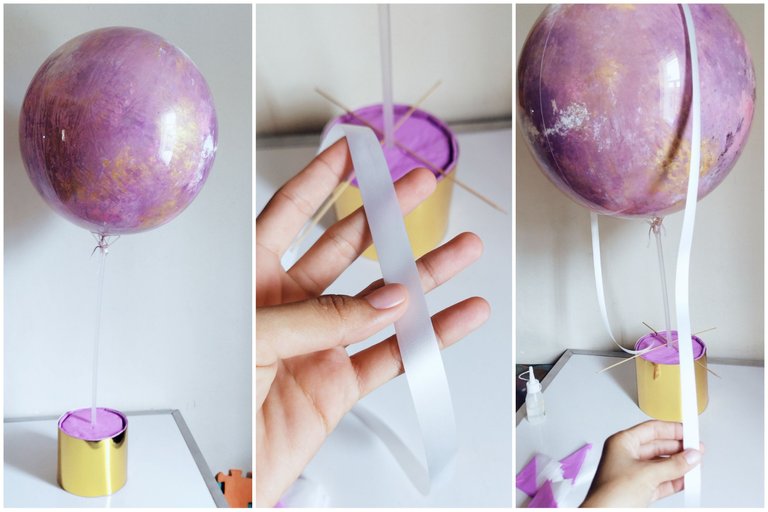

Coloqué el globo en el palo para globos, y lo ubiqué en el medio del cilindro, podemos colocarle silicón caliente para que no se mueva, ahora con la cinta blanca vamos hacer una x en el globo y tenemos que pasar de extremo. Extremo y pegar al cilindro como te muestro en la imagen 2 👆👆👆
I placed the balloon on the balloon stick, and placed it in the middle of the cylinder, we can put hot silicone so it does not move, now with the white ribbon we will make an x on the balloon and we have to pass from end. End and glue to the cylinder as I show you in the image 2 👆👆👆
Paso 4 || Step 4
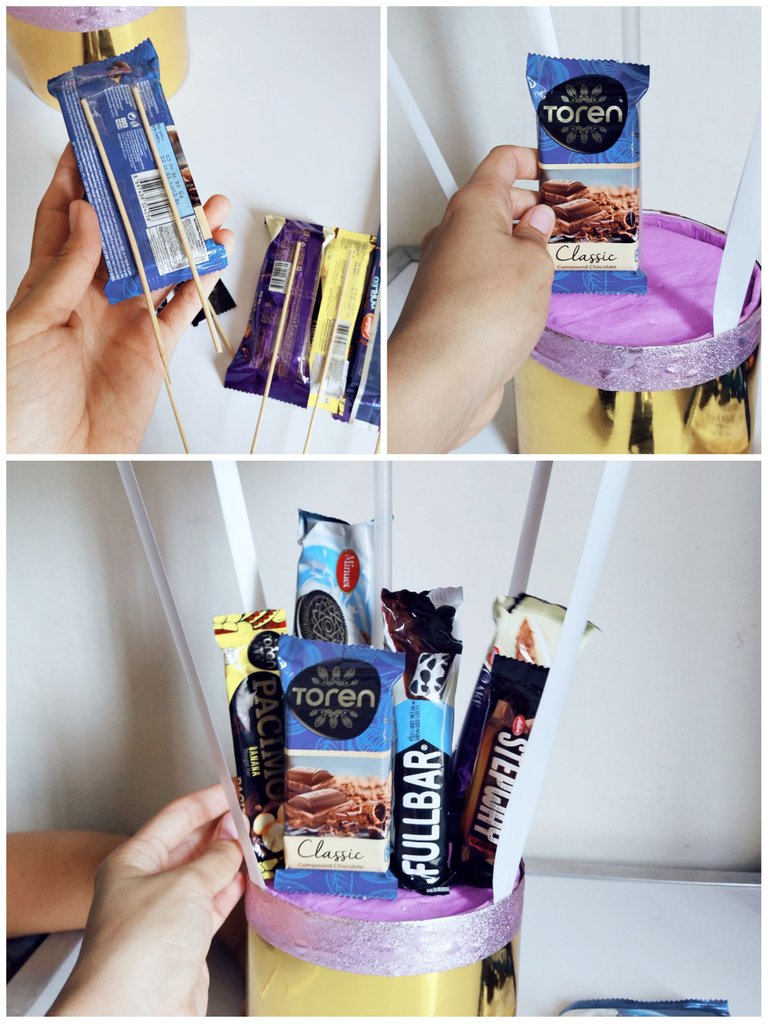
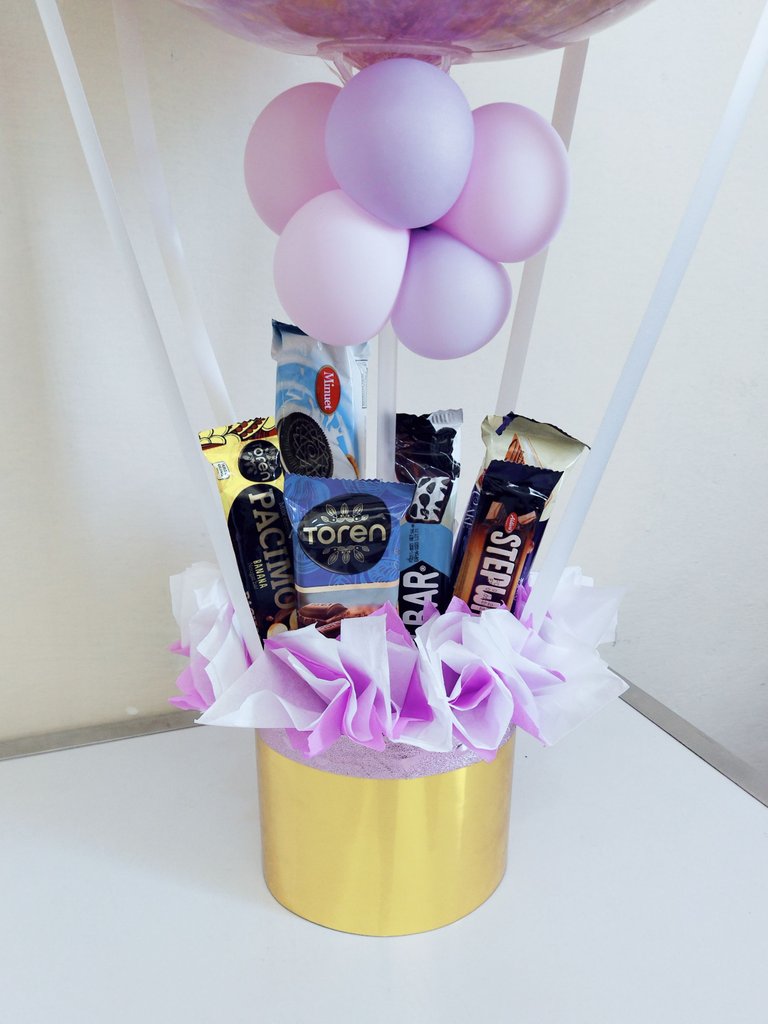
Ahora procedí a colocarle palitos de altura a los chucherías (esto es para que los dulces se puedan sostener), ubiqué los dulces equitativamente ubicando los más grandes en la parte de atrás y los más adelante, con los palillos es más fácil ubicar todo solo pinchamos el anime.
Now I proceeded to place sticks of height to the candy (this is so that the candy can be held), I placed the candy evenly placing the largest in the back and the most forward, with the sticks it is easier to place everything just prick the anime.
Paso 5 || Step 5
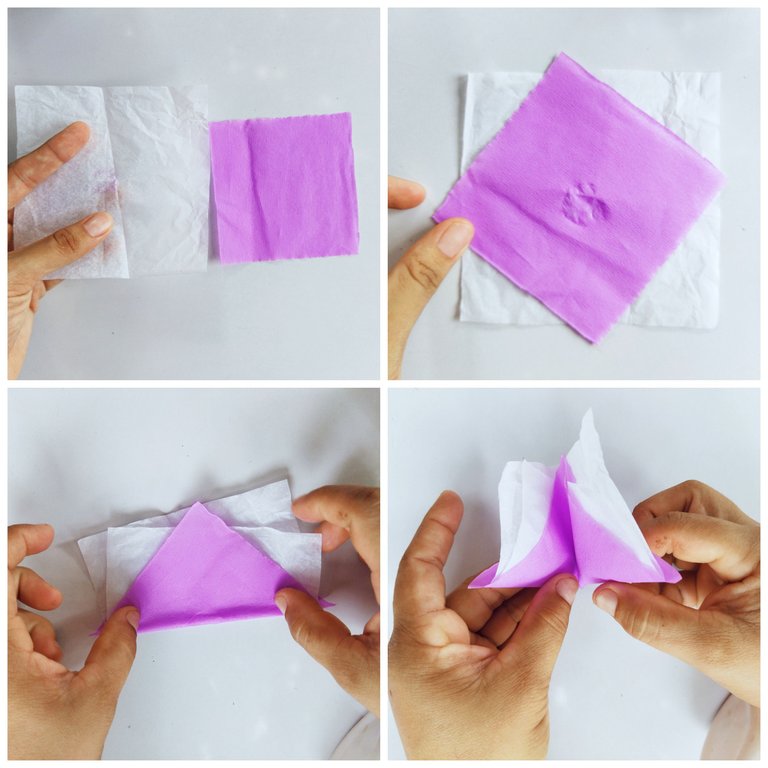
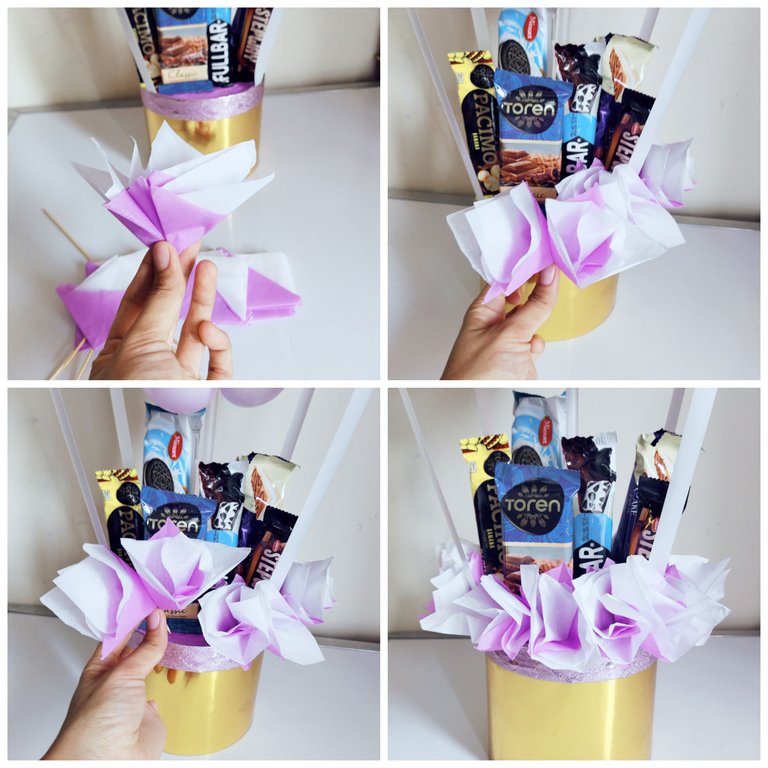
Continúe colocando detalles, para rellenar los espacios vacíos entre la chuchería hice unos conitos con el papel de seda, corté en cuadrados este papel, a este le pegamos cuadrados de papel crepé y doblamos dos veces hacia adentro, ahora los pegamos a un palillos de madera y hacemos varios igual. Y coloqué los conitos de papeles en el arreglo, en la imágen te muestro ☝️☝️☝️
I continued placing details, to fill the empty spaces between the baubles I made some little cones with tissue paper, I cut this paper into squares, to this we glued squares of crepe paper and folded them twice inwards, now we glued them to a wooden stick and made several of the same. And I placed the paper cones in the arrangement, in the image I show you ☝️☝️☝️☝️
Paso 6 || Step 6
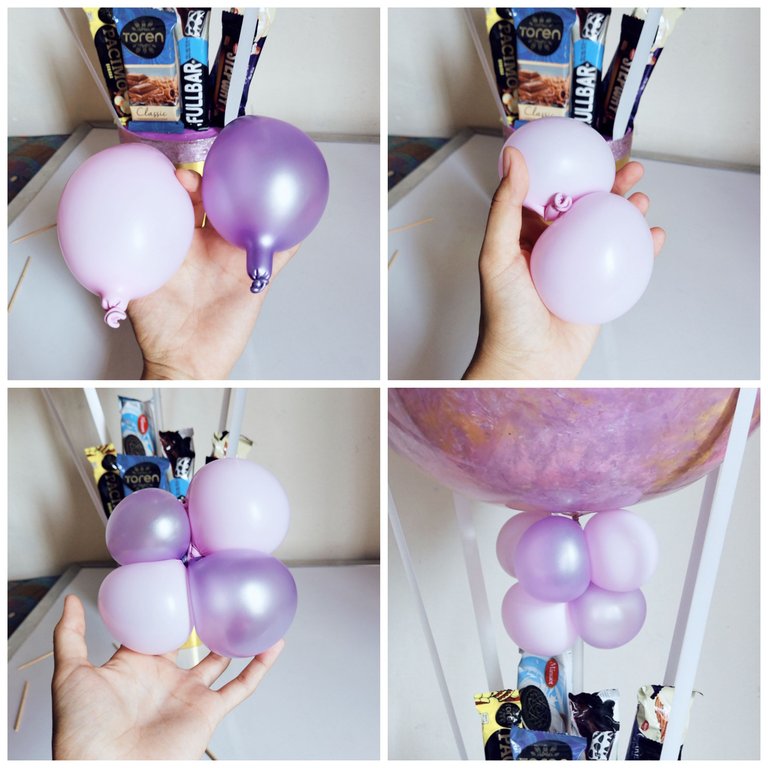
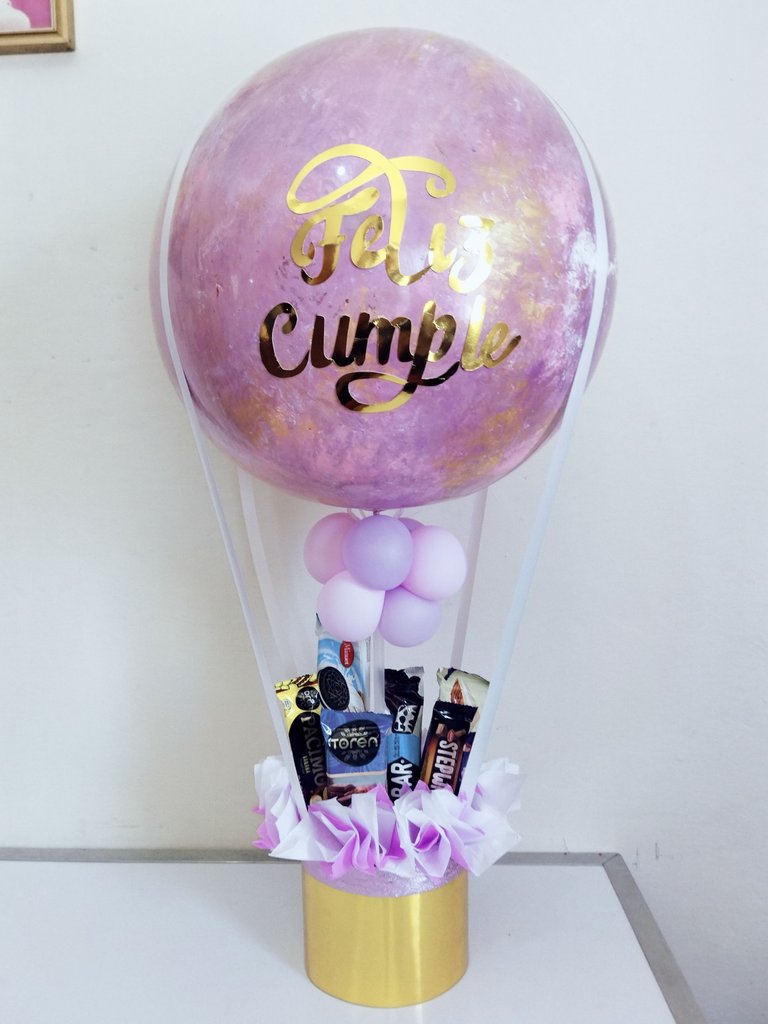
Cómo detalles finales hice un cuarteto de globos, tomé los globos y los inflamos del tamaño de la palma de mi mano, luego los dividí en dos y junte los globos dando vueltas entre ellos. Para colocarlos al palo del globo grande use un hilo resistente, lo pase entre los globos de esta manera no se verían.
As final details I made a quartet of balloons, I took the balloons and inflated them to the size of the palm of my hand, then I divided them in two and put the balloons together going around each other. To attach them to the stick of the big balloon I used a strong thread, I passed it between the balloons this way they would not be seen.
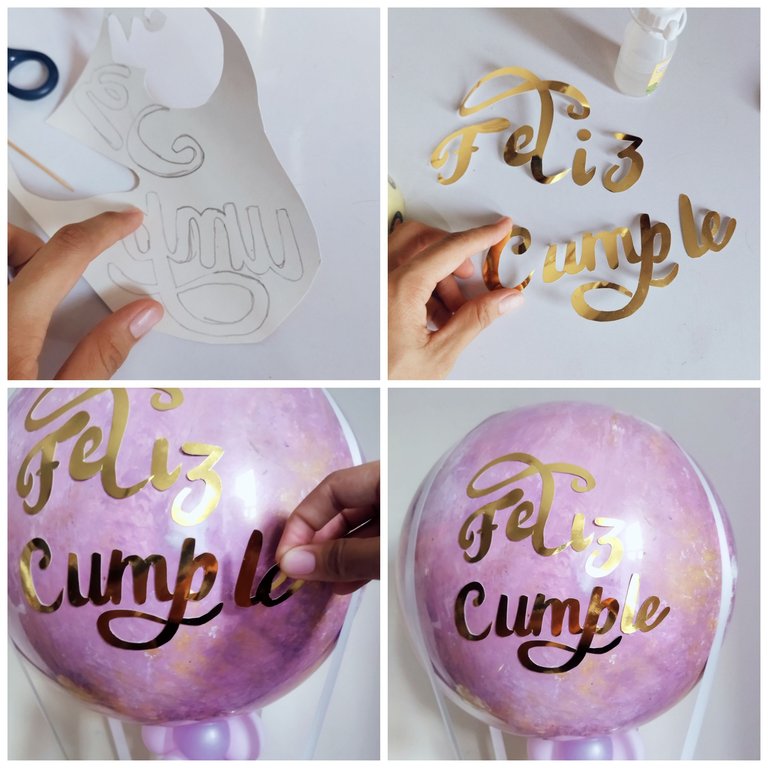
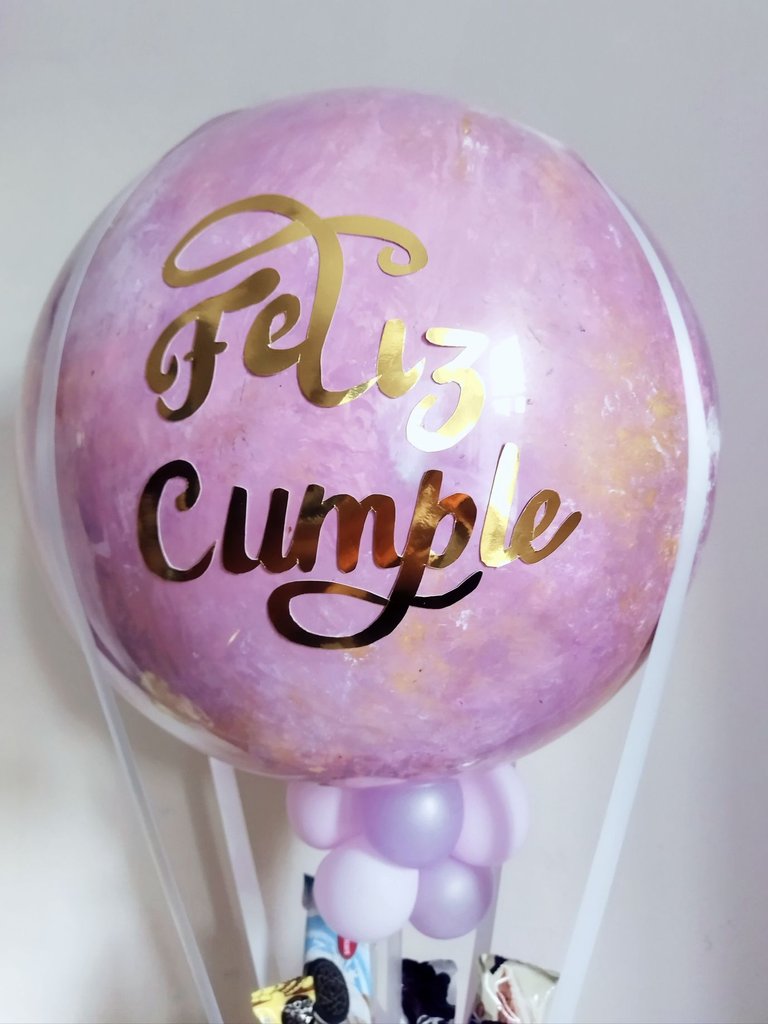
Por último pero no menos importante marqué las palabras "feliz cumple" en la cartulina dorada, las recorte con mucho cuidado y las peque en el medio del globo burbuja. En la imagen te muestro como queda. 👆👆👆
Last but not least I marked the words "happy birthday" on the gold cardboard, cut them out very carefully and stuck them in the middle of the bubble balloon. In the picture I show you how it looks like. 👆👆👆
Resultado final.
Final result.
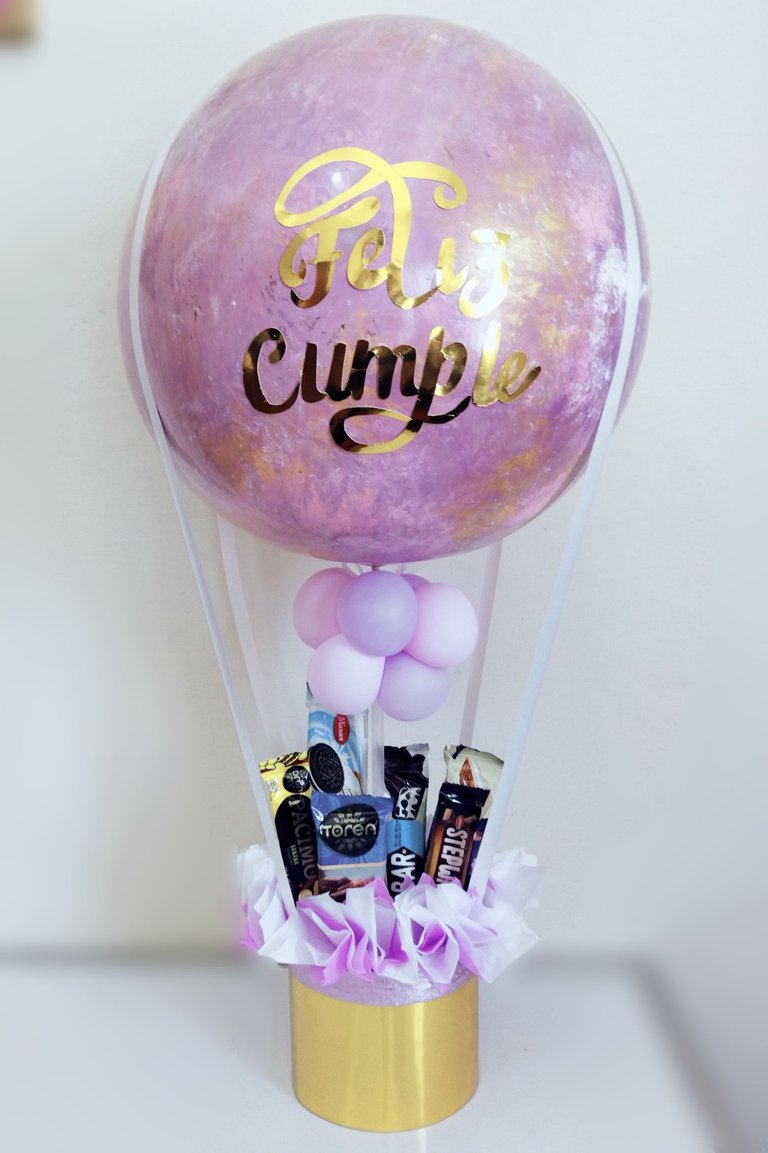
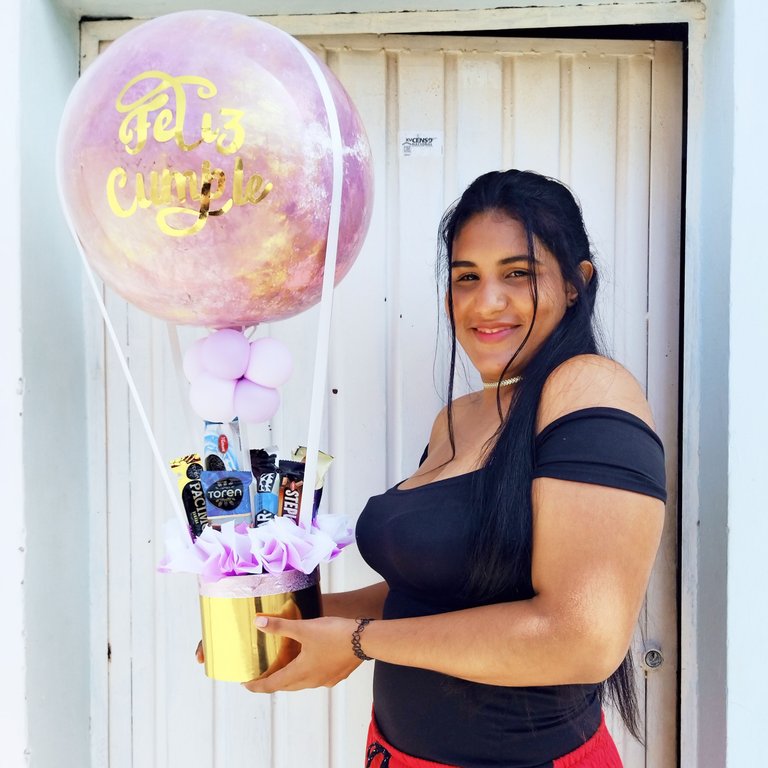
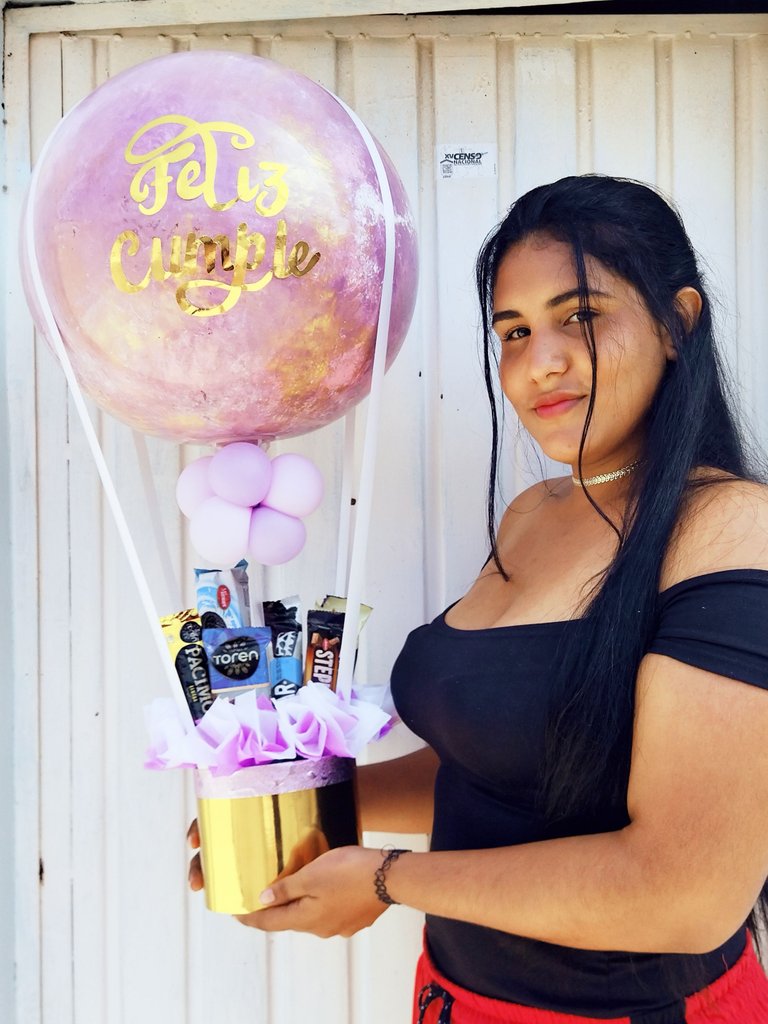
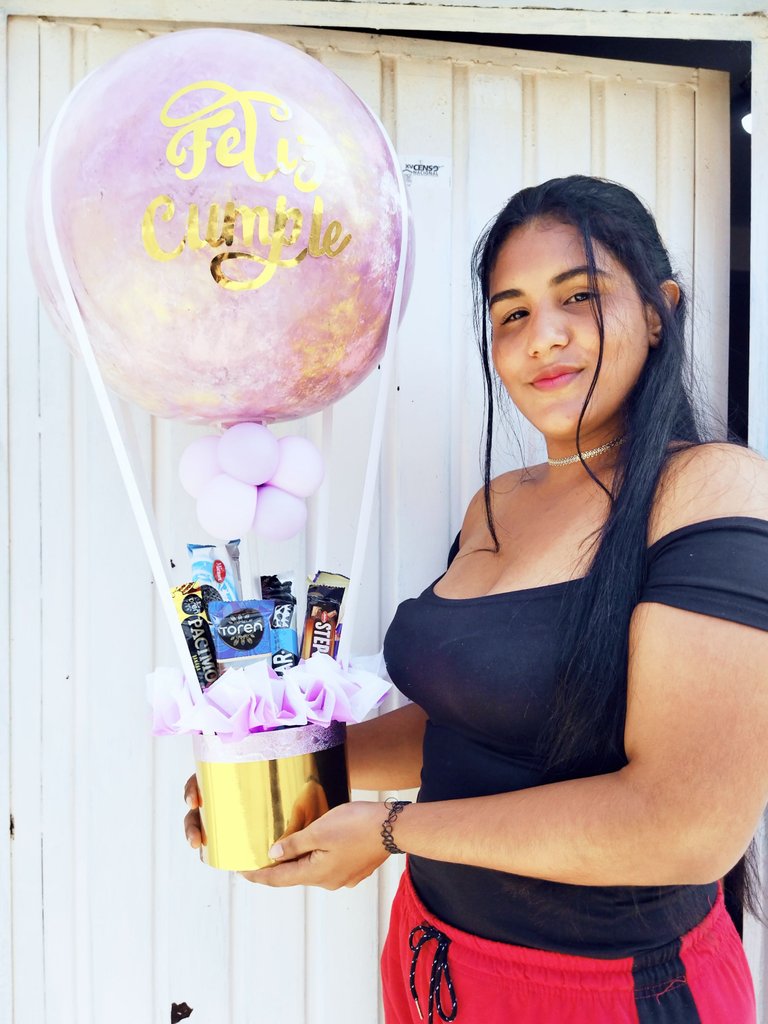
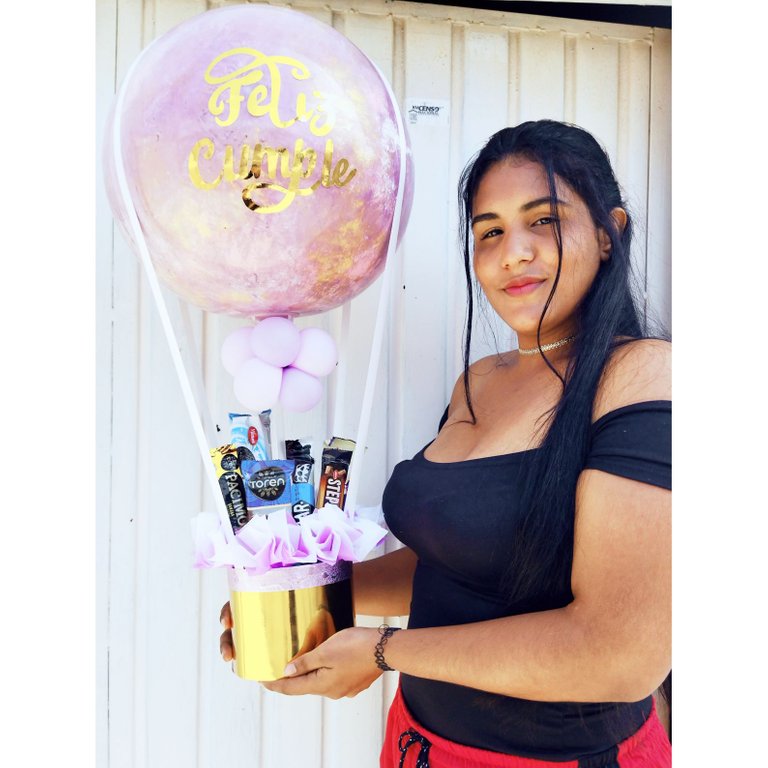
Éste fué el resultado final de este lindo arreglo de dulces inspirado en un globo aerostático, en las fotos finales está mi prima @celenadlr con el arreglo pues ella fue quien hizo el delivery, estoy muy orgullosa de poder hacer cosas tan lindas y lo más importante que le guste al cliente, espero que este tutorial les haya sido de provecho. Mil gracias por leer mi post ❤️😊 hasta pronto.
This was the final result of this cute candy arrangement inspired by a hot air balloon, in the final photos is my cousin @celenadlr with the arrangement because she was the one who made the delivery, I am very proud to be able to make such nice things and most importantly that the customer likes it, I hope this tutorial has been helpful. Thank you very much for reading my post ❤️😊 see you soon.
¡Que la creatividad los acompañe!
😘😘♥️😚🤩🤭🤗
May creativity be with you!
😘😘♥️😚🤩🤭🤗
All images are my property / Todas las imágenes son de mi propiedad
Camera: Xiaomi Redmi 9T.
Translation: Deepl.com
That's such a beautiful way to display a gift, I love it!
Es una manera tan hermosa de exhibir un regalo, ¡me encanta!
!LUV
@phoenixwren(1/1) gave you LUV. H-E tools | connect | community | <><
HiveBuzz.me NFT for Peace