
Fresh install
To become a witness without using MIRA, you'll require a server with at LEAST 64GB of RAM, 500GB disk (preferably SSD / NVMe), and a fast, reliable network.
If you do not have a server which meets these requirements, you can order one from Privex (you can even pay with HIVE/HBD!)
I personally use @privex for my own witness as a Top 20. While I am the CEO of Privex, there are many other customers, including witnesses who use our servers for their witness nodes, seed nodes, RPC nodes and/or other projects.
You're free to use any other server provider. I don't recommend trying to run a witness on your home internet, as it's likely not reliable enough for a witness.
Be aware that certain server providers have poor networks or hardware, which may cause missed blocks, so you may be hopping around a few until you can find one that's suitable for a witness node.
If you want to learn more about witnesses and what they do, check out my article: here
Shared memory note
Right now, the minimum RAM requirement for non-MIRA witnesses is 64GB due to shared memory.
This is because Hive stores information in a file called "shared_memory.bin" which is used similar to RAM. This file is around 58GB on HF23, and will continue to grow overtime.
As this file continues to grow, you will need to increase the amount of RAM in your server. So it is better to have some room.
Install hive-docker and dependencies
First, we install some basic dependencies (assuming you're on Ubuntu/Debian).
sudo apt update
sudo apt install git curl wget
Next, we install hive-docker (a line starting with a # is a comment, you don't need to paste them)
git clone https://github.com/someguy123/hive-docker.git
cd hive-docker
# If you don't already have a docker installation, this will install it for you
./run.sh install_docker
After the install_docker command has finished, it's recommended to log out and back in again (e.g. close your SSH client and re-connect) to ensure that the shell correctly detects docker.
Then, you can download and install the latest witness/seed docker image
# This downloads/updates the low-memory docker image for Hive
./run.sh install
If you are a witness, you need to adjust the configuration as needed e.g. witness name, private key, logging config, turn off p2p-endpoint etc.
If you're running a seed, then don't worry about the config, it will just work and you can skip the signing key/config section
Generating a signing key
For witnesses, you'll need to generate a signing key first. You can use the remote wallet for this.
Open the wallet using a public server with the following command:
./run.sh remote_wallet
Note: you may receive an error such as "timeout" or "invalid http status". This is normal, it's usually due to a server in the Privex load balancer having temporary problems.
Just run the command again a few times until it connects (you'll see new>>> or locked>>>)
Create a key pair for your witness.
suggest_brain_key
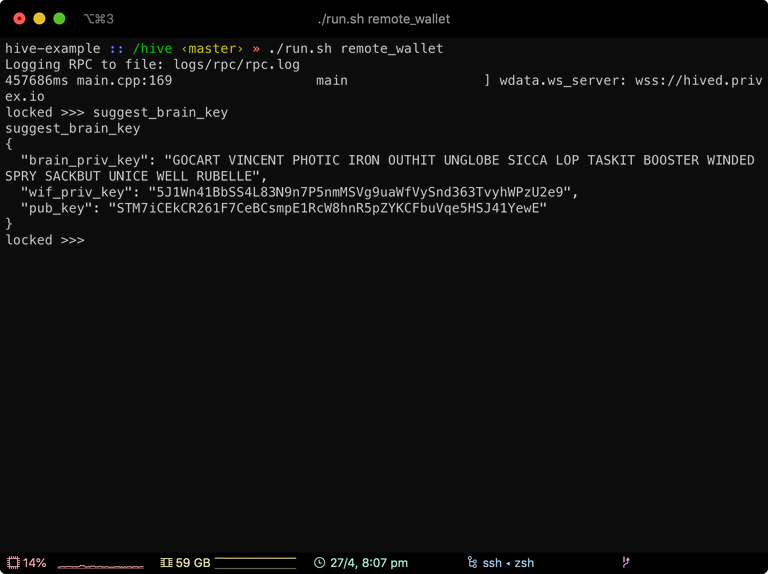
You should get something similar to this:
{
  "brain_priv_key": "GOCART VINCENT PHOTIC IRON OUTHIT UNGLOBE SICCA LOP TASKIT BOOSTER WINDED SPRY SACKBUT UNICE WELL RUBELLE",
  "wif_priv_key": "5J1Wn41BbSS4L83N9n7P5nmMSVg9uaWfVySnd363TvyhWPzU2e9",
  "pub_key": "STM7iCEkCR261F7CeBCsmpE1RcW8hnR5pZYKCFbuVqe5HSJ41YewE"
}
Put the keys in Notepad or something similar for the moment so you don't lose them.
Press CTRL-D to exit the wallet.
Setting up your config
Now, to set your witness name and private key. You can use nano (a simple text editor on Linux) for this.
nano data/witness_node_data_dir/config.ini
If you are running a witness, you'll want to change one of the first lines in the file to disable the seed.
# Endpoint for P2P node to listen on
p2p-endpoint = 0.0.0.0:2001
Simply place a # (hash sign) at the start of the p2p-endpoint line. This will disable the seed. Example:
# Endpoint for P2P node to listen on
#p2p-endpoint = 0.0.0.0:2001
Now to add your witness settings. Scroll down the file (use the up/down arrows, or page up/down) until you see something like this:
# Percent of witnesses (0-99) that must be participating in order to produce blocks
required-participation = 33

# name of witness controlled by this node (e.g. initwitness )
# witness =

# name of miner and its private key (e.g. ["account","WIF PRIVATE KEY"] )
# miner =

# Number of threads to use for proof of work mining
# mining-threads =

# WIF PRIVATE KEY to be used by one or more witnesses or miners
# private-key =
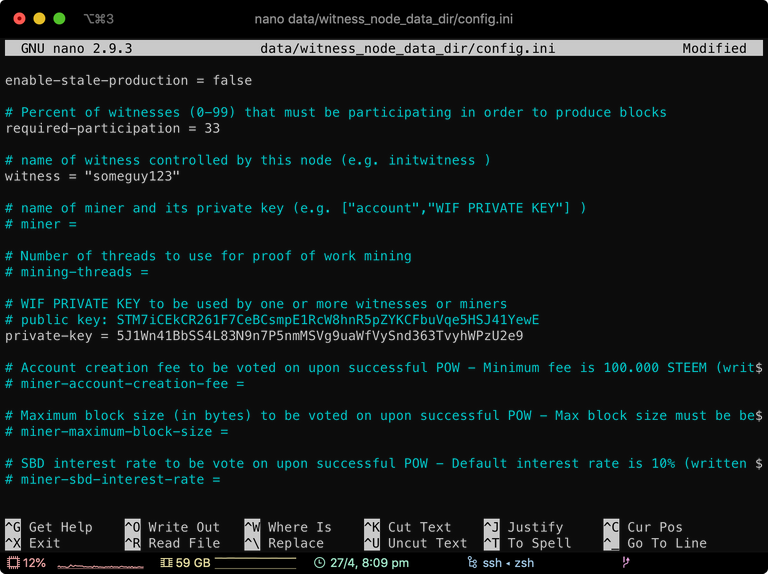
You'll want to uncomment (remove the # from the start) the witness = line, and the private-key = line.
Grab your public/private key that you saved earlier into notepad (or other similar app).
Then, similar to below, add your witness' name in quotes, e.g. "someguy123" in front of the witness =, and your private key (without quotes) in front of the private-key = line. To save you time in the future, it can be useful to place your public signing key in a comment above your private key (see example)
Example:
# name of witness controlled by this node (e.g. initwitness )
witness = "someguy123"

# name of miner and its private key (e.g. ["account","WIF PRIVATE KEY"] )
# miner =

# Number of threads to use for proof of work mining
# mining-threads =

# WIF PRIVATE KEY to be used by one or more witnesses or miners
# public key: STM7iCEkCR261F7CeBCsmpE1RcW8hnR5pZYKCFbuVqe5HSJ41YewE
private-key = 5J1Wn41BbSS4L83N9n7P5nmMSVg9uaWfVySnd363TvyhWPzU2e9
Now (assuming you're using nano) press CTRL-X, and press the y key when it asks if you would like to save.
Environment settings
If you're already comfortable with Linux, and want to play around with settings for hive-docker you may want to consider setting up a .env file, see the README for more information
Otherwise, let's continue. The defaults are generally fine for most people.
Setting up shared memory, swap settings, and downloading the blockchain
At this point you should have:
- installed hive-in-a-box
- installed docker (through the run.sh command)
- downloaded and installed the Hive docker container
- set up your witness configuration
Your witness is almost ready. Just a few more small things.
You'll need to set the shared memory size (use sudo if not logged in as root). 64 gigabytes is recommended (64G). Please be aware that the shared memory size changes constantly.
sudo ./run.sh shm_size 64G
You'll also want to adjust your "swappiness". This is a setting which tells Linux how much it should use swap (virtual memory on your disk. very slow). You'll want to set this to 1, which means "don't use the swap unless it's absolutely necessary". This helps to prevent missed blocks due to excessive swapping despite plenty of free RAM.
# To persist on reboot, place 'vm.swappiness=1' in /etc/sysctl.conf
sudo sysctl -w vm.swappiness=1
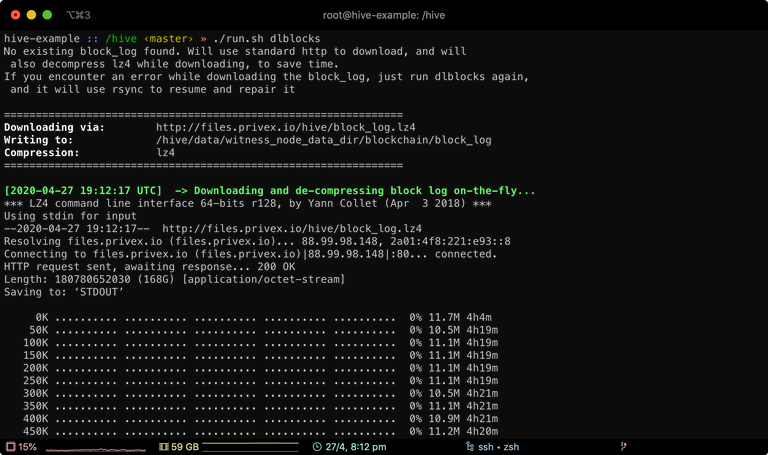
Now that you've configured your server, it's recommended to download the block log, as replays can be faster than p2p download.
./run.sh dlblocks
Almost ready!
Once this is done, you should be ready to start your server. The replay command will start steemd (the binary is still called steemd for Hive) in docker, and begin replaying the blockchain which was downloaded to create a block index, and the shared_memory file.
./run.sh replay
You can check the status with the logs command.
./run.sh logs
Assuming you did everything correctly, you should see something like this:
------------------------------------------------------

            STARTING HIVE NETWORK

------------------------------------------------------
initminer public key: STM8GC13uCZbP44HzMLV6zPZGwVQ8Nt4Kji8PapsPiNq1BK153XTX
chain id: 0000000000000000000000000000000000000000000000000000000000000000
blockchain version: 0.23.0
------------------------------------------------------
2393837ms main.cpp:121                  main                 ] Backtrace on segfault is enabled.
2393837ms chain_plugin.cpp:405          plugin_startup       ] Starting chain with shared_file_size: 53687091200 bytes
2393837ms chain_plugin.cpp:483          plugin_startup       ] Replaying blockchain on user request.
2393837ms database.cpp:185              reindex              ] Reindexing Blockchain
2396435ms block_log.cpp:142             open                 ] Log is nonempty
2396435ms block_log.cpp:151             open                 ] Index is nonempty
2396435ms database.cpp:193              reindex              ] Replaying blocks...
Please be aware that this can take many hours depending on your disk speed and CPU. In some cases it can take up to 24 hours.
You can press CTRL-C to exit the logs, or just leave it if you want to watch it replay.
After you've replayed
Once you see something which looks like this, it means your server is now ready to go:
1299055ms th_a       application.cpp:507           handle_block         ] Got 14 transactions on block 12928269 by pharesim -- latency: 55 ms
1302427ms th_a       application.cpp:507           handle_block         ] Got 18 transactions on block 12928270 by xeldal -- latency: 426 ms
1305291ms th_a       application.cpp:507           handle_block         ] Got 26 transactions on block 12928271 by arhag -- latency: 291 ms
1308045ms th_a       application.cpp:507           handle_block         ] Got 20 transactions on block 12928272 by pfunk -- latency: 45 ms
1311092ms th_a       application.cpp:507           handle_block         ] Got 23 transactions on block 12928273 by bhuz -- latency: 92 ms
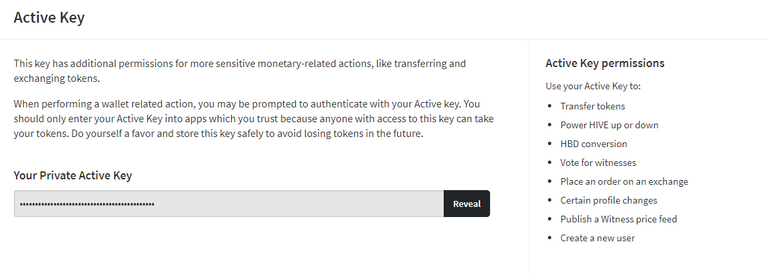
Go to your profile:
- https://wallet.hive.blog/@yourusername/permissions
- https://peakd.com/@yourusername/permissions
- (for the links, you need to edit the @yourusername part)
Click Wallet, then Permissions. Next to "Active Key" you should see "Reveal". Click that button and log in. Then press "Show private key", to reveal it. Make sure it begins with a "5".
Copy the key.
Now open the wallet with:
./run.sh wallet
Set a password, unlock the wallet with the same password, then import your ACTIVE private key from wallet.hive.blog / Peakd (NOT the one in notepad):
set_password "hunter2"
unlock "hunter2"
import_key 5somethingprivatekey
Finally, we can update/create the witness on the network. Replace the STMxxxx key with the public key you saved earlier in notepad (or if you wrote it as a comment in your config file, you can open that and get it from there), and replace YOURNAME with your witness name on Hive.
update_witness "YOURNAME" "https://hive.blog/witness-category/@YOURNAME/my-witness-thread" "STMxxxxxxx" {"account_creation_fee":"3.000 HIVE","maximum_block_size":65536,"sbd_interest_rate":0} true
Congratulations, your witness should now be working, and you can begin getting votes and producing blocks
Other useful information
You may want to persist the /dev/shm size (shared memory) across reboots. To do this, you can edit /etc/fstab, please be very careful, as any mistakes in this file will cause your system to become unbootable. (if you are not comfortable with linux, please don't try this as you may break your server).
Simply add this to the bottom of the file on a new line. Be sure not to damage any other lines in the file. Adjust "64G" to whatever size you would like /dev/shm to be.
tmpfs /dev/shm tmpfs nodev,nosuid,size=64G 0 0
See the README for more advanced options.
Upgrading steem-docker to hive-docker
If you have an existing steem-docker installation, you can convert it into a hive-docker installation by following the below steps.
Updating your Git repository
Use git remote set-url to change your steem-docker installation to track my hive-docker repository. Then git fetch to download any updates, checkout master, and git pull to update to hive-docker.
~/steem-docker $ git remote set-url origin https://github.com/Someguy123/hive-docker.git
~/steem-docker $ git fetch
~/steem-docker $ git checkout master
~/steem-docker $ git pull
To ensure hive-docker always uses the Hive network, add NETWORK=hive to your .env file
echo "NETWORK=hive" >> .env
Download the Hive HF23 docker image using this command.
./run.sh install
If you were previously running Steem, you'll need to replace your blockchain and state files
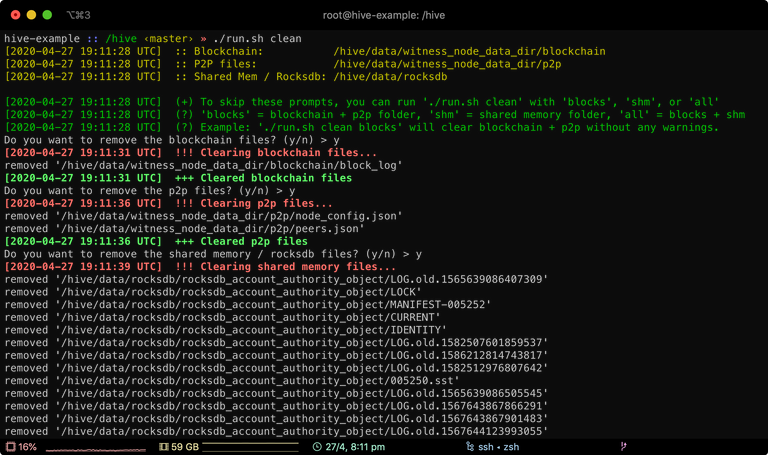
Delete your blockchain files and shared memory files using the clean command:
./run.sh clean
Download a fresh block_log:
./run.sh dlblocks
Now for the slow part - replaying
When upgrading from Steem to Hive, you'll need to replay.
To replay your witness, do the following (this will shutdown and remove the Steem software, and start a Hive one in replay mode)
./run.sh stop
./run.sh replay
You can check the status of the replay with the logs command
./run.sh logs
Note: the command now automatically updates in realtime. to exit the logs press CTRL-C
If all is well, you'll see it replaying on v0.23.0 (or whatever version is out by the time you read this):
------------------------------------------------------

            STARTING HIVE NETWORK

------------------------------------------------------
initminer public key: STM8GC13uCZbP44HzMLV6zPZGwVQ8Nt4Kji8PapsPiNq1BK153XTX
chain id: 0000000000000000000000000000000000000000000000000000000000000000
blockchain version: 0.23.0
------------------------------------------------------
2393837ms main.cpp:121                  main                 ] Backtrace on segfault is enabled.
2393837ms chain_plugin.cpp:405          plugin_startup       ] Starting chain with shared_file_size: 53687091200 bytes
2393837ms chain_plugin.cpp:483          plugin_startup       ] Replaying blockchain on user request.
2393837ms database.cpp:185              reindex              ] Reindexing Blockchain
2396435ms block_log.cpp:142             open                 ] Log is nonempty
2396435ms block_log.cpp:151             open                 ] Index is nonempty
2396435ms database.cpp:193              reindex              ] Replaying blocks...
Once it's replayed (may take 3 or more hours), you'll see the standard "got x transactions on block y".
1668107ms p2p_plugin.cpp:210            handle_block         ] Got 54 transactions on block 25299003 by cervantes -- latency: 107 ms
1671090ms p2p_plugin.cpp:210            handle_block         ] Got 36 transactions on block 25299004 by blocktrades -- latency: 90 ms
1674098ms p2p_plugin.cpp:210            handle_block         ] Got 28 transactions on block 25299005 by roelandp -- latency: 98 ms
If you see this, you can now re-enable this server :)
You're successfully upgraded to 0.23.0 (or higher).
For future HF23 releases, it will now be as simple as ./run.sh install && ./run.sh restart, but as always, be careful, always assume a replay may be needed. Test on your backup, or disable your witness before attempting to update.
To see if I've released a new version of the docker image and haven't made a post yet, just check my docker hub: https://hub.docker.com/r/someguy123/hive/tags/

GIF Avatar by @stellabelle
Do you like what I'm doing for Hive?
Vote for me to be a witness - every vote counts.
Don't forget to follow me for more like this.
Are you looking for a new server provider? My company @privex offers highly-reliable and affordable dedicated and virtual servers for HIVE, HBD, EOS, Monero, DOGE, LTC, and BTC!
Check out our website at https://www.privex.io
Join the Privex discord at: https://invite.gg/privex
Looks like I've found my new spare time project this weekend!
I think this would make a really awesome project and I'd learn a ton, as well as be able to contribute something to the community. I was doing some research yesterday on masternodes for a few coins and what it would take to run my own, but this sounds like way more fun since I'm a member here already!
Looking forward to more posts from you. Following and voting for you as a witness now!
@someguy123 I tried joining the Privex Discord as I have some questions, but it says your link is expired. Mind sending a new one? Thanks!
Normally https://invite.gg/privex works
Try this if not: https://discord.gg/5XrMuSv
This worked, thanks!
I think it's brilliant that witnesses such as yourself and a number of others are letting us all into the secrets of being a witness. Hopefully, this will encourage others to set up a server when they see, that despite it still being fairly technical, its perhaps not as complex as one might have thought.
Thanks again and cheers to the increased openness, and thus accountability on Hive :-)
That was very long but very good and important information. I can see why virtual servers are so important to use but placing many witnesses/nodes in one physical location could be limiting to the network when serving the quickest route. Perhaps I will attempt to run a witness when my gigabit fiber is installed. I would need to build a server too though.
Do you know what rank a witness needs to be to break even?
The daily rewards in HP are shown on https://www.eztk.net/witnesses.php?id=someguy123
You can put the numbers into https://value.steem.network and times the USD amount by 28 to figure out how much a witness makes per month.
Currently:
At https://www.privex.io - the cheapest witness server we have is $30/mo - so you could break even at around rank 100 with our cheapest server, and at rank 60 with a decent sized 64GB RAM dedicated server.
Of course the Hive price is very high at the moment, so the profitability of each witness rank could lower dramatically if/when the Hive price drops.
@someguy123 - reread this post and decided to dig through comments. So are you saying that a $30 server from Privex could still work as a "witness" node? Or is it absolutely mandatory that we need 64GB+.
I'd like to, if possible, start off with something small (since it would be coming out of pocket), and then scale over time if possible. If you could provide a bit more depth on this, I'd really appreciate it. Ideally something sub $100/mo. I don't mind shelling out until I grow a voter base/expand my skillset further.
Thanks in advance!
lord, you need a new GIF!
@tipu curate
Thanks for the GIF avatar :) I like this one best.
Needs my Cereal Guy added to it though - since a lot of people recognise me by that :P
Noob question, what does a seed node do?
A seed node is simply any Steem / Hive server which has it's P2P port (usually 2001) open to the public, and the seed URL posted publicly.
Witness servers generally have their public seed port firewalled off, for extra security - preventing an attack against the open seed port. This generally means they can only connect to servers which have their seed port open - i.e. actual seeds.
A seed node simply relays transactions / blocks between other seed nodes, witnesses, and RPC nodes etc.
Some people run a "light RPC node" (@aggroed calls them "compact broadcast nodes") on their seed node's, which provide a small subset of the features that a "full RPC node" provides - usually enough to handle something like Hive Keychain, but not applications that require post data (like peakd.com / hive.blog), or account history (l ike https://pay.privex.io and https://beeanon.com )
Seed nodes aren't linked to an account, but the person who runs it is usually clear from the domain it's attached to.
They don't receive any rewards, but they do help show goodwill to the community / network - which is important if you're a witness, since witnesses are similar to politicians, trying to convince people to vote for their witness.
Privex Servers are top notch !
So...
If I have 64 GB and am already running an Ethereum full node, how will I do?
if i want to mount a node in hive how much would it cost in total? a few months ago i think i saw a member ride you one for about $ 70
Congratulations @someguy123! You have completed the following achievement on the Hive blockchain and have been rewarded with new badge(s) :
You can view your badges on your board and compare to others on the Ranking
If you no longer want to receive notifications, reply to this comment with the word
STOPDo not miss the last post from @hivebuzz:
Vote for us as a witness to get one more badge and upvotes from us with more power!
Hi someguy123,
I have nto seen you round for a while.
It appares that you delegated to ctime - mass abuser and hostile flagger of many respected Hiveians. I suspect that it is by some sort of mistake. How has this happened?
Thanks for letting me know - it was a couple of https://dlease.io delegations - ctime often requests leases on DLease with high APR, high amounts, and/or long durations - so a lot of people might delegate to them unknowing of their problematic nature.
I have removed my delegations to them now :)
Hello,
Thanks so much 🙏🙇♂️
@someguy123 the rewards for running witness depends on the vote on witness gets or it depends how many blocks have been run on his machine???
Hello someguy, i have a question, i hope you can help me;
¿Which requirements classify as good internet connection?