Hola amigos cómo están?
Hoy quiero darles la bienvenida a mi espacio preferido y les voy a mostrar un paso a paso con el que podrán decorar su cocina.
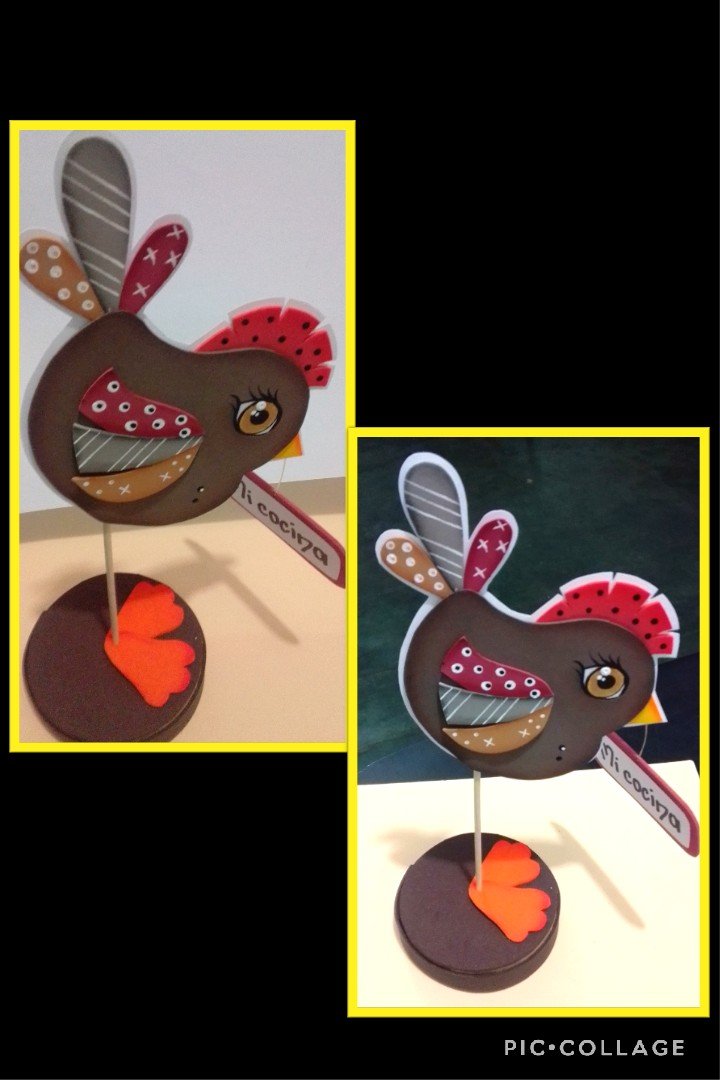
Es una linda gallina, hecha en foami y cartulina, estoy segura te va a encantar y lo mejor es que es muy fácil su elaboración.
Así que te invito a verlo.
Comenzaré con los materiales:
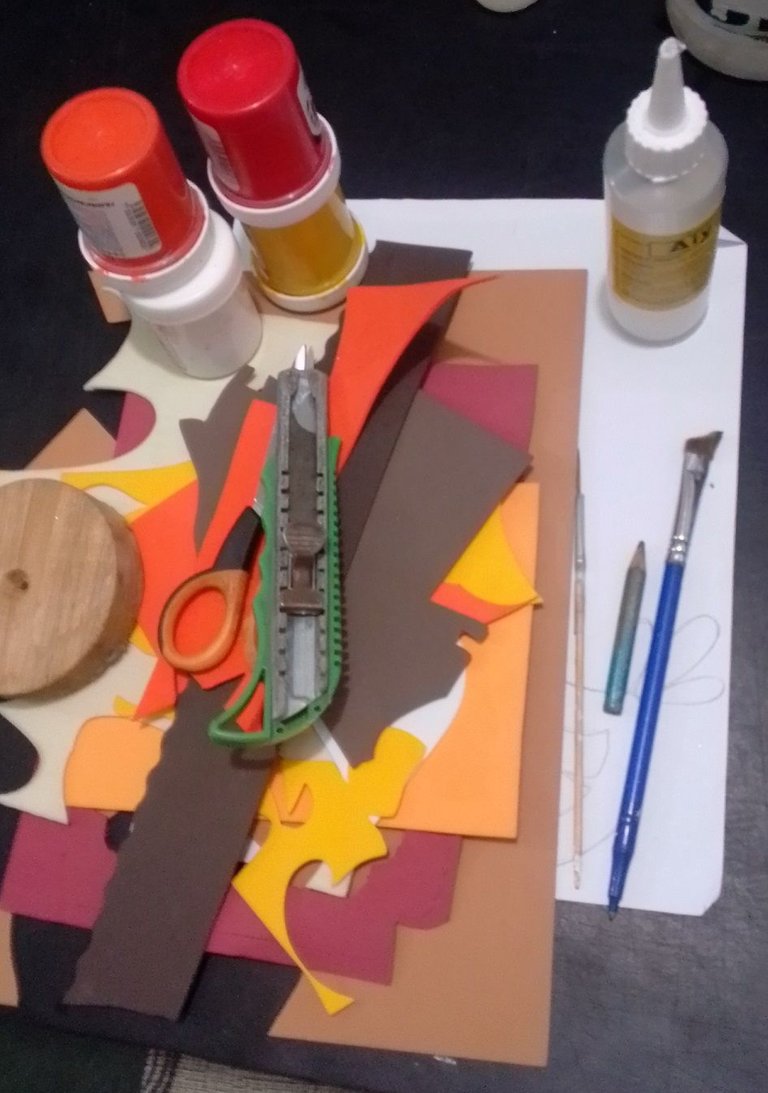
| Foami (retazos) | Cartulina | Pinturas |
|---|---|---|
| Pinceles | Silicón líquido | Lápiz |
| Dibujo(Gallina) | Tijera | Cuchilla |
| Círculo de madera |
Seguimos con el procedimiento:
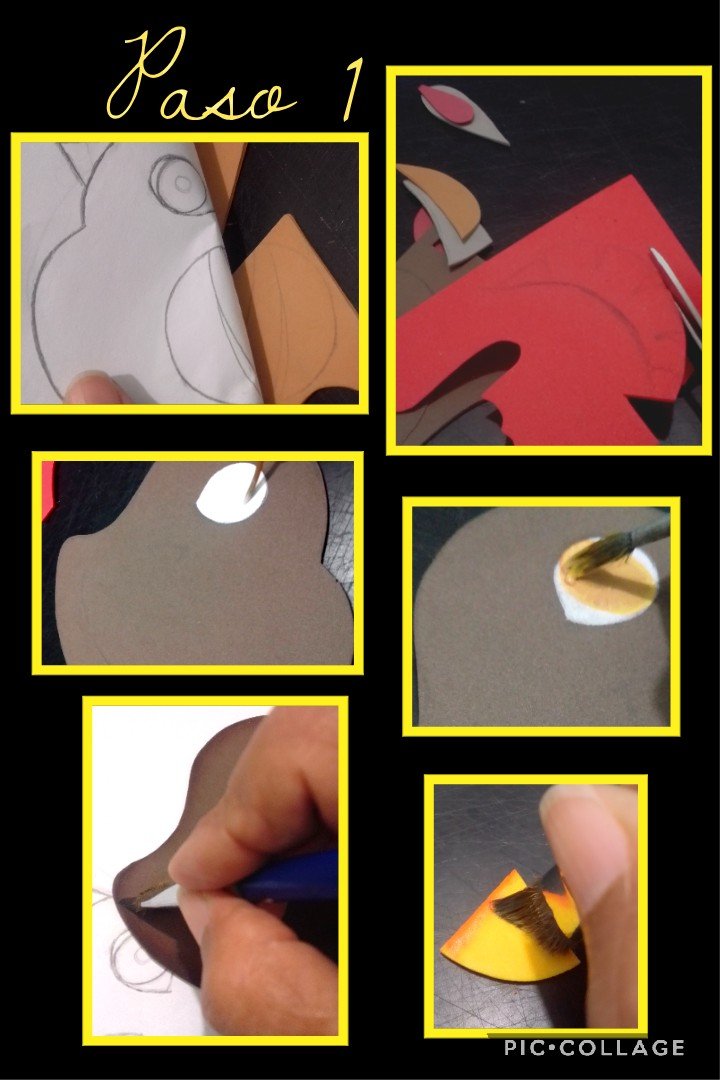
- Transferir la gallina y cada una de las piezas al foami en el color de tu preferencia.
Esto se hace remarcando el dibujo con lápiz de mina, luego colocar sobre el foami y con las orejas de la tijera frotar el papel para que se marque en el foami.(ver foto) - Recortar todas las piezas marcadas.
- Aplicar 2 manos de pintura blanca, rellenar el ojo y dejar secar entre cada mano.
- Luego pintar un círculo amarillo dentro del ojo y dejar secar.
- Ahora mojarás la punta del pincel en el color de la pintura correspondiente y delinearás por todo el borde cada una de las piezas.
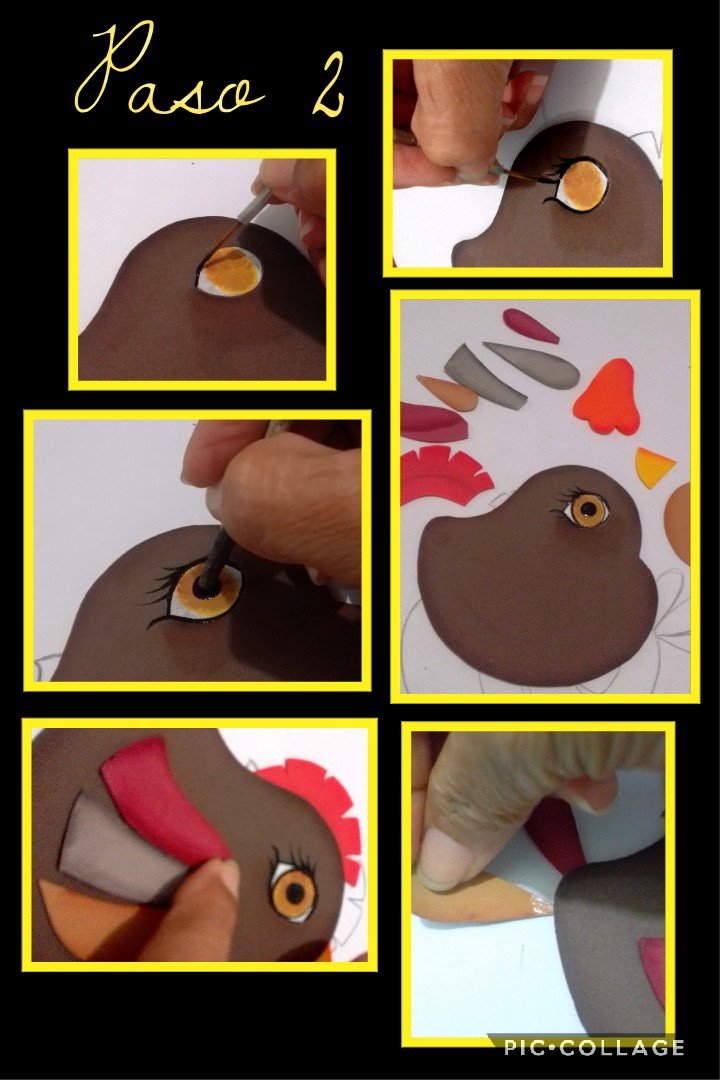
- Delinear con pintura negra con un pincel muy delgado o con marcador punta fina todo el borde del ojo, pintar pestañas y con la parte de atrás del pincel poner un punto negro en el centro del ojo y dejar secar.
- Luego aplicar silicón en cada una de las piezas a pegar, guiándote por el dibujo.
!
- Después de pegar todas las piezas, puedes decorar pintando con puntos, rayas, etc. a tu gusto.
- Luego aplicarás silicón a la gallina y pegarás sobre la cartulina blanca para cubrir por detrás para tapar y dar un buen acabado.
- Al círculo de madera, le aplicas silicón por todo el borde.
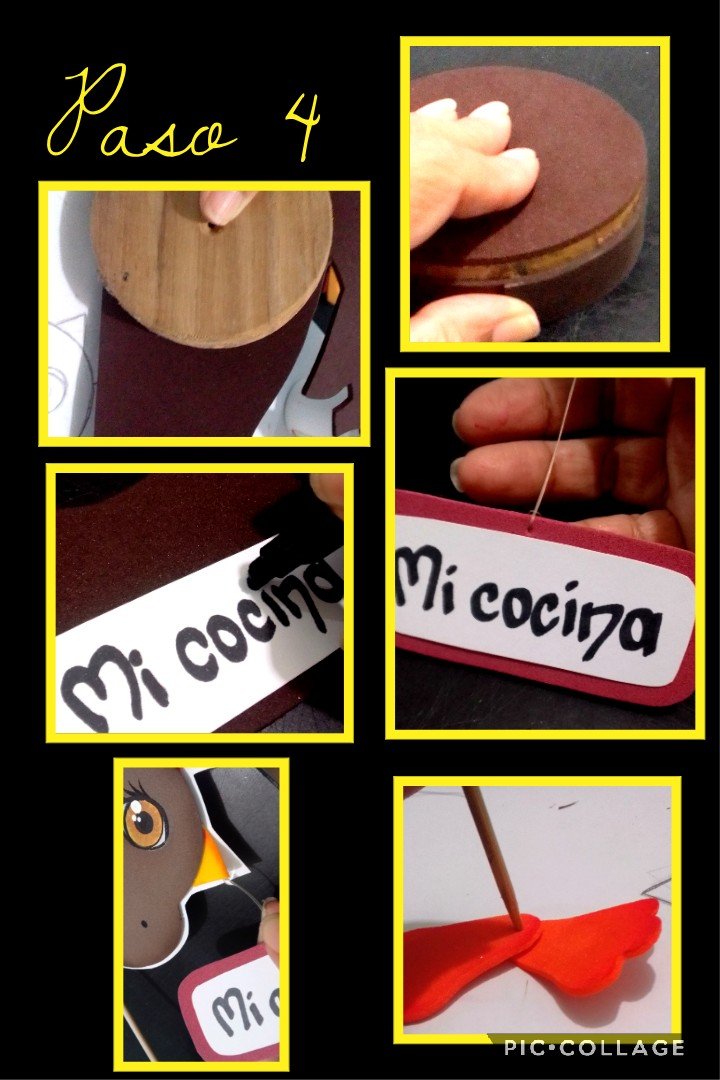
- Ahora pegarás el círculo al foami, dejas secar y recortas por todo el borde.
- Luego recortar una tira larga y pegar por el borde.
- En un cuadrito de cartulina escribir mi cocina y pegas sobre un foami al que le abrirás un orificio y meterás un hilo para guindar del pico.
- Seguimos con las patas, a las que harás un orificio y meterás un palito de altura que hará la función de las patas.

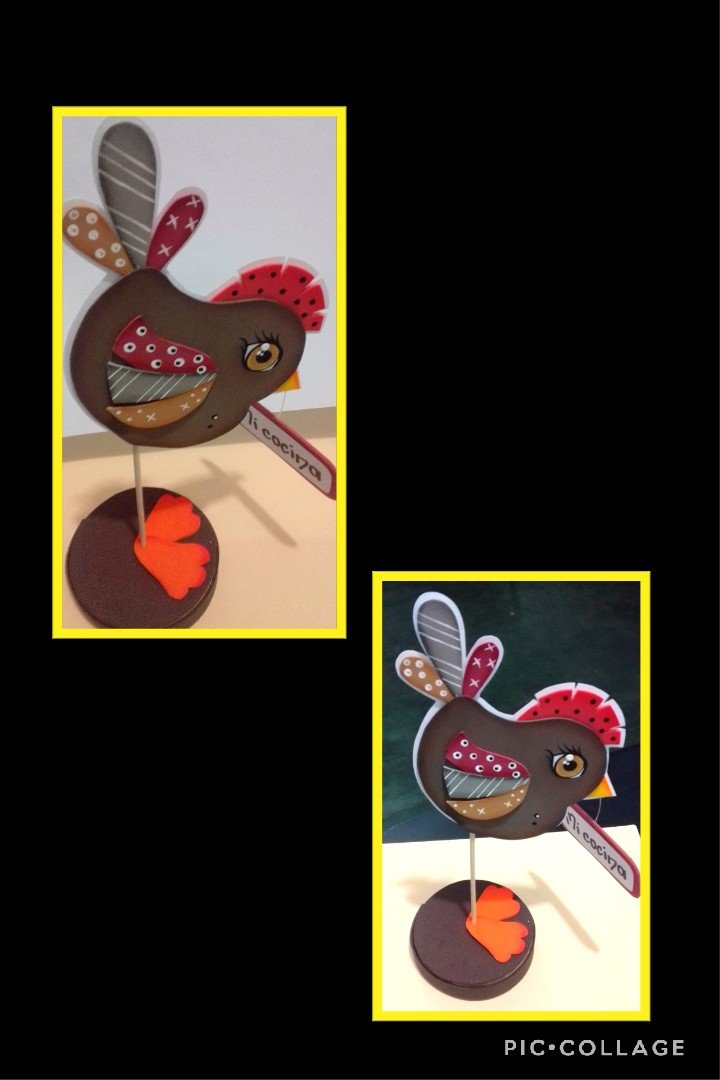
- Por último meterás el palito en la parte de abajo de la gallina, y pegarás las patas sobre la base de madera.
Como puedes ver, está terminada esta linda gallinita.
Viste lo fácil que es realizarla?
Te invito a decorar tu cocina haciendo este bonito paso a paso.
El texto de esta publicación está editado con etiquetas de HTML y traducido por DeepL.
Las fotos las capturé con la cámara de mi Blu G5 y las edité con Pic Collage.
Ahora me toca despedirme por esta noche y espero te haya gustado mi tutorial.
Gracias por el apoyo y comentario!
Saludos!
English
Hello friends, how are you?
Today I want to welcome you to my favorite space and I'm going to show you a step by step with which you can decorate your kitchen.
It's a cute chicken, made in foami and cardboard, I'm sure you'll love it and the best thing is that it is very easy to make.
So I invite you to see it.
I'll start with the materials:
| Foami (scraps) | Cardboard | Paints |
|---|---|---|
| Pencils | Liquid Silicone | Pencil |
| Drawing (hen) | Scissors | Blade |
| Wooden circle |
We continue with the procedure:
- Transfer the hen and each of the pieces to the foami in the color of your choice.
This is done by highlighting the drawing with a lead pencil, then place it on the foami and with the ears of the scissors rub the paper to mark it on the foami.(see photo). - Cut out all the marked pieces.
- Apply 2 coats of white paint, fill in the eye and let dry between each coat.
- Then paint a yellow circle inside the eye and let it dry.
- Now dip the tip of the brush in the corresponding paint color and outline around the edge of each piece.
- Outline with black paint with a very thin brush or with a fine tip marker all the edge of the eye, paint eyelashes and with the back of the brush put a black dot in the center of the eye and let it dry.
- Then apply silicone on each of the pieces to be glued, guided by the drawing.
- After gluing all the pieces together, you can decorate by painting with dots, stripes, etc. as you like.
- Then you will apply silicone to the hen and glue on the white cardboard to cover the back to cover and give a nice finish.
- To the wooden circle, apply silicone all around the edge.
- Now glue the circle to the foami, let it dry and trim around the edge.
- Then cut out a long strip and glue around the edge.
- In a small square of cardboard write my kitchen and paste on a foami to which you will open a hole and put a thread to hang from the beak.
- We continue with the legs, to which you will make a hole and put a stick that will make the function of the legs.
- Finally you will put the stick in the bottom of the hen, and glue the legs on the wooden base.
As you can see, this cute little hen is finished.
Did you see how easy it is to make it?
So I invite you to decorate your kitchen by making this nice step by step.
The text of this post is edited with HTML tags and translated by DeepL.
I captured the photos with my Blu G5 camera and edited them with Pic Collage.
Now it's my turn to say goodbye for tonight and I hope you liked my tutorial.
Thanks for your support and comments!
Regards!